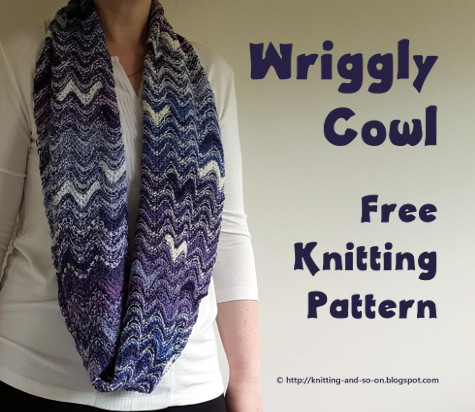
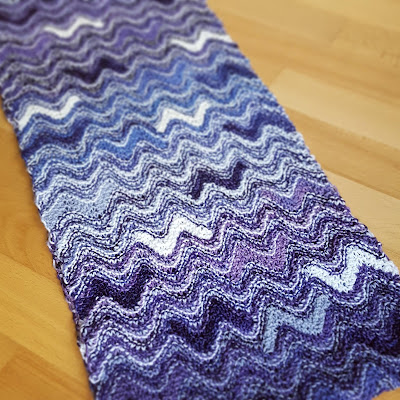
So for #scraptember I decided to use up my purple, lilac and similarly colored leftovers to knit this new cowl. It is knitted flat, starting with a provisional CO and finished by grafting.

This work by Knitting and so on is licensed under a Creative Commons Attribution-NonCommercial-ShareAlike 4.0 International License.

Materials
- about 200 grams of fingering weight yarn - of course you can use other yarn weights as well, I used yarns of similar colors, but it might be interesting to use mixed colors as well
- 3.5 mm knitting needles
- 5 stitch markers
- a removable stitch marker to mark the RS of your piece
- more scrap yarn for provisional CO
- a tapestry needle for grafting and for weaving it the many, many ends
Techniques and Abbreviations
- Provisional CO: My favorite method for a provision CO is the crochet provisional CO - it is shown in this Youtube video by New Stitch a Day.
- Grafting in Garter Stitch: A technique to get an invisible (knitted) seam - this technique is shown in this YouTube Video by knittinghelp.com.
- Carrying yarn up: When you're knitting the short row sections at the edges you have to carry up your yarn. This can be done by twisting the unused yarn with the current yarn at the first stitch of the current row - this technique is shown in this YouTube video by Knit Purl Hunter.
Since this cowl is made from leftovers, there is a high potential for many ends to weave in. Here are two techniques that may be helpful to avoid this:
- Weave in ends as you go as shown in this YouTube video by So, I make stuff.
- Frankfurt knot: a way to connect yarn with a strong knot - as shown in this YouTube video by nadelspiel.

Using Your Leftovers
Choose some leftover yarn from your stash - of the same weight (or nearly the same weight) - I used fingering weight yarn of the same part of the color spectrum (violet-ish) plus white for contrast. You always work with 3 skeins at a time, the one row is knitted with the skein 1, the next with skein 2, the next with skein 3, and then you start again with skein 1. Once one strand runs out of yarn, just connect the next one to it.
As with my Skein Hash Cowl, I wanted to be rather consistent color distribution (or as consistent as possible). That's why I seperated some of the leftover skeins into two and used them at different times. This will even increase the numbers of ends to weave in, but I prefered this over a color change that seemed to abrupt.
Pattern "Construction"
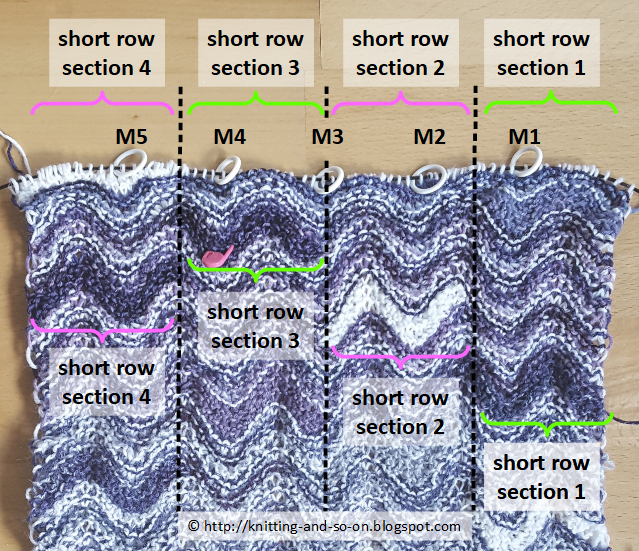
It is based on a basic wave or chevron pattern - one row with alternating increases and decreases and the next row k all. To make it a bit more interesting, there are short row sequences over one and a half "chevron repeats". There are markers to indicate the end of one chevron repeat.
There are four place to start the short row sequences: 1) at the beginning of the row (called short row section 1), 2) in the middle between M1 and M2 (called short row section 2), 3) at M3 (called short row section 3) and 4) in the middle between M4 and M5 (called short row section 4). This is shown in the schematic below.
Instructions
With scrap yarn, do a provisional CO of 96 stitches
From now on you will always work with three colors which are used alternatingly. After each row, change to the next color. If you run out of one yarn, just attach another one.
After knitting a few rows, mark RS with a removable stitch marker.
From now on you will always work with three colors which are used alternatingly. After each row, change to the next color. If you run out of one yarn, just attach another one.
After knitting a few rows, mark RS with a removable stitch marker.
Setup row (WS): k 16, place marker (M5), k16, place marker (M4), k16, place marker (M3), k16 place marker (M2), k16, place marker (M1), k16
The markers indicate the end of one chevron repeat, the short row sections are over one and a half chevron repeats.
Basic Knitting Sequence
Knit a neutral ridge (see "Component Parts" below).
Knit a short row section 2.
Knit a neutral ridge.
Knit a short row section 4.
Knit a neutral ridge.
Knit a short row section 1.
Knit a neutral ridge.
Knit a short row section 3.
Repeat until the cowl measures the desired length. Cut yarn but leave a tail long enough for grafting. Put the stitches of the provisional CO on the second needle. Graft in garter stitch.
Weave in (many) ends.
Mixing It Up
I had not only solid yarn, but variegated yarn as well - and when knitting a short row section it looked better (i.e. stood out better) with a solid color. That's why I occasionally included another neutral ridge to avoid knitting a short row sequence knitted with a variegated yarn.
I also like a kind of random effect in my patterns. That's why I didn't cling to the basic sequence but mixed it up. Here you need to make sure, that you knit all of the 4 short row sections before you start knitting the next sequence. (If you knitted e.g. short row sections 4 three times in a row, the cowl would be askew.)
Component Parts
Neutral Ridge
Row 1 (RS): *ssk, ssk, k2, kfb, kfb, kfb, kfb, k2, ssk, ssk (now you're at the next marker) repeat from * to end
Row 2 (WS): k all
Short Row Section 1
Row 1 (RS): ssk, ssk, k2, kfb, kfb, kfb, kfb, k2, ssk, ssk, ssk, ssk, k2, kfb, kfb, (you're in the middle between M1 and M2), w+t,
(WS) k to end
(RS) ssk, ssk, k2, kfb, kfb, kfb, kfb, k2, ssk, ssk, ssk, ssk, k2, kfb, kfb, w+t,
(WS) k to end
(RS) *ssk, ssk, k2, kfb, kfb, kfb, kfb, k2, ssk, ssk repeat from * to end
Row 2 (WS): k all
Short Row Section 2
Row 1 (RS): *ssk, ssk, k2, kfb, kfb, kfb, kfb, k2, ssk, ssk repeat from * twice more (i.e. you're at M3 now), w+t,
(WS) k24, w+t
(RS) kfb, kfb, k2, ssk, ssk, ssk, ssk, k2, kfb, kfb, kfb, kfb, k2, ssk, ssk (you're back at M3), w+t,
(WS) k24, w+t
(RS) kfb, kfb, k2, ssk, ssk, *ssk, ssk, k2, kfb, kfb, kfb, kfb, k2, ssk, ssk repeat from * to end
Row 2 (WS): k all
Short Row Section 3
Row 1 (RS): *ssk, ssk, k2, kfb, kfb, kfb, kfb, k2, ssk, ssk repeat from * three times more (you're at M4), ssk, ssk, k2, kfb, kfb, w+t,
(WS) k24, w+t
(RS) ssk, ssk, k2, kfb, kfb, kfb, kfb, k2, ssk, ssk, ssk, ssk, k2, kfb, kfb, w+t,
(WS) k24, w+t
(RS): *ssk, ssk, k2, kfb, kfb, kfb, kfb, k2, ssk, ssk repeat from * to end
Row 2 (WS): k all
Short Row Section 4
Row 1 (RS): *ssk, ssk, k2, kfb, kfb, kfb, kfb, k2, ssk, ssk (now you're at the next marker) repeat from * to end, turn (stranding up the next yarn)
(WS) k24, w+t,
(RS) kfb, kfb, k2, ssk, ssk, ssk, ssk, k2, kfb, kfb, kfb, kfb, k2, ssk, ssk , turn (stranding up the next yarn)
(WS) k24, w+t,
Row 2 (WS): k all
Row 2 (WS): k all
Short Row Section 1
Row 1 (RS): ssk, ssk, k2, kfb, kfb, kfb, kfb, k2, ssk, ssk, ssk, ssk, k2, kfb, kfb, (you're in the middle between M1 and M2), w+t,
(WS) k to end
(RS) ssk, ssk, k2, kfb, kfb, kfb, kfb, k2, ssk, ssk, ssk, ssk, k2, kfb, kfb, w+t,
(WS) k to end
(RS) *ssk, ssk, k2, kfb, kfb, kfb, kfb, k2, ssk, ssk repeat from * to end
Row 2 (WS): k all
Short Row Section 2
Row 1 (RS): *ssk, ssk, k2, kfb, kfb, kfb, kfb, k2, ssk, ssk repeat from * twice more (i.e. you're at M3 now), w+t,
(WS) k24, w+t
(RS) kfb, kfb, k2, ssk, ssk, ssk, ssk, k2, kfb, kfb, kfb, kfb, k2, ssk, ssk (you're back at M3), w+t,
(WS) k24, w+t
(RS) kfb, kfb, k2, ssk, ssk, *ssk, ssk, k2, kfb, kfb, kfb, kfb, k2, ssk, ssk repeat from * to end
Row 2 (WS): k all
Short Row Section 3
Row 1 (RS): *ssk, ssk, k2, kfb, kfb, kfb, kfb, k2, ssk, ssk repeat from * three times more (you're at M4), ssk, ssk, k2, kfb, kfb, w+t,
(WS) k24, w+t
(RS) ssk, ssk, k2, kfb, kfb, kfb, kfb, k2, ssk, ssk, ssk, ssk, k2, kfb, kfb, w+t,
(WS) k24, w+t
(RS): *ssk, ssk, k2, kfb, kfb, kfb, kfb, k2, ssk, ssk repeat from * to end
Row 2 (WS): k all
Short Row Section 4
Row 1 (RS): *ssk, ssk, k2, kfb, kfb, kfb, kfb, k2, ssk, ssk (now you're at the next marker) repeat from * to end, turn (stranding up the next yarn)
(WS) k24, w+t,
(RS) kfb, kfb, k2, ssk, ssk, ssk, ssk, k2, kfb, kfb, kfb, kfb, k2, ssk, ssk , turn (stranding up the next yarn)
(WS) k24, w+t,
Row 2 (WS): k all

Everything you design is so interesting! Thank you for sharing your wonderful work.
AntwortenLöschen