Mittwoch, 30. August 2017

Hermes - Another Sock Idea

Here's another pair of socks I knitted for a sock KAL in the Facebook-Group "Die drei vom Blog - Knit Along" (two others can be found here: Iceberg Socks and Alignment Socks). These socks are knitted toe-up with a new intarsia in the round pattern.
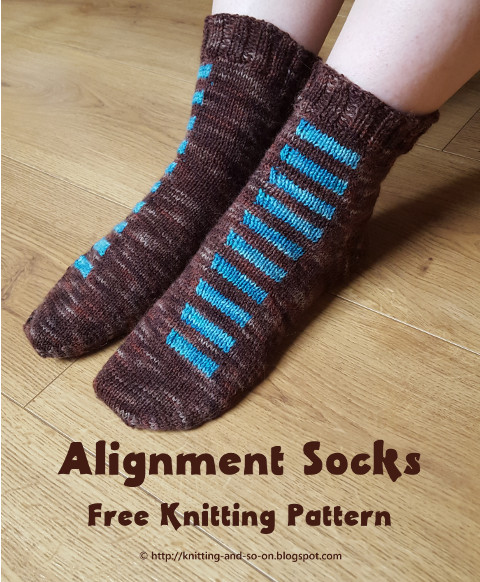
The name "Hermes" (i.e. Greek god of trade, thieves, etc. who was said to wear winged sandals) was suggested by madlycreativeme on Instagram when I first posted a photo of the finished pair. Thank you!


As with my Iceberg Socks, this blogpost is rather a short sketch or recipe than a complete pattern. It is assumed that you know how to knit socks to fit your feet.

Creative Commons License
This work by Knitting and so on is licensed under a Creative Commons Attribution-NonCommercial-ShareAlike 4.0 International License.


Materials
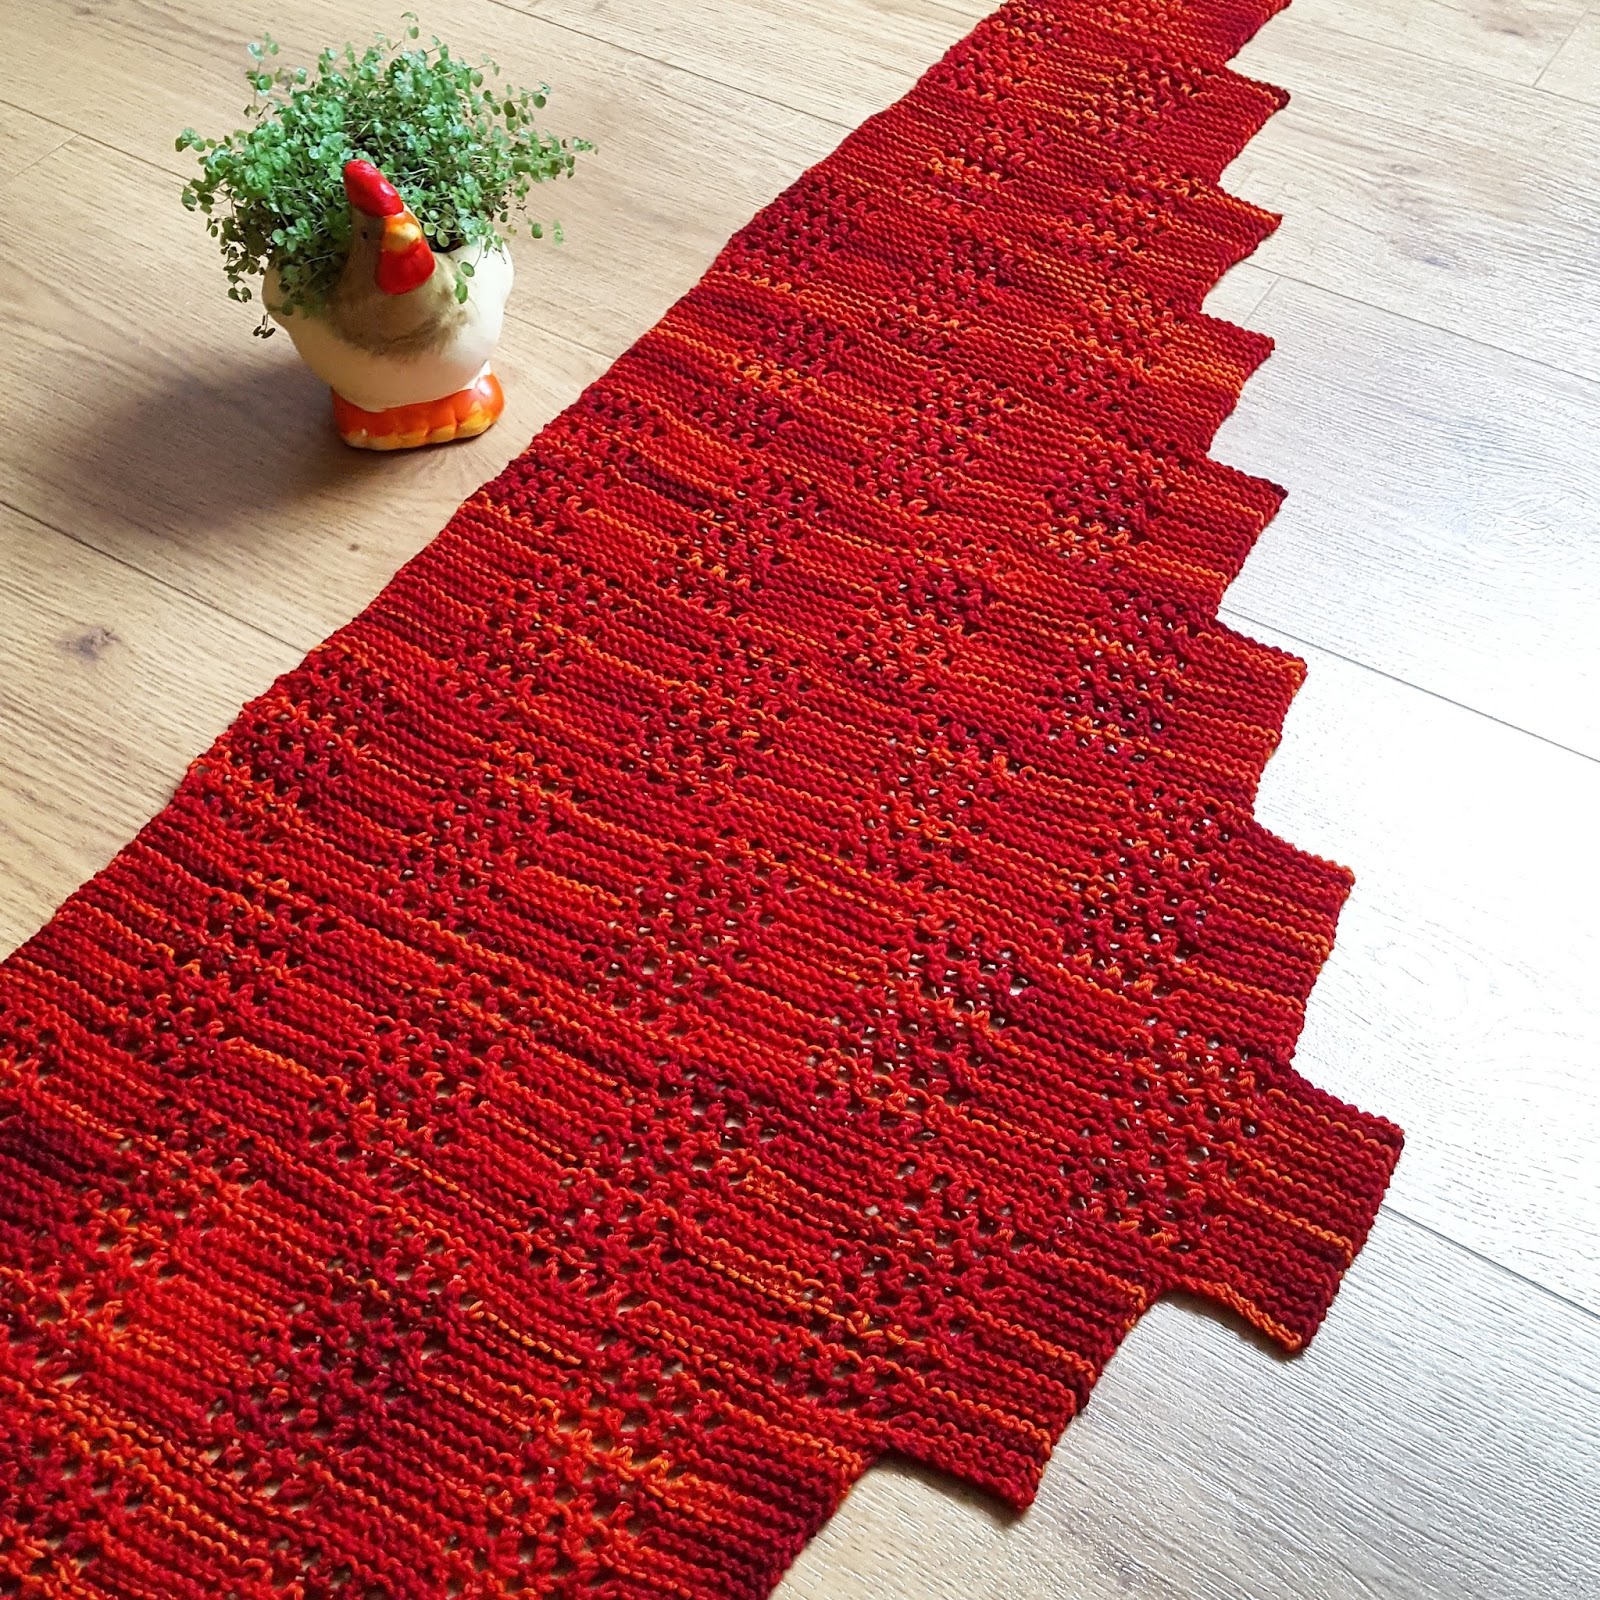
  • about 60 grams of fingering weight yarn - about 50 grams of the main color (MC, red in the pictures) and the rest of the contrast color (CC, orange in the pictures) 
  • 2.5 mm needles - I used 80 cm circulars and the magic loop method
  • scrap yarn for the afterthought heel
  • a tapestry needle to weave in ends


Techniques
  • Toe up sock knitting: as explained on dummies.com or in this video by Girly Knits 
  • Cutting a sock template of your feet: To make the finished piece fit your feet, it is useful to measure your feet and to cut out a card template. Here's a blogpost at knitbettersocks.blogspot.com that explains the idea.  If you want to knit a pair for someone else and cannot get a template, here are standard shoe size templates.  
  • Afterthought heel: Here's a tutorial in three videos by Knit Purl Hunter. Alternatively, you can do any kind of short row heel.
  • Intarsia in the round:  as shown in this YouTube video by Julia farwell-clay.
    I used the method from this video. Basically you knit back and forth even though your stitches are arranged in the round - and you have to consider rounds in pairs - one RS row and one WS row. You start with your main color (MC) on the RS, then - as in normal intarsia you change (by twisting the yarns) - to contrast color (CC) and knit your CC part, After finishing this you turn your work, make a yarn-over and do the WS with CC, when you get to the MC part you change back as in normal (flat) intarsia to MC.
    Now with MC you work your way on the WS not only to the start of the round, but further to the point where you ended the CC part. Here you p2tog the last MC stitch with the yarn over in CC. Then you turn - again with a yarn over - and do the RS part to the beginning of the round. That's the two round finished.
    When - during the next pair of rounds - you reach the new yarn over on the RS, you have to do an ssk of the last stitch in CC with the yarn over in MC.


Instructions

Knit your toe in MC and then divide the stitches into two equal parts - 1st half = back and 2nd half = front - and place a marker between the two halves. Start to knit the intarsia pattern (consisting of intarsia blocks that are 8 stitches wide an 2 rows high) as follows:

Rounds 1 and 2:
- RS, MC: k to 4 sts before half marker, change to C
- RS, CC: k8, turn work
- WS, CC: yo, p8, chang to MC
- WS, MC: p to beginning of round, go on purling to 1 st bef yo in CC, p2tog (i.e. you purl together the last stitch in MC and the yo in CC - connecting the two), turn work
- RS: MC: yo, k to beginning of round
Round 3 (RS, MC):  k to start of intarsia block and twist MC and CC yarn to avoid hole, continue to k in MC to 1 sts bef end of intarsia block, ssk (i.e. connect last sts in CC with the yo in MC), k to end

Rounds 4 and 5:
- RS, MC: k to beginning of last intarsia block, k1, change to C
- RS, CC: k8, turn work
- WS, CC: yo, p8, chang to MC
- WS, MC: p to beginning of round, go on purling to 1 st bef yo in CC, p2tog (i.e. you purl together the last stitch in MC and the yo in CC - connecting the two), turn work
- RS: MC: yo, k to beginning of round
Round 6 (RS, MC):  k to start of intarsia block and twist MC and CC yarn to avoid hole, continue to k in MC to 1 sts bef end of intarsia block, ssk (i.e. connect last sts in CC with the yo in MC), k to end

Repeat rounds 4 to 6 until the sock is as long as you'd like it to be - don't forget to insert scrap yarn for an afterthought heel when the foot part of your sock is long enough.

Finish a sock with a few rounds of k1-p1-ribbing.
Insert an afterthought heel.

For the second sock. begin the first intarsia block 4 sts from the end of the front part and start the following intarsia blocks one stitch earlier (as opposed to one stitch later for the first sock).

Freitag, 11. August 2017

Alignment Socks

Have you ever bought a few beautiful mini-skeins at a yarn festival ... and afterwards kept them for quite a while because you didn't actually know what to do with them because there was not enough yarn for a complete project, but they were too beautiful to use up for a scrap project? Well, in 2015 I bought 5 lovely little skeins dyed by Frau Wo aus Po at Wollefestival in Cologne. Each skein weighed about 25 grams - not enough for a pair of fingerless gloves or let alone socks.
Then - while participating in a sock knitting KAL - I learned how to do intarsia in the round (see this blogpost to see my first intarsia sock) and I knew that this was a way to incorporate one of these mini-skeins into bigger project without resorting to stripes.


The Alignment Socks are knitted toe-up with a short row heel. The pattern is written in a way that you can adapt it to your foot size - even in a way that you don't have to knit a swatch.

Creative Commons License
This work by Knitting and so on is licensed under a Creative Commons Attribution-NonCommercial-ShareAlike 4.0 International License.


Materials
  • about 50 to 60 grams of fingering weight yarn in main color (MC) - the yarn I used is Schoppel Wolle Admiral cat print (colorway 2156) ... you will need a bit more yarn if you prefer your sock cuffs longer
  • about 10 grams of fingering weight yarn in contrast color (CC)
  • 2.5 mm needles - I used long circulars and the magic loop methods, but dpns work as well
  • stitch markers
  • a tapestry needle to weave in ends

Techniques
  • Judy's Magic Cast-On is a technique that gives you live stitches on both sides of your needle - it is generally used for toe-up socks (e.g. in this pattern), but it can be used for other purposes as well. Here's a written description (from Knitty) and here's a YouTube-video by Cat Bordhi and another YouTube-video by Very Pink Knits.
  • Intarsia in the round: When I searched on the internet, I found two methods to do intersia in the rounds - for these socks I used the second method, but I think that the first one is ingenious and will even give you better edges between the colors. I will definitely try it out on another project
    • with crossing yarns at both ends: as shown in this YouTube video by Sheep to Shawl Knitting Studio & Store Vermont
    • with yarn-overs before turning: as shown in this YouTube video by Julia farwell-clay.
      I used the method from this video. Basically you knit back and forth even though your stitches are arranged in the round - and you have to consider rounds in pairs - one RS row and one WS row. You start with your main color (MC) on the RS, then - as in normal intarsia you change (by twisting the yarns) - to contrast color (CC) and knit your CC part, After finishing this you turn your work, make a yarn-over and do the WS with CC, when you get to the MC part you change back as in normal (flat) intarsia to MC.
      Now with MC you work your way on the WS not only to the start of the round, but further to the point where you ended the CC part. Here you p2tog the last MC stitch with the yarn over in CC. Then you turn - again with a yarn over - and do the RS part to the beginning of the round. That's the two round finished.
      When - during the next pair of rounds - you reach the new yarn over on the RS, you have to do an ssk of the last stitch in CC with the yarn over in MC.
  • Cutting a sock template of your feet: To make the finished piece fit your feet, it is useful to measure your feet and to cut out a card template. Here's a blogpost at knitbettersocks.blogspot.com that explains the idea.  If you want to knit a pair for someone else and cannot get a template, here are standard shoe size templates.  
  • Shadow Wrap Short Rows: as shown in this YouTube video by Lee Meredith. A video by Miriam Felton that shows how to do a heel with shadow wraps can be found here on YouTube. However, the heel knitted here is knitted slightly different because here there are two rounds between the two parts of the heel, i.e. there won't be any triple stitches.


Placement of the Intarsia Rectangles

It's always a good idea to place something according to the Rule of Thirds. That's why I wanted to place the CC rectangles around a line that is one third from the side of the sock (see picture below).
Here's a short table that shows the place and size of the intarsia rectangles for stitch numbers between 56 and 64. Please note, that the shoe size is only a rough guide - I looked it up in a table that was freely available on the internet.

Shoe sizeTotal no. of stsNo. of front stsWidth of intarsia block Start of intarsia block (1st sock)Start of intarsia block (2nd sock)
32-355628 9 stsafter 14th st on frontafter 5 th stitch on front
36-38603010 stsafter 15th st on frontafter 5 th st on front
40-43643211 stsafter 16th st on frontafter 5 th st on front

Here's how you calculate the placement in general: For both socks, the width of the intarsia block is 3rd of the width of the front part (or on sixth of the total number of stitches). For the first sock, the intarsia block starts right in the middle of the front half of your sock. For the second sock, the intarsia block ends right in the middle, i.e. you need to start after one sixth of the number of the front stitches (or one twelvth of the total number of stitches). See picture below.
Placement of CC intarsia blocks - click to enlarge

Instructions

Toe

With the magic CO cast on 2x12 stitches

To get a rounded toe, my usual toe is:
  • 4 x increases in every row
  • 2 x increases in every 2nd row
  • 2 x increases in every 3rd row
  • then increases every 4th row ... until wide enough

This means:
Round 1: Knit all - while placing stitch markers after 12 sts and at the end of the round - alternatively divide the stitches on your needles in such a way that you know exacly where one half of your stitches are.
Round 2 (increase round): * k1, kfb, k to one before marker, kfb, k1, slip marker repeat from *
Rounds 3 to 5 = increase rounds
Round 6 (neutral round): k all 
Round 7 = increase round
Round 8 = neutral round
Round 9 = increase round
Rounds 10 to 11 = neutral round
Round 12 = increase round
Rounds 13 to 14 = neutral round
Round 15 = increase round
Rounds 16 to 18 = neutral round
Round 19 = increase round
Repeat rounds 16 to 19 until the sock is wide enough.

Remove the marker that marks the middle of the round, but leave the one that marks the beginning of the round.

Foot

The foot is knitted party in the round (when knitting plain rounds in MC), and partly back and forth (when knitting intarsia).

Round 1 and 2:
- outside, MC: k to starting of intarsia block; change to CC
- outside CC: knit width of intarsia block sts, turn work
- inside CC: yo, purl width of intarsia block , change to MC
- inside MC: p to beginning of round, without turning, go one purling to 1 st bef yo in CC, p2tog (i.e. you purl together the last stitch in MC and the yo in CC - connecting the two), turn work
- outside MC: yo, k to beginning of round

Round 3 and 4:
- outside, MC: k to starting of intarsia block; change to CC
- outside CC: knit one st less than width of intarsia block  (or 1 st bef yo in MC), ssk, (i.e. you have connected the last st in CC with the yo in MC); turn work
- inside CC: yo, purl width of intarsia block, change to MC
- inside MC: p to beginning of round, without turning, go on purling to 1 st bef yo in CC, p2tog (i.e. you purl together the last stitch in MC and the yo in CC - connecting the two), turn work
- outside MC: yo, k to beginning of round

Rounds 5 to 8 are all knitted on the outside in MC only

Round 5:
- outside MC: k to start of intarsia block and twist MC and CC yarn to avoid hole, continue to k in MC to 1 sts bef end of intarsia block, ssk (i.e. connect last sts in CC with the yo in MC), k to end
Rounds 6 to 8: in MC k all

Rounds 9 to 12 = Rounds 1 to 4

Repeat rounds 5 to 12 to desired length just before the heel. If you made a template as suggested above, your sock should reach to the ankle bone line. Start with the heel.


Heel

Divide your stitches into two equal parts - front and back or instep and sole. The short rows will worked back and forth - only be worked over the sole part, i.e. the half without the intarsia rectangles. The heel is knitted in MC only.

First Part
Row 1 (outside): k to 1 bef last, knit into the mother stitch of the last st (shadow wrap), turn
Row 2 (inside): slip shadow wrap st, p to 1 bef last, purl into the mother stitch, turn
Row 3 (outside): slip shadow wrap, k to 1 bef last shadow wrap,  knit into the mother stitch of the last st (shadow wrap), turn
Row 4 (inside): slip shadow wrap, p to 1 bef last shadow wrap, purl into the mother stitch, turn
Repeat rows 3 and 4 until the row length is reduced to one third, i.e. 1/3 shadow wrap stitches on one side, 1/3 normal stitches and 1/3 shadow wrap stitches on the other side

Knit two rounds - making sure to knit the double stitches that result from the shadow wraps as one stitch.

Second Part
Row 1 (outside): k two thirds of the sts of the back of the sock, k into the mother stitch of the last st (shadow wrap), turn
Row 2 (inside): slip shadow wrap st, p to one third of back of sock, purl into the mother stitch, turn
Row 3 (outside): slip shadow wrap, k up to and including last shadow wrap stitch,  knit into the mother stitch of the last st (shadow wrap), turn
Row 4 (inside): slip shadow wrap, p up to and including last shadow wrap stitch, purl into the mother stitch, turn
Repeat rows 3 and 4 until the row length is the complete back of the sock.

Knit two rounds - making sure to knit the double stitches that result from the shadow wraps as one stitch.

On the front of the sock, you can see that you have knitted 4 complete rounds in MC. That means that when continuing the cuff, you have to start with an intarsia block again.

Cuff
Knit rounds 1 to 8 of intarsia pattern of the foot until desired length.
Finish with 12 rows of k2-p2-ribbing and bind off loosely in pattern. Weave in ends.

When knitting the second sock, make sure to start the intarsia block mirrored to the first sock - as described in the table above.


Sonntag, 6. August 2017

Iceberg Socks - Intarsia in the Round

When I entered the sock KAL in the Facebook-Group "Die drei vom Blog - Knit Along" I thought long and hard about what to knit. As a rule I prefer not to use patterns, but to knit something I made up myself. Plus I wanted to do something new. I.e. I wanted to try out a new technique. So I decided on trying out intarsia in the round.

Here's the first project I finished in this technique. The edges between the two colors are not quite as neat as they might be, but since it's a first try, I'm quite happy with it.


As with some of my other sock patterns, this is NOT A COMPLETE PATTERN with stitch counts and everything, but only a sketch. It is assumed that you know how to knit socks to fit your feet.

Creative Commons License
This work by Knitting and so on is licensed under a Creative Commons Attribution-NonCommercial-ShareAlike 4.0 International License.


Materials
  • about 60 grams of fingering weight yarn in two colors in equal amounts - I used one yarn in a solid color (dark blue) and another with a color gradient (light blue to off-white)
  • 2.5 mm needles - I used 80 cm circulars and the magic loop method
  • scrap yarn for the afterthought heel
  • a tapestry needle to weave in ends


Techniques
  • Toe up sock knitting: as explained on dummies.com or in this video by Girly Knits 
  • Afterthought heel: Here's a tutorial in three videos by Knit Purl Hunter. Alternatively, you can do any kind of short row heel.
  • Intarsia in the round: When I searched on the internet, I found two methods to do intersia in the rounds - for these socks I used the second method, but I think that the first one is ingenious and will even give you better edges between the colors. I will definitely try it out on another project
    • with crossing yarns at both ends: as shown in this YouTube video by Sheep to Shawl Knitting Studio & Store Vermont
    • with yarn-overs before turning: as shown in this YouTube video by Julia farwell-clay.
      I used the method from this video. Basically you knit back and forth even though your stitches are arranged in the round - and you have to consider rounds in pairs - one RS row and one WS row. You start with your main color (MC) on the RS, then - as in normal intarsia you change (by twisting the yarns) - to contrast color (CC) and knit your CC part, After finishing this you turn your work, make a yarn-over and do the WS with CC, when you get to the MC part you change back as in normal (flat) intarsia to MC.
      Now with MC you work your way on the WS not only to the start of the round, but further to the point where you ended the CC part. Here you p2tog the last MC stitch with the yarn over in CC. Then you turn - again with a yarn over - and do the RS part to the beginning of the round. That's the two round finished.
      When - during the next pair of rounds - you reach the new yarn over on the RS, you have to do an ssk of the last stitch in CC with the yarn over in MC.

Instructions
Knit your toe and then divide the stitches into two equal parts - front and back - and place a marker between the two halves. Start to knit the intarsia pattern. The chart below shows only the stitches that are knitted in the contrast color xxx . It also shows only the lower right quarter of the stitches. The pattern is mirrored at the stitch marker. This means e.g. in row 1 that after knitting 1 stitch in CC before the stitch marker and 1 stitch in CC after it - or in row 15 that you knit 6 stitches in CC before the marker and 6 stitches in CC after the marker.
Furthermore after knitting it once, it is repeated in opposite order (i.e. you start with row 26 end with row 1 - also mirrored around the marker).
Chart - click to enlarge

I inserted the scrap yarn for the afterthought heel just after finishing the second half of the intarsia pattern. If you need your socks shorter, leave out some of the upper rows (e.g. rows 24 and 23), but I'd suggest to knit rows 25 and 26 to have two full rows of the contrast color.


I used the colors as follows:
  • Sock 1: start with C1 as main color, then include C2 as contrast color for the first half of intarsia pattern - for the second half of intarsia pattern, switch the colors, i.e. C2 becomes main color and C1 the contrast color. Finish the sock in C2 and also knit the afterthought heel in C2.
  • Sock 2: completely reversed to sock 1: start with C2 as main color, then add C1 as contrast color for the first half of intarsia pattern - for the second half of intarsia pattern, switch the colors, i.e. C1 becomes main color and C2 the contrast color. Finish sock in C1 and also knit the afterthought heel in C1.


Donnerstag, 3. August 2017

Esprit de l'escalier

L'esprit de l'escalier was designed in July 2017 after I paid a visit to the Rohrspatz & Wollmeise store in Pfaffenhofen/Ilm while I stayed with a friend in Bavaria.

L'esprit de l'escalier is knitted sideways – mainly in garter stitch with an easy lace pattern. This scarf is designed to be knitted with one skein of Wollmeise Pure (or 150 grams of another fingering weight yarn). If you want yours to be bigger, you will need more yarn – in fact, I had to frog nearly half of my scarf, because I knitted one increasing tier too many.

I wanted something simple to show off the beautiful colors of this yarn, but not too boring, so I included some lacy rectangles. The lower edge forms a staircase pattern - hence the name L'Esprit de l'escalier (or staircase wit).


This pattern is available for purchase

The price is 4 EURO (plus VAT).


Materials
  • about 150 grams of fingering weight yarn - I used Wollmeise Pure (colorway "Campari Orange")
  • 3.25 mm needles
  • a removable stitch marker - scrap yarn or a safety PIN work as well
  • a tapestry needle to weave in ends
Size
Blocked the scarf measures about 165 cm from side to side. At its widest point (in the middle) it measures about 39 cm in width.


Necessary Skills
To knit this scarf, you need to know the following techniques:
  • Garter stitch
  • Yarn Over
  • K2tog
  • Knitted Cast-On


This post was featured on the Wednesday Link Party by Oombawkadesign Crochet. Thank you!

Samstag, 29. Juli 2017

Unfinished Business

I haven't posted much lately ... this is partly due to the fact that I have started a new job (in real life and totally unrelated to knitting), but partly my own fault ... Even though I have knitted a lot in the last few weeks (see pictures below), I haven't felt up to the task to finish writing up a pattern.


Here's an overview of some of my current unfinished projects (roughly from left to right on the picture above):

  • The huge purple thing in the upper left corner is supposed to be a poncho scarf combination (here's a picture of it on Instagram). It's made from bulky yarn which is something I don't usually knit with and I don't like how the lacy edging curls in. I guess it will be frogged - and I might pursue the general idea, but with a different edging and different (lighter weight) yarn.
  • The orange-pink piece with holdes in the lower left hand corner is supposed to be a light summer scarf. It is constructed with short rows and BO/CO-holes and made with Wollmeise Pure yarn. If you want to see a close up (with a better view of the colors) it's here on my Instagram.
  • The small half-moon shaped piece in pale mint (lying on top of the purple poncho) is a small swatch for a scarf/shrug combination. I will design a lower edging that does not curl in, but I guess it will work.
  • The dark blue lacy piece is supposed to be a short row scarf, with lacy short rows. It somehow worked with the small swatches I knitted, but when kinitting a bigger piece the inner edge started to curl. That's why I added a garter stitch edge that is five stitches wide ... but I really don't like how it looks. Furthermore, the main idea (short rows in a lace pattern) is not visible at all. So I guess this piece will be frogged .
  • The green trapezoid shaped piece is going to be another Waterfall Tunic, but with some fancy stitches at the side. The back piece is already finished. 
  • Finally, the small crocheted piece in colors from pink to orange on the right is a crochet version of my Helix Mitts. Somebody on Ravelry asked whether I could do them in crochet and I am determined to finish them - including a written pattern - for autumn this year.

On the plus side, I have managed to finish some pieces - and quite a few of them will be made into patterns.


  • On the upper part of the picture above there is a new knitted scarf. It is knitted from side to side with CO increases and decreases which gives it a staircase look. It is made from one skein of my new Wollmeise yarn, that I purchased a few weeks ago when I visited a friend in Bavaria. I have written a part of the pattern and (hopefully) I'll finish it over the weekend. I
  • The black and white piece on the left hand side is going to be a cowl. It is knitted in intarsia technique with short rows. I've finished the written part of the pattern, but I still need to finish the chart (and maybe a helpful "shorthand" version). I also need to get some nice photos for it.
  • The blue/white pair of fingerless gloves was finished earlier this year, and I really love the look and texture of them. I have started writing the pattern and some of the explanatory schematics have been drawn ... 
  • The brown/beige pair is basically the same idea - only in crochet. And the pattern is half-written, half-illustrated, too.
If you know of any techniques that make me actually finish the things I started, please let me know. In real life deadlines work fine for me. But there aren't any deadlines for my blog and my knitting patterns ... (which is actually a good thing :)

Mittwoch, 12. Juli 2017

First of August

Ever since moving back to Germany last winter - after having lived in Switzerland for 18 years - I have started to feel a bit nostalgic about my time there. And when I explored the idea of combining intarsia and short rows a bit more, I thought it might be fun to knit a Swiss flag.

So in honour of Swiss National Day, here's a little pattern with a Swiss flag. The finished piece can be used as a coaster or potholder - or just as a bit of Swiss decoration for your table. Since it is knitted in intarsia technique, it looks reasonably OK from WS as well.


For other ideas of combining intarsia with short rows see also my Wölkchen washcloth, my Wedges Wrap and my Citrus Fruit Potholder).

Creative Commons License
This work by Knitting and so on is licensed under a Creative Commons Attribution-NonCommercial-ShareAlike 4.0 International License.


Materials & Size
  • I used about 20 grams of DK weight yarn - in red and white
  • 3.5 mm knitting needles - I used dpns because the rows are quite short and you only have 14 sts on your needles
  • scrap yarn for provisional CO
  • a tapestry needle for grafting
The coaster that I knitted is a square that measures about 14 cm on each side.


Techniques & Notation
  • Throughout the pattern, the following notation is used:  C1 (k4); C2 (k10, w+t, k10); C1 (k to end) means, knit 4 stitches in C1, change to C2 and knit 10 sts, do a wrap and turn, knit 10 stitches and then change back to C1 and k to end. I.e. color is indicated before the knitting instructions for that yarn. the knitting instructions for that yarn are given in brackets after the color and color changes are indicated by a semicolon.  I.e. color is indicated before the knitting instructions for that yarn. the knitting instructions for that yarn are given in brackets after the color and color changes are indicated by a semicolon.
  • Short rows with wrap and turn (w+t) - as shown in this YouTube video by Very Pink Knits.
    Since this washcloth is knit in garter stitch, you don't have to pick up your wraps - except in two rows, i.e. the rows where the wrapping color is different from the color of the wrapped stitch. These rows are indicated in the pattern. Here's a YouTube video that shows how to pick up your wraps (also by Very Pink Knits).
  • Note: in some rows the wrap has to be made just at the color change in the row below, e.g. Ridge 3 where you knit 11 sts in C1 and the 12 stitch that is to be wrapped was knitted in C2. In this case, it's advisable to change the color (as if to knit the next stitch in the new color), wrap and turn in the new color, and then to change back. This gives nicer color edges.
  • Provisional CO: My favorite method for a provisional CO is the crochet provisional CO - it is shown in this Youtube video by New Stitch a Day.
  • Grafting in Garter Stitch: A technique to get an invisible (knitted) seam - this technique is shown in this YouTube Video by knittinghelp.com. 
  • Weaving in ends while knitting: as shown in this YouTube video by So, I make stuff.
  • Weaving in yarn while carrying it back: Draw a long loop of C2 to the point where you want to knit it (picture 1). This gives you a really long float. Knit the first stitch (picture 2). Before knitting the second stitch, catch the float by put the left hand needle under the float (picutre 3) and then knit the stitch with your working yarn as usual. If you catch the float every second stitch, the WS will look as shown in picture 4. (This is a bit like catching floats in stranded knitting as shown in this YouTube video by Knit Purl Hunter.)
    The last two techniques (this and weaving in ends while knitting) will are used to avoid a long float that runs parallel to your knitting - and to avoid cutting your yarn. 
Click to enlarge

Instructions

With scrap yarn do a provisional CO of 14 sts.
Knit the very first row (WS) as follows: C2 (k9); C1 (k5)
Ridge 1 (RS, WS): C1 (k5); C2 (k8, w+t, k8); C1 (k5)
Ridge 2 (RS, WS): C1 (k5); C2 (k7, w+t, k7); C1 (k5)
Ridge 3 (RS, WS): C1 (k11); C2 (w+t); C1 (k11) - on the RS weave in C2 yarn while you're knitting up to the stitch where you're using it.
Ridge 4 (RS, WS): C1 (k10, w+t, k10) 
Ridge 5 (RS, WS): C1 (k9, w+t, k9)
Ridge 6 (RS, WS): C1 (k8, w+t, k8)
Ridge 7 (RS, WS): C1 (k7, w+t, k7)
Ridge 8 (RS, WS): C1 (k6, w+t, k6)
Ridge 9 (RS, WS): C1 (k5, w+t, k5)
Ridge 10 (RS, WS): C1 (k4, w+t, k4)
Ridge 11 (RS, WS): C1 (k3, w+t, k3)
Ridge 12 (RS, WS): C1 (k2, w+t, k2)
Ridge 13 (RS, WS): C1 (k1, w+t, k1)
Ridge 14 (RS, WS): C1 (k1, w+t, k1)
Ridge 15 (RS, WS): C1 (k2, w+t, k2)

Ridge 16 (RS, WS): C1 (k3, w+t, k3)
Ridge 17 (RS, WS): C1 (k4, w+t, k4)
Ridge 18 (RS, WS): C1 (k5, w+t, k5)
Ridge 19 (RS, WS): C1 (k6, w+t, k6)
Ridge 20 (RS, WS): C1 (k7, w+t, k7)
Ridge 21 (RS, WS): C1 (k8, w+t, k8)
Ridge 22 (RS, WS): C1 (k9, w+t, k9)
Ridge 23 (RS, WS): C1 (k10, w+t, k10)
Ridge 24 (RS, WS): C1 (k11); C2 (w+t); C1 (k11)
Ridge 25 (RS, WS): C1 (k5); C2 (k7, w+t, k7); C1 (k5) - on the RS draw a long C2 loop
Ridge 26 (RS, WS): C1 (k5); C2 (k8, w+t, k8); C1 (k5)
Ridge 27 (RS, WS): C1 (k5); C2 (k9, turn, sl1, k8); C1 (k5)

Repeat ridges 1 to 27 twice more.
Then knit ridges 1 to 26.
Cut your yarns but leave tails long enough for grafting.
Graft in garter stitch: 5 sts in C1 and 9 sts in C2.

After grafting there is still a small hole in the middle of the piece - you can sew this closed with your C2 yarn tail. Sew in ends afterwards.


Chart

If you prefer to work from a chart, here's one. The numbers in front of the ridge indicate the number of stitches per color - the red number for the C1 stitches and the black number for the C2 stitches.
Chart - click on picture to enlarge


Montag, 3. Juli 2017

No Assembly Required - Knitted Top

I really like variegated yarn, but I don't like the "interruption" effect that comes from adding a piece of knitting in a color at a different place in the color gradient. Furthermore, I don't really like finishing sweaters, i.e. sewing pieces together etc.

So, when I bought a few skeins of a beautiful variegated yarn, I started thinking about how to knit it into a top in one continuous piece ... and here's what I came up with.


As with my Summer Garter Stitch Top and my Waterfall Tunic this is not a stitch-by-stitch pattern with stitch and row counts for various sizes but rather a tutorial on how to knit a top like this. You will have to swatch and calculate for yourself. So this top is completely configurable to your wishes and your shape. I will however give you my numbers and calculations as an example (written in purple). ... I hope, it is not too complicated.

Creative Commons License
This work by Knitting and so on is licensed under a Creative Commons Attribution-NonCommercial-ShareAlike 4.0 International License.


A Danish translation of this pattern has been provided by Marianne Holmen and can be found here on strikkeglad.dk.


Materials
  • I used about 120 grams of lace weight yarn - however, this tutorial is written in a way that it can be adapted to other yarn weights as well (I used Jaipur by Katia - here's a link to the yarn's Ravelry page).
  • 3.5 mm needles (long straight needles or circulars)
  • 3 stitch markers, 2 removable stitch markers
  • scrap yarn for the provisional CO
  • a tapestry needle for grafting

Techniques

Measurements to take

Take the following measurements - either on yourself or using a top that fits you well.

A = distance between underarm edge and start of shoulder
B = width of the shoulder seam
C = half of the width of neckline
D = a quarter of the waist circumference
E = a quarter of your  bust circumference
F = a quarter of your hip circumference

G = from shoulder to neckline (back)
H = from shoulder to neckline (front)
I = from shoulder to right under your arm
J = from shoulder to bust
K = from shoulder to waist
L = from shoulder to hip (total length of the garment)

Furthermore (not on the picture) you need to measure the height of your bust (top of your breast to just below your breasts). This number will be called N.

Construction

The picture below shows the construction:


You start with a provisional CO that reaches from just under your arms to the bottom of the top. After a few rows you start increasing and then you CO in order to for the strap reaching up to your shoulder. Once the shoulder is finished you decrease again for the neckline with a normal BO and a few further decreases during the next row. After you've finished the 1st half of the front piece, you'll have to knit a mirror image of it, i.e. you increase a few stitches and then do a cable CO for the shoulder pieces
Other noteworthy points:
  • While you're knitting the front piece you add in short rows, a) to make sure that the bottom edge is wide enough to fit around your hip and b) to add bust "darts". These bust darts are not added at the back of the piece - instead the added width is knitted into an underarm part. However, there are also short rows to make the piece fit around your waist. 
  • The 2nd half of one piece (front or back) is the exact mirror of the 1st part. So it's really useful to take notes while you're knitting, in order to be able to knit the same rows in the opposite order.
  • When knitting the shoulder parts of the back piece you can connect them to the shoulder of the front piece while knitting - alternatively, you can sew them up after finishing.
You'll notice that I've used different COs and BOs for different parts of the piece. That's because different COs and BOs have a different "stretchy-ness". For the arm hole I wanted something rather elastic, that's why I chose a stretchy BO and a knitted CO. However, for the neckline I wanted something more stable, that's why I chose a "normal" BO and a cable CO.


Calculations

Knit a swatch in garter stitch that measures at least 10cm by 10cm. For this kind of project it is really important. I'm not a "swatcher" myself (i.e. I usually avoid knitting a swatch at all cost), but in case of a fitted top you're either really lucky (and it fits) or it safes some time and effort because when you start knitting without concrete ideas about stitch and row numbers, you just end up knitting a bigger swatch. Then start calculating how many stitches and rows there are for each of the measurements you took.

Here are my calculations for stitch numbers and ridges - rounded. My swatch measured 22 sts for 10 cm in width and 22 ridges (44 rows) for 10 cm in height.

A (distance between underarm edge and start of shoulder): 2 cm = 9 rows (4.4 ridges)
B (width of the shoulder seam): 10 cm = 22 ridges
C (half of the width of neckline): 11 cm = 24 ridges
D (a quarter of the waist circumference): 20,5 cm = 45 ridges
E (a quarter of your  bust circumference): 22,5 cm = 49 ridges
F (a quarter of your hip circumference): 24,5 cm = 54 ridges

G (from shoulder to neckline (back)): 13 cm = 28 sts
H (from shoulder to neckline (front)): 16 cm = 35 sts
I  (from shoulder to right under your arm): 21 cm = 46 sts
J  (from shoulder to bust): 29 cm = 64 sts
K (from shoulder to waist): 48 cm = 106 sts
L (from shoulder to hip (total length of the garment): 60 cm = 132 sts
N (height of bust darts): 15 cm = 33 sts

Further calculations:
You need to calculate the number of short rows - for bust darts and hip, per half of one side.
For the bust darts this is E-D, and F-D for the hip. To calculate how often they need to be done, divide the number of waist ridges (D) by E (for the bust darts) and F (for the hip) respectivel - taking into account the ridges you knitted before you started the shaping short rows (A).
  • For bust darts: (D-A)/(E-D)
  • For the waist: (D-A)/(F-D) 
In my case, I needed 
  • 4 ridges for the bust darts (E-D=49-45=4), i.e. 4 bust darts short rows and 
  • 9 more ridges for the hip shaping (F-D=54-45=9), i.e 9 waist shaping short row ridges need to be knitted for one half of one side 
  • the hip shaping ridges need to be done every 5th row ((D-A)/9=(45-4)/9=4.555, rounded 5). 
  • the bust shaping ridges need to be knitted every 10th row ((D-A)/4=(45-4)/4=10,25, rounded 10) 
You also need to calculate the length from just under your arm to the bottom edge for your first (provisional) CO, this is L-I, in my case 60-21=39 cm (86 sts).


Instructions

Front - 1st Half

With provisional CO cast on L-I stitches and knit the first row with your working yarn. This first row is knitted upwards (i.e. from the bottom hem of the top upwards, ↑).
To achieve a rounded arm hole, you need to increase a few stitches at this end before you cast on (with a knitted CO) the stitches for the armhole. That's why I knitted one kfb at this end in every row while knitting the distance A, i.e.
R1 (armhole to bottom hem, ↓): sl1, kfb, k to end
R2 (bottom hem to armhole, ↑): sl1, k to last 2 sts, kfb, k1
After these ridges, I did a knitted CO of the stitches that were needed for the armhole (I minus the increases already done).
In my case I knitted 9 rows (very first row after provisional CO plus four times R1 & R2), i.e. I had increased by 8 stitches. So I cast on 38 sts (46 (I) - 8 (increases) = 38).

In the next row (top-down) you can put in your stitch markers to help with the short rows for shaping:
M1: K sts from top (to mark the waistline)
M2: J sts from top (to mark the bustline)
M3: I sts from top (to mark the end of the armhole)

Now you need to start inserting the short rows for shaping waist and bust.

Ridge with waist shaping short row (starts from bottom hem):
  (↑) sl1, k to M1, w+t,
  (↓) k to end, turn,
  (↑) sl1, k to end, turn
  (↓) sl1, k to end

Ridge with short rows for bust darts:
  (↑) sl1, k to M2, k N/2, w+t,
  (↓) k to M2, k N/2, w+t
  (↑) k to end, turn
  (↓) sl1, k to end
In my case (with N = 33 sts) I knitted 16 sts on the way up /(counted from M2) and 17 sts on the way down (counted from M2)).

Normal ridges (no shaping) are knitted as follows:
  (↑) sl1, k to end,
  (↓) sl1, k to end

When the shoulder seam measures B ridges, knit your neckline. Start by a BO of three quarters of H at the top - i.e. start BO in the beginning of a top-down row.
During the next rows, decrease one stitch at the top edge - one quarter of H times (so in the end you have decreased a total of H sts), i.e.
  (↑) sl1, k to 3 bef, end, k2tog, k1
  (↓) sl1, ssk, k to end

In my case (with H = 35 sts), I did a BO of 26 sts, and decreased on the top edge by one stitch for the next 9 rows.

(Don't forget to insert the hip and bust short rows while knitting the neckline).

Knit to the middle of the front piece - without forgetting to knit the bust and hip shaping short rows.

Put a removable stitch marker into the first stitch of the next row to mark the middle of the front piece.

Front - 2nd Half
Knit exactly the same ridges as in the 1st half, but
  • knit them in the opposite order, i.e. start with the last ridge of the 1st half and end with the first ridge of the 1st half and
  • for every increased stitch on the top edge during the first half, you decrease a stitch in the second half - and vice versa.
After you've knitted nearly all of the first part, your piece should look as shown below.

After finishing the 2nd half of the front you should have the same number of stitches you CO in the first provisional CO.


1st Underarm Part

Since there are no bust darts on the back of this piece, the necessary ridges must be knitted somewhere else to get the bust circumference. In case of this sweater, I leveled this out by knitting the necessary ridges underarm. When starting from the top, knit to M2 and then N/2 stitches further (like in the short row for bust shaping), then do a w+t and knit back. The next row, knit up to 2 sts before the last w+t. do a w+t and knit back. Repeat this until you have knitted the calculated number of ridge. Or in knitting terms:

  (↓) sl1, k to M2, k N/2, w+t,
    (↑) k end
* (↓) sl1, k to M2, k 2 sts before last turn, w+t,
    (↑) k to end
  repeat from * until you've knitted E-D ridges.

In my case, I needed to knit 4 ridges  (E-D=49-45=4) and N/2 was calculated as 17 sts. So I knitted:
  (↓) sl1, k to M2, k17, w+t, (↑) k end
  (↓) sl1, k to M2, k15, w+t, (↑) k end
  (↓) sl1, k to M2, k13, w+t, (↑) k end
  (↓) sl1, k to M2, k11, w+t, (↑) k end

Back - 1st Half

Knit the same rows as in the 1st half of the front bit, with the following differences.
  • Do not knit the short rows for the bust darts.
  • When you've knitted the armhole CO (and start to knit the shoulder seam), you can connect the first stitch of the next top-down row to the last stitch of the second shoulder seam of the front part. Connect the first stitch next top-down row to the next stitch of the shoulder seam of the front part (alternatively, you can sew up both shoulder seams after finishing).
  • When decreasing for the neckline, use G sts (instead of H). The same goes for the increases later during the 2nd half of the back.
Back - 2nd Half

Knit exactly the same ridges as in the 1st half of the back piece, but
  • knit them in the opposite order, i.e. start with the last ridge of the 1st half and end with the first ridge of the 1st half and
  • for every increased stitch on the top edge during the first half, you decrease a stitch in the second half - and vice versa
  • connect the 2nd shoulder seam of the back to the first shoulder seam of the front.


2nd Underarm Part

Knit this exactly as the 1st underarm part.
Make sure that your last row is knitted upwards.

Finishing

Put the stitches of the provisional CO on the second needle.
Cut your yarn but leave a tail that is long enough for grafting - I usually leave a tail that is 5 times the length of the seam to be grafted. Graft in garter stitch.
Weave in ends and block to size.