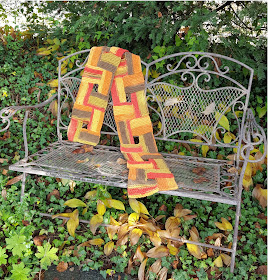
As usual, I had some difficulties in finding a name for this scarf - so again I asked the members of knittingparadise.com for suggestions (here's the link to the thread), I loved some of the suggestions but in the end I decided to go for the bricks theme (suggested several times) - but I used a different language :) - "Bauklötze" is the German word for building bricks or toy bricks.

This work by Knitting and so on is licensed under a Creative Commons Attribution-NonCommercial-ShareAlike 4.0 International License.
Materials
- about 200 grams of bulky yarn
- 7mm needles (straight or circular)
- tapestry needle to weave in ends
Techniques
- Knitted CO: a method to cast on stitches at the end of a row, as shown in this video by VeryPinkKnits.
- Pickup and knit stitches (from side): insert the right hand needle into the upper bump of the last stitch of the row (photos 1 and 2), and draw your yarn through the loop (photos 3 and 4)

- Pick up and connect (with a bind-off row): When you've turned your piece insert the left hand needle from below into the front leg of the bind off stitch (photo 1), then - as if to k2tog - insert the left hand needle into the first stitch on the needle and into the leg of the bind off stitch (photo 2) and draw your yarn through both loops (photo 3). In the pattern this sequence will be called (k2tog-connect).

Gauge and Measurements
In garter stitch, about 13 stitches equal 10 cm in width - and 7 ridges (14 rows) equal 5 cm in height. My finished scarf (unblocked) is about 22 cm wide and 186 long (I knitted 8 blocks).
General Construction
The picture on the right shows the general construction of this scarf. It consists of a number of blocks that in turn consists of 4 rectangles.
Each rectangle is 18 stitches wide and 12 garter stitch ridges high. For each block the rectangles are knit in the sequence A, B, C, D. The rectangles are connected to each other
- either by picking up and knitting stitches from the side or top of the last rectangle
- or by picking up and connecting with stitches from a bind-off.
Instructions
Block 1
Rectangle A
CO 18 (with knitted CO)
Knit 11 ridges of garter stitch (knit all stitches)
Last row: BO all except last stitch
Rectangle B
CO5 (with knitted CO)
Knit 6, pick up and knit 12 sts from the side of rectangle A (your piece should now look similar to photo 1)
Knit 11 ridges of garter stitch
Last row: BO all except last stitch
Rectangle C
Pick up and knit 12 stitches from the side of rectangle B, CO5 (with knitted CO) (your piece should now look similar to photo 2)
Knit 11 rigdes of garter stitch
Last row: BO all except last stitch

Rectangle D
Pick up and knit 12 stitches from the side of rectangle C, CO5 (with knitted CO) (your piece should now look similar to photo 3)
Row 1: k2tog-connect, k to end (connect your first row to the 12th stitch of rectangle A counted from the left hand edge of the piece, see photo 4)
Row 2: k all
Repeat rows 1 and 2 ten more times - after a few rows your piece should look similar to photo 4
Row 13: k2tog-connect, BO all except last stitch
Block 2
Rectangle A
Pick up and knit 17 stitches from rectangles D and C of the block below
Knit 11 ridges of garter stitch
Last row: BO all except last stitch
Rectangle B
CO5 (with knitted CO)
Knit 6, pick up and knit 12 from rectangle A
Row 1: k2tog-connect to BO of rectangle C of block below, k to end (start to connect right next to the last picked up stitch from rectangle A, i.e. don't leave a gap)
Row 2: k all
Row 1: k2tog-connect to BO of rectangle C of block below, k to end (start to connect right next to the last picked up stitch from rectangle A, i.e. don't leave a gap)
Row 2: k all
Repeat rows 1 and 2 ten more times
Last row: BO all except last stitch
Rectangle C = Rectangle C of block 1
Pick up and knit 12 stitches from the side of rectangle B, CO5 (with knitted CO)
Knit 11 rigdes of garter stitch
Last row: BO all except last stitch
Rectangle D = Rectangle D of block 1
Pick up and knit 12 stitches from the side of rectangle C, CO5 (with knitted CO) (your piece should now look similar to photo 3)
Row 1: k2tog-connect, k to end (connect your first row to the 12th stitch counted of rectangle A from the left hand side edge of the piece)
Row 2: k all
Repeat rows 1 and 2 ten more times
Row 13: k2tog-connect, BO all except last stitch
Repeat block 2 until your scarf is as long as you want it.
In the last block change row 13 of rectangle D as follows:
Row 13: k2tog-connect, BO all
I knitted a total of 8 rectangles.
Weave in ends and block lightly.


Great scarf! My mother has been hooked on knitting domino gloves for the last year, I will have to see if she wants to try this pattern! Love the autumn colours!
AntwortenLöschenBarbara xx
Thank you. I had to google "Domino Gloves" ... they are cute and interesting! Maybe your mother has fun trying out this pattern, too. Happy knitting!
LöschenThank you :) I had fun knitting it :)
AntwortenLöschenThat is such a unique scarf. I've never seen one like that before, it certainly is eye catching. And the colors are perfect for fall.
AntwortenLöschenThank you. And thanks for hosting the Sweet Inspiration Links Party.
Löschenwhat a fun and clever way to make a scarf, love it.
AntwortenLöschen