Do you like constructions a bit out of the ordinary? And are you - as me - not really fond of weaving in ends? Then this crochet pattern is made for you.
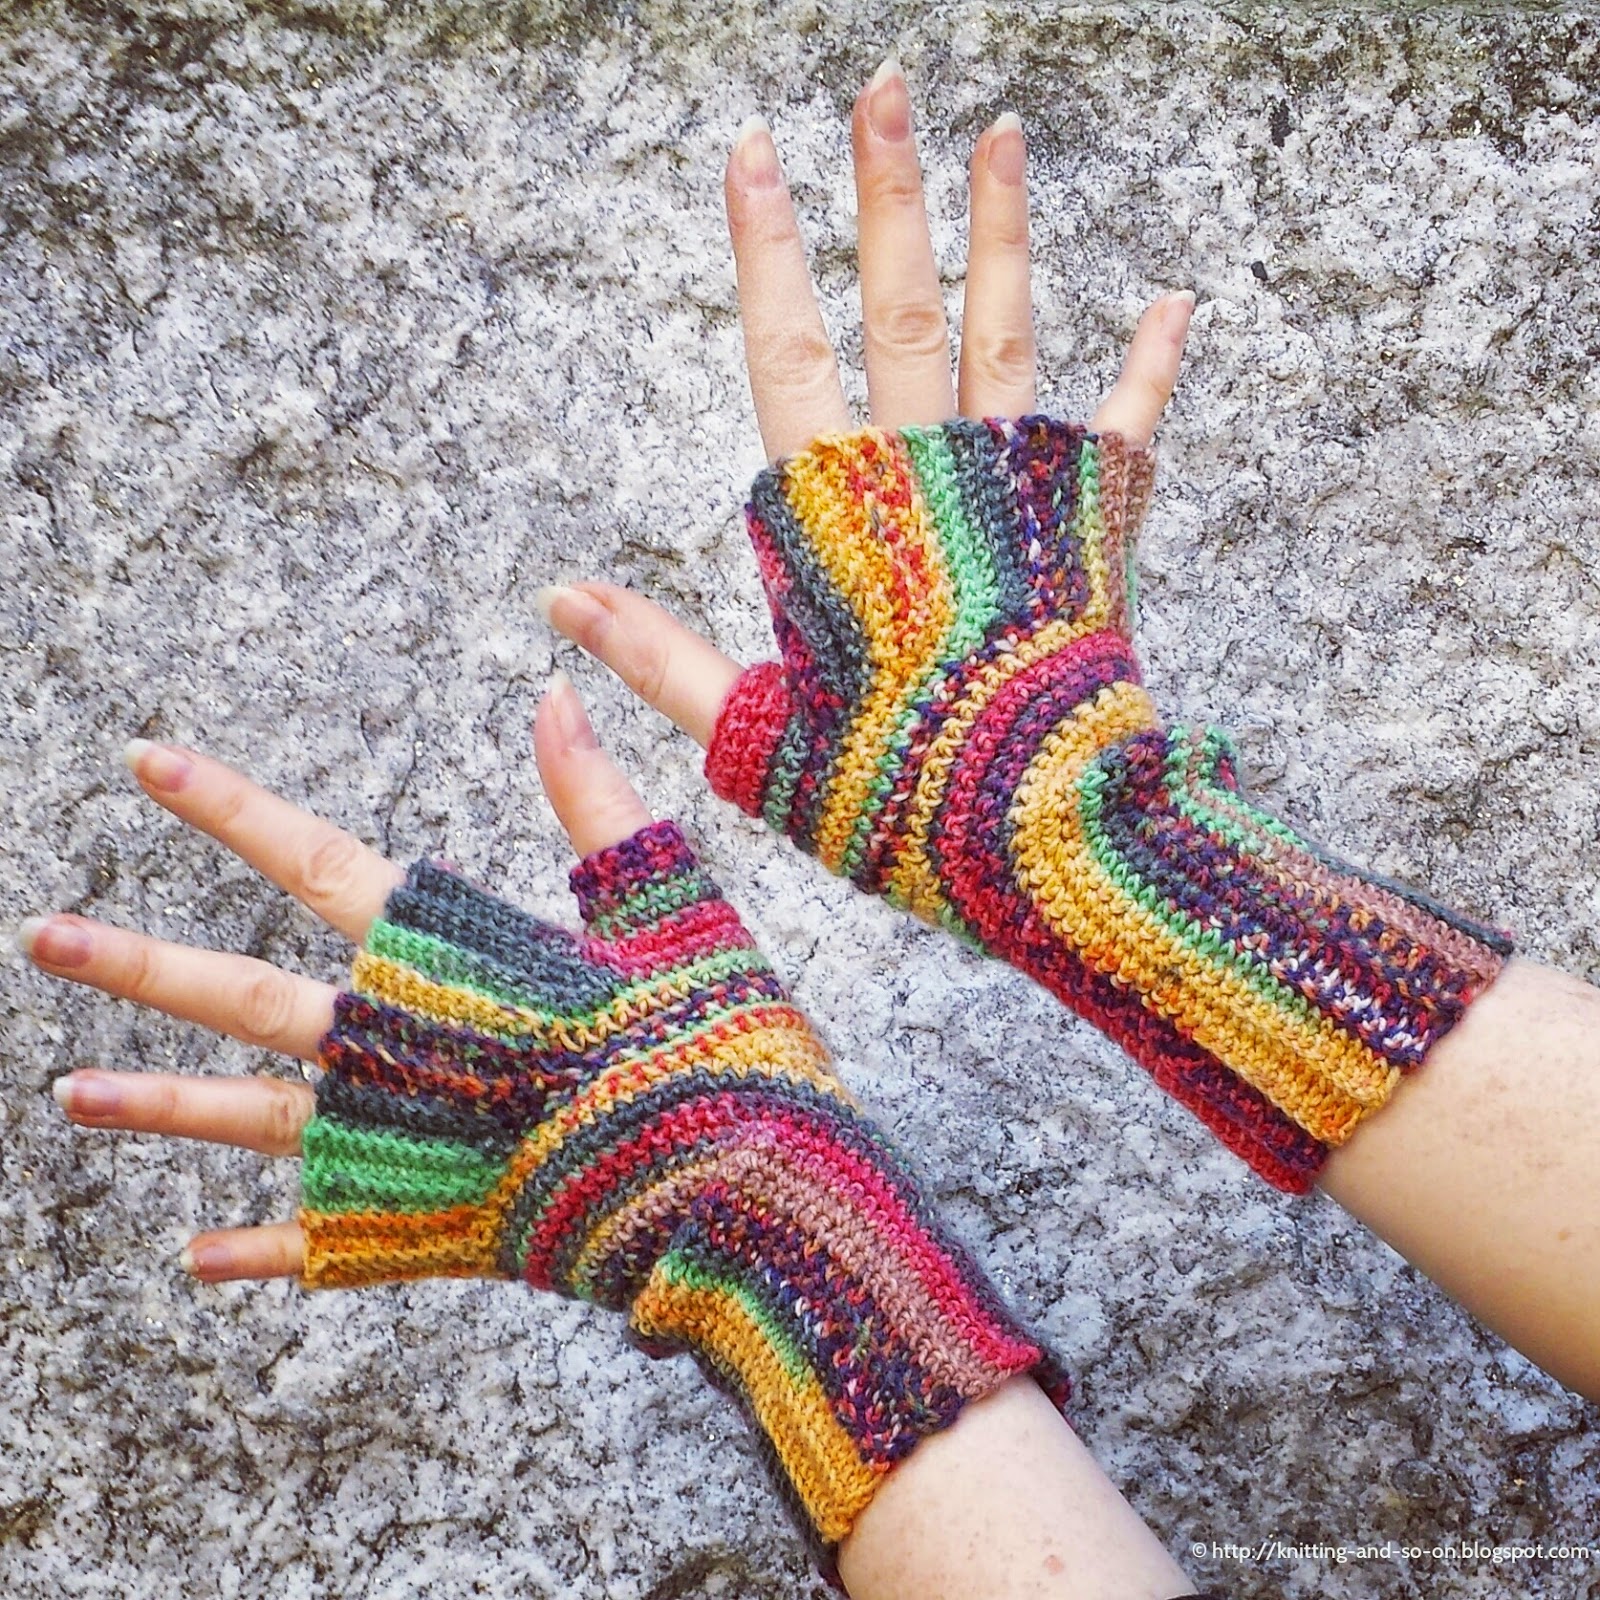
These fingerless gloves are worked in on piece, starting at the outer wrists and ending at the thumb - in an interesting construction that great to show off your variegated yarn.
A knitted version of these mitts can be found in this blogpost.


This work by Knitting and so on is licensed under a Creative Commons Attribution-NonCommercial-ShareAlike 4.0 International License.

Other Languages
Thanks to sannemethorst (Ravelry user name) a dutch version of this pattern is available here.
Materials
Abbreviations
How the half-circle is worked in this pattern?
Basically, in each RS-row, you have to increase by 4 stitches – evenly distributed whereas in WS-rows no increases occur. It is important to start the increases at different points in each row to avoid a visible edges, so I started increasing at a random stitch in the first quarter
So, if you start with 4 stitches that will form the half-circle, you start off as follows
row 1: [inc]*4
row 2 and all even-numbered rows: sc all sts
row 3: [sc inc]*4 (i.e. there is a distance of 1 st between the increases)
row 5: [inc sc*2]*4 (i.e. there is a distance of 2 sts between the increases)
row 7: [sc*2 inc sc]*4 (i.e. there is a distance of 3 sts between the increases)
row 9: [sc inc sc*4]*4 (i.e. there is a distance of 4 sts between the increases)
Gauge or what to measure beforehand
You should measure the circumference of your wrists.
Construction
 These mitts are knitted in three parts (see picture on the right):
Instructions
The pictures numbered 1 to 6 will give you and idea how the piece looks like during the stages of creation. On the pictures you see stitch markers. Strictly speaking, it’s not necessary really to use them, but it may be convenient as they provide a visual (and haptic?) aid. Therefore, I have included instruction for working with stitch markers in brackets. Since this is crochet, the marker must be carried up to the current row. I'd also advise to mark the RS (e.g. with a safety pin).

Part 1
Chain 23 (22 stitches and 1 turning-chain)
Row 1 (RS): sc 10, (place marker) sc 10, (place marker), [inc]*2, turn piece by 180 degrees and continue on the lower edge of your chain, [inc]*2, sc 10 (place marker), sc 10, (place marker), 1 turning-chain
Row 2 (WS): sctbl 10, sc 10, sc 4, place marker (="middle-marker") sc 4, sc 10, sctbl 10, 1 turning-chain
Row 3 (RS): sctbl 10, sc 10, from here to the last 20 stitches (or between the current and the next marker): increase by 4 stitches – evenly spaced out and started at a random point to form the half-circle, sc 10 sctbl 10, 1 turning chain
Row 4 (WS): sctbl 10, sc 10, sc until the last 20 stitches (or until the last but one marker), sc 10, sctbl 10, 1 turning-chain
Repeat rows 3 and 4 until the lover edge fits around your wrists - for me this was the case after row 17. After a few repeats, your piece should look similar to the one in picture 1. End with an odd-numbered row.
If you're not comfortable with the instructions above, here are the first odd-numbered rows spelled out:
Row 3 (RS): sctbl 10, sc 10, [sc 1, inc]*4, sc 10 sctbl 10, 1 turning chain (-> 1 stitch distance between the increases)
Row 5 (RS): sctbl 10, sc 10, [inc, sc 2]*4, sc 10 sctbl 10, 1 turning chain (-> 2 stitches distance between the increases)
Row 7 (RS): sctbl 10, sc 10, [sc 2, inc, sc 1]*4, sc10, sctbl10, 1 turning chain (-> 3 stitches distance between the increases)
Row 9 (RS): sctbl 10, sc 10, [sc 1, inc, sc 3]*4, sc10, sctbl 10, 1 turning chain (-> 4 stitches distance between the increases)
Row 11 (RS): sctbl 10, sc 10, [sc 3, inc, sc 2]*4, sc10, sctbl 10, 1 turning chain (-> 5 stitches distance between the increases)
Row 13 (RS): sctbl 10, sc 10, [sc 1, inc, sc 5]*4, sc10, sctbl 10, 1 turning chain (-> 6 stitches distance between the increases)
Row 15 (RS): sctbl 10, sc 10, [sc 4, inc, sc 3]*4, sc10, sctbl 10, 1 turning chain (-> 7 stitches distance between the increases)
Row 17 (RS): sctbl 10, sc 10, [sc 7, inc, sc 1]*4, sc10, sctbl 10, 1 turning chain (-> 8 stitches distance between the increases)
Fold in half with right sides together and join the first 20 stitches, i.e. inserting your hook into the front and the back stitch at the same time (see picture 2). Remove all markers except for "middle marker".
Part 2
Turn mitt back right sides out (be sure to secure your last loop while you're doing this) and start working a small triangle on top of the joined stitches as follows (see picture 3):
Row 1 (RS-WS-RS): sc 3, turn, sc 5, turn, sc 2 (you're back at the point where you started this row)
Row 2 (RS-WS-RS): sc 5, turn, sc 9, turn, sc 4 (you're back at the point where you started this row)
Row 3 (RS-WS-RS): sc 7, turn, sc 13, turn, sc 6 (you're back at the point where you started this row)
Row 4: crochet (sc's) up to middle-marker and chain 11 (i.e. 10 + 1 turning-chain) (see picture 4)
Row 5: sc 9, dec, sc 2, turn; sc 1, sctbl 10, 1 turning-chain (and turn - this is a short row),
sctbl 9, dec, sc 22, dec, sc to end (i.e. middle-marker), sc 1 from gap between last st and last row's chain, sc 10 into the lower edge of chain, 1 turning chain (see picture 5)
Row 6: sc 9, dec, dec, sc 1, turn; sc 1, sctbl 10, 1 turning-chain;
sctbl 9, dec, sc 5, dec, sc to the last 17 sts, dec, sc 5, sctbl 10, 1 turning-chain
Row 7: sctbl 9, dec, sc 1, turn; sc 1, sctbl 10, 1 turning-chain;
sctbl 9, dec, sc 1, turn; sc 1, sctbl 10, 1 turning-chain;
sctbl 9, dec, sc to last 10 sts, sctbl 10, 1 turning-chain
Row 8: sctbl 9, dec, sc 1, turn; sc 1, sctbl 10, 1 turning-chain;
sctbl 9, dec, sc 1, turn; sc 1, sctbl 10, 1 turning-chain;
sctbl 9, dec, sc to last 10 sts, sctbl 10, 1 turning-chain
Repeat rows 7and 8 a few times and end with an odd-numbered row - until there are only about 36 stitches left (2x 10 ribbing, and about 16 for the thumb hole. For me this after two more repeats (i.e. row 13, if counted on).
If it feel as if the mitts gets too wide, you can always do a row with two decreases (similar to row 6).
You can - if necessary - now widen the upper ribbing by working 1 or 2 widening-rows as follows:
Widening-Row: sctbl 10, turning-chain"; sctbl 10, turning-chain
If you want to avoid cutting yarn, it is necessary that your last stitch is a the top of the ribbing before you start joining the sides. That's why the widening-row is actually two rows - back-and-forth
Now hold the right sides of upper ribbing together and join 10 stitches (see picture 6) - this will look and feel odd, but only for the 10 join stitches.
Turn the upper ribbing back (inside-out) making sure to secure the open loop while you're doing this - now you can start the thumb.

These fingerless gloves are worked in on piece, starting at the outer wrists and ending at the thumb - in an interesting construction that great to show off your variegated yarn.
A knitted version of these mitts can be found in this blogpost.


This work by Knitting and so on is licensed under a Creative Commons Attribution-NonCommercial-ShareAlike 4.0 International License.
Other Languages
Thanks to sannemethorst (Ravelry user name) a dutch version of this pattern is available here.
Materials
- about 40-45 grams of fingering weight yarn
- 3mm crochet hook
- 5 removable stitch markers (e.g. safety pins)
- tapestry needle to weave in ends
Abbreviations
- ch: chain
- sc: single crochet
- sl st: slip stitch: http://www.dummies.com/how-to/content/how-to-crochet-the-slip-stitch.html
- inc: increase by working 2 single crochet stitches into 1 sc below: http://www.dummies.com/how-to/content/how-to-increase-with-single-crochet.html
- sctbl: single crochet through back loop: http://crochet.about.com/od/crochetterms/tp/back-loops-only-or-blo.htm
- dec or sctog: decrease by working 2 single crochet stitches together: http://www.dummies.com/how-to/content/how-to-decrease-single-crochet.html
- join: joining pieces with crochet: in order to join to pieces (or, in case of this pattern, the two sides of one piece) hold the pieces together with wrong sides facing and insert the crochet hook into both pieces at the same time, a foto tutorial can be found here (scroll down to “Joining with Crochet” http://knitty.com/ISSUEwinter08/FEATwin08TT.php)
- [y]*x: work the sequence y (within the brackets) x times.
- crochet short rows (as done in this pattern (*)): work sc's to the stitch indicated, then turn work (without a turning-chain) and start into the 2nd sc; when you're working over this turn in a following row, always crochet into the turning-sc as well.
(*) there may be different methods out there, feel free to try them.
How the half-circle is worked in this pattern?
Basically, in each RS-row, you have to increase by 4 stitches – evenly distributed whereas in WS-rows no increases occur. It is important to start the increases at different points in each row to avoid a visible edges, so I started increasing at a random stitch in the first quarter
So, if you start with 4 stitches that will form the half-circle, you start off as follows
row 1: [inc]*4
row 2 and all even-numbered rows: sc all sts
row 3: [sc inc]*4 (i.e. there is a distance of 1 st between the increases)
row 5: [inc sc*2]*4 (i.e. there is a distance of 2 sts between the increases)
row 7: [sc*2 inc sc]*4 (i.e. there is a distance of 3 sts between the increases)
row 9: [sc inc sc*4]*4 (i.e. there is a distance of 4 sts between the increases)
Gauge or what to measure beforehand
You should measure the circumference of your wrists.
Construction
 These mitts are knitted in three parts (see picture on the right):
- Part 1 covers the wrists, it is worked with a 10 stitch wide ribbing (always working into the back loop) and a single crochet body which includes the half-circle. This part ends with a row that join the two sides together (1st join).
- Part 2 covers the palms up to the knuckles. It is worked back and forth and consists of an upper ribbing edge (also 10 stitches that are worked into the back loop) and its main body. It also ends with a row where the two side of the upper ribbing are joined together (2nd join) - leaving a hole for the thumb.
- Part 3 is worked around the thumb - to create the same stitch pattern than parts 2 and 3, it is also worked back and forth with a slip stitch to join the "rounds" together.
The pictures numbered 1 to 6 will give you and idea how the piece looks like during the stages of creation. On the pictures you see stitch markers. Strictly speaking, it’s not necessary really to use them, but it may be convenient as they provide a visual (and haptic?) aid. Therefore, I have included instruction for working with stitch markers in brackets. Since this is crochet, the marker must be carried up to the current row. I'd also advise to mark the RS (e.g. with a safety pin).
Chain 23 (22 stitches and 1 turning-chain)
Row 1 (RS): sc 10, (place marker) sc 10, (place marker), [inc]*2, turn piece by 180 degrees and continue on the lower edge of your chain, [inc]*2, sc 10 (place marker), sc 10, (place marker), 1 turning-chain
Row 2 (WS): sctbl 10, sc 10, sc 4, place marker (="middle-marker") sc 4, sc 10, sctbl 10, 1 turning-chain
Row 3 (RS): sctbl 10, sc 10, from here to the last 20 stitches (or between the current and the next marker): increase by 4 stitches – evenly spaced out and started at a random point to form the half-circle, sc 10 sctbl 10, 1 turning chain
Row 4 (WS): sctbl 10, sc 10, sc until the last 20 stitches (or until the last but one marker), sc 10, sctbl 10, 1 turning-chain
Repeat rows 3 and 4 until the lover edge fits around your wrists - for me this was the case after row 17. After a few repeats, your piece should look similar to the one in picture 1. End with an odd-numbered row.
If you're not comfortable with the instructions above, here are the first odd-numbered rows spelled out:
Row 3 (RS): sctbl 10, sc 10, [sc 1, inc]*4, sc 10 sctbl 10, 1 turning chain (-> 1 stitch distance between the increases)
Row 5 (RS): sctbl 10, sc 10, [inc, sc 2]*4, sc 10 sctbl 10, 1 turning chain (-> 2 stitches distance between the increases)
Row 7 (RS): sctbl 10, sc 10, [sc 2, inc, sc 1]*4, sc10, sctbl10, 1 turning chain (-> 3 stitches distance between the increases)
Row 9 (RS): sctbl 10, sc 10, [sc 1, inc, sc 3]*4, sc10, sctbl 10, 1 turning chain (-> 4 stitches distance between the increases)
Row 11 (RS): sctbl 10, sc 10, [sc 3, inc, sc 2]*4, sc10, sctbl 10, 1 turning chain (-> 5 stitches distance between the increases)
Row 13 (RS): sctbl 10, sc 10, [sc 1, inc, sc 5]*4, sc10, sctbl 10, 1 turning chain (-> 6 stitches distance between the increases)
Row 15 (RS): sctbl 10, sc 10, [sc 4, inc, sc 3]*4, sc10, sctbl 10, 1 turning chain (-> 7 stitches distance between the increases)
Row 17 (RS): sctbl 10, sc 10, [sc 7, inc, sc 1]*4, sc10, sctbl 10, 1 turning chain (-> 8 stitches distance between the increases)
Fold in half with right sides together and join the first 20 stitches, i.e. inserting your hook into the front and the back stitch at the same time (see picture 2). Remove all markers except for "middle marker".

Part 2
Turn mitt back right sides out (be sure to secure your last loop while you're doing this) and start working a small triangle on top of the joined stitches as follows (see picture 3):
Row 1 (RS-WS-RS): sc 3, turn, sc 5, turn, sc 2 (you're back at the point where you started this row)
Row 2 (RS-WS-RS): sc 5, turn, sc 9, turn, sc 4 (you're back at the point where you started this row)
Row 3 (RS-WS-RS): sc 7, turn, sc 13, turn, sc 6 (you're back at the point where you started this row)
Row 4: crochet (sc's) up to middle-marker and chain 11 (i.e. 10 + 1 turning-chain) (see picture 4)
Row 5: sc 9, dec, sc 2, turn; sc 1, sctbl 10, 1 turning-chain (and turn - this is a short row),
sctbl 9, dec, sc 22, dec, sc to end (i.e. middle-marker), sc 1 from gap between last st and last row's chain, sc 10 into the lower edge of chain, 1 turning chain (see picture 5)
Row 6: sc 9, dec, dec, sc 1, turn; sc 1, sctbl 10, 1 turning-chain;
sctbl 9, dec, sc 5, dec, sc to the last 17 sts, dec, sc 5, sctbl 10, 1 turning-chain
Row 7: sctbl 9, dec, sc 1, turn; sc 1, sctbl 10, 1 turning-chain;
sctbl 9, dec, sc 1, turn; sc 1, sctbl 10, 1 turning-chain;
sctbl 9, dec, sc to last 10 sts, sctbl 10, 1 turning-chain
Row 8: sctbl 9, dec, sc 1, turn; sc 1, sctbl 10, 1 turning-chain;
sctbl 9, dec, sc 1, turn; sc 1, sctbl 10, 1 turning-chain;
sctbl 9, dec, sc to last 10 sts, sctbl 10, 1 turning-chain
Repeat rows 7and 8 a few times and end with an odd-numbered row - until there are only about 36 stitches left (2x 10 ribbing, and about 16 for the thumb hole. For me this after two more repeats (i.e. row 13, if counted on).
If it feel as if the mitts gets too wide, you can always do a row with two decreases (similar to row 6).
You can - if necessary - now widen the upper ribbing by working 1 or 2 widening-rows as follows:
Widening-Row: sctbl 10, turning-chain"; sctbl 10, turning-chain
If you want to avoid cutting yarn, it is necessary that your last stitch is a the top of the ribbing before you start joining the sides. That's why the widening-row is actually two rows - back-and-forth
Now hold the right sides of upper ribbing together and join 10 stitches (see picture 6) - this will look and feel odd, but only for the 10 join stitches.
Turn the upper ribbing back (inside-out) making sure to secure the open loop while you're doing this - now you can start the thumb.

Part 3 (Thumb)
Hold your mitt so that the upper ribbing is down, i.e. that you can work stitches into it.
Row 1: work sc's into the edge of the upper ribbing (the number depending on the number of widening-rows you worked at the end of part 2) - at least 1 (if you didn't do any widening-rows) or the number of widening-rows+1, place marker; work sc's into all sc's that are left over from part 2, work 1 sc into gap, and join with sl st to first stitch of row, turning-chain and turn
Row 2: sc 1, dec, sc to one before marker, dec, sc to end, join with sl st to first stitch of row, turning-chain and turn
Repeat row 2 until the the hole fits snugly around your thumb - I repeated until there were 16 sts.
Row 3: sc into all sts, join with sl st to last st, turning-chain (except for very last row)
Repeat until you have worked a total of 6 thumb rows.
Cut yarn and weave in ends.
Make two.

Yarn
The yarn I used here is called Zwerger Opal Hundertwasser - colorway "Blinde Venus" (yarn link on Ravelry).
This pattern was featured at Pinbellish Link Party at Purfylle.com.
This pattern was featured at Pinbellish Link Party at Purfylle.com.

Wonderful stylisch and so unique. Thanks for the great tutorial inc. Photo tutorial
AntwortenLöschenDanke. Freut mich sehr, dass es dir gefällt!
LöschenHallo
LöschenEinfach fantastisch.
Finde ich dazu auch deutsche Anleitung? Würde es sehr erleichtern.
Besten Dank
Dieser Kommentar wurde vom Autor entfernt.
LöschenBeautifu! Thank you :)
AntwortenLöschenOh my goodness! These fingerless mitts look amazing and I love the yarn too! This is going to go on my "must make" list. We are getting into warmer weather in Louisiana but cooler is coming soon.
AntwortenLöschenMany thanks for sharing your wonderful pattern! :). :)
____
Lee Ann
Http://crochetgottaloveit.blogspot.com
Thank you - I'm glad you like them. Greetings to Louisiana!
LöschenLove it. I will try one, thanks for the great explanation.
AntwortenLöschenThanks! Teşekkürler!
LöschenIt's such a lovely pattern! I really want to make it, though I'd have to find the perfect variegated fingering weight. Can I just ask what bsc is though? You mention it on the fourth row and I'd usually take it as beaded single crochet, but we're not using beads in this work so I;m a bit confused.
AntwortenLöschenThank you so much.
Löschenbsc = sctbl = sc through the back loop
When I started writing the pattern, I googled some crochet terms and found different ones - eg. for single crochet in back loop I found bsc and sctbl. While I was writing, it took me a while to decide ... and I tried to make the pattern consistent. Apparently, this one "bsc" slipped through ... sorry.
I have corrected it now - thanks for letting me know.
que buena idea. hermosos! gracias por compartir.
AntwortenLöschenI am having trouble getting part2 started. I'm not understanding the instructions, I've tried a couple different things but I'm not winding up back where I started. Any help would be greatly appreciated.
AntwortenLöschenThose are so cute!
AntwortenLöschenThanks!
Löschenschoon !
AntwortenLöschenCan you tell me how many stitches I should have after doing the triangle in part 2. I am not an experienced crocheted but would love to master this pattern.
AntwortenLöschenThank you
Hi! First of all thank you so much for sharing this, but like another commentator, I'm having trouble with part 2. I have one loop in my hook and then a "V" shaped with the rest of the stitches (after joining those first 20), should I knit up one of the rows of the V, or... what? I'm really lost.
AntwortenLöschenHi, after you've crocheted the first 20 sts together, you start to fill the triangle perpendicular to the seam of the first 20 sts - and you do that by working short rows, i.e. a few sts to the left, then turn and a few stitches more back, then turn again and even more stitches in the opposite direction. Then it will look like picture 3. Hope this helps!
LöschenDieser Kommentar wurde vom Autor entfernt.
LöschenDanke für die Anleitung, ist mal was anderes. Hab doch gerade tatsächlich einen Handschuh fertigbekommen - der Teil mit den "Fingern" fand ich etwas schwierig, aber sieht ganz gut aus. (Wird dann wohl doch richtig sein ...)
AntwortenLöschenWas mir persönlich aber zu kurz ist, sind eben die "Finger", die mache ich nächstes Mal länger :-)
Außerdem versuche ich, noch eine Kappe dranzuhäkeln, so wie bei Marktfrauenhandschuhen.
Wird bestimmt eine tolle Kombination!
Lieben Gruß
Pit
Freut mich, dass dir die Idee gefällt. Danke!
LöschenLiebe Grüsse
SR
I am in the middle of this pattern and loving it! Thank you for sharing another beautiful fingerless mitt.
AntwortenLöschenThank you for this pretty pattern
AntwortenLöschen