Posts mit dem Label Socks werden angezeigt. Alle Posts anzeigen

Montag, 19. Januar 2026

Cactus Socks

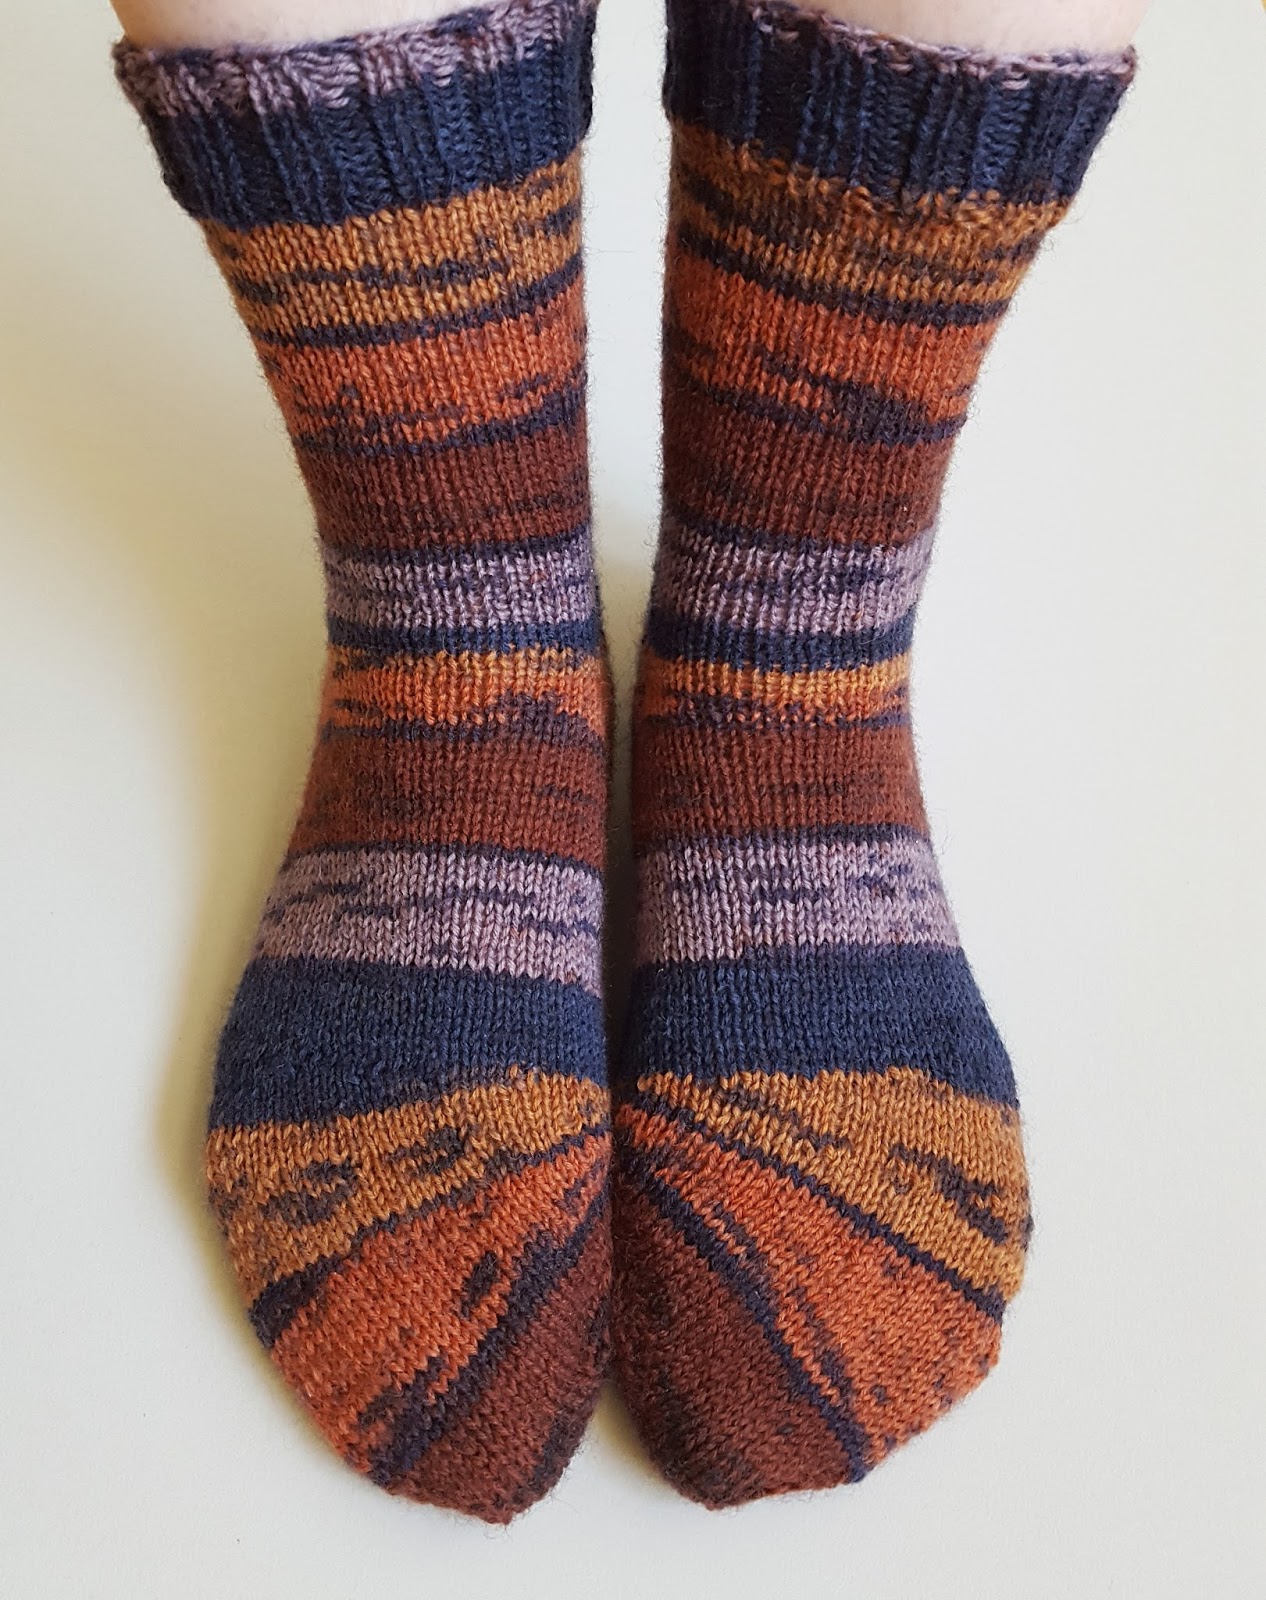
I love knitting socks. They are my go-to-project if I run out of knitting ideas or if I don't feel like continuing one of my other projects. These socks were knitted as a Christmas present for my Mum. They got quite a few likes on my social media - so I thought it'd be a good idea to write down how I did them. Since the stitch pattern looks a bit prickly, I called them Cactus Socks.

These socks are based on the Generic Sock Toe-Up, Slip-Stitch Heel, Sock Formula by Sarah Keller (here's the Ravelry-Link) - but adapted to my size, with a stitch pattern for the main part of the sock that is carried over the heel as well - plus my favorite techniques for sock knitting.

This is NOT a complete knitting pattern in different sizes, but a description how I did it - especially the stitch pattern and carrying it through on the heel flap. If you want to knit them in another size, please use Sarah Kellers pattern to calculate your numbers.


Size and Gauge

The instructions are for a women's size 38 to 39 (i.e. 24 to 24,7 cm total foot length).

For other sizes, use the methods described in Sarah Kellers pattern (Generic Sock Toe-Up, Slip-Stitch Heel, Sock Formula by Sarah Keller (here's the Ravelry-Link)) - but make sure that the stitch count after the toe can be devided by 8.

Here, 19 rows of stockinette gave 5cm in height and 16 sts (stockinette) gave 5 cm in width. But If you've knitted socks before, you'll know which total stitch count to aim for.Any stitch count that can be devided by 8 is fine.


Materials

  • about 60 grams of fingering weight yarn - I used Larneras Yarn Co Barefoot Fingering (here's a link to the yarn's Ravelry page)
  • 2.5 mm needles - I used Addi Crasy Trios, but dpns or circulars with magic loop will work as well


Techniques and Abbreviations

  • Judy's Magic Cast-On is a technique that gives you live stitches on both sides of your needle - it is generally used for toe-up socks (e.g. in this pattern), but it can be used for other purposes as well. Here's a written description (from Knitty) and here's a YouTube-video by Cat Bordhi and another YouTube-video by Very Pink Knits.
  • Shadow Wrap Short Rows: as shown in this YouTube video by Lee Meredith. A video by Miriam Felton that shows how to do a heel with shadow wraps can be found here on YouTube. However, I pick up the stitches in a different manner. 
    • Knitting the Shadow Wraps: In a knit row (i.e. you're knitting on the outside of your socks), you knit up to the stitch where you want to turn, and then knit into the stitch in the row below, i.e. you insert the right hand needle from the front into the stitch below (1 on picture below) the next stitch and pull your working yarn through (2 on picture below). Then you put the loop onto the left hand needle (creating a double stitch from the stitch below) - keeping the yarn on the back (3 on picture below). Then you turn and your yarn is now in front, tighten it to make sure that all stitches have the same size and start to purl in the opposite direction. This sequence (knitting int the stitch below and turning) will be called kbelow in the pattern.
    • If you're in a purl row, you purl into the stitch of the row below, i.e. insert the right hand needle from the back into the stitch below and draw your yarn through and put the stitch onto your left hand needle - creating a double stitch. The yarn is in front while you're doing this. Turn your work. The yarn is now on the back of your knitting. Make sure that the stitch is as tight as the other stitches on your needles and start knitting in the opposite direction. This sequence will be called pbelow in the pattern.
    • Picking up the double stitches: When you come to a double stitch you can simply knit / purl it as one. This can create quite thick stitches and small holes that might be uncomfortable and not really neat. That's why (on the knit side, outside of the sock) I knitted the double stitch as follows: slip the first loop of your triple stitch as if to knit and slip the second stitch of the triple stitch as if to knit. Slip these two stitches together back onto the left hand needle (i.e. each of the stitches is turned now). Now knit them together through the back loop - similar to an ssk.
    • On the purl side I worked the triple stitch like a normal purl 3 together.
    • To avoid holes it is quite important to draw your second loops quite tight when turning.
  • kbf: a stitch that mirrors a kfb, there are different ways to do this - here's one YouTube video by Mostly Knitting that shows this. However, my preferred method is this: shown in a YouTube short by strickhexx (in German). Both methods give the same result.
  • Picking up stitches from the gap: a method to avoid holes after finishing the heel flap
  • m1k: make 1 knit stitch
  • m1p: make 1 purl stitch
  • sssk: slip slip slip knit (a left leaning double decrease)
  • k3tog: knit 3 together (a right leaning double decrease)


Instructions

Sock 1

Toe

do a magic CO of 2x10 stitches 

Round 1: k10, place marker, k10
Rounds 2 - 5: k1, kfb, k to 2 bef marker, kbf, k1, slip marker, k1, kfb, k to 2 bef marker, kbf, k1 (-> 2x18 sts)
Round 6: k all
Round 7 = Round 2 (-> 2x20 sts)
Round 8: k all
Round 9 = Round 2 (-> 2x22 sts)
Round 10: k all
Round 11 = Round 2 (-> 2x24 sts)
Rounds 12 - 13: k all
Round 14 = Round 2 (-> 2x26 sts)
Rounds 15 - 16: k all
Round 17 = Round 2  (-> 2x28 sts)

Foot

Round 1: * k1, p1, k2 rep from * to marker, slip marker, k to end 
Round 2: * k2, p1, k1 rep from * to marker, slip marker, k to end

Repeat rounds 1 - 2 23 more times - the stitches before the marker are on the upper side of the foot, the stitches after the marker are on the sole
A chart for this stitch pattern (4 stitches, 2 rows) can be found below.

//increases for heel gusset, i.e. continue stitch pattern on front and increase on sole
Round 49: * k1, p1, k2 rep from * to marker, slip marker, k1, kfb, k to 2 bef marker, kbf, k1
Round 50: * k2, p1, k1 rep from * to marker, slip marker, k to end

Repeat rounds 49 -50 nine more times, now there are 28 sts before the marker (front) and 48 sts after the marker (sole)
During the last round, place a stitch marker after 24 stitches of the sole stitches (i.e. after the half of the sole stitches, this marker will be called MM (middle marker))

//turning the heel
Round 69: * k1, p1, k2 rep from * to marker, slip marker,
    k to MM, k 8, m1k, k1, kbelow, p to MM, p8, mk1p, p1, pbelow
    k to MM, k 6, m1k, k1, kbelow, p to MM, p6, mk1p, p1, pbelow
    k to MM, k 4, m1k, k1, kbelow, p to MM, p4, mk1p, p1, pbelow
    k to MM, k 2, m1k, k1, kbelow, p to MM, p2, mk1p, p1, pbelow
    k to end of round

You have now added an additional 8 sole stitches.

//heel flap
Round 70: 
* k2, p1, k1 rep from * to marker, slip marker, 
   (a) k to MM, k13, ssk, turn, sl1, p to MM, p13 p2tog, turn
   (b) sl1, * k1 p1 k2 rep from * to 2 bef last ssk, k1, p1, ssk, turn, 
        sl1, * p1, k1, p2 rep from * to 2 bef last p2tog, p1, k1, p2tog, turn
   repeat (b) until there are only 28 sts left of the sole stitches
finish the round by: 
sl1, * k1 p1 k2 rep from * to 3 bef last ssk, k1, p1, k1

Cuff

There will be a gap between the sole stitches and the front of the sock. To avoid a hole, pick up 1 or 2 stitches from the gap.

Round 71: * k1, p1, k2 rep from * to marker, slip marker,
    there will be a gap here too, so again, pick up 1 or 2 stitches from the gap, 
     k1, p1, k2 rep from * to 5 or 6 bef end (depending on how many stitches you picked up from the gap), k1, p1, k1, sssk (or ssk if you only picked up 1 stitch from the gap)
Round 72: * k2, p1, k1 rep from * to marker, slip marker, 
    k3tog (or k2tog if you only picked up 1 stitch), k1, p1, k1, * k2, p1, k1 rep from * to end

Round 73: * k1, p1, k2 rep from * to end 
Round 74: * k2, p1, k1 rep from * to end

Repeat round 73 to 74 until your cuff is as long as you want it (I knitted a total of 28 cuff rows)

Ribbing

Ribbing-Round: * k1, p2, k1 rep from * to end 

Knit at least 11 Ribbing rounds then bind off in pattern - using a stretchy bind off


Since the stitch pattern is quite small, it will look symmetrical enough if you knit two socks as described above. However, I wanted them to be really (REALLY!) symmetrical, so I mirrored the stitch pattern for the second sock. This requires also a few other adjustments - that are described below.


Sock 2

Toe: see sock 1

Foot

Round 1: * k2, p1, k1 rep from * to marker, slip marker, k to end
Round 2: * k1, p1, k2 rep from * to marker, slip marker, k to end

Repeat rounds 1 - 2 23 more times

//increases for heel gusset
Round 49: * k2, p1, k1 rep from * to marker, slip marker, k1, kfb, k to 2 bef marker, kbf, k1
Round 50: * k1, p1, k2 rep from * to marker, slip marker, k to end

Repeat rounds 49 -50 nine more times, now there are 28 sts before the marker (front) and 48 sts after the marker (sole)
During the last round, place a stitch marker after 24 stitches of the sole stitches (i.e. after the half of the sole stitches)

//turning the heel

Round 69: * k2, p1, k1 rep from * to marker, slip marker,
    k to MM, k 8, m1k, k1, kbelow, p to MM, p8, mk1p, p1, pbelow
    k to MM, k 6, m1k, k1, kbelow, p to MM, p6, mk1p, p1, pbelow
    k to MM, k 4, m1k, k1, kbelow, p to MM, p4, mk1p, p1, pbelow
    k to MM, k 2, m1k, k1, kbelow, p to MM, p2, mk1p, p1, pbelow
    k to end of round

//heel flap
Round 70: * k1, p1, k2 rep from * to marker, slip marker, 
   (a) k to MM, k13, ssk, turn, sl1, p to MM, p13 p2tog, turn
   (b) sl1, * p1, k3 rep from * to 2 bef last ssk, p1, k1 ssk, turn, 
        sl1, * k1, p3 rep from * to 2 bef last p2tog, k1, p1, p2tog, turn
   repeat (b) until there are only 28 sts left of the sole stitches
   finish the round by: sl1, * p1, k3 rep from * to 3 bef last ssk, p1, k2

Cuff

There will be a gap between the sole stitches and the front of the sock. To avoid a hole, pick up 1 or 2 stitches from the gap.

Round 71: * k2, p1, k1 rep from * to marker, slip marker,
    there will be a gap here too, so again, pick up 1 or 2 stitches from the gap, 
     k2, p1, k1 rep from * to 5 or 6 bef end (depending on how many stitches you picked up from the gap), k2, p1, sssk (or ssk if you only picked up 1 stitch from the gap)
Round 72: * k1, p1, k2 rep from * to marker, slip marker, 
    k3tog (or k2tog if you only picked up 1 stitch), p1, k2, * k1, p1, k2 rep from * to end

Round 73: * k2, p1, k1 rep from * to end 
Round 74: * k1, p1, k2 rep from * to end

Repeat round 73 to 74 until your cuff is as long as you want it (I knitted a total of 28 cuff rows)

Ribbing: see sock 1


Chart

Stitch Pattern Chart


Mittwoch, 9. Oktober 2019

Eckstein Socks

Recently, at a departement store I saw a pair of socks with a heel at a right angle. The claim was that it would be more comfortable to wear because there'd be no crease at the instep. Well, I wanted to try this myself - especially whether they really fitted better. It took me only two attempts to get the shaping right - and even though the socks look a bit strange, they fit rather well.
So, here's the pattern: a pair of socks knitted cuff-down with a right angled heel.


As with most of my sock patterns, I assume that you already have a certain knowledge of how to knit socks. So, this is NOT a stitch-by-stitch and row-by-row pattern.

Creative Commons License
This work by Knitting and so on is licensed under a Creative Commons Attribution-NonCommercial-NoDerivatives 4.0 International License.


Materials
  • about 50 to 70 grams of fingering weight yarn - a bit more if you like your shaft to be longer (the yarn I used is called Schöller+Stahl Sockina Color, here's the link to the yarn's page on Ravelry)
  • 2.5 mm knitting needles - I used Addi Crazy Trios, but you can also use long circulars (with the Magic Loop method) or dpns
  • 2 stitch markers
  • a tapestry needle to weave in ends


Techniques
    • Knitting the Shadow Wraps: In a knit row (i.e. you're knitting on the outside of your socks), you knit up to the stitch where you want to turn, and then knit into the stitch in the row below, i.e. you insert the right hand needle from the front into the stitch below (1 on picture below) the next stitch and pull your working yarn through (2 on picture below). Then you put the loop onto the left hand needle (creating a double stitch from the stitch below) - keeping the yarn on the back (3 on picture below). Then you turn and your yarn is now in front, tighten it to make sure that all stitches have the same size and start to purl in the opposite direction. This sequence (knitting int the stitch below and turning) will be called kbelow in the pattern.
    • If you're in a purl row, you purl into the stitch of the row below, i.e. insert the right hand needle from the back into the stitch below and draw your yarn through and put the stitch onto your left hand needle - creating a double stitch. The yarn is in front while you're doing this. Turn your work. The yarn is now on the back of your knitting. Make sure that the stitch is as tight as the other stitches on your needles and start knitting in the opposite direction. This sequence will be called pbelow in the pattern.
    • In this pattern you'll be asked to kbelow/pbelow into a stitch that is already a double stitch, i.e. creating a triple stitch.
    • Picking up the double / triple stitches: When you come to a double stitch you can simply knit / purl it as one. This can create quite thick stitches and small holes that might be uncomfortable and not really neat. That's why (on the knit side, outside of the sock) I knitted the triple stitch as follows: slip the first loop of your triple stitch as if to knit (1 on picture below). Slip the second stitch of the triple stitch as if to knit - and do the same with the third stitch (2 on picture below). Slip all three stitches together back onto the left hand needle (i.e. each of the stitches is turned now). Now knit them together through the back loop (3 on picture below).
    • On the purl side I worked the triple stitch like a normal purl 3 together.
    • To avoid holes it is quite important to draw your second and third loops quite tight when turning.

Gauge and Sizes
In stockinette stitch, I had 21 rows for 5cm in height and 15 stitches for 5 cm in width.
With my gauge, a heel (size 36-39) is 8 cm high and wide. Therefore, it's about 0.25 cm less for sizes 32-35, and about 0.25cm more for sizes 40-43.

Here are the stitch counts for the sizes given:

shoe sizetotal number
of stitches
short rowsstitches w/o
short rows (top)
stitches w/o
short rows
(below heel)
33-3556 = 2x281945
36-3960 = 2x302046
40-4264 = 2x322156

Instructions for sizes are given as follows: sizes 32-35 [sizes 36-39, sizes 40-43]. I.e. the instructions before the brackets are for sizes 32 to 35 and in brackets first for sizes 36 to 39 and then for sizes 40 to 43.


Instructions

Cuff
CO 56 [60, 64] stitches and join in round - the start of a round will be at the back of the calf
Knit 15 rounds of k2p2-ribbing
Knit 20 rounds of stockinette stitch - during the last round place a stitch marker after 28 [30, 32] stitches, i.e. after half the stitches

Heel
R1: k to 5 [5, 6] sts before half, kbelow, p to end, p to 5 [5, 6] sts before half, pbelow, k to end
R2: k to 2 sts before last double stitch, kbelow (i.e. now there are two double stitches next to each other), p to end, p to 2 before last double stitch, pbelow, k to end
Repeat R2 17 [18, 19] more times

Now you have 19 [20, 21] double stitches on each side of your heel and your piece should look similar to the photo on the right.

R3: k to first double stitch, k this stitch, kbelow (now you have a triple stitch), p to end, p to first double stitch, p this stitch, pbelow (another triple stitch), k to end - make sure to draw your (third) loops tight before turning.
R4: k to first triple stitch, k this stitch, kbelow, p to end, p to first triple stitch, pbelow, k to end
Repeat R4 until you have used up all your double stitches. Now you have finished your heel and can go on knitting in rounds again.

You'll encounter two leftover triple stitches in the next round
  • work the first one (i.e. that was created on the k-side) as before
  • work the second one (i.e. that was created on the p-side) also by turning the loops one by one before knitting it.
Remove the stitch marker you replaced at the half point.


Foot
Knit in stockinette until you are 5 cm short of the desired total foot length.
Place two stitch markers while knitting the last round, one at 1/4 of your stitches (i.e. after 14, [15, 16] stiches - called M1) and one after 3/4 of your stitches (i.e. after 42, [45, 48] stitches - called M2).


Toes
Knit to M1 - the following rounds will start and end at this marker, i.e. the rounds will from now on start at the side of your foot.
R1: k1, ssk, k to 3 bef M2, k2tog, k1, slip marker, k1, ssk1, k to 3 bef M1, k1 (decrease row)
R2: k all
R3 = R2
R4 = R2
R5 = R1 (decrease row)
R6 = R2
R7 = R2
R8 = R1 (decrease row)
R9 = R2
R10 = R2
R11 = R1 (decrease row)
R12 = R2
R13 = R1 (decrease row)
R14 = R2
R15 = R1 (decrease row)
R16 = R2
R17 = R1 (decrease row)
R18 = R1 (decrease row)
R19 = R1 (decrease row)
R20 = R1 (decrease row)

Now you have a total of 16, [20, 24] stitches left, i.e. 2x8, [2x10, 2x12] stitches.
Rearrange your stitches to sit on two needles - with needle 1 holding the stitches between M1 and M2, and the other holding the stitches between M2 and M1.
Cut yarn and graft toes in stockinette stitch.

Weave in ends.
Make two.


Donnerstag, 5. September 2019

Grape Socks

Usually, I have quite a few ideas what to knit next. But sometimes I am out of ideas or have only ideas that don't feel right at the time - that's when I knit socks, plain socks.
My preferred method is knitting toe-up socks - and ever since I first tried it, a flap heel. 
I used the method described here, i.e. Sarah Keller's Generic Toe-Up, Slip-Stitch Heel, Sock Formula, which worked brilliantly for me.


The stitch pattern that I used was as follows (very similar to my Osterspaziergang Socks):
Using a multiple of 4 stitches, the pattern consists of 6 rows.
Row 1: * k1, ssk, yo, k1 repeat from *
Rows 2 and 3: k all
Row 4: * k1, yo, k2tog, k1 repeat from *
Rows 5 and 6: k all


The yarn used here is called Regia Cotton Tutti Frutti Color, colorway 2423 Grapes - here's a link to the yarn's Ravelry page.

Montag, 11. März 2019

Querverweis - or Inclination towards Short Rows

It's always fun to knit socks, and I usually like to try out new ideas to make them more interesting - especially if it makes the self-striping sock yarn stand out in an interesting manner. And since I really like to work with short rows, here's another way to use them for socks - to create a diagonal stripe. Other sock patterns with short rows are my Tipsy Toe Socks, Tipsy Toe Socks 2.0 and Klecks Socks.

The name "Querverweis" is the german word for cross-reference.


This is NOT a complete row-by-row knitting pattern, but just a rough sketch to enable you to knit a similar pair for yourself. It assumes that you have a rough idea of how to knit socks and especially that you know how to do a heel.

Creative Commons License
This work by Knitting and so on is licensed under a Creative Commons Attribution-NonCommercial-NoDerivatives 4.0 International License.


Materials
  • 50 to 100 grams of fingering weight yarn 
  • 2.5mm needles - I used Addi CrasyTrio, but you can use dpns or a circular needle (with Magic Loop method) as well 
  • 2.25mm needles - to knit the ribbing 
  • 2 different stitch markers - one to mark the end of round (called "end marker") and one to mark the middle of the round (called "middle marker")
  • a tapestry needle to weave in ends

Techniques
  • Judy's Magic Cast-On is a technique that gives you live stitches on both sides of your needle - it is generally used for toe-up socks (e.g. in this pattern), but it can be used for other purposes as well. Here's a written description (from Knitty) and here's a YouTube-video by Cat Bordhi and another YouTube-video by Very Pink Knits.
  • Stretchy Bind-Off: see this YouTube-video by Knitting Pipeline.
  • Shadow Wrap Short Rows - used throughout the pattern: as shown in this YouTube video by Lee Meredith. A video by Miriam Felton that shows how to do a heel with shadow wraps can be found here on YouTube. However, the heel knitted here is knitted slightly different because here there are two rounds between the two parts of the heel, i.e. there won't be any triple stitches.
    • Knitting the Shadow Wraps: In a knit row (i.e. you're knitting on the outside of your socks), you knit up to the stitch where you want to turn, and then knit into the stitch in the row below, i.e. you insert the right hand needle from the front into the stitch below the next stitch and pull your working yarn through. Then you put the loop onto the left hand needle (creating a double stitch from the stitch below) - keeping the yarn on the back. Then you turn and your yarn is now in front, tighten it to make sure that all stitches have the same size and start to purl in the opposite direction. This sequence (knitting int the stitch below and turning) will be called kbelow in the pattern.
      If you're in a purl row, you purl into the stitch of the row below, i.e. insert the right hand needle from the back into the stitch below and draw your yarn through and put the stitch onto your left hand needle - creating a double stitch. The yarn is in front while you're doing this. Turn your work. The yarn is now on the back of your knitting. Make sure that the stitch is as tight as the other stitches on your needles and start knitting in the opposite direction. This sequence will be called pbelow in the pattern.
    • Knitting the double stitch.: When you come to a double stitch you can simply knit / purl it as one. This looks well when you're working it in the same direction it was created (i.e. the double stitch was created in a purl row and is also worked in a purl row). However, when you have to knit a double stitch that was created in a purl row, the following sequence made the result look a bit neater. I slipped the first loop of the double stitch to the right hand needle, turned the second loop so that the front leg was now in the back and put the first loop back facing the same way (i.e. the former front leg was now in the back). Then I knitted both loops through the back loop.
  • Flap Heel when knitting toe-up: I used the formular given in this free pattern on Ravelry by Sarah Keller. But you can use the heel type you prefer.
    Other heel tutorials are:


Instructions

First Sock

Toe

With the magic CO cast on 2x10 stitches

To get a rounded toe, my usual toe is:
  • 4 x increases in every row
  • 2 x increases in every 2nd row
  • 2 x increases in every 3rd row
  • then increases every 4th row ... until wide enough
This means:
Round 1: Knit all - while placing stitch markers after 10 sts and at the end of the round - alternatively divide the stitches on your needles in such a way that you know exacly where one half of your stitches are.
Round 2 (increase round): * k1, kfb, k to one before marker, kfb, k1, slip marker repeat from *
Rounds 3 to 5 = increase rounds
Round 6 (neutral round): k all 
Round 7 = increase round
Round 8 = neutral round
Round 9 = increase round
Rounds 10 to 11 = neutral round
Round 12 = increase round
Rounds 13 to 14 = neutral round
Round 15 = increase round
Rounds 16 to 18 = neutral round
Round 19 = increase round
Repeat rounds 16 to 19 until the sock is wide enough and your stitch count is a multiple of 4.

I tend to knit up to a total of 56 stitches, but you might as well have 60, 64 etc. - depending on your size of foot.


Foot
Now it's time to start main pattern. It starts with a short rows sequence that includes a few increases, then a few diagonal rounds and finishes with a 2nd short row sequence where you decrease again.

Short rows part 1 - knitted back and forth:
Basically, each row is 2 sts shorter than the row below and every third row there is an increase on each side.

Row 1: k to 3 sts before the middle marker, kbelow, p to end marker, without turning continue and p to 3 before middle marker, pbelow, k to end marker
Row 2: k to 2 sts before last turn, kbelow, p to end marker, without turning continue and p to 2 before last turn,  pbelow, k to end marker
Row 3: k to 3 sts before last turn, mk1, k1, kbelow, p to end marker, without turning continue and p to 3 sts before last turn, mk1p, p1, pbelow, k to end marker
Row 4: k to 3 sts before last turn, kbelow, p to end marker, without turning continue and p to 3 sts before last turn,  pbelow, k to end marker
Repeat rows 2 to 4 until the last row consists of 2 x 2 sts. Depending on the number of stitches you started with, you may end with a row 2, row 3 or row 4.

Diagonal rows - knitted in the round:
Round 1: k all
Round 2: k1, mk1, k to 3 sts before half marker, ssk, k1; k1, k2tog, k to 2 sts before end marke, mk1, k1
Repeat rounds 1 and 2 nine times more.

Short rows part 2 - knitted back and forth:
Here, every row is 2 sts longer than the one below and there is a decrease on each side every third row. It's knitted around the middle marker.

Row 1: k to half marker, k2, kbelow, p to middle marker and continue without turning, p2, pbelow, k2
Row 2: k up to and including last turn, k1, kbelow,  p to middle marker and continue without turning, p up to and including last turn, p1, p below, k to middle marker.
Row 3: k up to and including last turn, ssk, kbelow,  p to middle marker and continue without turning, p up to and including last turn, p2tog, p below, k to middle marker.
Row 4: k up to and including last turn, k1, kbelow,  p to middle marker and continue without turning, p up to and including last turn, p1, p below, k to middle marker.
Repeat rows 2 to 4, until the last row ends 1 or 2 sts before the middle marker - depending on whether you count the "below stitch".
Row 5: You are at the middle marker now: k to end marker

Now you should have the same stitch count that you started with.

Continue in plain stockinette until you need to start the heel.

Then knit your preferred kind of heel.

Cuff
I knitted straight stockinette (I like my sock cuffs rather short), but for longer socks you can also repeat the short row pattern of the foot. 

Ribbing
Switch to 2.25 mm needles.

Knit 15 rows of p1k2p1-ribbing (i.e. k2p2 ribbing with an offset of 1 purl stitch) and bind off in pattern.


The second sock is knitted in the same way - except for the heel that is started on the other side.


Donnerstag, 24. Januar 2019

Strawberry Socks

After finishing two lovely brioche scarfs (photo on Instagram, tutorial to follow soon), I was a bit out of inspiration and decided to knit a plain pair of socks with some self striping yarn I had bought some time before (Regia Cotton Tutti Frutti, colorway Strawberry, link to the yarn's Ravelry page).

For self striping yarn I prefer patterns that are visible in spite of the yarn, i.e. the detail of most lace patterns is lost in self striping yarn. So usually I like a pattern that's either interestingly constructed so that the color changes provide interesting shapes (e.g. my Tipsy Toe Socks or the Skew Socks by Lana Holden) or a pattern that disrupts the stripes (a bit), e.g. by knitting into a stitch below or with slip stitches. Since I hadn't done much with slip stitches before, I decided on them. And - as usual - the first try didn't look the way I wanted :)


In the end I used the slip stitches as provided by the Slip Stitch Lines pattern on Ravelry. But I only used the stitch pattern together with my preferred sock construction:
  • I knitted the socks toe-up - the way I usually do (see for example this pattern
  • I decided to knit only three vertical lines of slip stitches and placed them on the outer side of the sock - with a distance of three stitches inbetween
  • I did an afterthought heel (as I did with these socks)

Sonntag, 2. Dezember 2018

Tipsy Toe Socks 2.0

For a KAL I wanted to knit another pair of socks - but something that wouldn't bore me and something that would bring out the colors of self-striping yarn. I had always thought that my Tipsy Toe Socks were interesting at the start (the toes) but slightly boring for the rest of the pattern. That's why I wanted to continue a pattern of wedges for the whole sock. It took me a while to a) get it right and b) choose the right yarn for the pattern. But now that they are finished I really like them.
These socks are knitted toe-up, but unlike the original Tipsy Toe Sock pattern (where I used German short rows for the wedges, but not the heel) I used only Shadow wrap short rows here. For me these short rows looked neater than any other type that I had tried to knit in the round.


Creative Commons License
This work by Knitting and so on is licensed under a Creative Commons Attribution-NonCommercial-NoDerivatives 4.0 International License.


Materials
  • 50 to 80 grams of fingering weight yarn - depending on how long you like your sock cuff; for the rainbow colored ones I used Lang Yarns Twin Soxx (color 909, here's a link to the yarn's Ravelry page) and for the blue-purple one Vendita Sockenwolle (bought at Aldi's a few years ago - here's a link to the yarns Ravelry page).
  • 2.5mm needles - I used Addi CrasyTrio, but you can use dpns or a circular needle (with Magic Loop method) as well
  • 2.25mm needles - to knit the ribbing
  • 2 different stitch markers - one to mark the end of round (called "end marker") and one to mark the middle of the round (called "middle marker")
  • a tapestry needle to weave in ends


Techniques
  • Judy's Magic Cast-On is a technique that gives you live stitches on both sides of your needle - it is generally used for toe-up socks (e.g. in this pattern), but it can be used for other purposes as well. Here's a written description (from Knitty) and here's a YouTube-video by Cat Bordhi and another YouTube-video by Very Pink Knits.
  • Shadow Wrap Short Rows - used throughout the pattern: as shown in this YouTube video by Lee Meredith. A video by Miriam Felton that shows how to do a heel with shadow wraps can be found here on YouTube. However, the heel knitted here is knitted slightly different because here there are two rounds between the two parts of the heel, i.e. there won't be any triple stitches.
    • Knitting the Shadow Wraps: In a knit row (i.e. you're knitting on the outside of your socks), you knit up to the stitch where you want to turn, and then knit into the stitch in the row below, i.e. you insert the right hand needle from the front into the stitch below the next stitch and pull your working yarn through. Then you put the loop onto the left hand needle (creating a double stitch from the stitch below) - keeping the yarn on the back. Then you turn and your yarn is now in front, tighten it to make sure that all stitches have the same size and start to purl in the opposite direction. This sequence (knitting int the stitch below and turning) will be called kbelow in the pattern.
      If you're in a purl row, you purl into the stitch of the row below, i.e. insert the right hand needle from the back into the stitch below and draw your yarn through and put the stitch onto your left hand needle - creating a double stitch. The yarn is in front while you're doing this. Turn your work. The yarn is now on the back of your knitting. Make sure that the stitch is as tight as the other stitches on your needles and start knitting in the opposite direction. This sequence will be called pbelow in the pattern.
    • Knitting the double stitch.: When you come to a double stitch you can simply knit / purl it as one. This looks well when you're working it in the same direction it was created (i.e. the double stitch was created in a purl row and is also worked in a purl row). However, when you have to knit a double stitch that was created in a purl row, the following sequence made the result look a bit neater. I slipped the first loop of the double stitch to the right hand needle, turned the second loop so that the front leg was now in the back and put the first loop back facing the same way (i.e. the former front leg was now in the back). Then I knitted both loops through the back loop.


Gauge and Sizes
When I knitted these 19 rows of stockinette gave 5cm in height and 16 sts (stockinette) gave 5 cm in width. But If you've knitted socks before, you'll know which total stitch count to aim for. Here's the table that shows you the usual amount of stitches you need for your shoe size. Furthermore, it shows over how many stitches you're going to knit the heel (after some increases) and how these stitches are distributed, i.e. how many stitches are used for short rows at each side.
E.g. for size 36 you work the heel over 34 stitches, i.e. you do short rows for 11 stitches on both sides and 12 stitches in the middle are knitted normally.

shoe sizetotal number of stitchesheel stitches (after increasing)distribution of heel stitches
32-3556 = 2x2828 + 4 = 3211 - 10 - 11
36-3960 = 2x3030 + 4 = 3411 - 12 - 11
40-4364 = 2x3232 + 4 = 3612 - 12 - 12

Instructions for sizes are given as follows: sizes 32-35 [sizes 36-39, sizes 40-43]. I.e. the instructions before the brackets are for sizes 32 to 35 and in brackets first for sizes 36 to 39 and then for sizes 40 to 43.


Instructions

First Sock

Toe
Do a magic CO of 2x10 sts [2x10, 2x12]
Round 1: k8 [k8, k10], kfb k1, place marker ("half marker"), k1 kfb k8 [k8, k10], place marker ("end marker")
Round 2: k1, kfb, k to 2 bef half marker, kfb, k1, slip half marker, k1, kfb, k to 2 bef end marker, kfb, k1
Round 3: k to 2 bef half marker, kfb, k1, slip half marker, k1, kfb, k to end
Repeat rounds 2 and 3 four more times. (Now you have 2x26 [2x26, 2x28] sts on your needles)
For sizes 36-39 and 40-43 repeat round 2 once more.

Now you have 2x26 [2x28, 2x30] sts on your needles

Round 12 [13, 13]: k all
Round 13 [14, 14] = Round 2
Round 14 [15, 15]: k all
Round 15 [16, 16] = Round 3

Now you have 2x29 [2x31, 2x33] sts on your needles (i.e. 1 too much for the stitch count you're actually aiming for) - and the short row wedges will be started.

Wedge 1
Round 16: k to 4 bef half marker, kbelow, p to end (and without changing direction) p to 4 bef half marker, pbelow, k to end
Round 17: k to 8 bef half marker, kbelow, p to end (and without changing direction) p to 8 bef half marker, pbelow, k to end
Round 18: k to 12 bef half marker, kbelow, p to end (and without changing direction) p to 12 bef half marker, pbelow, k to end
Round 19: k to 16 bef half marker, kbelow, p to end (and without changing direction) p to 16 bef half marker, pbelow, k to end
Round 20: k to 20 bef half marker, kbelow, p to end (and without changing direction) p to 20 bef half marker, pbelow, k to end
Round 21: k to 24 bef half marker, kbelow, p to end (and without changing direction) p to 24 bef half marker, pbelow, k to end

Round 22: k1, ssk, k to 3 bef end marker, k2tog, k1
Round 23: k to 2 bef half marker, kfb, k1, slip half marker, k1, kfb, k to end

Wedge 2
Round 24: k to 6 bef half marker, kbelow, p to end (and without changing direction) p to 6 bef half marker, pbelow, k to end
Round 25: k to 12 bef half marker, kbelow, p to end (and without changing direction) p to 12 bef half marker, pbelow, k to end
Round 26: k to 18 bef half marker, kbelow, p to end (and without changing direction) p to 18 bef half marker, pbelow, k to end
Round 27: k to 24 bef half marker, kbelow, p to end (and without changing direction) p to 24 bef half marker, pbelow, k to end

Round 28: k1, ssk, k to 3 bef end marker, k2tog, k1
Round 29: k all

Wedge 3 = Wedge 1 (i.e. Rounds 16 to 21)

Now you've finished the toe and 2x28 [2x30, 2x32] sts on your needles.

Foot
Round 1: k all

Wedge 4
Round 2: k to 4 bef half marker, kbelow, p to end (and without changing direction) p to 4 bef half marker, pbelow, k to end
Round 3: k to 8 bef half marker, kbelow, p to end (and without changing direction) p to 8 bef half marker, pbelow, k to end
Round 4: k to 12 bef half marker, kbelow, p to end (and without changing direction) p to 12 bef half marker, pbelow, k to end
Round 5: k to 16 bef half marker, kbelow, p to end (and without changing direction) p to 16 bef half marker, pbelow, k to end
Round 6: k to 20 bef half marker, kbelow, p to end (and without changing direction) p to 20 bef half marker, pbelow, k to end
Round 7: k to 24 bef half marker, kbelow, p to end (and without changing direction) p to 24 bef half marker, pbelow, k to end

Round 8: k all
Repeat Round 8 once [twice, three times] more

Wedge 5
Round 10: k to half marker,
    k4, kbelow, p8, pbelow
    k12, kbelow, p16, pbelow
    k20, kbelow, p24, pbelow
    k28, kbelow, p32, pbelow
    k36, kbelow, p40, pbelow
    k44, kbelow, p48, pbelow
    k to end

Round 11: k all

Wedge 6
Round 12: k to half marker,
   k to 4 bef end kbelow, p to half marker p to 4 bef end, pbelow,
   k to 8 bef end kbelow, p to half marker p to 8 bef end, pbelow,
   k to 12 bef end kbelow, p to half marker p to 12 bef end, pbelow,
   k to 16 bef end kbelow, p to half marker p to 16 bef end, pbelow,
   k to 20 bef end kbelow, p to half marker p to 20 bef end, pbelow,
   k to 24 bef end kbelow, p to half marker p to 24 bef end, pbelow,
   k to end
Round 13: k all
Repeat Round 13 once [twice, three times] more

Wedge 7
Round 14: k4, kbelow, p8, pbelow
    k12, kbelow, p16, pbelow
    k20, kbelow, p24, pbelow
    k28, kbelow, p32, pbelow
    k36, kbelow, p40, pbelow
    k44, kbelow, p48, pbelow
    k to end

Knit in rounds until you have to start the heel.

Heel
If you want to knit a short row heel (e.g. shadow wrap heel, as described here) you usually start it when you're about 5 cm short of the total foot length.
But I like to make my heels a bit bigger, so I do a few increases at the sides of the "heel" half and I start a bit earlier, about 6 to 6.5 cm short of the total length.

Round 1: k to half marker, slip half marker, kfb, k to 1 bef end marker, kfb,
Round 2: k all
Repeat rounds 1 and 2 once more - now the heel part of your socks has 4 (=2x2) more stitches than the other part

And now for the real heel - this is worked only over the stitches after the half marker:
Round 5:
(a) k to one stitch before end marker, kbelow
(b) slip shadow wrap stitch, p to one stitch before half marker, pbelow
(c) slip shadow wrap stitch, k to one stitch before the last shadow wrap, kbelow
(d) slip shadow wrap stitch, p to one stitch before the last shadow wrap, pbelow
Repeat (c) and (d) until the remaining (knitted) stitches are only one third of your heel stitches.
k to end of row (making sure to pick up the shadow wraps, i.e. to knit the twin-stitches as one stitch) and mk1l (this last increase is to avoid a hole at the gap)

Round 6: k to half marker, slip half marker, mk1r (also to avoid a hole), k to end (also making sure to pick up the shadow wraps) - now the heel part of your socks has 6 (=4+2) more stitches than the other part
Round 7 and 8: k all

Round 9: k to half marker,
(a) k two thirds of the heel stitches, kbelow
(b) slip shadow wrap stitch, p one third of the heel stitches, pbelow
(c) slip shadow wrap stitch, k up to and including the twin-stitch, kbelow
(d) slip shadow wrap stitch, p up to and including the twin-stitch, pbelow
Repeat (c) and (d) until the twin-stitches on both sides are one stitch away from the markers (end marker and half marker),
k to end of row and mk1l

Round 10: k to half marker, slip half marker, mk1r, k to end  - now the heel part of your socks has 8 (=6+2) more stitches than the other part
Round 11: k all

Now the extra stitches for the heel (four per side) must be decreased again.
Round 12: k to half marker, slip half marker, ssk, k to 2 bef end marker, k2tog
Round 13: k all
Repeat rounds 12 and 13 three times more.


Cuff
Knit rounds 1 to 11 of the Foot rounds, i.e. wedges 4 and 5.
If you want longer cuffs you can also go on and knit rounds 12 to 14 of the Foot rounds as well (wegdes 6 and 7).

End with about 10 rounds of k2p2-ribbing - knitted with the 2.25mm needles.
Bind off loosely in ribbing pattern.


Second Sock
Knit toe and foot like the first sock, but start the heel on the opposite side, i.e. when knitting the first sock, the instructions told you to start the heel after the half marker (second half of the stitches), so for the second sock you should start it right at the beginning of the round (over the first half of the stitches).


Freitag, 2. November 2018

The Right Yarn for the Right Pattern

For #socktober I wanted to knit a pair of short row socks - with a similar toe construction to the Tipsy Toe Socks, but with a bit more of a short row pattern for the main part. At first I wasn't quite sure about the effect I wanted to achieve. That's why I tried it a few times - and with different yarns. But once I had roughly settled for a pattern (or rather a pattern idea), I found out that not every kind of variegated yarn worked for it and - as a general rule - how important it is to choose the right yarn for the right pattern.

Here's how it went for me when trying to knit these socks:


  • Upper Left - 1st Attempt: This was my first attempt and done with Lang Yarns Twin Wash - the yarn worked beautifully for the shape I had in mind - especially with the longer dark yarn between the lovely rainbow color changes, but I hadn't quite fixed how exactly the socks were supposed to look. I tried once with a shadow wrap heel and once with a sweet tomato heel, but I wasn't quite happy with both. So in order to save this yarn (i.e. not to frog it too often) I tried the same shape with different yarn. 
  • Upper Right - 2nd Attempt: For the 2nd try I used yarn from years ago (to be exact from the second pair of Pieces of Eight Mitts) - a beautiful autumnal dark-green, red and yellow combination of Schoeller+Stahl Fortissima Mexico. When trying the socks with this yarn, I found out that the color change was a bit too long to look nice. I finished the sock anyway, just to frog it later on. But at least I figured out, the actual pattern I wanted to knit.
  • Lower Left - 3rd Attempt: So I tried again, with a yarn that had much shorter color changes: a Regia Mosaik Color colorway I bought this year on holiday. The yarn is beautiful, but the lack of longer strands of one color results in a lack of color blocks that you usually get from short rows and therefore the shape wasn't quite visible. But while knitting the tip of this sock, I finally figured out, how to best do the short rows in the round (hint: with shadow-wraps). 
  • Lower Right - 4th Attempt: I then dived into my stash again and found some of last year's cheap Aldi yarn. Since I knew what socks pattern and what heel I wanted to knit (plus I had figured out a way to do nice looking short rows in the round), it worked a treat - and I finished a pair of them and I am really happy with the look.

Since the pattern also fits the first yarn I tried it with, I have started another pair with my Lang Yarns Twin Socks yarn. I guess I will also write and publish the pattern for it.

As an aside, this sock was the first time, I tried to use shadow-wrap short rows for something other than a heel - and I really liked how neat they looked.

Donnerstag, 23. August 2018

Socks with Mini-Cables ...

... or "It Is Important to Choose the Right Yarn"

I wanted to knit a pair of socks with some sock yarn (slightly variegated) that I had bought a few years ago. My pattern "requirements" were simply that I wanted an easy pattern, but not too boring. So I decided on a pattern of mini cables - C2B cables to be precise.
When I had knitted a few of the pattern repeats I noticed that the cabling was barely visible :/ Nevertheless, I finished because ... well ... I wanted a sock that fitted me and I didn't mind too much about the pattern. But I learned (again) that it is quite important to choose a yarn that fits the stitch pattern you're using. The yarn that I used was a bit too wild in color (and probably too dark), so that the stitch pattern didn't really show.
But anyway, I've got a new pair of socks - knitted toe up with an afterthought heel.
Below (in section "Stitch Pattern) you find a photo of the same pattern knitted in yarn with a solid color.


This is NOT a complete knitting pattern, but just a sketch or rather a stitch pattern (over 8 stitches and 12 rows) that can be used for socks. It only works for socks with a number of stitches that is a multiple of 8.
For socks there are many general instructions and tutorials around, I have linked to some in the Techniques section of this post.

Creative Commons License
This work by Knitting and so on is licensed under a Creative Commons Attribution-NonCommercial-ShareAlike 4.0 International License.


Materials
  • about 60 to 80 grams of fingering weight yarn
  • 2.5 mm needles, e.g. dpns
  • a tapestry needle (for grafting and weaving in ends)
  • scrap yarn (for afterthought heel)

Techniques

Stitch Pattern
The stitch pattern consists of a repeat of 8 stitches and 12 rounds.
Round 1: * p1 C2B p1 k2 p1 repeat from *
Round 2 and all even rounds: * p1 k2 p1 repeat from *
Round 3 = Round 1
Round 5 = Round 1
Round 7: * p1 k2 p1 C2B  p1 repeat from *
Round 9 = Round 7
Round 11 = Round 7
Below you can find a chart as well as a photo of this stitch pattern in a solid color yarn.


Instructions

Toe

With the magic CO cast on 2x10 stitches

To get a rounded toe, my usual toe is:
  • 4 x increases in every row
  • 2 x increases in every 2nd row
  • 2 x increases in every 3rd row
  • then increases every 4th row ... until wide enough
This means:
Round 1: Knit all - while placing stitch markers after 10 sts and at the end of the round - alternatively divide the stitches on your needles in such a way that you know exacly where one half of your stitches are.
Round 2 (increase round): * k1, kfb, k to one before marker, kfb, k1, slip marker repeat from *
Rounds 3 to 5 = increase rounds
Round 6 (neutral round): k all 
Round 7 = increase round
Round 8 = neutral round
Round 9 = increase round
Rounds 10 to 11 = neutral round
Round 12 = increase round
Rounds 13 to 14 = neutral round
Round 15 = increase round
Rounds 16 to 18 = neutral round
Round 19 = increase round
Repeat rounds 16 to 19 until the sock is wide enough and your stitch count is a multiple of 8.

Remove the marker that marks the middle of the round, but leave the one that marks the beginning of the round.

Foot
Knit the front part in pattern (I knitted 3.5 repeats - in width) and the back (sole) part in plain stockinette.

Continue until the piece is long enough to start the heel.

Heel Preparation
Slip the front stitches and knit the stitches of the sole with scrap yarn.

Cuff
Like foot, but with pattern on front and back

Ribbing
Knit 9 rows of p1k2p1-ribbing (i.e. k2p2 ribbing with an offset of 1 purl stitch) and bind off in pattern.

Finish heel.

Weave in ends.
Make two.

Sonntag, 20. Mai 2018

Lovely Little Stitch Pattern(s)

When I went to the city center this friday I bought a ball of cotton sock yarn (Regia Cotton Tutti Frutti to be exact, here's the link to the yarn's Ravelry page) - in a lovely fruity self-striping color way. I was planning to do something with short rows - though I wasn't sure what exactly. My first try didn't really work the way I planned, so I frogged it ... and decided to knit a plain sock (yes, no short rows), but I wanted a nice stitch pattern at least. So I searched Ravelry for inspiration. The best sock patterns are usually knitted over a small stitch count (i.e. repeats over 4 stitches or so) - and it's a plus if they're stretchy.

In the end, I used the stitch pattern from the Syncopation Socks (pattern by Mary Heininger - available on Ravelry). It's a really simple rib pattern, but the effect is gorgeous. Since I'm usually too lazy to read patterns (unless I really want to learn a new technique), I only used the stitch pattern and did the construction that I currently like most (toe-up and a shadow-wrap heel).


Creative Commons License
This work by Knitting and so on is licensed under a Creative Commons Attribution-NonCommercial-ShareAlike 4.0 International License.

Other stitch patterns that I really want to try with socks are:
What are your favorite stitch patterns for socks?

Donnerstag, 10. Mai 2018

Tipsy Toe Socks

When using self striping sock yarn it's always fun to try different ways of knitting common shapes like sock toes, because the self striping yarn will create attractive patterns. A while ago I had the idea of knitting slanted toes and using short rows to even them out before getting to the heel. I tried and frogged quite a few times before I actually managed to knit something to fit around human feet, but I finally made it.
These socks are knitted from the toe up, but they start at an angle and continuing with short row wedges. This slanted effect shows best with variegated yarn ... it's possible to knit it with a solid yarn, but you won't see the slanted effect. I've used and described a shadow wrap heel, but you can use any toe-up heel you like.
As with many of my patterns, this is not exactly a beginner pattern. It's also helpful, if you've knitted another pair of socks before.


Eine deutsche Version dieser Anleitung gibt es hier.
A German version of this pattern is available here.

Creative Commons License
This work by Kniting and so on is licensed under a Creative Commons Attribution-NonCommercial-ShareAlike 4.0 International License.


Materials
  • 50 to 80 grams of fingering weight yarn - depending on how long you like your sock cuff; for the lighter ones (in pastell colors) I used Lana Grossa Meilenweit Special Confetti (color 2508; here's the link to the yarn's Ravelry page) for the darker ones (dark blue, brown, orange etc.) I used Vendita Sockenwolle bought at Aldi's about three years ago (here's a link to the yarn's Ravelry page)
  • 2.5mm needles - I used Addi CrasyTrio, but you can use dpns or a circular needle (with Magic Loop method) as well
  • 2 different stitch markers - one to mark the end of round (called "end marker") and one to mark the middle of the round (called "middle marker")
  • a tapestry needle to weave in ends

Techniques
  • Judy's Magic Cast-On is a technique that gives you live stitches on both sides of your needle - it is generally used for toe-up socks (e.g. in this pattern), but it can be used for other purposes as well. Here's a written description (from Knitty) and here's a YouTube-video by Cat Bordhi and another YouTube-video by Very Pink Knits.
  • German Short Rows (t+p): when you turn, bring yarn to the front and pull it back so that a sort of double-stitch is created, then knit back as usual - when you have to knit the double-stitch, be careful to knit it as one stitch (see also https://www.youtube.com/watch?v=P6n561SMZXQ); this method has the advantage the no picking up of stitches is necessary. In the pattern, this stitch will be called t+p (turn and pull).
  • Shadow Wrap Short Rows - as used for the heel: as shown in this YouTube video by Lee Meredith. A video by Miriam Felton that shows how to do a heel with shadow wraps can be found here on YouTube. However, the heel knitted here is knitted slightly different because here there are two rounds between the two parts of the heel, i.e. there won't be any triple stitches.

Gauge and Sizes
When I knitted these 19 rows of stockinette gave 5cm in height and 16 sts (stockinette) gave 5 cm in width. But If you've knitted socks before, you'll know which total stitch count to aim for. Here's the table that shows you the usual amount of stitches you need for your shoe size. Furthermore, it shows over how many stitches you're going to knit the heel (after some increases) and how these stitches are distributed, i.e. how many stitches are used for short rows at each side.
E.g. for size 36 you work the heel over 34 stitches, i.e. you do short rows for 11 stitches on both sides and 12 stitches in the middle are knitted normally.

shoe sizetotal number of stitchesheel stitches (after increasing)distribution of heel stitches
32-3556 = 2x2828 + 4 = 3211 - 10 - 11
36-3960 = 2x3030 + 4 = 3411 - 12 - 11
40-4364 = 2x3232 + 4 = 3612 - 12 - 12

Instructions for sizes are given as follows: sizes 32-35 [sizes 36-39, sizes 40-43]. I.e. the instructions before the brackets are for sizes 32 to 35 and in brackets first for sizes 36 to 39 and then for sizes 40 to 43.


Instructions

First Sock

Toe
Do a magic CO of 2x10 sts [2x10, 2x12]
Round 1: k8 [k8, k10], kfb k1, place marker ("half marker"), k1 kfb k8 [k8, k10], place marker ("end marker")
Round 2: k1, kfb, k to 2 bef half marker, kfb, k1, slip half marker, k1, kfb, k to 2 bef end marker, kfb, k1
Round 3: k to 2 bef half marker, kfb, k1, slip half marker, k1, kfb, k to end
Repeat rounds 2 and 3 four more times. (Now you have 2x26 [2x26, 2x28] sts on your needles)
For sizes 36-39 and 40-43 repeat round 2 once more.

Now you have 2x26 [2x28, 2x30] sts on your needles

Round 12 [13, 13]: k all
Round 13 [14, 14] = Round 2
Round 14 [15, 15]: k all
Round 15 [16, 16] = Round 3

Now you have 2x29 [2x31, 2x33] sts on your needles (i.e. 1 too much for the stitch count you're actually aiming for) - and the short row wedges will be started.

Wedge 1
Round 16: k to 4 bef half marker, t+p, p to end (and without changing direction) p to 4 bef half marker, t+p, k to end
Round 17: k to 8 bef half marker, t+p, p to end (and without changing direction) p to 8 bef half marker, t+p, k to end
Round 18: k to 12 bef half marker, t+p, p to end (and without changing direction) p to 12 bef half marker, t+p, k to end
Round 19: k to 16 bef half marker, t+p, p to end (and without changing direction) p to 16 bef half marker, t+p, k to end
Round 20: k to 20 bef half marker, t+p, p to end (and without changing direction) p to 20 bef half marker, t+p, k to end
Round 21: k to 24 bef half marker, t+p, p to end (and without changing direction) p to 24 bef half marker, t+p, k to end

Round 22: k1, ssk, k to 3 bef end marker, k2tog, k1
Round 23: k to 2 bef half marker, kfb, k1, slip half marker, k1, kfb, k to end

Wedge 2
Round 24: k to 6 bef half marker, t+p, p to end (and without changing direction) p to 6 bef half marker, t+p, k to end
Round 25: k to 12 bef half marker, t+p, p to end (and without changing direction) p to 12 bef half marker, t+p, k to end
Round 26: k to 18 bef half marker, t+p, p to end (and without changing direction) p to 18 bef half marker, t+p, k to end
Round 27: k to 24 bef half marker, t+p, p to end (and without changing direction) p to 24 bef half marker, t+p, k to end

Round 28: k1, ssk, k to 3 bef end marker, k2tog, k1
Round 29: k all

Wedge 3 = Wedge 1 (i.e. Rounds 16 to 21)

Now you've finished the toe and 2x28 [2x30, 2x32] sts on your needles.

Foot
Knit plain stockinette rows until it's time to start the heel.

Heel
If you want to knit a short row heel (e.g. shadow wrap heel, as described here) you usually start it when you're about 5 cm short of the total foot length.
But I like to make my heels a bit bigger, so I do a few increases at the sides of the "heel" half and I start a bit earlier, about 6 to 6.5 cm short of the total length.

Round 1: k to half marker, slip half marker, kfb, k to 1 bef end marker, kfb,
Round 2: k all
Repeat rounds 1 and 2 once more - now the heel part of your socks has 4 (=2x2) more stitches than the other part

And now for the real heel - this is worked only over the stitches after the half marker:
Round 5:
(a) k to one stitch before end marker, knit into the mother stitch of the next st (i.e. do a shadow wrap), turn
(b) slip shadow wrap stitch, p to one stitch before half marker, purl into the mother stitch of the next st, turn
(c) slip shadow wrap stitch, k to one stitch before the last shadow wrap, knit into the mother stitch of the next st, turn
(d) slip shadow wrap stitch, p to one stitch before the last shadow wrap, purl into the mother stitch of the next st, turn
Repeat (c) and (d) until the remaining (knitted) stitches are only one third of your heel stitches.
k to end of row (making sure to pick up the shadow wraps, i.e. to knit the twin-stitches as one stitch) and mk1l (this last increase is to avoid a hole at the gap)

Round 6: k to half marker, slip half marker, mk1r (also to avoid a hole), k to end (also making sure to pick up the shadow wraps) - now the heel part of your socks has 6 (=4+2) more stitches than the other part
Round 7 and 8: k all

Round 9: k to half marker,
(a) k two thirds of the heel stitches, knit into the mother stitch of the next st (i.e. do a shadow wrap), turn
(b) slip shadow wrap stitch, p one third of the heel stitches, purl into the mother stitch of the next stitch, turn
(c) slip shadow wrap stitch, k up to and including the twin-stitch, knit into the mother stitch of the next st (i.e. do a shadow wrap), turn
(d) slip shadow wrap stitch, p up to and including the twin-stitch, purl into the mother stitch of the next st (i.e. do a shadow wrap), turn
Repeat (c) and (d) until the twin-stitches on both sides are one stitch away from the markers (end marker and half marker),
k to end of row and mk1l

Round 10: k to half marker, slip half marker, mk1r, k to end  - now the heel part of your socks has 8 (=6+2) more stitches than the other part
Round 11: k all

Now the extra stitches for the heel (four per side) must be decreased again.
Round 12: k to half marker, slip half marker, ssk, k to 2 bef end marker, k2tog
Round 13: k all
Repeat rounds 12 and 13 three times more.

Cuff
Knit plain stockinette rounds and end with about 10 rounds of k2p2-ribbing.
Bind off loosely in ribbing pattern.


Second Sock
Knit toe and foot like the first sock, but start the heel on the opposite side, i.e. when knitting the first sock, the instructions told you to start the heel after the half marker (second half of the stitches), so for the second sock you should start it just at the beginning of the round (over the first half of the stitches).