Posts mit dem Label Home Decor werden angezeigt. Alle Posts anzeigen

Freitag, 31. März 2023

Aunt Dahlia

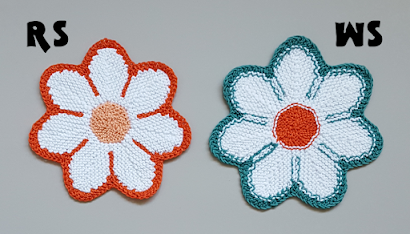
Knitting experiments are fun. You can try what's possible with a range of techniques. So, after knitting my Garter Stitch Snowflake, I wanted to try something similar with a contrasting color to contour the petals. 

This doily (placemat, potholder ...) consists of 60 short-row diamonds that stack up to be triangles which in turn form a (slightly angular) circle – or a spiky hexagon. It starts with a provisional cast on and is finished by grafting in garter stitch. It is quite fiddly and not a beginner pattern

This knitting pattern is available via


The pattern PDF contains 

  • written row-by-row instructions for knitting this piece – including 8 in-process photos
  • an explanation (plus schematic) of the construction, i.e. how the diamonds stack up to create the whole piece
  • chart(s) of one diamond
  • short photo tutorials for the following techniques
    • provisional CO with a crochet hook and undoing it
    • grafting in garter stitch
    • short rows with wrap and turn and picking up the wraps 
    • crochet CO (at the edge of a knitted piece)
    • weaving in yarn while carrying it (backwards and forwards)


To knit this piece you need the following materials:
  • Sports weight yarn 
    • 120 metres in MC (main colour)
    • 50 metres in CC (contour colour)
  • 2.5 mm knitting needles 
  • a crochet hook of a similar size (I used a 2.5mm hook)  
  • scrap yarn
  • a tapestry needle – for grafting and to weave in ends
The finished piece knitted in Sports weight yarn measures 30 - 33 cm in diameter.
Another one knitted in Lace weight yarn measured 26 - 29 cm in diameter.

Wrong side of the piece

Freitag, 2. September 2022

Garter Stitch Snowflake

I've always wanted to do a big lacy half-circle shawl all in garter stitch. This doily started out as a test piece for that kind of shawl. However, I liked the small piece quite a lot, so I tried to figure out how to do it in a seamless full circle – and here it is. 

This doily consists of diamonds that stack up to be triangles which in turn form a (slightly angular) circle. It starts with a provisional cast on and is finished by grafting in garter stitch (just before knitting and binding off the last stitches). It is NOT A BEGINNER PATTERN.


The knitting pattern is available via


The pattern PDF is 12 pages long and contains
  • written row-by-row instructions for knitting this piece – including 6 photos
  • schematic of the construction, i.e. how the diamonds stack up to create the whole piece
  • chart(s) of one diamond
  • short photo tutorials for the following techniques
    • provisional CO with a crochet hook and undoing it
    • grafting in garter stitch
    • short rows with wrap and turn and picking up the wraps 
    • crochet CO (at the edge of a knitted piece)
    • backwards loop CO


To knit this piece you need the following materials
  • about 250 metres of light fingering weight yarn (for the blue piece in the photos I used Creative Melange Lace by Rico Design, colorway 011 - here's the yarn's Ravelry page, the red one is made with Wollmeise Lace, colorway Allegria - here's the yarn's Ravelry page)
  • 2.5 mm knitting needles 
  • a crochet hook of a similar size (I used a 2.5mm hook)  
  • scrap yarn
  • a tapestry needle – for grafting and to weave in ends
Knitted in light fingering weight yarn the finished piece has a diameter of about 42 cm.
I did not knit a swatch, but measuring from the finished piece, 13 sts give about 5 cm in width.


Freitag, 26. November 2021

Starry Christmas Decorations - Knitted

The first sunday of advent is coming up, which is the time to decorate your space as christmassy as possible. And for me stars - knitted and otherwise - are the best way to do so. 

So here are two seasonal patterns that help to bring a starry sparkle to your home.

Stella Star-Shaped Potholders

These potholders (doilies, coasters) are knitted flat and in garter stitch. This pattern was published two years ago. Lately, I have completely reviewed it and added two more variations. 

The new pattern PDF 14 pages long and contains:

  • the complete written patterns for stars in two sizes including charts
  • a general pattern how to knit stars in other sizes – containing also a photo tutorial
  • three further variations of this pattern (see photos below)
    • a lacy variation of this star – written pattern and a chart
    • a pattern for a two-colour variation – written pattern, a chart and detailed instructions how to undo the provisional CO in two colours and how to do the grafting in two colours
    • a three-colour variation – chart only 
  • short photo tutorials for the following techniques
    • provisional cast on with a crochet hook and how to undo it
    • grafting in garter stitch
    • intarsia

You can buy this pattern


Sternchen 3D-Stars

Even though these stars are 3-dimensional they are knitted flat. They have six points, are constructed of short rows and knitted (nearly) all in garter stitch. They come in four sizes and can be used to decorate your house for Christmas.

The pattern PDF contains

  • a written pattern for four sizes of these little stars (ranging from 6 to 14 cm in diameter - if knitted in fingering weight yarn)
  • a chart for two sizes
  • photo illustrations for various stages of star

The pattern is available as a PDF


Freitag, 6. August 2021

Jasmin

During the last months my knitting inspiration was quite low. All bigger project didn't seem appealing to me, so I started (again) playing around with colorful cotton and small motifs. And here's what I came up with. A knitting pattern for a hexagonal potholder with a flower motif.  It starts with a provisional CO, is knitted in short row wedges and finished with grafting in garter stitch.

Since this is an intarsia project with two colours that also uses short rows, it can be quite fiddly. It is NOT a beginner pattern.


The pattern is available at


The pattern PDF is 11 pages long and contains

  • written row-by-row instructions for knitting this piece – including five photos of the different stages
  • a brief explanation on how to adapt the pattern for a version with different petal colours (see photo below)
  • pattern charts for one wedge of the original pattern and the variation
  • short photo tutorials for the following techniques: 
    • provisional CO with a crochet hook and how to undo it, grafting in garter stitch, 
    • short rows with wrap and turn and picking up the wraps, intarsia knitting, weaving in yarn while carrying it (backwards and forwards)
    • step-by-step explanations with photos of undoing the provisional CO in this pattern (i.e. catching stitches in different colours), grafting with colour changes

To knit one of these potholders/coasters you need the following materials:

  • Cotton yarn in two colors – I knitted these potholders in Aran and in Thread weight yarn
    • in Aran weight I used a total of 65 meters (about 30 meters of C1 and 35 meters of C2
    • in Thread weight a total of 50 meters (also a bit more for C2 than for C1)
  • knitting needles – straight or circulars: I used 3.5mm needles for Aran weight yarn,  i.e. smaller than the yarn usually requires because I wanted a firm texture. 
  • scrap yarn and a crochet hook (about 3mm) for the provisional CO
  • two tapestry needles for grafting and to weave in ends
Knitted in Aran weight yarn the pieces measured between 22 and 25 cm in diameter.


Samstag, 10. Juli 2021

Windrose

If you have been following my blog or social media you may know that I love to experiment with with short rows to create shapes and motifs. A while ago, I published my Water Lily pattern - a semicircular potholder with a flower shape.

After finishing it, I started to think about changing in a way to make it a full circle. The most difficult bit was a find out how to start it in order to be able to easily graft it in the end - and it took me a few attempts to get it right. 

So here it is: a pattern for a potholder or doily in a flower shape. I called it windrose, because the petals look a bit like the points of a compass. It starts with a provisional CO, is knitted in short row parts and finished with grafting in garter stitch. 

This project uses yarn in two colours, short rows and is really fiddly in the beginning - so it is definitely NOT a beginner pattern.


The pattern  PDF is available at


The pattern PDF is 10 pages long and contains

  • written row-by-row instructions for knitting this piece – including 19 illustration photos (total of 4 pages)
  • short photo tutorials for the following techniques
    • provisional CO with a crochet hook and how to undo it
    • grafting in garter stitch
    • short rows with wrap and turn and picking up the wraps 
    • weaving in yarn while carrying it (backwards and forwards)
    • crochet CO (at the edge of a knitted piece)

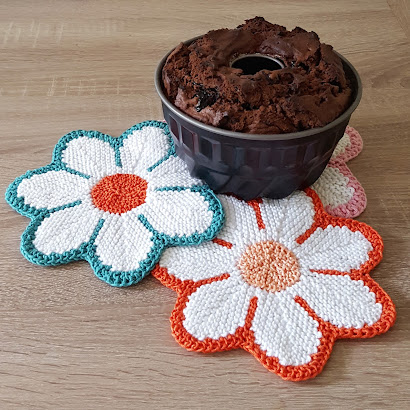
Knitting in DK weight, the piece measures about 30 cm in diameter (yes, it's a small cake on the picture above).  I also knitted the pieces in other yarn weights: The ones in fingering weight yarn, measure about 26 cm in diameter and the ones knitted in thread weight measure 23 cm in diameter.

To knit this you need the following materials

  • about 90 – 100 metres of DK Cotton yarn in two colors
    • MC - Main Color 32gr (about 55-60 metres)
    • CC - Contour Color 14 (about 35-40 metres)
  • 3mm knitting needles – I used dpns (just because they are short)
  • a crochet hook of a similar size (I used a 3.5mm hook)
  • scrap yarn for the provisional CO
  • a tapestry needle – for grafting and to weave in ends
With my favorite Greek orange cake (link to the recipe in German)


Mittwoch, 24. März 2021

Tulips

In my part of the world, spring has just started - so just in time for it, here's a suitable little knitting pattern ... knitted tulips.
I like to experiment with short rows to achieve organic shapes (see e.g. my Pumpkin Potholders or Pear Potholders patterns). And I really like the idea of knitting flower shapes (Daisy, Seven Petals Potholders). So a tulip shape was a natural thing to try. However, it proved to be far more difficult than I  had expected ... It took me a while to a) figure out which shape I wanted and b) how to achieve it. Nine tries to be precise (see my Ravelry project page for the "failed" attempts), but now I am happy with their looks. 
These pieces make lovely presents, e.g. to accompany a home made cake. But you can also use them as potholders, coasters or general table decoration. 


Creative Commons License
This work by Knitting and so on is licensed under a Creative Commons Attribution-NonCommercial-NoDerivatives 4.0 International License.


Materials
  • about 20 to 25 grams of Worsted weight cotton yarn in two colors - called CC (contour color) and MC (main color): 7 gr CC, 18 gr MC - of course you can use other yarn weights as well
  • 3 mm knitting needles - in case you use other yarn weights, use needles that are slightly smaller than the yarn calls for; that way you get a tighter fabric
  • (possibly) a stitch marker
  • a tapestry needle to weave in ends

Techniques
  • Short rows with wrap and turn (w+t) - as shown in this YouTube video by Very Pink Knits. Since this washcloth is knit in garter stitch, you don't have to pick up your wraps - except in two rows, i.e. the rows where the wrapping color is different from the color of the wrapped stitch. These rows are indicated in the pattern. Here's a YouTube video that shows how to pick up your wraps (also by Very Pink Knits).
  • Knitted Cast-On: See this Youtube-video by Very Pink Knits.
    A tutorial for the knitted cast-on that uses one of my older patterns as an example (Water Lily) has been written by Christina Garza-Brown and can be found here at knitfarious.com
  • Weaving in yarn while knitting - carrying it towards the end of the row: This technique (and the next) are used to avoid a long float that runs parallel to your knitting - and to avoid cutting your yarn. When starting with the contour color yarn (lilac in the photos) before knitting a stitch you put the main coloryarn (white in the photos) over the contour color yarn (see illustration 1 below), then you knit the stitch. Before knitting the next stitch you twist the yarns again (see illustration 2). If you repeat these steps you can carry the yarn over a chosen number of stitches- so that it looks neat on WS (see illustration 3 below).
    A similar technique (to weave in ends) is shown in this YouTube video by So, I make stuff
  • Weaving in yarn while knitting - towards the beginning of a row: This technique is similar to the one explained before and it serves the same purpose. You draw a long loop of the "new" yarn to the point where you want to knit it (picture 1). This gives you a really long float. Knit the first stitch. Before knitting the second stitch, catch the float by put the left hand needle under the float (picture 2) and then knit the stitch with your working yarn as usual. If you catch the float every second stitch, the WS will look as shown in picture 3. (This is a bit like catching floats in stranded knitting as shown in this YouTube video by Knit Purl Hunter.)

In case the last two techniques are too fiddly, you can alternatively cut the yarn of the main color after each petal and weave in the ends.


Size
Knitted in worsted weight yarn, one tulip measures about 20 cm in height and 14 cm in width (at its widest point).


Construction
These tulip are constructed in petals of short rows and contour lines in a contrast color. It is knitted sideways and consists of three petals, one right petal, a small middle one, and a left petal.


After each petal - when knitting the contour lines, you carry the MC yarn forward a bit and you bind off 9 stitches. Then you cast them on again. After doing this, you should carry the main color yarn first back to the beginning of the row.
The picture below shows how the WS of this piece looks. You can see the carried yarn at the tips of the petals.


It may be helpful to place a stitch marker after the 10th stitch. This means when binding off, you don't have to count but the 9 stitches to BO, but only have to BO up to the stitch before the marker.
I knitted the first some without a stitch marker and sometimes left track of how many stitches I had already bound off. So I used a stitch marker which worked well with regards to counting. But while knitting the petals the stitch marker got in the way, so I took it out again.


Instructions

CO48 in CC
Setup Row: k all

When knitting the petals, you slip the first two stitches (they are knitted only in CC to achieve a contour).

Right Petal

in MC
Ridge 1: (RS) sl2 k44, w+t,
    (WS) k42, w+t,
Ridge 2: (RS) k21, ssk, k7, w+t,
    (WS) k9, w+t,
Ridge 3: (RS) k4, ssk, k5, w+t,
    (WS) k12, w+t,
Ridge 4: (RS) k9, ssk, k3, w+t,
    (WS) k15, w+t,
Ridge 5: (RS) k6, ssk k9, w+t,
    (WS) k18, w+t,
Ridge 6: (RS) k20, ssk, w+t,
    (WS) k33, w+t,
Ridge 7: (RS) k27, ssk, k5, w+t,
    (WS) k24, w+t,
Ridge 8: (RS) k13, ssk, k1, w+t,
     (WS) k18, w+t,
Ridge 9: (RS) k16, w+t,
    (WS) k11, w+t,
Ridge 10: (RS) k1, ssk, k5, kfb, k8 ssk, w+t,
    (WS) k21, w+t,
Ridge 11: (RS) k6, kfb, k9, w+t,
    (WS) k12, w+t,
Ridge 12: (RS) k10, kfb, k6, ssk, w+t,
    (WS) k17, w+t,
Ridge 13: (RS) k12, w+t,
    (WS) k10, w+t,
Ridge 14: (RS) k2, kfb, k8, ssk, w+t,
    (WS) k23, w+t,
Ridge 15: (RS) k8, kfb, k9, w+t,
    (WS) k24, w+t,
Ridge 16: (RS) k17, kfb, k4, w+t,
    (WS) k10, w+t,
Ridge 17: (RS) k17, ssk, k1, w+t,
    (WS) k38, sl2

Contour

in CC
Row 1: (RS) sl1, k to end (carrying MC over 11 sts), 
Row 2: (WS) k to last st, sl1
Row 3: (RS) BO9, w+t, 
Row 4: (WS) k1, kCO9
Row 5: (RS) sl1wyib, ktbl, k7, ktbl, k1, w+t, 
Row 6: (WS) k to end

Middle Petal

in MC
Ridge 1: (RS) sl2, k16 (while carrying MC from the 11th stitch back to the 2nd stitch), w+t,
    (WS) k9, w+t,
Ridge 2: (RS) k4, w+t,
    (WS) k6, w+t,
Ridge 3: (RS) k8, w+t,
    (WS) k10, w+t,
Ridge 4: (RS) k12, w+t,
    (WS) k14, w+t,
Ridge 5: (RS) k12, w+t,
    (WS) k10, w+t,
Ridge 6: (RS) k8, w+t,
    (WS) k6, w+t,
Ridge 7: (RS) k5, w+t,
    (WS) k3, w+t,
Ridge 8: (RS) k9, w+t,
    (WS) k16, sl2

Contour

in CC
Row 1: (RS) sl1, k18 (carrying MC over 11 sts), 
Row 2: (WS) k to last st, sl1
Row 3: (RS) BO9, w+t, 
Row 4: (WS) k1, kCO9
Row 5: (RS) sl1wyib, ktbl, k7, ktbl, k1, w+t, 
Row 6: (WS) k to end

Left Petal

in MC
Ridge 1: (RS) sl2, k38 (while carrying MC from the 11th stitch back to the 2nd stitch), w+t,
    (WS) k21, w+t,
Ridge 2: (RS) k2, w+t,
    (WS) k4, w+t,
Ridge 3: (RS) k6, w+t,
    (WS) k8, w+t,
Ridge 4: (RS) k10, w+t,
    (WS) k11, w+t,
Ridge 5: (RS) k13, kfb, k3, w+t,
    (WS) k24, w+t,
Ridge 6: (RS) k26, w+t,
    (WS) k11, w+t,
Ridge 7: (RS) k1, kfb, k11, w+t,
    (WS) k16, w+t,
Ridge 8: (RS) k18, w+t,
    (WS) k33, w+t,
Ridge 9: (RS) k31, w+t,
    (WS) k17, w+t,
Ridge 10: (RS) k14, w+t,
    (WS) k11, w+t,
Ridge 11: (RS) k7, kfb, k2, w+t,
    (WS) k15, w+t,
Ridge 12: (RS) k5, kfb, k14, w+t,
    (WS) k36, w+t,
Ridge 13: (RS) k23, kfb, k2, w+t,
    (WS) k8, w+t,
Ridge 14: (RS) k21, w+t,
    (WS) k42, sl2

Contour

CC
Row 1: (RS) sl1 k to end, 
Row2: (WS) sl1 k to last, sl1
BO all

Cut yarns, weave in ends.
If there is still a small distance between the left and right petal, use the CC tail to sew it closed. 


Samstag, 3. Oktober 2020

Sideways Pumpkins

 After a few really warm days in September, it's finally getting colder and wetter outside. For me, that's the moment where I really like to stay inside, make myself comfortable and have it cozy. Part of this is a bit of seasonal decoration and somehow the pumpkin is the ultimate autumn decoration (even though I cannot remember eating it as a child). That's why I decided to knit little decorative pumpkins, using old  yarn that was already in my stash. (The light orange ones are made from yarn, that was leftover when my Mum knitted a sweater in the 70ies :) 

As it is my usual go-to construction (e.g. here or here), I knitted them sideways - starting with a provisional CO, shaping the piece with short rows and finishing by grafting in garter stitch. If you want to learn one of these techniques, this might be a project to learn.

This is a project a bit like my little knitted hearts (Herzchen) - once you start knitting them, you cannot stop :)


Creative Commons License
This work by Knitting and so on is licensed under a Creative Commons Attribution-NonCommercial-ShareAlike 4.0 International License.


Size

The pumpkins I knitted measured between 6 and 11 cm in diameter - depending on yarn (fingering, to fingering held double) and needles that I used (2.25 to 3.5 mm).


Materials

  • yarn – basically leftovers - I different kinds of yarn – and self-striping fingering weight yarn)
  • knitting needles – dpns knitting needles, circulars or AddiTrios (both will work for the flat piece and for the i-cord), always smaller needles than the yarn called for – in order to get a tight texture, e.g. 2.25 mm for fingering weight yarn or 3.5 mm for fingering yarn held doubly
  • a crochet hook (for the provisional cast-on)
  • stuffing - I used the yarn ends and fabric scraps that I had saved from previous knitting or sewing projects
  • a tapestry needle for grafting and weaving in ends


Techniques


Instructions

Pumpkin

With scrap yarn, do a provisional CO of 18 stitches and with your working yarn (see illustration 1), knit the setup row (k all, see illustration 2).

Ridge 1 (RS/WS): sl, k1, kfb, k1, kfb, k2, kfb, k2, kfb, k1, kfb, k1, kfb, k1, w+t, k20 (or k to 2 bef end), w+t
Ridge 2 (RS/WS): k5, kfb, k8, kfb, k3 (i.e. 4 bef end), w+t, k15,  (i.e. 7 bef end) w+t
Ridge 3 (RS/WS): k10, w+t, k13 (i.e. 4 bef end), w+t
Ridge 4 (RS/WS): k15, w+t, k11, w+t
Ridge 5 (RS/WS): k10, w+t, k12 (i.e. 6 bef end), w+t
Ridge 6 (RS/WS): k14 (i.e. 6 bef end), w+t, k15 (i.e. 5 bef end), w+t
Ridge 7 (RS/WS): k1, ssk, k10, ssk, k1 (i.e. 5 bef end), w+t, k11, w+t
Ridge 8 (RS/WS): k10, w+t, k15 (i.e. 3 bef end), w+t
Ridge 9 (RS/WS): ssk, k1, ssk, k1, ssk, k1, ssk, k1, ssk, k1, ssk, k1 (i.e. 3 bef end), w+t, k14 (i.e. 1 bef end), w+t
Ridge 10: k17, turn, sl1, k17 (i.e. to end)

Illustrations
After the first repeat of these 10 ridges you're back to 18 stitches on your needles and the piece will look similar to illustration 3.

Repeat ridges 1 to 10 four more times, then knit ridges 1 to 8 - and a slightly altered version of ridge 9 (i.e. ridge 9b), knitting the WS row to end - or spelled out: 

Ridge 9b (RS/WS): ssk, k1, ssk, k1, ssk, k1, ssk, k1, ssk, k1, ssk, k1, ssk, k1, w+t, k to end

Remove the scrap yarn of the provisional CO and catch the stitches on a knitting needle. As you can see on illustration 4, the right edge of the piece is 6 rows high. That's why you first have to close up the (potential) hole at the end of the row. Then start grafting the live stitches together in garter stitch. 

When you've closed about two thirds of the row, fill the pumpkin with stuffing. Continue grafting in garter stitch to the end of the row. With the same tail, close the other (potential) hole. Then stick the needle right through the middle of the piece, and then back (illustration 5). Pull the yarn tight. That will make the piece a bit flatter and therefore more pumpkin shaped. Secure tail and weave in ends.

Please note:

  • It may be helpful to mark the RS of the piece.
  • When I knitted these, I sometimes miscounted my stitches. This doesn't really matter, as long as you're not too far out (and anyway, real pumpkins aren't completely symmetrical, are they?). But that's why I've included the instructions until which stitch some of the ridges are to be knitted (e.g. k to 2 bef end). This may help you to get back in sync with the pattern after having miscounted.


Stem

In contrasting yarn, knit an i-cord (of 5 stitches) of about 12 rows (or however long you want the stem), cut yarn, but leave a tail that's long enough to sew stem to pumpkin.

Use the tail to sew the stem to the pumpkin (illustration 6) and weave in ends.


Montag, 17. August 2020

Seven Petals Potholder

After finishing my Daisy Potholders I wanted to knit a flower with a petal contour - and so I started experimenting - and surprisingly enough, it worked.
So, here is the pattern for a flower-shaped potholder, hotpad or coaster. It starts with a provisional CO, is knitted in short row wedges and finished with grafting in garter stitch.
Since this is an intarsia project with three colours that also uses short rows, it can be quite fiddly. It is NOT a beginner pattern.


The pattern is available 

The pattern PDF is 12 pages long and contains
  • written row-by-row instructions for knitting this piece – including four photos of the different stages 
  • a pattern chart of one wedge
  • short photo tutorials for the following techniques
    • provisional CO with a crochet hook and how to undo it
    • grafting in garter stitch
    • short rows with wrap and turn and picking up the wraps 
    • intarsia knitting 
    • weaving in yarn while carrying it (backwards and forwards)
  • photo tutorials and step-by-step explanations of
  • undoing the provisional CO in this pattern (i.e. catching stitches in different colours)
  • grafting this piece – with a decrease and colour changes
Of the 12 pages, the pattern instructions and chart comprise only 3 pages - the rest are the technique tutorials and explanations of their specific application for this motif.

Since it's an intarsia pattern, it looks OK from WS as well (see picture below).


To knit one of these pieces you need the following materials
  • Cotton yarn in three colors – I knitted these potholders in Aran and Sports weight yarn
    • for Aran, I used a total of 30 grams
    • for Sports weight, I used a total of 20 grams
  • knitting needles – straight or circulars: I used 3mm needles for Aran weight yarn and 2.5mm needles for Sports weight yarn, i.e. smaller than the yarn usually requires because I wanted a firm texture. 
  • scrap yarn and a crochet hook (about 3mm) for the provisional CO
  • two tapestry needles for grafting and to weave in ends
The pieces I knitted measure 16 cm to 22 cm in diameter - depending on the yarn weight I used.


Mittwoch, 17. Juni 2020

Daisy Potholder

I guess I have more potholders (or coasters or doilies) than anyone actually needs. But I think they are a great project for trying out new knitting techniques or to knit motifs.
Here is the pattern for a circular potholder with a flower motif – an idea that I had for quite a while.
Since this is a three colour intarsia project with three colours that also uses short rows, it can be quite fiddly. If you've never done intarsia and/or short rows before, this wouldn't be the pattern to start - sorry.
It is definitely NOT a beginner pattern.


The pattern PDF is available via


The document is 11 pages long and contains:
  • written row-by-row instructions for knitting this piece – including four photos of the different stages 
  • pattern chart
  • short photo tutorials for the following techniques
    • provisional CO with a crochet hook and how to undo it
    • short rows with wrap and turn and picking up the wraps 
    • intarsia knitting 
    • weaving in yarn while carrying it (backwards and forwards)
    • grafting in garter stitch
  • photo tutorials and step-by-step explanations of
    • undoing the provisional CO in this pattern (i.e. catching stitches in different colours)
    • grafting with colour changes
The pattern instructions and the chart comprise only 2 pages - the rest are the technique tutorials and explanations of their specific application for this motif.


To knit this you need the following materials:
  • Cotton yarn in three colors – I knitted these potholders in Aran and DK weight yarn
    • for Aran, I used a total of 50 grams
    • for DK weight, I used a total of 25 grams
  • knitting needles – straight or circulars: I used 3mm needles for Aran weight yarn and 2.5mm needles for DK weight yarn, i.e. smaller than the yarn usually requires because I wanted a firm texture. 
  • scrap yarn and a crochet hook (about the same size as your knitting needles) for the provisional CO - I used a 3mm crochet hook
  • two tapestry needles for grafting and to weave in ends

Freitag, 17. April 2020

Yet Another Heart-Shaped Potholder

In my part of the world, Mother's Day is celebrated on the 2nd Sunday in May. So here's a pattern for cute heart shaped potholders to accompany the cake you bake for your mum.
It's knitted in one  piece, which minimizes the number of ends you have to weave in - and all in garter stitch. They come in two sizes - a larger and a smaller one.
If you've never done short rows, this might be the project to learn it, because it's quickly done <3


Creative Commons License
This work by Knitting and so on is licensed under a Creative Commons Attribution-NonCommercial-ShareAlike 4.0 International License.


Materials
  • between 20 or 30 grams of DK weight 
  • 3mm knitting needles
  • a tapestry needle to weave in ends

Techniques

Sizes
The bigger heart measures 19 cm at its widest point - the small one 15 cm.


Instructions

Big Heart

CO21
Row 0 (setup row): sl1, k to end, do a knitted CO of 2 sts
Ridge 1: kfb, k1, ktbl, k up to last st, w+t, k up to last st, kfb
Ridge 2: kfb, k to 2 bef end, w+t, k up to last st, kfb
Ridge 3: kfb, k to 3 bef end, w+t, k up to last st, kfb
Ridge 4: kfb, k to 4 bef end, w+t, k up to last st, kfb
Ridge 5: kfb, k to 5 bef end, w+t, k to end
Ridge 6: kbf, k20, w+t, k to end
Ridge 7: kfb, k to 6 bef end, w+t, k to end
Ridge 8: kfb, k to 7 bef end, w+t, k to end
Ridge 9: kfb, k to 8 bef end, w+t, k to end
Ridge 10: k to 9 bef end, w+t, k to end
Ridge 11: k 20, w+t, k to end
Ridge 12: k to 10 bef end, w+t, k to end
Ridge 13: k to 11 bef end, w+t, k to end
Ridge 14: k to 12 bef end, w+t, k to end
Ridge 15: k to 13 bef end, w+t, k to last 2 sts, ssk
Ridge 16: k 15, w+t, k to last 2 sts, ssk
Ridge 17: k to 14 bef end, w+t, k to last 2 sts, ssk
Ridge 18: k to 15 bef end, w+t, k to last 2 sts, ssk
Ridge 19: k to 16 bef end, w+t, k to last 2 sts, ssk
Ridge 20: k2tog, k to 17 bef end, w+t, k to last 2 sts, ssk
Rigde 21: k2tog, k to 18 bef end, w+t, k to last 2 sts, ssk
Rigde 22: k2tog, k to 19 bef end, w+t, k to last 2 sts, ssk
Rigde 23: k2tog, k to 20 bef end, w+t, k to last 2 sts, ssk
Ridge 24: k2tog, w+t, kfb

Ridge 25: kfb, k to 20 bef end, w+t, k up to last st, kfb
Ridge 26: kfb, k to 19 bef end, w+t, k up to last st, kfb
Ridge 27: kfb, k to 18 bef end, w+t, k up to last st, kfb
Ridge 28: kfb, k to 17 bef end, w+t, k up to last st, kfb
Ridge 29: kfb, k to 16 bef end, w+t, k to end
Ridge 30: kfb, k to 15 bef end, w+t, k to end
Ridge 31: kfb, k to 14 bef end, w+t, k to end
Ridge 32: kfb, k15, w+t, k to end
Ridge 33: kfb, k to 13 bef end, w+t, k to end
Ridge 34: k to 12 bef end, w+t, k to end
Ridge 35: k to 11 bef end, w+t, k to end
Ridge 36: k to 10 bef end, w+t, k to end
Ridge 37: k20, w+t, k to end
Ridge 38: k to 9 bef end, w+t, k to end
Ridge 39: k to 8 bef end, w+t, k to last 2 sts, ssk
Ridge 40: k to 7 bef end, w+t, k to last 2 sts, ssk
Ridge 41: k to 6 bef end, w+t, k to last 2 sts, ssk
Ridge 42: k20, w+t, k to last 2 sts, ssk
Ridge 43: k to 5 bef end, w+t, k to last 2 sts, ssk
Ridge 44: k2tog, k to 4 bef end, w+t, k to last 2 sts, ssk
Ridge 45: k2tog, k to 3 bef end, w+t, k to last 2 sts, ssk
Ridge 46: k2tog, k to 2 bef end, w+t, k to last 2 sts, ssk
Ridge 47: k2tog, k to 1 bef end, w+t, k to last 2 sts, ssk
Ridge 48: BO2, k2tog, k to last st, w+t, k to last 2 sts, ssk
Row 49: k2tog, BO to end

Cut yarn and weave in ends.


Small Heart

CO16
Row 0 (setup row): sl1, k to end, do a knitted CO of 2 sts
Ridge 1: kfb, k1, ktbl, k up to last st, w+t, k up to last st, kfb
Ridge 2: kfb, k to 2 bef end, w+t, k up to last st, kfb
Ridge 3: kfb, k to 3 bef end, w+t, k up to last st, kfb
Ridge 4: kfb, k to 4 bef end, w+t, k to end
Ridge 5: kfb, k12, w+t, k to end
Ridge 6: kfb, k to 5 bef end, w+t, k to end
Ridge 7: kfb, k to 6 bef end, w+t, k to end
Ridge 8: kfb, k to 7 bef end, w+t, k to end
Ridge 9: k to 8 bef end, w+t, k to end
Ridge 10: k12, w+t, k to end
Ridge 11: k to 9 bef end, w+t, k to end
Ridge 12: k to 10 bef end, w+t, k to end
Ridge 13: k to 11 bef end, w+t, k to last 2 sts, ssk
Ridge 14: k12, w+t, k to last 2 sts, ssk
Ridge 15: k to 12 bef end, w+t, k to last 2 sts, ssk
Ridge 16: k2tog, k to 13 bef end, w+t, k to last 2 sts, ssk
Ridge 17: k2tog, k to 14 bef end, w+t, k to last 2 sts, ssk
Ridge 18: k2tog, k to 15 bef end, w+t, k to last 2 sts, ssk
Ridge 19: k2tog, w+t, kfb

Ridge 20: kfb, k to 15 bef end, w+t, k to last st, kfb
Ridge 21: kfb, k to 14 bef end, w+t, k to last st, kfb
Ridge 22: kfb, k to 13 bef end, w+t, k to last st, kfb
Ridge 23: kfb, k to 12 bef end, w+t, k to end
Ridge 24: kfb, k11, w+t, k to end
Ridge 25: kfb, k to 11 bef end, w+t, k to end
Ridge 26: kfb, k to 10 bef end, w+t, k to end
Ridge 27: k to 9 bef end, w+t, k to end
Ridge 28: k12, w+t, k to end
Ridge 29: k to 8 bef end, w+t, k to end
Ridge 30: k to 7 bef end, w+t, k to end
Ridge 31: k to 6 bef end, w+t, k to 2 bef end, ssk
Ridge 32: k to 5 bef end, w+t, k to 2 bef end, ssk
Ridge 33: k12, w+t, k to 2 bef end, ssk
Ridge 34: k to 4 bef end, w+t, k to 2 bef end, ssk
Ridge 35: k2tog, k to 3 bef end, w+t, k to 2 bef end, ssk
Ridge 36: k2tog, k to 2 bef end, w+t, k to 2 bef end, ssk
Ridge 37: k2tog, k10, w+t, k to 2 bef end, ssk
Ridge 38: k2tog, k to last st, w+t, k to last 2 sts, ssk
Row 39: k2tog, BO to end

Cut yarn and weave in ends.