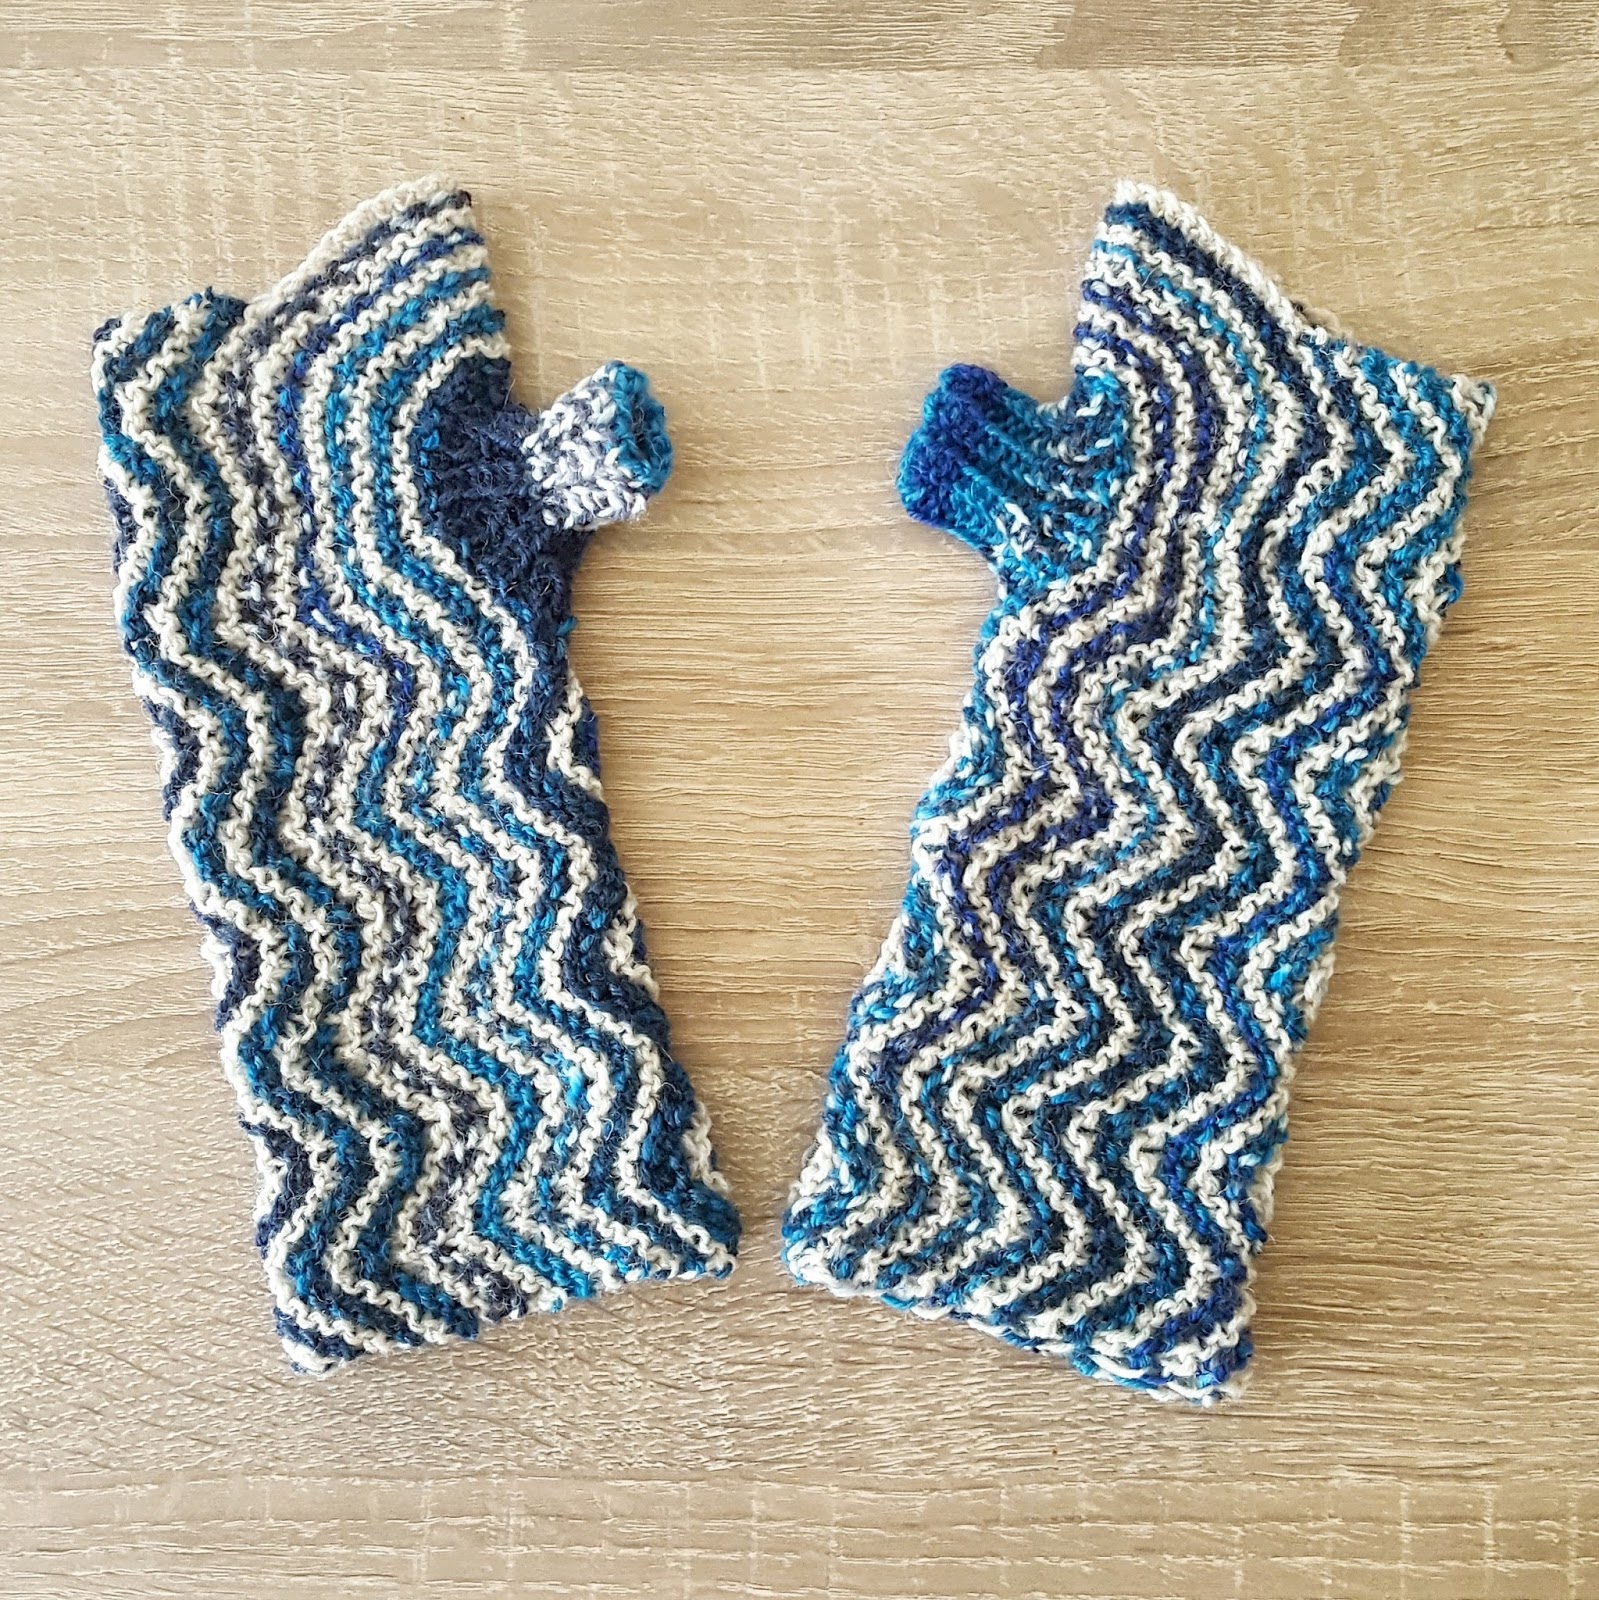
During the last couple of months I have experimented a lot with intarsia in the round - mainly to knit socks. However, I had failed on producing a sock with one uninterrupted intarsia stripe from top to bottom: I had trouble with the CO as well as with the heel. So I was quite pleased when I managed to solve these problems and finished these socks.
These socks are knitted from the cuff down with a shadow wrap heel and ergonomically shaped toes. For the color effect intarsia in the round is used. The pattern is written for Magic Loop Method (i.e. for an even distribution of stitches between two sides of a circular needle) - but it can be done with dpns as well (e.g. by using stitch markers).
Just a quick heads up: If you've never knitted socks before, this is probably not the best pattern to start with, because the intarsia work can be quite fiddly.
As to the name, Seitenstreifen is the German word for a curb or emergency lane of a highway - literally it translates to side-strip.
A big thank you to
nordling (Ravelry name) who test-knitted the pattern and - in the process - eliminated quite a few of my mistakes. Tack så mycket!

This work by
Knitting and so on is licensed under a
Creative Commons Attribution-NonCommercial-ShareAlike 4.0 International License.
 Materials
- a total of about 60 to 80 grams of fingering weight yarn - 60 grams of the main color (MC) and 20 grams of the contrast color (CC).
- 2.25 mm or 2 mm circular needles to knit the ribbing - mine was 80 cm long
- 2.5 mm circular needles to knit the rest of the sock - mine was 80 cm long
- a tapestry needle to weave in ends
Gauge
In stockinette stitch, 17 stitches and 20 rows gave 5 cm.
Techniques and Notation
- Intarsia in the round with yarn-overs before turning: as shown in this YouTube video by Julia farwell-clay. Basically you knit back and forth even though your stitches are arranged in the round - and you have to consider rounds in pairs - one RS row and one WS row. You start with your main color (MC) on the RS, then - as in normal intarsia you change (by twisting the yarns) - to contrast color (CC) and knit your CC part, After finishing this you turn your work, make a yarn-over and do the WS with CC, when you get to the MC part you change back as in normal (flat) intarsia to MC.
Now with MC you work your way on the WS not only to the start of the round, but further to the point where you ended the CC part. Here you p2tog the last MC stitch with the yarn over in CC. Then you turn - again with a yarn over - and do the RS part to the beginning of the round. That's the two round finished.
When - during the next pair of rounds - you reach the new yarn over on the RS, you have to do an ssk of the last stitch in CC with the yarn over in MC.
In this pattern the following notation will be used: "MC [k7]; CC [k23]" means knit 7 sts in MC, change to CC and knit 23 sts in CC, i.e. the color is indicated before the knitting instructions - the instructions are in square brackets and a semicolon indicates a change of color.
- Shadow Wrap Short Rows: as shown in this YouTube video by Lee Meredith. A video by Miriam Felton that shows how to do a heel with shadow wraps can be found here on YouTube. However, the heel knitted here is knitted slightly different because here there are two rounds between the two parts of the heel, i.e. there won't be any triple stitches.
- Magic Loop Method: as shown in this YouTube video by KnitPicks.
- Kitchener Stitch: e.g. as shown in this YouTube video by Very Pink Knits
- When the instructions differ for different sizes, the instructions for sizes 32 - 35 will be given first, then for sizes 36 - 39 as the first number in brackets and for sizes 40 - 43 as the second number in brackets

General Construction
The Socks are knitted from the cuff down, i.e. you start from the ribbing at the top and finish with the toes.
Even though it is a sock and knitted in the round, there is a change of direction after every row. That's because it is knitted in intarsia where one round is knitted from the outside of the sock and the next from the inside. This means that at one point in the round you change the color just as in normal (flat knitted) intarsia knit, i.e. where you twist your two strands of yarn (called color changing point or CCP in the pattern) and at another point you attach the colors while you're turning by knitting together the last stitch of the current round with a yarn-over you did in the round below (called turning point or TP in the pattern). The Color Change Point needs to be on the back of the sock.
The picture below shows how the stitches are distributed on the front and back needle. Here, the first number indicates the number of stitches for socks in sizes 32 - 35, the first number in brackets for sizes 36 - 39 and the second number in brackets for sizes 40 - 43. It also shows two other significant points of your rounds, i.e. the two half points, where you switch from one side of the needle to the next - called half
CC on the CC side and half
MC on the MC side.
 |
| Stitch Distribution and Abbreviations |
The color changing point never moves, i.e. every stitch is knitted in the same color as the stitch in the row below.
Instructions
Left Sock
Ribbing
With 2.25mm needles CO 14 in CC and CO 42 (46, 50) in MC. To make the CO loose enough for socks, I usually CO with both needles. Your piece should look like in photo 1. Turn your work, do NOT JOIN in round, yet.
Set-up row: MC [* k2, p2 repeat from * until 2 sts left to CCP , k2]; CC [* p2, k2 repeat from * until 2 sts from end, p2] - now your piece should look like in photo 2.
Starting on the end with the CC stitches, divide your stitches into three parts as follows: 7-28-21 (7-30-23, 7-32-25) (see photo 3). The first and third part will be the front of the sock, the second part the back. Join in round.
Round 1 (outside): CC [yo, * k2, p2 repeat from * until 2 sts left to CCP, k2], MC [ * p2, k2 repeat from * until 2 sts left to TP, p1, p2togtbl], turn work - please note: with the p2togtbl you join the last stitch knitted with MC with the yo in CC you did at the beginning of the round.
Round 2 (inside): MC [yo, * k2, p2 repeat from * until 2 sts left to CCP, k2], CC [ * p2, k2 repeat from * until 2 sts left to TP, p1, p2tog], turn work - again, with the p2tog you join the last knitted stitch of your round - in CC - with the yarn over in MC you did at the beginning of the round
Repeat rounds 1 and 2 four more times.
 |
| Illustrations - Left Sock |
Shaft
Change to 2.5mm needles
Round 1 (outside): CC [yo, k to CCP], MC [k to last st before TP, ssk], turn - just as for the ribbing, the ssk combines the last st of the current row, with the yo from the beginning of the row
Round 2 (inside): MC [yo, p to CCP], CC [p to last st before TP, p2tog], turn
Repeat rounds 1 and 2 14 more times (or until the shaft is as long as you want it to be).
Heel
When knitting a short row heel, I usually increase the back "half" by two or three stitches to get a heel that is slightly wider. That's what is done during the first 6 rounds of the heel and this means that all the increases are on the side that contains the back stitches.
Round 1 (outside): CC [yo, k to half
CC and change to other side of needles, mk1, k to CCP], MC [k up to half
MC, mk1 and afterwards change sides, k to 1 bef TP, ssk], turn
Round 2 (inside): MC [yo, p to CCP), CC [p to 1 bef TP, p2tog], turn
Repeat rows 1 and 2 once more.
There are now four more stitches on the back part of the sock than on the front.
Now the short-row heel (with shadow wraps) is knitted only with the stitches of the back part. And since the working yarn is currently on the front part, you need to knit to the beginning of the back part first.
First Part
Row 1 (outside): CC [yo, k to half
CC and change to other side of needles - now you can start with the short row heel (the complete round will be finished later (#)], CC [k to CCP]; MC [k to 1 bef half
MC. knit into the mother stitch of the next st (i.e. do a shadow wrap), turn]
Row 2 (inside): MC [slip shadow wrap st, p to CCP); CC [p to 1 bef half
CC, purl into the mother stitch (i.e. do a shadow wrap), turn]
Row 3 (outside): CC [slip shadow wrap, k to CCP]; MC [k to 1 bef last shadow wrap, knit into the mother stitch of the next st, turn]
Row 4 (inside): MC [slip shadow wrap, p to CCP]; CC [p to 1 bef last shadow wrap, purl into the mother stitch of next st, turn]
Repeat rows 3 and 4 seven more times. Now all of your CC stitches have been shadow wrapped. The last bit will be knitted only in MC
Row 5 (outside): MC [slip shadow wrap, k to 1 bef last shadow wrap knit into the mother stitch of the next st, turn]
Row 6 (inside): MC [slip shadow wrap, p to 1 bef last shadow wrap, purl into the mother stitch of next st, turn]
Repeat rows 5 and 6 once (twice, three times) more
Picking Up the Shadow Wraps
While you knit the next two rounds make sure to knit/purl all double stitches that result from shadow wraps as one stitch.
Round 1 (outside): MC [k to last st before TP, ssk], turn - just as for the ribbing, the ssk combines the last st of the current row, with the yo from the beginning of the row
Round 2 (inside): MC [yo, p to CCP], CC [p to last st before TP, p2tog], turn - please note the last 7 sts (i.e. the stitch on the front part of the needles) are completing the round that was started with row 1 of the first part of the heel (#)
Second part
Row 1 (outside): CC [yo, k to half
CC and change to other side of needles - now you can start with the short row heel (the complete round will be finished later], CC [k to CCP]; MC [k12 (k13, k14) half
MC. knit into the mother stitch of the next st (i.e. do a shadow wrap), turn]
Row 2 (inside): MC [slip shadow wrap, p10, purl into the mother stitch of the next st (i.e. do a shadow wrap), turn]
Row 3 (outside): MC [slip shadow wrap, k to last shadow wrap and
knit it, knit into the mother stitch of the next st (i.e. do a shadow wrap), turn]
Row 4 (inside): MC [slip shadow wrap, p to last shadow wrap and
purl it, purl into mother of next st turn]
Repeat rows 3 and 4 or until the last stitch on the inside row is the stitch next to CCP.
Row 5 (outside): MC [slip shadow wrap, k to last shadow wrap and
knit it, knit into the mother stitch of the next st (i.e. do a shadow wrap), turn]
Row 6 (inside): MC [slip shadow wrap, p to last shadow wrap and
purl it]; CC [purl into mother of next st turn]
Row 7 (outside): CC [slip shadow wrap]; MC [k to last shadow wrap and
knit it, knit into the mother stitch of the next st (i.e. do a shadow wrap), turn]
Row 8 (inside): MC [slip shadow wrap, p to CCP]; CC [purl to last shadow wrap and
purl it, purl into mother of next st turn]
Row 9 (outside): CC [slip shadow wrap, k to CCP]; MC [k to last shadow wrap and
knit it, knit into the mother stitch of the next st (i.e. do a shadow wrap), turn]
Row 10 (inside): MC [p to CCP]; CC [purl to last shadow wrap and
purl it, purl into mother of next st turn]
Repeat rows 9 and 10 until the last shadow wrap is the stitch next to half
MC (outside) and half
CC (inside).
Picking Up the Shadow Wraps
While knitting the next two rounds make sure to knit/purl all double stitches that result from shadow wraps as one stitch.
Round 1 (outside): CC [k to CCP]; MC [k to last st before TP, ssk], turn - just as for the ribbing, the ssk combines the last st of the current row, with the yo from the beginning of the row
Round 2 (inside): MC [yo, p to CCP], CC [p to last st before TP, p2tog], turn - please note the last 7 sts are completing the round that was started with row 1 of the second part of the heel
Now the increases that were made when beginning to knit the heel need to be decreased again.
Round 1 (outside): CC [yo, k to half
CC and change to other side of needles, ssk, k to CCP], MC [k up to 2 sts bef half
MC, k2tog and afterwards change sides, k to 1 bef TP, ssk], turn
Round 2 (inside): MC [yo, p to CCP], CC [p to 1 bef TP, p2tog], turn
Repeat rows 1 and 2 once more.
Now you're back to the original stitch number.
Foot
Round 1 (outside): CC [yo, k to CCP], MC [k to last st before TP, ssk], turn - just as for the ribbing, the ssk combines the last st of the current row, with the yo from the beginning of the row
Round 2 (inside): MC [yo, p to CCP], CC [p to last st before TP, p2tog], turn
Repeat rounds 1 and 2 until the foot (measured from the tip of the heel) measures 5 cm less than the desired length.
Toes
The picture below shows in which row the decreases are made on which side of the sock. For the first sock, it shows the front view - the back view is its mirror image. (For the second sock, it shows the back view).
That means that you knit the standard rounds (as in the foot part) with decreases around half
CC and half
MC when indicated.
 |
| Toe Decreases |
Here are these 19 rounds spelled out - to mark the difference of normal rounds, the toe decreases are printed in
boldface.
Round 1 (outside): CC [yo, k to CCP], MC [k to last st before TP, ssk], turn
Round 2 (inside): MC [yo, p to CCP], CC [p to 2 sts before half
CC,
p2tog,
p2togtbl, p to last st before TP, p2tog], turn
Round 3 (outside): CC [yo, k to CCP], MC [k to last st before TP, ssk], turn
Round 4 (inside): MC [yo, p to CCP], CC [p to 2 sts before half
CC,
p2tog,
p2togtbl, p to last st before TP, p2tog], turn
Round 5 (outside): CC [yo, k to CCP], MC [k to last st before TP, ssk], turn
Round 6 (inside): MC [yo, p to CCP], CC [p to 2 sts before halfCC, p2tog, p2togtbl, p to last st before TP, p2tog], turn
Round 7 (outside): CC [yo, k to 2 sts before half
CC,
ssk,
k2tog, k to CCP], MC [k to last st before TP, ssk], turn
Round 8 (inside): MC [yo, p to 2 sts before half
MC,
p2tog,
p2togtbl, p to CCP], CC [p to 2 sts before half
CC,
p2tog,
p2togtbl, p to last st before TP, p2tog], turn
Round 9 (outside): CC [yo, k to 2 sts before half
CC,
ssk,
k2tog, k to CCP], MC [k to last st before TP, ssk], turn
Round 10 (inside): MC [yo, p to CCP], CC [p to 2 sts before half
CC,
p2tog,
p2togtbl], turn
Round 11 (outside): CC/MC [
k2tog]; MC [k to 1 bef CCP], MC/CC [
ssk], turn
Now all CC sts have been decreased. The last rounds are MC only, this means all following rounds are
all knitted from the outside and in MC - the points where you switch from one part of the needle to the other will be called half and end.
Round 12:
k2tog, k to 2 bef half,
ssk,
k2tog, k to 2 bef end,
ssk
Round 13:
k2tog, k to 2 bef end,
ssk
Round 14:
k2tog, k to 2 bef end,
ssk
Round 15:
k2tog, k to 2 bef half,
ssk,
k2tog, k to 2 bef end,
ssk
Round 16:
k2tog, k to 2 bef end,
ssk
Round 17:
k2tog, k to 2 bef half,
ssk,
k2tog, k to 2 bef end,
ssk
Round 18:
k2tog, k to 2 bef half,
ssk,
k2tog, k to 2 bef end,
ssk
Round 19:
k2tog, k to 2 bef half,
ssk,
k2tog, k to 2 bef end,
ssk
Now you have 8 (10, 12) sts on each needle.
Cut yarn and graft toes in kitchener stitch.
Weave in ends and block.
Right Sock
The right sock is a mirror image of the left one. Here's what you should do differently:
- CO in opposite sequence, i.e. CO 40 (46, 50) in MC and then CO 14 in CC.
- Basically, for the whole of the right sock, the colors are reversed, i.e. everytime the pattern for the left sock says MC it's CC for the right sock and vice versa.
- When knitting the heel, the last CC shadow wrap of the 1st part of the heel will appear on an outside row (as opposed to an inside row for the left socks), this means also that the first shadow wrap of the 2nd part of the heel will appear on an outside row.
- When knitting the toe a similar effect occurs: I.e. the first two rows of the toe read as follows:
Round 1 (outside): MC [yo, k to CCP], CC [k to last st before TP, ssk], turn
Round 2 (inside): CC [yo, p to CCP], MC [p to 2 sts before halfCC, p2tog, p2togtbl, p to last st before TP, p2tog], turn
and Rows 10 and 11 (the last rows with CC) read as follows:
Round 10 (inside): CC [yo, p2tog, p2togtbl], MC [p to 1 bef TP, p2tog], turn
Round 11 (outside): MC [yo, k to 1 bef CCP], MC/CC [ssk], CC [k2tog (last st in CC together with yo], turn
The schematic "Toe Decreases" shows the back view of the 2nd sock - the front part is its mirror image.


