
This work by Kntting and so on is licensed under a Creative Commons Attribution-NonCommercial-ShareAlike 4.0 International License.
Tweet
A German version of this pattern can be found here.
Diese Anleitung gibt es hier auch auf Deutsch.
Materials
- 100 grams of fingering weight yarn
- 3.75mm needles (3.5mm or 4mm needles will do as well)
- stitch markers
- a tapestry needle to weave in ends
- German short rows: when you turn, bring yarn to the front and pull it back so that a sort of double-stitch is created, then knit back as usual - when you have to knit the double-stitch, be careful to knit it as one stitch (see also https://www.youtube.com/watch?v=P6n561SMZXQ); this method has the advantage the no picking up of stitches is necessary. In the pattern, this stitch will be called t+p (turn and pull).
For purposes of this pattern, this pulled stitch will NOT be counted after turning.
- Drop Stitches/Elongated Stitches: In the first row insert the right hand needle into the next stitch and wrap the yarn around it 3 times - in the next row drop all your extra wraps, i.e. only knit one stitch per three wraps. Here are some YouTube videos that show this technique see http://www.youtube.com/watch?v=D_PtbMLkty4 or http://www.youtube.com/watch?v=NN0sbky-3IE)
I personally prefer the method of doing yarn overs (2 yo's in case of this pattern) inbetween the stitches - the result is the same. Unfortunately, I couldn't find a video in English for this - this one is in German: http://www.youtube.com/watch?v=fqcnTlwYzTQ
- Since both sides look the same, it may be helpful to mark the RS.
- Notations: Since I'm lazy, I will use the following abbreviations - please note that this refers to the current knitting direction, i.e. on RS M2+1 is a different stitch than on WS.
- "k to M2+1" means: nit to M2 and then k1
- "k to M2-4" means: knit to four stitches before M2
Instructions
CO52
Set-up row: k6 pm (this marker will be called M5) k10 pm (this marker will be called M4) k10 pm (this marker will be called M3) k10 pm (this marker will be called M2) k10 pm (this marker will be called M1) k6
Row 1: (RS) k all stitches
Row 2: (WS) k to M4, t+p
(RS) k to end
(WS) k to M4-2, t+p
(RS) k to end
(WS) k to M4-4, t+p
(RS) k to end
(WS) k to M4-6, t+p
(RS) k to end
(WS) k to M4-8, t+p
(RS) k to end
(WS) k to M5 (i.e. k M4-10), t+p
(RS) k to end;
(WS) k to M2, t+p
(RS) k10 (i.e. k to M3+1) t+p
(WS) k8 (i.e. k to M2-2) t+p
(RS) k10 (i.e. k to M3+3) t+p
(WS) k8 (i.e. k to M2-4) t+p
(RS) k10 (i.e. k to M3+5) t+p
(WS) k8 (i.e. k to M2-6) t+p
(RS) k10 (i.e. k to M3+7) t+p
(WS) k8 (i.e. k to M2-8) t+p
(RS) k10 (i.e. k to M3+9) t+p
(WS) k8 (i.e. k to M2-10 = M3) t+p
(RS) k10 (i.3. k to M3+11 = M4+1) t+p
(WS) k to end
(RS) k to M1+1, t+p
(WS) k to end
(RS) k to M1+3, t+p
(WS) k to end
(RS) k to M1+5, t+p
(WS) k to end
(RS) k to M1+7, t+p
(WS) k to end
(RS) k to M1+9, t+p
(WS) k to end
(RS) k to M1+11 (i.e. to M2+1), t+p
(WS) k to end;
Row 3: (RS) k all stitches as elongated stitches
Row 4: (WS) k all stitches dropping all additonal wraps
Row 5: (RS) k to M3+1, t+p
(WS) k10 (i.e. k to M2), t+p
(RS) k8 (i.e. k to M3-1), t+p
(WS) k10 (i.e. k to M2+2), t+p
(RS) k8, (i.e. to M3-3), t+p
(WS) k10 (i.e. k to M2+4), t+p
(RS) k8 (i.e. to M3-5), t+p
(WS) k10 (i.e. k to M2+6), t+p
(RS) k8 (i.e. to M3-7), t+p
(WS) k10 (i.e. k to M2+8), t+p
(RS) k8 (i.e. k to M3-9), t+p
(WS) k10 (i.e. k to M2+10 = M1), t+p
(RS) k to M5+1, t+p
(WS) k10 (i.e. k to M4), t+p
(RS) k8 (i.e. to M5-1), t+p
(WS) k10 (i.e. k to M4+2), t+p
(RS) k8, (i.e. k to M5-3), t+p
(WS) k10 (i.e. k to M4+4), t+p
(RS) k8 (i.e. to M5-5), t+p
(WS) k10 (i.e. k to M4+6), t+p
(RS) k8 (i.e. to M5-7), t+p
(WS) k10 (i.e. k to M4+8), t+p
(RS) k8 (i.e. k to M5-9), t+p
(WS) k10 (i.e. k to M4+10 = M3), t+p
(RS) k to end
Row 6: (WS) k all stitches
Row 7 = Row 3
Row 8 = Row 4
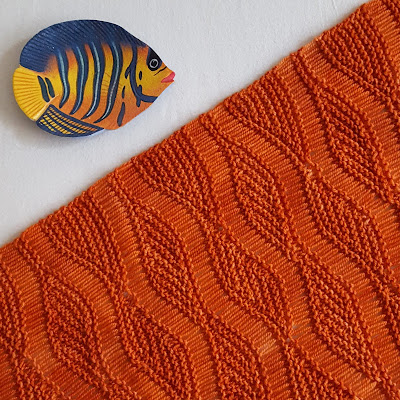
Repeat rows 1 to 8 until you run out of yarn or until your scarf is long enough. To make both ends look alike, end with rows 1 and 2; then BO loosely.
Weave in ends and block.
This pattern has been featured on the Pinbellish Link Party #43. Thank you!


Thank you !!!
AntwortenLöschenGlad you like it!
LöschenThank you very much, it is beautiful and original.
AntwortenLöschenThank you very much!
Löschen