So, when I bought a few skeins of a beautiful variegated yarn, I started thinking about how to knit it into a top in one continuous piece ... and here's what I came up with.

As with my Summer Garter Stitch Top and my Waterfall Tunic this is not a stitch-by-stitch pattern with stitch and row counts for various sizes but rather a tutorial on how to knit a top like this. You will have to swatch and calculate for yourself. So this top is completely configurable to your wishes and your shape. I will however give you my numbers and calculations as an example (written in purple). ... I hope, it is not too complicated.

This work by Knitting and so on is licensed under a Creative Commons Attribution-NonCommercial-ShareAlike 4.0 International License.

A Danish translation of this pattern has been provided by Marianne Holmen and can be found here on strikkeglad.dk.
Materials
- I used about 120 grams of lace weight yarn - however, this tutorial is written in a way that it can be adapted to other yarn weights as well (I used Jaipur by Katia - here's a link to the yarn's Ravelry page).
- 3.5 mm needles (long straight needles or circulars)
- 3 stitch markers, 2 removable stitch markers
- scrap yarn for the provisional CO
- a tapestry needle for grafting
Techniques
- Provisional CO: My favorite method for a provision CO is the crochet provisional CO - it is shown in this Youtube video by New Stitch a Day.
- Short rows with wrap and turn (w+t) - as shown in this YouTube video by Very Pink Knits.
- Knitted Cast-On: See this Youtube-video by Very Pink Knits.
- Cable Cast-On: See this Youtube-video by Very Pink Knits.
- Grafting in Garter Stitch: A technique to get an invisible (knitted) seam - this technique is shown in this YouTube Video by knittinghelp.com.
- Picking up stitches from the edge and joining as you go: to attach the first stitch of one row to the edge stitch of the row opposite, slip the last stitch and insert the right needle in a loop from the opposite side, reinsert the left needle into the last 2 loops and knit them together (like doing a ssk) - a similar method is shown in this video: http://youtu.be/3zPXZ4cu66
- Stretchy Bind-Off: see this YouTube-video by Knitting Pipeline.
- There is also something, I'll call normal BO in the instructions: see this YouTube-video by Knit Purl Hunter.
Measurements to take
Take the following measurements - either on yourself or using a top that fits you well.

B = width of the shoulder seam
C = half of the width of neckline
D = a quarter of the waist circumference
E = a quarter of your bust circumference
F = a quarter of your hip circumference
G = from shoulder to neckline (back)
H = from shoulder to neckline (front)
I = from shoulder to right under your arm
J = from shoulder to bust
K = from shoulder to waist
L = from shoulder to hip (total length of the garment)
Furthermore (not on the picture) you need to measure the height of your bust (top of your breast to just below your breasts). This number will be called N.
Construction
The picture below shows the construction:
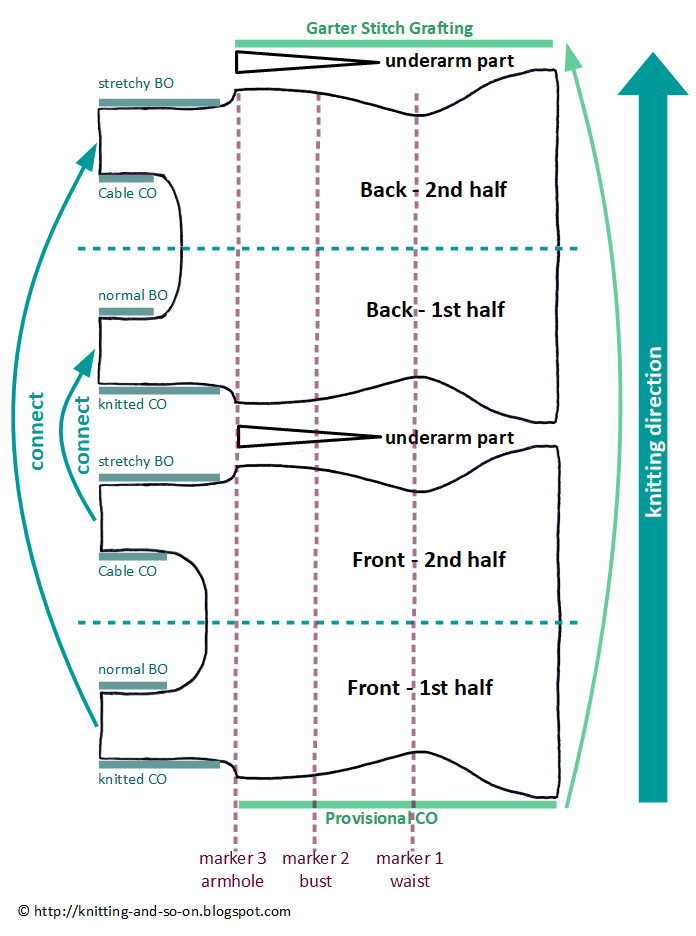
You start with a provisional CO that reaches from just under your arms to the bottom of the top. After a few rows you start increasing and then you CO in order to for the strap reaching up to your shoulder. Once the shoulder is finished you decrease again for the neckline with a normal BO and a few further decreases during the next row. After you've finished the 1st half of the front piece, you'll have to knit a mirror image of it, i.e. you increase a few stitches and then do a cable CO for the shoulder pieces
Other noteworthy points:

Calculations
Knit a swatch in garter stitch that measures at least 10cm by 10cm. For this kind of project it is really important. I'm not a "swatcher" myself (i.e. I usually avoid knitting a swatch at all cost), but in case of a fitted top you're either really lucky (and it fits) or it safes some time and effort because when you start knitting without concrete ideas about stitch and row numbers, you just end up knitting a bigger swatch. Then start calculating how many stitches and rows there are for each of the measurements you took.
Here are my calculations for stitch numbers and ridges - rounded. My swatch measured 22 sts for 10 cm in width and 22 ridges (44 rows) for 10 cm in height.
A (distance between underarm edge and start of shoulder): 2 cm = 9 rows (4.4 ridges)
B (width of the shoulder seam): 10 cm = 22 ridges
C (half of the width of neckline): 11 cm = 24 ridges
D (a quarter of the waist circumference): 20,5 cm = 45 ridges
E (a quarter of your bust circumference): 22,5 cm = 49 ridges
F (a quarter of your hip circumference): 24,5 cm = 54 ridges
G (from shoulder to neckline (back)): 13 cm = 28 sts
H (from shoulder to neckline (front)): 16 cm = 35 sts
I (from shoulder to right under your arm): 21 cm = 46 sts
J (from shoulder to bust): 29 cm = 64 sts
K (from shoulder to waist): 48 cm = 106 sts
L (from shoulder to hip (total length of the garment): 60 cm = 132 sts
N (height of bust darts): 15 cm = 33 sts
Further calculations:
You need to calculate the number of short rows - for bust darts and hip, per half of one side.
For the bust darts this is E-D, and F-D for the hip. To calculate how often they need to be done, divide the number of waist ridges (D) by E (for the bust darts) and F (for the hip) respectivel - taking into account the ridges you knitted before you started the shaping short rows (A).

Instructions
Front - 1st Half
With provisional CO cast on L-I stitches and knit the first row with your working yarn. This first row is knitted upwards (i.e. from the bottom hem of the top upwards, ↑).
To achieve a rounded arm hole, you need to increase a few stitches at this end before you cast on (with a knitted CO) the stitches for the armhole. That's why I knitted one kfb at this end in every row while knitting the distance A, i.e.
R1 (armhole to bottom hem, ↓): sl1, kfb, k to end
R2 (bottom hem to armhole, ↑): sl1, k to last 2 sts, kfb, k1
After these ridges, I did a knitted CO of the stitches that were needed for the armhole (I minus the increases already done).
In my case I knitted 9 rows (very first row after provisional CO plus four times R1 & R2), i.e. I had increased by 8 stitches. So I cast on 38 sts (46 (I) - 8 (increases) = 38).
In the next row (top-down) you can put in your stitch markers to help with the short rows for shaping:
M1: K sts from top (to mark the waistline)
M2: J sts from top (to mark the bustline)
M3: I sts from top (to mark the end of the armhole)
Now you need to start inserting the short rows for shaping waist and bust.
Ridge with waist shaping short row (starts from bottom hem):
(↑) sl1, k to M1, w+t,
(↓) k to end, turn,
(↑) sl1, k to end, turn
(↓) sl1, k to end
Ridge with short rows for bust darts:
(↑) sl1, k to M2, k N/2, w+t,
(↓) k to M2, k N/2, w+t
(↑) k to end, turn
(↓) sl1, k to end
In my case (with N = 33 sts) I knitted 16 sts on the way up /(counted from M2) and 17 sts on the way down (counted from M2)).
Normal ridges (no shaping) are knitted as follows:
(↑) sl1, k to end,
(↓) sl1, k to end
When the shoulder seam measures B ridges, knit your neckline. Start by a BO of three quarters of H at the top - i.e. start BO in the beginning of a top-down row.
During the next rows, decrease one stitch at the top edge - one quarter of H times (so in the end you have decreased a total of H sts), i.e.
(↑) sl1, k to 3 bef, end, k2tog, k1
(↓) sl1, ssk, k to end
In my case (with H = 35 sts), I did a BO of 26 sts, and decreased on the top edge by one stitch for the next 9 rows.
(Don't forget to insert the hip and bust short rows while knitting the neckline).
Knit to the middle of the front piece - without forgetting to knit the bust and hip shaping short rows.
Put a removable stitch marker into the first stitch of the next row to mark the middle of the front piece.
Front - 2nd Half
Knit exactly the same ridges as in the 1st half, but
After finishing the 2nd half of the front you should have the same number of stitches you CO in the first provisional CO.

1st Underarm Part
Since there are no bust darts on the back of this piece, the necessary ridges must be knitted somewhere else to get the bust circumference. In case of this sweater, I leveled this out by knitting the necessary ridges underarm. When starting from the top, knit to M2 and then N/2 stitches further (like in the short row for bust shaping), then do a w+t and knit back. The next row, knit up to 2 sts before the last w+t. do a w+t and knit back. Repeat this until you have knitted the calculated number of ridge. Or in knitting terms:
(↓) sl1, k to M2, k N/2, w+t,
(↑) k end
* (↓) sl1, k to M2, k 2 sts before last turn, w+t,
(↑) k to end
repeat from * until you've knitted E-D ridges.
In my case, I needed to knit 4 ridges (E-D=49-45=4) and N/2 was calculated as 17 sts. So I knitted:
(↓) sl1, k to M2, k17, w+t, (↑) k end
(↓) sl1, k to M2, k15, w+t, (↑) k end
(↓) sl1, k to M2, k13, w+t, (↑) k end
(↓) sl1, k to M2, k11, w+t, (↑) k end
Knit the same rows as in the 1st half of the front bit, with the following differences.
Knit exactly the same ridges as in the 1st half of the back piece, but

2nd Underarm Part
Knit this exactly as the 1st underarm part.
Make sure that your last row is knitted upwards.
Finishing
Put the stitches of the provisional CO on the second needle.
Cut your yarn but leave a tail that is long enough for grafting - I usually leave a tail that is 5 times the length of the seam to be grafted. Graft in garter stitch.
Weave in ends and block to size.

- While you're knitting the front piece you add in short rows, a) to make sure that the bottom edge is wide enough to fit around your hip and b) to add bust "darts". These bust darts are not added at the back of the piece - instead the added width is knitted into an underarm part. However, there are also short rows to make the piece fit around your waist.
- The 2nd half of one piece (front or back) is the exact mirror of the 1st part. So it's really useful to take notes while you're knitting, in order to be able to knit the same rows in the opposite order.
- When knitting the shoulder parts of the back piece you can connect them to the shoulder of the front piece while knitting - alternatively, you can sew them up after finishing.

Calculations
Knit a swatch in garter stitch that measures at least 10cm by 10cm. For this kind of project it is really important. I'm not a "swatcher" myself (i.e. I usually avoid knitting a swatch at all cost), but in case of a fitted top you're either really lucky (and it fits) or it safes some time and effort because when you start knitting without concrete ideas about stitch and row numbers, you just end up knitting a bigger swatch. Then start calculating how many stitches and rows there are for each of the measurements you took.
Here are my calculations for stitch numbers and ridges - rounded. My swatch measured 22 sts for 10 cm in width and 22 ridges (44 rows) for 10 cm in height.
A (distance between underarm edge and start of shoulder): 2 cm = 9 rows (4.4 ridges)
B (width of the shoulder seam): 10 cm = 22 ridges
C (half of the width of neckline): 11 cm = 24 ridges
D (a quarter of the waist circumference): 20,5 cm = 45 ridges
E (a quarter of your bust circumference): 22,5 cm = 49 ridges
F (a quarter of your hip circumference): 24,5 cm = 54 ridges
G (from shoulder to neckline (back)): 13 cm = 28 sts
H (from shoulder to neckline (front)): 16 cm = 35 sts
I (from shoulder to right under your arm): 21 cm = 46 sts
J (from shoulder to bust): 29 cm = 64 sts
K (from shoulder to waist): 48 cm = 106 sts
L (from shoulder to hip (total length of the garment): 60 cm = 132 sts
N (height of bust darts): 15 cm = 33 sts
Further calculations:
You need to calculate the number of short rows - for bust darts and hip, per half of one side.
For the bust darts this is E-D, and F-D for the hip. To calculate how often they need to be done, divide the number of waist ridges (D) by E (for the bust darts) and F (for the hip) respectivel - taking into account the ridges you knitted before you started the shaping short rows (A).
- For bust darts: (D-A)/(E-D)
- For the waist: (D-A)/(F-D)
- 4 ridges for the bust darts (E-D=49-45=4), i.e. 4 bust darts short rows and
- 9 more ridges for the hip shaping (F-D=54-45=9), i.e 9 waist shaping short row ridges need to be knitted for one half of one side
- the hip shaping ridges need to be done every 5th row ((D-A)/9=(45-4)/9=4.555, rounded 5).
- the bust shaping ridges need to be knitted every 10th row ((D-A)/4=(45-4)/4=10,25, rounded 10)

Instructions
Front - 1st Half
With provisional CO cast on L-I stitches and knit the first row with your working yarn. This first row is knitted upwards (i.e. from the bottom hem of the top upwards, ↑).
To achieve a rounded arm hole, you need to increase a few stitches at this end before you cast on (with a knitted CO) the stitches for the armhole. That's why I knitted one kfb at this end in every row while knitting the distance A, i.e.
R1 (armhole to bottom hem, ↓): sl1, kfb, k to end
R2 (bottom hem to armhole, ↑): sl1, k to last 2 sts, kfb, k1
After these ridges, I did a knitted CO of the stitches that were needed for the armhole (I minus the increases already done).
In my case I knitted 9 rows (very first row after provisional CO plus four times R1 & R2), i.e. I had increased by 8 stitches. So I cast on 38 sts (46 (I) - 8 (increases) = 38).
In the next row (top-down) you can put in your stitch markers to help with the short rows for shaping:
M1: K sts from top (to mark the waistline)
M2: J sts from top (to mark the bustline)
M3: I sts from top (to mark the end of the armhole)
Now you need to start inserting the short rows for shaping waist and bust.
Ridge with waist shaping short row (starts from bottom hem):
(↑) sl1, k to M1, w+t,
(↓) k to end, turn,
(↑) sl1, k to end, turn
(↓) sl1, k to end
Ridge with short rows for bust darts:
(↑) sl1, k to M2, k N/2, w+t,
(↓) k to M2, k N/2, w+t
(↑) k to end, turn
(↓) sl1, k to end
In my case (with N = 33 sts) I knitted 16 sts on the way up /(counted from M2) and 17 sts on the way down (counted from M2)).
Normal ridges (no shaping) are knitted as follows:
(↑) sl1, k to end,
(↓) sl1, k to end
When the shoulder seam measures B ridges, knit your neckline. Start by a BO of three quarters of H at the top - i.e. start BO in the beginning of a top-down row.
During the next rows, decrease one stitch at the top edge - one quarter of H times (so in the end you have decreased a total of H sts), i.e.
(↑) sl1, k to 3 bef, end, k2tog, k1
(↓) sl1, ssk, k to end
In my case (with H = 35 sts), I did a BO of 26 sts, and decreased on the top edge by one stitch for the next 9 rows.
(Don't forget to insert the hip and bust short rows while knitting the neckline).
Knit to the middle of the front piece - without forgetting to knit the bust and hip shaping short rows.
Put a removable stitch marker into the first stitch of the next row to mark the middle of the front piece.
Front - 2nd Half
Knit exactly the same ridges as in the 1st half, but
- knit them in the opposite order, i.e. start with the last ridge of the 1st half and end with the first ridge of the 1st half and
- for every increased stitch on the top edge during the first half, you decrease a stitch in the second half - and vice versa.
After finishing the 2nd half of the front you should have the same number of stitches you CO in the first provisional CO.

1st Underarm Part
Since there are no bust darts on the back of this piece, the necessary ridges must be knitted somewhere else to get the bust circumference. In case of this sweater, I leveled this out by knitting the necessary ridges underarm. When starting from the top, knit to M2 and then N/2 stitches further (like in the short row for bust shaping), then do a w+t and knit back. The next row, knit up to 2 sts before the last w+t. do a w+t and knit back. Repeat this until you have knitted the calculated number of ridge. Or in knitting terms:
(↓) sl1, k to M2, k N/2, w+t,
(↑) k end
* (↓) sl1, k to M2, k 2 sts before last turn, w+t,
(↑) k to end
repeat from * until you've knitted E-D ridges.
In my case, I needed to knit 4 ridges (E-D=49-45=4) and N/2 was calculated as 17 sts. So I knitted:
(↓) sl1, k to M2, k17, w+t, (↑) k end
(↓) sl1, k to M2, k15, w+t, (↑) k end
(↓) sl1, k to M2, k13, w+t, (↑) k end
(↓) sl1, k to M2, k11, w+t, (↑) k end
Back - 1st Half
Knit the same rows as in the 1st half of the front bit, with the following differences.
- Do not knit the short rows for the bust darts.
- When you've knitted the armhole CO (and start to knit the shoulder seam), you can connect the first stitch of the next top-down row to the last stitch of the second shoulder seam of the front part. Connect the first stitch next top-down row to the next stitch of the shoulder seam of the front part (alternatively, you can sew up both shoulder seams after finishing).
- When decreasing for the neckline, use G sts (instead of H). The same goes for the increases later during the 2nd half of the back.
Knit exactly the same ridges as in the 1st half of the back piece, but
- knit them in the opposite order, i.e. start with the last ridge of the 1st half and end with the first ridge of the 1st half and
- for every increased stitch on the top edge during the first half, you decrease a stitch in the second half - and vice versa
- connect the 2nd shoulder seam of the back to the first shoulder seam of the front.

2nd Underarm Part
Knit this exactly as the 1st underarm part.
Make sure that your last row is knitted upwards.
Finishing
Put the stitches of the provisional CO on the second needle.
Cut your yarn but leave a tail that is long enough for grafting - I usually leave a tail that is 5 times the length of the seam to be grafted. Graft in garter stitch.
Weave in ends and block to size.

Very cool, thank you for sharing!
AntwortenLöschenThank you ♥
LöschenBeautiful !!!!!
AntwortenLöschenAnna
Thank you. Merci beaucoup!
Löschen