Donnerstag, 16. Januar 2020

Luftbläschen Brioche and Lace Scarf

This year my Mum wanted a new scarf for her birthday. So I took her to the yarn store and asked her to select whatever yarn she wanted. She choose a beautiful purple wool/silk mix in Lace weight. I wanted to knit something with a bit of structure, but I soon found that the yarn didn't lend itself to this and was better suited to a lacy pattern. In the end I settled for a combination of brioche and lace stitches – and I am very pleased with it.

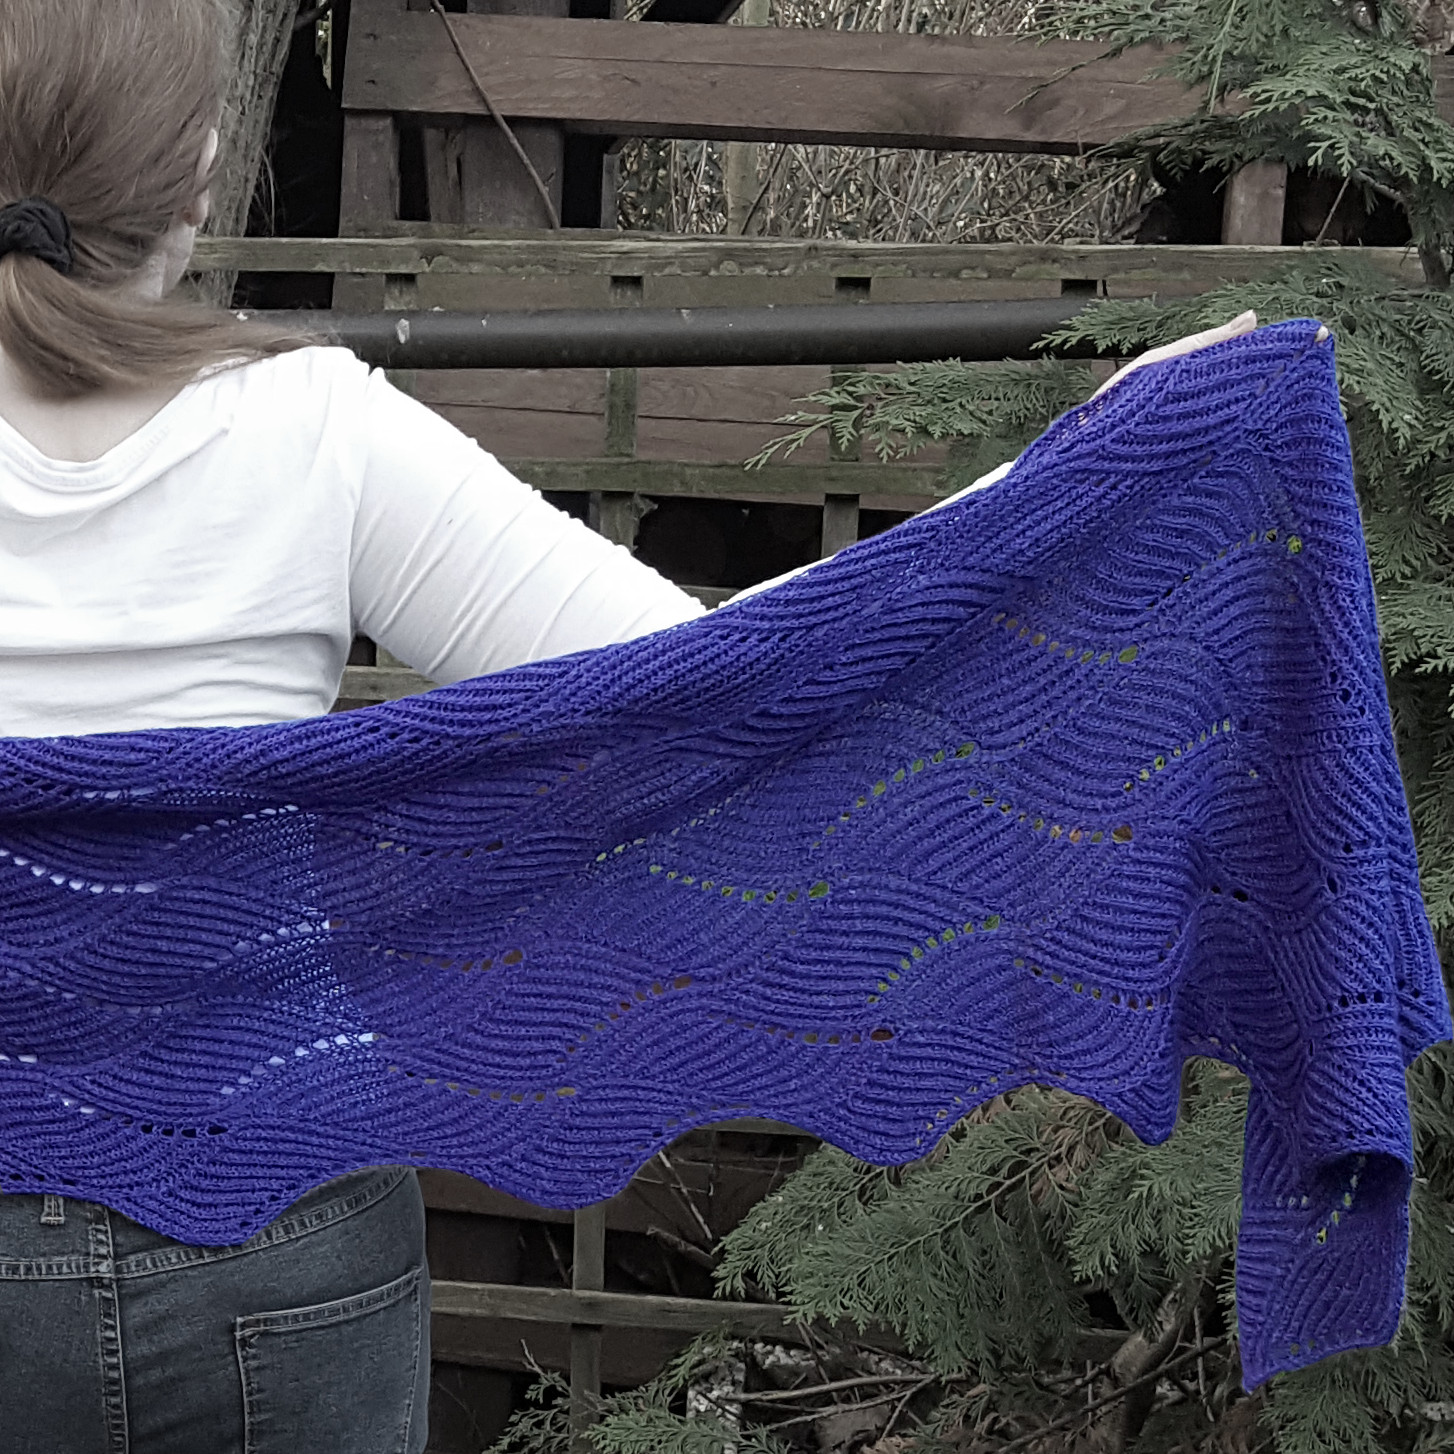
It results in an elegant and squishy scarf with a reversible lace pattern that looks the same from both sides.

As to the name, Luftbläschen is the German word for little air bubbles.

The pattern PDF is available via


This pattern pdf is 5 pages long and contains:
  • the complete written patterns to knit this scarf
  • photo tutorials for the stitches and stitch combinations that are used in this pattern 
    • yarn over between brioche stitches and how to knit it
    • a left-leaning decrease in brioche


Skills you need to knit this pattern:
  • knitting brioche (in one color)
  • a certain stamina while knitting - this is knitted in lace weight yarn and brioche, i.e. it grows extremely slow

To knit this you need the following materials 
  • about 160 grams of Lace weight yarn (around 1300 meters) - for the piece in the pictures I used West Yorkshire Spinners Exquisite Lace (here's a link to the yarn's Ravelry page)
  • 3mm knitting needles
  • 4 stitch markers plus 1 removable stitch markers
  • a tapestry needle to weave in ends


Sonntag, 8. Dezember 2019

Pixel Star

After publishing the Stella potholders pattern, I thought it might be a good idea to do an 8-pointed star within a knitted square. I had done similar constructions before (e.g. Tannenbäumchen potholders) - i.e. something within a square, using short rows combined with intarsia.
In the end, it didn't look exactly the way I wanted - more like a pixelized star :) But I realized that this was something more or less built in with this kind of construction - and so I didn't change it.
So here it is. Enjoy!


Creative Commons License
This work by Knitting and so on is licensed under a Creative Commons Attribution-NonCommercial-NoDerivatives 4.0 International License.


Materials
  • a total of about 30 grams of DK weight cotton yarn in two colors (C1 = background color, C2 = color of star)
  • 3 mm needles - if you use yarn of a different weight, use a needle that is one size below the size that the yarn calls for
  • scrap yarn for provisional CO
  • a tapestry needle for grafting and to weave in ends


Techniques and Notation
  • Provisional CO: My favorite method for a provision CO is the crochet provisional CO - it is shown in this Youtube video by New Stitch a Day.
  • Short rows with wrap and turn (w+t) - as shown in this YouTube video by Very Pink Knits.
    Note: in some rows the wrap has to be made just at the color change in the row below, e.g. Ridge B11 where you knit 11 sts in C1 and the 12 stitch that is to be wrapped was knitted in C2. In this case, it's advisable to change the color (as if to knit the next stitch in the new color), wrap and turn in the new color, and then to change back. This gives nicer color edges.
  • Grafting in Garter Stitch: A technique to get an invisible (knitted) seam - this technique is shown in this YouTube Video by knittinghelp.com.
  • Intarsia: Changing colors with the intarsia technique - as shown in this YouTube video by knitwithpat; or this YouTube video by Francoise Danoy. That way you don't have to carry long strands on the WS. The picture below shows the RS and WS of the piece.
    Throughout the pattern, the following notation is used:  C1 (k4), C2 (k10, w+t, k10), C1 (k to end) means, knit 4 stitches in C1, change to C2 and knit 10 sts, do a wrap and turn, knit 10 stitches and then change back to C1 and k to end. I.e. color is indicated before the knitting instructions for that yarn and the knitting instructions for that yarn are given in brackets after the color. 

Construction

This potholder is knitted in 4 parts. It starts with a provisional CO. Then each row is a stitch shorter than the last one, One part ends,
  • when the row is only 1 stitch (plus 1 w+t) long - then the next part begins and each row is one stitch longer than the last one until all stitches are knitted and we've sucessfully knitted around a corner - or
  • when the row length is knitted to the end and after a normal turn (as opposed to a w+t) starts with a slip stitch; then the row  length is getting shorter as you approach the next corner.
After knitting around four corners, the two sides (CO and last row) are grafted in garter stitch.
The photo on the right shows the piece, just before taking out the stitches of the provisional CO and grafting this to the last row.

Size
Knitted in DK yarn, the piece measures about 15 cm x 15 cm.


Instructions
With scrap yarn provisionally CO 17 stitches

Part A:
Setup row (WS): C2 (k14), C1 (k3)
Ridge 1: C1 (k5), C2 (k11, w+t, k11), C1 (k5)
Ridge 2: C1 (k7), C2 (k8, w+t, k8), C1 (k7)
Ridge 3: C1 (k9), C2 (k5, w+t, k5), C1 (k9)
Ridge 4: C1 (k10), C2 (k3, w+t, k3), C1 (k10)
Ridge 5: C1 (k9), C2 (k3, w+t, k3), C1 (k9)
Ridge 6: C1 (k9), C2 (k2, w+t, k2), C1 (k9)
Ridge 7: C1 (k8), C2 (k2, w+t, k2), C1 (k8)
Ridge 8: C1 (k8), C2 (k1, w+t, k1), C1 (k8)
Ridge 9: C1 (k7), C2 (k1, w+t, k1), C1 (k7)
Ridge 10: C1 (k6), C2 (k1, w+t, k1), C1 (k6)
Ridge 11: C1 (k6), C2 (w+t), C1 (k6)
Ridge 12: C1 (k5, w+t, k5)
Ridge 13: C1 (k4, w+t, k4)
Ridge 14: C1 (k3, w+t, k3)
Ridge 15: C1 (k2, w+t, k2)
Ridge 16: C1 (k1, w+t, k1)

Ridge 17 = Ridge 16
Ridge 18 = Ridge 15
Ridge 19 = Ridge 14
Ridge 20 = Ridge 13
Ridge 21 = Ridge 12
Ridge 22 = Ridge 11
Ridge 23 = Ridge 10
Ridge 24 = Ridge 9
Ridge 25 = Ridge 8
Ridge 26 = Ridge 7
Ridge 27 = Ridge 6
Ridge 28 = Ridge 5
Ridge 29 = Ridge 4
Ridge 30 = Ridge 3
Ridge 31 = Ridge 2
Ridge 32 = Ridge 1
Ridge 33:  C1 (k3), C2 (k14, turn, sl1, k13), C1 (k3)

That's the first part finished.

Now repeat this (ridges 1 to 33) two more times (parts 2 and 3) - and then once again ridges 1 to 32 (part 4).

Take out your scrap yarn of the provisional cast on and put the live stitches on a knitting needle. Cut your yarns but leave tails long enough for grafting.
Graft in garter stitch: 3 sts in C1 and 14 sts in C2.

After grafting there is still a small hole in the middle of the piece - you can sew this closed with your C2 yarn tail. Sew in ends afterwards.


Chart
The chart below shows one forth of the potholder. The numbers indicate the number of stitches per color of each ridge. The orange number gives the stitches in C2 and the black number the stitches in C1.

Samstag, 16. November 2019

Stella - Star-Shaped Potholders

Christmas is the time to decorate the space around you with pretty things. And as a knitter, in the run-up to Christmas I like to knit decorations. And if these decorations are also useful, it's even better. These 8-pointed stars can be used as hotpads, doilies or coasters.
They are knitted in one piece and all in garter stithc– starting with a provisional CO, then point by point around the center. Grafting the first and last rows together gives it a seamless look. The construction uses short rows and basic increases and decreases.
So, if you want a quick knit to get you into a Christmas mood – and maybe learning a couple of new techniques along the way – this pattern is for you.


The pattern is available for purchase 
The pattern PDF 14 pages long and contains:

  • the complete written patterns for stars in two sizes including charts
  • a general pattern how to knit stars in other sizes – containing also a photo tutorial
  • three further variations of this pattern (see photos below)
    • lacy variation of this star – written pattern and a chart
    • a pattern for a two-colour variation – written pattern, a chart and detailed instructions how to undo the provisional CO in two colours and how to do the grafting in two colours
    • a three-colour variation – chart only 
  • short photo tutorials for the following techniques
    • provisional cast on with a crochet hook and how to undo it
    • grafting in garter stitch
    • intarsia


Skills you need to knit this pattern:
  • provisional CO
  • short rows with wrap and turn
  • grafting in garter stich
  • basic increases (kfb) and decreases (ssk and k2tog)


Materials
  • yarn – I used cotton yarns, for the off white ones in Aran weight (15 grams for the small star, 30 grams for the bigger star) and Sports weight yarn for the orange lacy star (about 40 grams)
  • knitting needles that are smaller than what the yarn calls for – I used 2.5mm needles
  • scrap yarn and a crochet hook for a provisional CO
  • a tapestry needle for grafting

Sizes
The bigger star in Aran weight measures 24 cm from tip to tip, the smaller one 16 cm.
The big lacy star in Sports weight yarn measures about 36 cm.