Montag, 13. April 2015

Lacy E-Book or Tablet Sleeve

Free DIY Tutorial: Lacy E-Book SleeveThis e-book sleeve is easy to make and looks quite special. You can use some leftover yarn and contrast or complement it with a colored foam sheet.

The lace part is knitted at random. This means that there are no detailed knitting instructions as in a real lace patterns, but only a description how to arrive at something similar. The effect is created by randomly knitting lace stitches (yarn-over, "knit2together etc.) that make up a nice organic looking structure.


Creative Commons License
This work by Knitting and so on is licensed under a Creative Commons Attribution-NonCommercial-ShareAlike 4.0 International License.


Materials:
  • yarn (I used fingering weight yarn)
  • knitting needles the yarn calls for (I used 3mm needles)
  • a foam sheet
  • a pair of scissors
  • a tapestry needle
  • glue (I used basic universal glue)
  • a ruler and a pencil 
  • the measurements of your e-book/tablet

Free DIY Tutorial: Lacy E-Book Sleeve


Instructions:
  • Measure your ebook - and knit a piece of random lace that is 5mm wider than your ebook and 5mm longer then twice its height. Block it to size. See instructions on how to knit random lace below.

  • Using pencil and ruler, mark and cut out two pieces of foam sheet that are as big as your ebook reader or tablet - something like 1mm per side.

  • Glue the foam sheet pieces to the WS of your knitting, in a way that the edge stitches ofr your knitting still stand out a bit on each side. Apply the glue sparingly on your knitting only in places where there are no holes (see picture below). That way you will minimize the visible glue residue on the ebook sleeve.
    Press the foam sheet to the knitting for a few seconds and then let it dry completely.

  • After the glue has dried completely, fold the halves together right sides out and sew the sides together (I used the tails of my knitting) - using the "invisible stitch" (as shown from minute 3:30 to 5:15 in this YouTube video). 
Free DIY Tutorial: Lacy E-Book Sleeve


How to Knit Random Lace

It's best to use a yarn that blocks well, e.g. something that has a large percentage of wool. I used standard sock yarn and 3mm needles.

Loosely cast on the amount of stitches you think you need. For my 12.2cm wide piece I cast on 25 stitches. If in doubt, it's better to knit one stitch less - this allows you to stretch the piece while blocking it and thus bringing out the lace in a better way.

I decided to do only "knit stitches" on one side (RS) and only "purl stitches" on the other (WS). Starting with WS I knitted lace stitches in a completely random manner.
  • On WS I randomly did p2tog's, yo's, p2togtbl's, double-yo's and p3tog's.
  • On RS I randomly did k2tog's, ssk's yo's and double-yo's.
The important thing is to make sure that the number of stitches stays the same after finishing one row, e.g. if you started off with 25 stitches, you need to finish each row with 25 stitches (loops) on your needles.

If you want a neater pattern, do one increase and corresponding decrease next to each other. For a more organic look, do a few increases and only then the necessary decreases. I would advise, however, not to do this too much, since then your piece will be askew.

After a while, I only counted the increases and decreases (or stitches below and above par).

Knit until your piece is a bit less than about twice as long as your ebook is high - keep in mind that it will grow on the blocking board, both with width and length. Therefore, it's better to knit it slightly smaller and stretch it on the blocking board.

Random Lace before and after blocking. http://knitting-and-so-on.blogspot.com

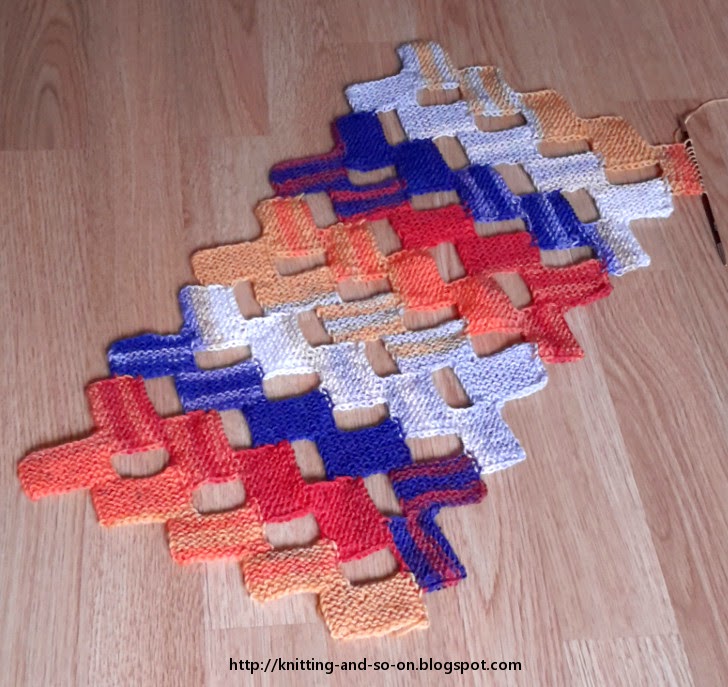
Don't worry if your piece looks crumpled before blocking. Chances are that it will look nice and lacy afterwards (see picture above).

I didn't weave in the ends but left tails on both sides that were long enough to sew the sides together.

Free DIY Tutorial: Lacy E-Book Sleeve


This project was featured on the Pinbellish Link Party #35 at purfylle.com. Thank you!

Sonntag, 12. April 2015

Random Lace - E-Book Sleeve

When my Dad bought a new ebook reader, I promised to make a new sleeve for it and bought some foam sheets to knit around them. However, While I was deciding what to knit, I remembered the beautiful lace patterns at String Geekery Blog, Some of them look so nice and organic, and I wanted to do something similar.

But I'm very lazy ... too lazy in fact to decide upon a pattern, to print it out and to count stitches and rows. So I decided to knit a completely random pattern, with yarn-overs, k2togs, double yarn-overs, p2togs, ssks etc.. I just had to make sure, that the number of stitches stayed the same.
Here's how it looked after a few centimeters. But even "real" lace patterns look a bit crumpled before blocking, so I persevered :)


After I blocked it and glued it around the foam sheet, it looked much better.


I started a second one that I even like better.


Moreover, I really think the random approach has potential and I like the organic look. Plus, it's really fun to knit. I'm trying to do a scarf or stole next.

I later googled at bit and found some resources on random lace knitting - a tutorial (also linked on Ravelry) and a book (that I haven't read, but according to the description at amazon it seems to pursue a similar approach).

Freitag, 10. April 2015

Kleine Rechtecke Schal

Endlich wird es Frühling - daher möchte man auch buntere Kleidung anziehen und vielleicht diesen hübschen, leichten Schal aus Sockengarn stricken.

Gratis-Strickanleitung: Kleine Rechtecke-Schal (knitting-and-so-on.blogspot.com)

Dieser Schal ist modular gestrickt, d.h. es werden einzelne kleine Teile (hier kleine Rechtecke) gestrickt, die während des Strickens verbunden werden. Er besteht aus kleinen krausrechts gestrickten Rechtecken, die nur 12 Maschen breit sind.

Diese Anleitung ist die deutsche Version meiner Anleitung "Little Rectangle Summer Scarf".

The original english version of this pattern is available here: Little Rectangles Summer Scarf.


Creative Commons Lizenzvertrag
Dieses Werk von Knitting and so on ist lizenziert unter einer Creative Commons Namensnennung - Nicht-kommerziell - Weitergabe unter gleichen Bedingungen 4.0 International Lizenz.


Benötigtes Material
  • ca, 150 Gramm 4-fädiges Garn (ich habe Sockenwolle genommen)
  • 3.25mm Stricknadeln (ganz kurze Nadeln reichen, denn man hat jeweils nur 12 Maschen auf den Nadeln)
  • Nähnadel, um am Ende die Fäden zu vernähen

Techniken


Konstruktion des Schals

Der Schal wird in Schichten gestrickt. Jede Schicht besteht aus fünf Rechtecken - jedes ist 12 Maschen breit und 8 Rippen hoch (d.h. 16 kraus rechts gestrickte Reihen).

Gratis-Strickanleitung: Kleine Rechtecke-Schal


Mit Ausnahme der allerersten Schicht, werden die Rechtecke 1 bis 4 durch 8 abgekettete Maschen beendet. Die erste Reihe des nächsten Rechtecks bildet sich aus den überbleibenden 4 Maschen zusammen mit 4 neu angeschlagenen Maschen (Schlingenanschlag) und 4 Maschen, die am Rand des darunterliegenden Rechtecks aufgenommen werden. Am Ende des letzten Rechtecks jeder Schicht werden bis auf die letzte Schlinge alle Maschen abgekettet. Aus diesem letzten Stich wird dann der Anschlag für das erste Rechteck der nächsten Schicht herausgestrickt (getrickter Maschenanschlag).

Strickanleitung

Erste Schicht

Rechteck 1:
Mit gestricktem Maschenanschlag 12 Maschen aufnehmen
Reihe 1: rechte Maschen
Reihen 2-14: erste Masche wie zum linksstricken abheben, rechte Maschen bis ans Ende der Reihe
Reihe 15: 8 Maschen abketten, es sollten noch 4 Maschen auf der Nadel sein

Rechtecke 2 bis 4:
Reihe 1: die vom letzten Rechteck übriggebliebenen 4 Maschen rechts stricken, mit gestricktem Maschenanschlag 8 Maschen aufnehmen
Reihe 2: rechte Maschen
Reihen 3-15: erste Masche wie zum linksstricken abheben, rechte Maschen bis ans Ende der Reihe
Reihe 16: 8 Maschen abketten, es sind noch 4 Maschen auf der Nadel

Rechteck 5:
Reihe 1: die vom letzten Rechteck übriggebliebenen 4 Maschen rechts stricken, mit gestricktem Maschenanschlag 8 Maschen aufnehmen
Reihe 2: rechte Maschen
Reihen 3-14: erste Masche wie zum linksstricken abheben, rechte Maschen bis ans Ende der Reihe
Reihe 15: 11 Maschen abketten, es bleibt nur eine Masche auf der Nadel übrig

Zweite Schicht und weitere Schichten

Rechteck 1:
Die Masche zur anderen Seite der Nadel schieben, d.h. das Strickstück nicht wenden, sondern den Maschenanschlag auf dieser Seite starten.
Mit dem gestrickten Maschenanschlag 7 Maschen anschlagen, d,h. jetzt sind 8 Maschen auf der Nadel (siehe Bild A)
Reihe 1: 7 rechte Maschen, 1 Masche rechts verschränkt stricken, 4 Maschen aus der Seite des letzten Rechtecks aufnehmen (siehe Bild B)
Reihen 2-15: erste Masche wie zum linksstricken abheben, rechte Maschen bis ans Ende der Reihe
Reihe 16: 8 Maschen abketten, es sind noch 4 Maschen auf der Nadel

Rechtecke 2 bis 4:
Reihe 1: die vom letzten Rechteck übriggebliebenen 4 Maschen rechts stricken, mit Schlingenanschlag 4 Maschen aufnehmen und 4 Maschen von der Seite des darunterliegenden Rechtecks aufnehmen (dies ist für Rechteck 2 das Rechteck 4 der darunterliegenden Reihe, für Rechteck 3 ist es Rechteck 3 der darunterliegenden Reihe usw. - siehe auch das Bild im Abschitt "Konstruktion des Schals"). Die Reihe sollte nun so aussehen wie in Bild C.
Reihe 2: erste Masche wie zum linksstricken abheben, 2 rechte Maschen, 1 rechte Masche verschränkt, 4 rechte Maschen, 1 rechte Masche verschränkt, rechte Maschen bis zum Ende der Reihe.
Reihen 3-15: erste Masche wie zum linksstricken abheben, rechte Maschen bis ans Ende der Reihe
Reihe 16:  8 Maschen abketten, es sind noch 4 Maschen auf der Nadel

Rechteck 5:
Reihe 1: die vom letzten Rechteck übriggebliebenen 4 Maschen rechts stricken, mit Schlingenanschlag 4 Maschen aufnehmen und 4 Maschen von der Seite des darunterliegenden Rechtecks aufnehmen
Reihe 2: erste Masche wie zum linksstricken abheben, 2 rechte Maschen, 1 rechte Masche verschränkt, 4 rechte Maschen, 1 rechte Masche verschränkt, rechte Maschen bis zum Ende der Reihe.
Reihen 3-14: erste Masche wie zum linksstricken abheben, rechte Maschen bis ans Ende der Reihe
Reihe 15:  11 Maschen abketten, es bleibt nur eine Masche auf der Nadel übrig

Diese Schicht solange wiederholen bis der Schal die gewünschte Länge hat. Beim allerletzten Rechteck der allerletzten Schicht alle Maschen abketten.

Anschliessend Fäden vernähen und vorsichtig aufspannen.

Gratis-Strickanleitung: Kleine Rechtecke-Schal (knitting-and-so-on.blogspot.com)


Garn

Das hier verwendete Garn ist Lang Yarns Jawoll Color (Farbe 132.0458). Ich habe relativ lange herumprobiert, bis ich für diese Garn ein gutes Projekt gefunden habe - dies habe ich in zwei Blogposts (hier und hier) beschrieben.
Aber jetzt bin ich mit dem Ergebnis sehr zufrieden.

Gratis-Strickanleitung: Kleine Rechtecke-Schal (knitting-and-so-on.blogspot.com)

Donnerstag, 9. April 2015

Little Rectangles Summer Scarf

Here, in the middle of Europe, spring is just starting. So here's a thin and lightweight scarf that's just right for the season.

This scarf is made up of little garter stitch rectangles - that are connected as you go, making it an example of modular knitting (if you want to see my first modular pattern, it's here: Queen of Diamonds Scarf).

Little Rectangles Summer Scarf - A free knitting pattern by Knitting and so on


Creative Commons License
This work by Knitting and so on is licensed under a Creative Commons Attribution-NonCommercial-ShareAlike 4.0 International License.


A german version of this pattern is available here.

Die deutsche Version dieser Anleitung gibt es hier.

A crochet version of this pattern is available on my blog as well. It is called Rettangolini Scarf.


Materials:
  • about 150 grams fingering weight yarn
  • 3.25 mm needles (I used small dpns, because you only ever have 12 sts on your needles)
  • tapestry needle (to weave in ends)


Techniques:

General Construction:

The scarf is knitted in layers, each layer consists of 5 garter stitch rectangles that are 12 stitches wide and 8 ridges (i.e. 16 rows) high - see picture below.


With the exception of the set-up layer, at the end of rectangles 1 to 4 there are 8 bind-off stitches and 4 stitches left over. These 4 start the new rectangle, together with 4 newly cast-on stitches and 4 stitches picked up from the side of the corresponding rectangle in the layer below. At the end of rectangle 5, all but one stitch are bound-off - this leftover stitch will be the basis of the first rectangle for the next layer.

Free Knitting Pattern: Little Rectangles Summer Scarf


Instructions:

First layer (set-up layer)

Rectangle 1:
CO12 (with knitted cast-on)
Row 1: k
Rows 2-14: sl1, k to end
BO8 sts

Rectangle 2:
Row 1: Knit the 4 sts that are left over from the last rectangle, CO8 (with knitted cast-on)
Row 2: k8, ktbl, k to end
Rows 3-15: sl1, k to end
BO8 sts

Repeat rectangle 2 twice (i.e. knit it a total of three times).

Rectangle 5 (or last rectangle in one layer)
Row 1: Knit the 4 sts that are left over from the last rectangle, CO8 (with knitted cast-on)
Row 2: k8, ktbl, k to end
Rows 3-14: sl1, k to end
Row 15: BO11 sts -> you have one stitch left on your needles


Second layer (and next layers)

Rectangle 1:
Move the leftover stitch to the other end of your needle (i.e. don't turn, but start the CO on this side)
CO7 sts with knitted cast-on -> you have now 8 sts on your needles (see picture A)
Row 1: k7, ktbl, pick up and knit 4 sts from the side of the last rectangle (see picture B)
Rows 2-15: sl1, k to end
Row 16: BO8 sts

Rectangle 2 to 4:
Row 1: Knit the 4 sts that are left over from the last rectangle, CO4 (with backwards loop cast-on) and pick up 4 sts from the side of the next rectangle in the layer below (i.e. for rectangle 2 connect to rectangle 4 in the layer below, for rectangle 3 to rectangle 3 etc. - see picture in General Construction section)
Row 2: sl1, k2 ktbl, k4, ktbl, k to end
Rows 3-15: sl1, k to end
BO8 sts

Rectangle 5:
Row 1: Knit the 4 sts that are left over from the last rectangle, CO4 (with backwards loop cast-on) and pick up 4 sts from the side of the next rectangle in the layer below
Row 2: sl1, k2 ktbl, k4, ktbl, k to end
Rows 3-15: sl1, k to end
Row 15: BO11 sts -> you have one stitch left on your needles

Repeat 2nd layer until you're scarf is long enough.
In the very last rectangle of the very last layer bind off all stitches in row 15.

Weave in ends and block gently.


Yarn
The yarn that I used for this project is Jawoll Color (colorway 132.0458) by Lang Yarns. It was quite a challenge to find the right project for this yarn - as described in this blogpost and this blogpost.
I'm really pleased with how it turned out.


This post was featured at Pinbellish Pinparty 34 at purfylle.com and at the New Tuesday PINspiration Linkparty No. 6. Thanks!

   Tuesday Pin-spiration Link Party

Sonntag, 29. März 2015

How to Use this Yarn? Part II

In a post in October of last year, I wrote about the problems ... ehm ... challenges I had in finding the right pattern for some Jawoll Color (colorway 132.0458) by Lang Yarns. The funny thing about it is, that even though I have frogged this yarn more times than I dare to count, playing around with it has actually prompted a few new knitting pattern ideas.

The picture below contrasts the prototypes with Jawoll Color on the left (i.e. the versions that turned out not so nice) with the finished objects done with another yarn on the right (i.e. the versions in another yarn, that turned out much nicer).

(I have tried (and failed) to make this a clickable image ... so instead here are the links to the patterns shown above: Through Thick and Thin Scarf, Almendra Cowl, Queen of Diamonds Scarf, Zoom Out Fingerless gloves.)

I think at least the yarn works well for testing out ideas and it's really durable. Due to its color changes, any patterns made by short rows or other shaping methods come out very clearly.

However, I guess (!) I have finally found something that works for this yarn. I think this modular design - together with the rather big gaps - gives the whole thing a neat and tidy look - a bit like a tiling pattern.

On second thoughts, maybe I'm foolish to commit this yarn to a finished object since it has inspired so many patterns. Not sure yet :)


Has anybody else had similar problems in finding the right pattern/idea for some yarn? I'd love to hear your stories.

Montag, 23. März 2015

From Both Sides

I've had this idea for quite a while: how to avoid carrying up the yarn when knitting with two colors, I thought it might be possible to start knitting each color on one side of the piece. It seems to work ... and really like the result - especially that there are no stranded strings on either side.

I also like the way the two colors contrast and how the color pattern develops.

This is going to be a scarf - even though I'm not sure yet whether it will only get wider or whether it'll be something symmetrical, i.e. growing in width up to a point and then narrowing again ...


Sonntag, 22. März 2015

Fingerlose Handschuhe "Zoom Out" - Deutsch

Gratisstrickanleitung: Fingerlose Handschuhe "Zoom Out"
Mykoya (Ravelry-Name) hat sich die Zeit genommen, die Anleitung für die Zoom-Out-Fingerless Gloves zu übersetzen (vielen, vielen Dank!). Nebenbei hat sie dabei auch noch korrekturgelesen und so geholfen, einige Fehler in der Originalanleitung zu eliminieren.

Die Anleitung ist hier als PDF verfügbar.


Diese fingerlosen Handschuhe werden in einem Stück gestrickt - man muss pro Handschuhe also nur zwei Fäden vernähen :). Man startet mit einem kleinen Kreis (Nähe Handgelenk), strickt kreisförmig weiter und endet schliesslich am Daumen.

(Edit 03.10.2021: Update des Links auf die PDF-Datei, da sich offenbar die Links auf GoogleDrive geändert hatten.)