Montag, 22. Mai 2017

Waterfall Tunic

I guess I've been watching too many sewing tutorials on the internet - without really being able to sew myself :/ ... something I really liked was the idea of a top with a waterfall or cowl neck.

So, I tried to create a pattern for myself using one of the great tutorials on the internet (linked below) and knitted the pieces all in stockinette stitch. So, here's a tutorial on how to do something similar for yourself. Since I used bulky yarn, this was a very quick knit for me - it only took me four days to knit the two pieces and - after blocking - one afternoon to sew it and to weave in the ends.

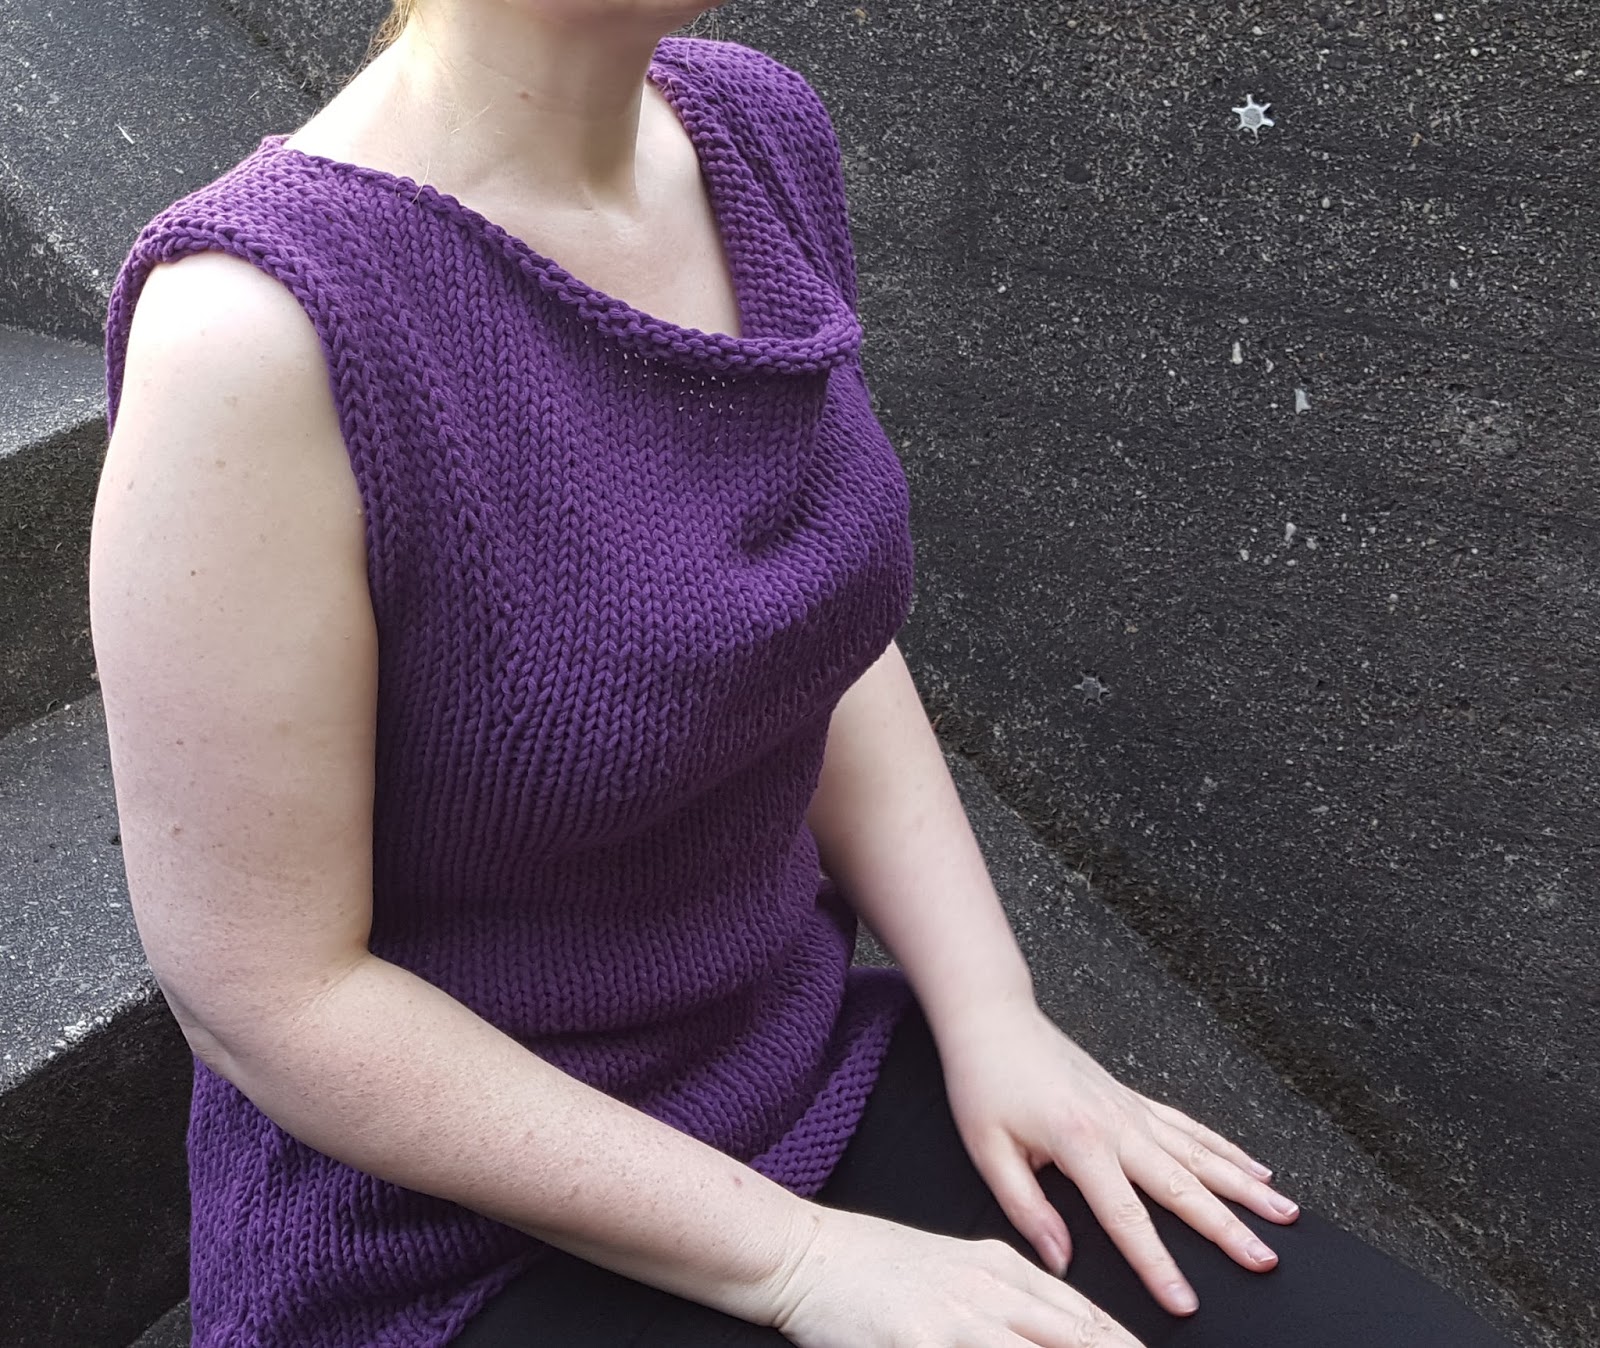
This sleeveless tunic is knitted in plain stockinette stitch. It is shaped to suit your body and has an elegant waterfall neck. It is knitted in two pieces (front and back) from bottom to top.


It is NOT a stitch-by-stitch knitting pattern for various sizes. It is rather a tutorial how to contruct and knit a similar tunic - and of course you don't have to use bulky yarn but can use other yarn weights as well. I will give you my numbers and calculations as an example written in purple.


Creative Commons License
This work by Knitting and so on is licensed under a Creative Commons Attribution-NonCommercial-ShareAlike 4.0 International License.

Materials
  • 300 to 400 grams of bulky weight cotton yarn (for my size I used a little over 300 grams - about 425 meters of yarn)
  • 8 mm needles (the yarn label asked for 5.5 - 6 mm needles, but since I wanted the fabric to be very loose I chose bigger needles)
  • 2 stitch markers
  • a tapestry needle to weave in ends and to sew the pieces together

Useful Techniques and Abbreviations
  • How to make a cowl top pattern (for sewing): see this YouTube video by IzzyMEIMsaab.
  • Make One Knit-Stitches (here's a video by PurlSoho that shows these stitches)
    • mk1l (left-leaning): pick up the bar from front to back and knit it through the back loop
    • mk1r (right-leaning): pick up the bar from back to front and knit it through the front loop
  • Make One Purl-Stitches (here's a video by KnitPurlHunter that shows these stitches)
    • mk1p right-leaning (mk1pl, i.e. right-leaning effect on RS): make one purl stitch by inserting the left-hand needle from the back in the bar between the two stitches and purl through the front of the loop
    • mk1p left-leaning (mk1pr, i.e. left-leaning effect on RS): make one purl stitch by inserting the left-hand needle from the back in the bar between the two stitches and purl through the back of the loop
  • Mattress stitch to create an invisible seam between two stockinette pieces: see this YouTube video by iknitwithcatfur
  • How to knit shoulder seams: see this YouTube video by knitpurlhunter.


Measuring and Swatching

I created a pattern on paper (any broadsheet newspaper will do) using the method shown in IzziMEIMsaab's video). But it will be OK if you just take the measurements listed below.
Note: For me it's difficult to take measurements from my body - that's why I generally use a top that fits me well to take measurements.

Here's an outline of the pattern with all the necessary measurements (since this was inspired by sewing videos, the measurements are shown on the fold, i.e. half of the piece).

You need to measure:
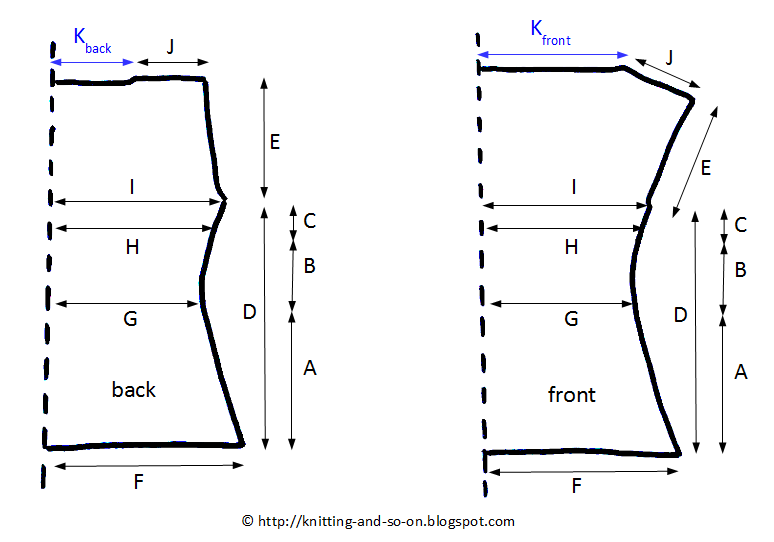
A = from your hips to your waist
B = from your waist to your bust
C = from your bust to under your arm
D = A + B + C = from your hips to under your arm
E = from the shoulder to under your arms
F = one quarter (1/4) of your hip circumference
G = one quarter (1/4) of your waist circumference
H = one quarter (1/4) of your bust circumference
I  = one quarter (1/4) of your underarm circumference
J = shoulder seam
Kback = half of your neck width

Drape your measuring tape from shoulder to shoulder around your neck to see how deep you want your neckline to fall (see IzziMEIMsaab's video at minute 1:44). Then see how many cm this is on your measuring tape. Kfront is half of that measurement.

Knit a swatch! And block it.
Then carefully count your stitches and rows and calculate the numbers of the measurements you've taken.

My swatch gave the following numbers: 10 cm = 10.5 sts in width and 10 cm = 16 rows in height. Then I calculated:
A = 27 cm => 2.7 x 16 = 43.2 => 43 rows
B = 11 cm => 1.1 x 16 = 17,6 => 18 rows
C = 5 cm => 0.5 x 16 = 8 => 8 rows
D = A + B + C => 69 rows
E = 22 cm => 2.2 x 16 = 35,2 => 35 rows
F = 25 cm => 2.5 x 10.5 = 26.25 => 26 sts
G = 19 cm => 1.9 x 10.5 = 19.95 => 20 sts
H = 23 cm =>  2.3 x 10.5 = 24.15 => 24 sts
I = 22 cm => 2.2 x 10.5= 23.1 => 23 sts
J = 12 cm => 1.2 x 10.5 = 12.6 => 13 sts
Kback = 9 cm => 0.9 x 10.5 => 9.45 => 10 sts
Kfront = 21 cm => 2.1 x 10.5= 22.05 => 22 sts


Instructions

Back piece

Hip to Waist
CO twice the stitches you've calculated for F plus 2 edge stitches (in my case 2x26 + 2 = 54).
Then knit in plain stockinette up to your waist while decreasing at the sides:

Normal row (RS): sl1, k to end
Normal row (WS): sl1, p to end
Decrease row (RS): sl1, ssk, k to last 3 sts, k2tog, k1
Decrease row (WS): sl1, p2tog, p to last 3 sts, p2togtbl, p1

Calculate the decreases you need for a shaped waist per side: F-G.  (I had to decrease 6 sts per side (F-G => 26-20 = 6) over 43 rows. I only wanted to decrease on RS, so I chose to knit normal rows, and then I knitted one decrease row instead of every 6th normal row.)

Waist to Bust
From the waist up to your bust, you want to increase, i.e. to knit normal rows as well as increasing rows. For this you want to calculate the number of stitches per side that you need to increase (H-G) over the rows you calculated for B. (I had to decrease 4 sts (H-G=24-20 = 4) over 18 rows (B).)

Increase row (RS): sl1, mk1l, k to last 2 sts, mk1r, k1
Increase row (WS): sl1, mk1p, p to last 2 sts, mk1p, p1

Bust to Armhole
From your bust line to the arm hole you'll want to decrease again. Here you need to calculate the number of stitches to decrease per side (I-H) over C rows. The decrease rows are the same as listed above. (I had to decrease only 1 sts (I-H = 24-23=1) per side over 8 rows.)

Armhole to Shoulder
If you're shoulder measurement (J+Kback) is narrower or wider than your underarm measurement (I) you also need to knit increase or decrease rows over the next E rows. In my case I didn't have to decrease (J+Kback-I = 13+10-23=0)).

When you've finished these last rows. Bind off.
The back piece is finished.


Front piece

Hip to Armhole
From the waist up to the armhole the front piece is knitted exactly as your back piece. So knit this exactly as your back piece up to the last row.
During the last row put in two stitchmarkers: look at the stitch number you calculated for your shoulder measurement (J, 13 sts in my case) and put the first stitchmarker J sts away from the beginning of the row, and the second stitch marker J sts away from the end of the row.


Armhole to shoulder
Now you need to calculate the increases per side for the waterfall neckline. This is the difference between Kback  and Kfront, i.e. Kfront-Kback (in my case: 22-10=12). These increases have to be distributed evenly over the number of rows you calculated for E (in my case over 36 rows; 36 / 12 = 3, this means I had to increase every 3rd row).

Neck Increase Row (RS): sl1, k to marker, mk1r, k to next marker, mk1l, k to end
Neck Increase Row (WS): sl1, p to marker, mk1pl, p to next marker, mk1pr, p to end

Alternate neck increase rows as calculated with normal (stockinette) rows until you've knitted the rows you calculated for E. Then bind off. Now your front piece is finished, too.

Finishing

I blocked both piece to size and then sewed them at the sides and the shoulders. I used the techniques linked above (mattress stitch & invisible seam).


This post was featured on OuiCrochet's Fiber Tuesday Link Party #115 and at the New Tuesday Pin-spiration Link Party.. Thank you!
Tuesday Pin-spiration Link Party

Samstag, 20. Mai 2017

Knitted Monster Fridge Magnet

The idea for this little project actually came when I received a new catalogue from a food delivery service. Their catalogue is quite big and on its back there is a glued on magnet so that you can just put it on your fridge. I didn't like the idea to just throw the magnet away, so I started asking myself what I could do with it ... and - not really surprising - I liked the idea of doing something in knitting :) I furthermore decided to only use materials that I had already at home, i.e. to make this a real recycling project.

Knitted Monster Fridge Magnet - free knitting pattern

Creative Commons License
This work by Knitting and so on is licensed under a Creative Commons Attribution-NonCommercial-ShareAlike 4.0 International License.


Materials
  • magnets (I used one rescued from a delivery catalogue) 
  • knitting needles and scrap yarn to knit the surface - if you don't like knitting you can also use a small piece of fabric
  • embroidery thread or other yarn to stitch the face
  • embroidery needle
  • 1 to 3 button(s) for the eye(s)
  • a piece of cardboard stock (this can be old packaging - it will not be visible)
  • a piece of scrap paper
  • glue (I used normal craft glue and superglue) 
Knitted Monster Fridge Magnet - free knitting pattern


Instructions
  • Knit a small square (about 7cm x 7cm) with any yarn of your choice - I knitted it in plain stockinette stitch. The edges will roll in, but that won't matter because the edges will be hidden at the back of the monster. Don't weave in the ends - rather you can use them to draw the edges tight later. 
  • On a piece of paper doodle a few monsters to scale and decide upon a design (photo 1).
  • Copy that design on a piece of cardboard stock and cut out both the cardboard and the paper (photo 2).
  • With your embroidery needle stitch through the paper to mark where the facial features should be (photo 3). Then glue paper to the WS of your knitted square (photo 4).
Knitted Monster Fridge Magnet
  • Stitch the face on with embroidery thread and sew on the button(s). If you're design changes a bit while you're stitching - that's fine, too (photo 5).
  • Then glue the cardboard monster to the back of paper.
  • Fold a piece of leftover cardboard to get a higher block and glue it to the back of the monster. This will give your monster some body - it'll get a bit convex when you draw the sides in and you'll need something to glue your magnet to.
  • Thread the tail of your knitting into the embroidery needle, stitch around the edges of the piece and draw the sides in (photo 6). Make sure that the outline of your monster looks smooth.
  • With superglue, glue magnet to the back of your monster - finished!
Knitted Monster Fridge Magnet - free knitting pattern

Knitted Monster Fridge Magnet - free knitting pattern


Freitag, 12. Mai 2017

Eifel Cowl

Currently, I love knitting with cotton because it is lovely to wear in summer. But since I am always feeling chilly, I like to wear a cowl in bed - here cotton is also my material of choice.
For this cowl I wanted something to sit snugly around my neck but a bit wider near the shoulders. That's why I used short rows for shaping - but in case of this cowl they are done in a contrast color and therefore provide a decorative element as well.


The Eifel is a low mountain range west of Cologne. I thought the name was suitable because of the modest height of the cowl and the peak decoration from the short rows.


Creative Commons License
This work by Knitting and so on is licensed under a Creative Commons Attribution-NonCommercial-ShareAlike 4.0 International License.


Materials
  • about 50 grams of fingering weight yarn in two colors - of the main color (orange in the photos) I used about 40 grams and 10 grams of the contrast color (white in the photos)
  • 3.25mm knitting needles (straight or circulars)
  • scrap yarn (for provisional CO)
  • a tapestry needle for grafting

Size and Gauge
  • I had the follwing gauge: 21 rows in garter stitch gave 5 cm in height, and 12 stitches in garter stitch gave 5 cm in width. 
  • The finished cowl measures about 19 cm in height - and about 44 cm in circumference at the top, and about 66 cm in circumferenc at the bottom.
Suggestions how to change the size can be found below.


Techniques
  • Provisional CO: My favorite method for a provision CO is the crochet provisional CO - it is shown in this Youtube video by New Stitch a Day.
  • Short rows with wrap and turn (w+t) - as shown in this YouTube video by Very Pink Knits. Since the wraps are in a different color than the wrapped stitch, it looks better if the wraps are picked up. Here's a YouTube video that shows how to pick up your wraps (also by Very Pink Knits).
  • Grafting in Garter Stitch: A technique to get an invisible (knitted) seam - this technique is shown in this YouTube Video by knittinghelp.com.

Instructions

With scrap yarn provisionally CO 45 stitches.
Setup row: k all stitches in Main Color (MC)
Ridge 1 (Contrast Color, CC): k3, w+t, k to end
Ridge 2 and 3 (MC): k to end, turn, k to end
Ridge 4 (CC): k6, w+t, k to end
Ridges 5 and 6 (MC) = Ridges 2 and 3
Ridge 7 (CC): k9, w+t, k to end
Ridges 8 and 9 (MC) = Ridges 2 and 3
Ridge 10 (CC): k12, w+t, k to end
Ridges 11 and 12 (MC) = Ridges 2 and 3
Ridge 13 (CC): k15, w+t, k to end
Ridges 14 and 15 (MC) = Ridges 2 and 3
Ridge 16 (CC): k18, w+t, k to end
Ridges 17 and 18 (MC) = Ridges 2 and 3
Ridge 19 (CC): k21, w+t, k to end
Ridges 20 and 21 (MC) = Ridges 2 and 3
Ridge 22 (CC): k24, w+t, k to end
Ridges 23 and 24 (MC) = Ridges 2 and 3
Ridge 25 (CC): k27, w+t, k to end
Ridges 26 and 27 (MC) = Ridges 2 and 3
Ridge 28 (CC): k30, w+t, k to end
Ridges 29 and 30 (MC) = Ridges 2 and 3
Ridge 31 (CC): k33, w+t, k to end
Ridges 32 and 33 (MC) = Ridges 2 and 3
Ridge 34 (CC): k36, w+t, k to end
Ridges 35 and 36 (MC) = Ridges 2 and 3
Ridge 37 (CC): k33, w+t, k to end
Ridges 38 and 39 (MC) = Ridges 2 and 3
Ridge 40 (CC): k30, w+t, k to end
Ridges 41 and 42 (MC) = Ridges 2 and 3
Ridge 43 (CC): k27, w+t, k to end
Ridges 44 and 45 (MC) = Ridges 2 and 3
Ridge 46 (CC): k24, w+t, k to end
Ridges 47 and 48 (MC) = Ridges 2 and 3
Ridge 49 (CC): k21, w+t, k to end
Ridges 50 and 51 (MC) = Ridges 2 and 3
Ridge 52 (CC): k18, w+t, k to end
Ridges 53 and 54 (MC) = Ridges 2 and 3
Ridge 55 (CC): k15, w+t, k to end
Ridges 56 and 57 (MC) = Ridges 2 and 3
Ridge 58 (CC): k12, w+t, k to end
Ridges 59 and 60 (MC) = Ridges 2 and 3
Ridge 61 (CC): k9, w+t, k to end
Ridges 62 and 63 (MC) = Ridges 2 and 3
Ridge 64 (CC): k6, w+t, k to end
Ridges 65 and 66 (MC) = Ridges 2 and 3

Repeat ridges 1 to 65.
Cut yarns but leave a tail long enough for grafting of MC . Put the stitches from the provisional CO on your second needles and graft in garter stitch with main color.

Weave in ends.


How to Change the Size
If you have different gauge or if you want to change the size of the piece, here are a few suggestions:
  • For a narrower cowl, CO fewer stitches.
  • If you want a cowl that is much longer you could just knit the sequence (row 1 to 65) one more times. 
  • As you may have notice when reading the pattern, there is a sequence of short rows in a contrast color. These short rows are knitted every 3rd ridge and each short row ridge in the contrast color is either 3 sts longer or 3 sts shorter than the short row ridge knitted before. In this pattern, the length of the short rows starts at 3 sts and grows to 36 sts before decreasing back to 3 sts. Each of this up-and-down sequences measures about 22 cm at the shorter side and about 33 cm at the longer side.
    So, if you want a length inbetween you could shorten this sequence, e.g. knit ridges 1 to 24 (the CC short row is now 24 sts long), and then continue with ridge 49 (here the CC short row is 3 sts shorter, namely 21 sts long) and continue to ridge 66. Then repeat this until you've reached the desired length.

Mittwoch, 3. Mai 2017

Wedges Wrap

Combine your favorite colors to create a very special piece that will keep you warm – in winter as well as in summer nights. It's a rectangular wrap or wide scarf with a bold graphical pattern which is knitted with short rows and intarsia technique.

Wedges Wrap - knitting pattern by Knitting and so on

This pattern is available for purchase

The PDF includes a written version and a shorthand version of the pattern. It also contains a chart to show how the short rows stack up to form the wedges.


Materials
  • about 250 grams of DK weight yarn in your main color (I used Rico Essentials Merino DK, but other yarns will do as well)
  • about 100 grams of DK weight yarn in contrast color 1
  • about 100 grams of DK weight yarn in contrast color 2
  • about 100 grams of DK weight yarn in contrast color 3
  • 4.5mm knitting needles (I used circulars, but straight will do as well)
Wedges Wrap - knitting pattern by Knitting and so on


Size
Unblocked the scarf measures about 40 cm in width and 185 cm in length. I guess blocked it would be about 5 cm wider and 20 cm longer.
(Even though I'm a firm believer in blocking (it evens out the stitches and make a garment look better), I didn't block this wrap for a number of reasons. It was big enough already and since I used merino which stretches quite a bit. Beside the stitch tension looked good and (on a more practical note) the blocking mat I use wasn't quite big enough.)

Wedges Wrap - knitting pattern by Knitting and so on

Necessary Skills
Besides being able to knit plain garter stitch you need the following knitting skills to complete this wrap:
  • Short rows with wrap and turn
  • Intarsia
Helpful skills (but not absolutely necessary):
  • Weaving in ends while knitting
  • Stranding yarn upwards
Wedges Wrap - knitting pattern by Knitting and so on

Wedges Wrap - knitting pattern by Knitting and so on


This blogpost has been featured at New Tuesday Pin-spiration Link Party. Thank you!
Tuesday Pin-spiration Link Party

Mittwoch, 26. April 2017

Citrus Fruit Potholder

This "fruity" potholder will brighten up your kitchen and bring a summery atmosphere to your home. Since it's done in intarsia technique, the WS is presentable as well. It is worked flat and in wedges of short-rows.
I always think that potholders, washcloths or other really small items are best if you'd like to explore new knitting ideas or to just try out a new technique. It only takes some leftover yarn and a few hours to try it out, but if it works, these newly acquired skills can be in your next big project. For this little potholder quite a few interesting techniques are used - form a provisional cast-on, over short rows and intarsia, to grafting in garter stitch. Alternatively, this piece can be used as coaster or washcloth.


Creative Commons License
This work by Knitting and so on is licensed under a Creative Commons Attribution-NonCommercial-ShareAlike 4.0 International License.


Materials
  • about 30 grams of DK or sports weight cotton yarn in two colors - of color 1 you need two skeins or to put yarn of color 1 on a separate bobbin
  • 4mm needles or a needle that fits your yarn (I used small dpns, since you only ever have 21 sts on a needle)
  • a tapestry needle for grafting and to weave in ends


Techniques
  • Short rows with wrap and turn (w+t) - as shown in this YouTube video by Very Pink Knits.
    Since this washcloth is knit in garter stitch, you don't have to pick up your wraps - except in two rows, i.e. the rows where the wrapping color is different from the color of the wrapped stitch. These rows are indicated in the pattern. Here's a YouTube video that shows how to pick up your wraps (also by Very Pink Knits).
  • Throughout the pattern, the following notation will be used: "C1a (k2); C2 (k2); C1b (k13, w+t, k13); C2 (k2); C1a (k2)" means "knit 2 sts with skein a of C1; change to C2 and knit 2 sts with C2; change to skein b of C1 and knit 13 sts with this skein, wrap and turn, knit another 13 sts with this skein, change to C2 and knit 2 sts with C2, then change to skein a of C1 and knit 2 sts with it".
     I.e. color is indicated before the knitting instructions for that yarn. the knitting instructions for that yarn are given in brackets after the color and color changes are indicated by a semicolon.
  • Provisional CO: My favorite method for a provisional CO is the crochet provisional CO - it is shown in this Youtube video by New Stitch a Day.
  • Grafting in Garter Stitch: A technique to get an invisible (knitted) seam - this technique is shown in this YouTube Video by knittinghelp.com. 


Instructions

With scrap yarn provisionally CO21 sts.
Setup row: C2 (k19), C1a (k2)
Ridge 1: C1a (k2); C2 (k2); C1b (k13, w+t, k13); C2 (k2); C1a (k2)
Ridge 2: C1a (k2); C2 (k2); C1b (k9, w+t, k9); C2 (k2); C1a (k2)
Ridge 3: C1a (k2); C2 (k2); C1b (k5, w+t, k5); C2 (k2); C1a (k2)
Ridge 4: C1a (k2); C2 (k2); C1b (k1, w+t, k1); C2 (k2); C1a (k2)
Ridge 5: C1a (k2); C2 (k1, w+t, k1); C1a (k2)
Ridge 6: C1a (k2); C2 (k2); C1b (k3, w+t, k3); C2 (k2); C1a (k2)
Ridge 7: C1a (k2); C2 (k2); C1b (k7, w+t, k7); C2 (k2); C1a (k2)
Ridge 8: C1a (k2); C2 (k2); C1b (k11, w+t, k11); C2 (k2); C1a (k2)
Ridge 9: C1a (k2); C2 (k2); C1b (k15, w+t, k15); C2 (k2); C1a (k2)
Ridge 10: C1a (k2): C2 (k to end, turn, sl1, k18); C1a (k2)
Now you've finished the first "wedge".

Repeat ridges 1 to 10 ten more times (i.e. you have now 11 "wedges").

For the last (12th) wedge, knit ridges 1 to 9. Remove the scrap yarn of the provisional CO and catch the stitches on a knitting needle. Your piece should look similar to the one in the photo on the right.

Graft the last row in garter stitch: 2 sts in C1, and the remaining sts in C2.

Weave in ends.


Chart
In addition to the written instructions above, here's also a chart that shows how one wedge is knitted.
The first number written in orange is the number of stitches with skein a of C1, the number written in black is the number of stitches knitted with C2 and the second number in orange is the number of stitches knitted with skein b of C1.

Chart - click to enlarge


This post was featured at Oombawkadesigncrochet's 192nd Link and Share Wednesday, at Ouichrochet's Fiber Tuesday Link Part #111, at Myhusbandhastoomanyhobbies.com's Brag about it Link Party #21-17, at the Linky Ladies's Community Link Party No. 104 and at Sewcando's Craftastic Monday Link Party and at Reviews, Chews and How-Tos Awesome Life Friday #114.  Thank you :)
Oombawka Design
My Husband Has Too Many Hobbies Linky Ladies

Craftastic Monday at Sew Can Do Awesome Life Friday - I Was Featured!

Mittwoch, 19. April 2017

I ♥ Intarsia Wasch- oder Topflappen

Suchst du noch nach etwas, um das Geschenk zum Muttertag etwas aufzupeppen und persönlicher zu gestalten? Oder möchtest du einfach etwas Hübsches, das ein bisschen Liebe in dein Badezimmer bringt. Dann ist dieser Intarsia-Lappen genau richtig.
Es ist ein interessantes, kleines Strickprojekt, das in ein paar Stunden fertiggestellt werden kann. Weil es klein ist, eignet es sich außerdem gut, wenn man einmal neue Techniken, wie verkürzte Reihen oder Intarsia ausprobieren will.

The english version of this pattern is available here.


Creative Commons Lizenzvertrag
Dieses Werk von Knitting and so on ist lizenziert unter einer Creative Commons Namensnennung - Nicht-kommerziell - Weitergabe unter gleichen Bedingungen 4.0 International Lizenz.


Materialien
  • ca. 30 - 40 Gramm Baumwollgarn in zwei Farben (diese werden F1 und F2 genannt); ich habe älteres Garn verwendet (ca. 10-fädig) 
  • zum Garn passende Nadeln; in meinem Fall 4mm Nadeln (und da es sich um ein kleineres Strickstück handelt, haben zwei Nadeln eines Nadelspiels ausgereicht.

Größe
Der Lappen, der mit 10-fädigem Garn war, wurde 17x17 cm gross. Eine Version mit 5-fädigem Garn und 3mm Nadeln wurde 14x14 cm gross.


Techniken und Schreibweisen in der Anleitung
  • Intarsia: ist eine Technik, um die Farbe innerhalb einer Reihe zu ändern - dabei werden die Fäden auf der Rückseite des Strickstücks gekreuzt. Ein YouTube-Video dazu gibt es hier von Andrea Maschenanschlag
  • Verkürzte Reihen mit Wickelmaschen - werden in diesem YouTube-Video von Luise1910 gezeigt. In dieser Anleitung wird hierfür jeweils die Abkürzung w+t verwendet (aus dem Englischen "wrap and turn", umwickele und drehe).
    Da es sich bei diesem Projekt um ein kraus rechts gestricktes Stück handelt, ist es (meistens) nicht notwendig, die Umwickelungen beim abstricken abzuheben - mit Ausnahme von zwei Reihen. Nämlich in den Reihen, in denen die gewickelte Masche mit einem Faden in der anderen Farbe umwickelt wurde. Dies ist in der Anleitung vermerkt. Das oben genannte YouTube-Video zeigt auch, wie man die Umwickelungen abhebt. 
  • In dieser Anleitung wird die folgende Schreibweise verwendet: F1 (4 re.M.); F2 (10 re.M., w+t, 10 re.M.); C1 (re. bis zum Ende) heisst: 4 rechte Maschen in Farbe F1, Wechsel zu F2, 10 rechte Maschen in F2; Wickelmasche und drehen, 10 rechte Maschen in F2; Farbwechsel zu F1 un bis zum Ende der Reihe in F1 stricken. Die jeweils benutzte Farbe wird also vor die Anweisung gestellt, was mit der Farbe zu stricken ist und die Anleitung befindet sich in Klammern. Die Anleitung wird in Rippen gegeben (zwei Reihen rechte Maschen = eine (kraus-rechts) Rippe). 
  • Fäden einweben beim Stricken mit zwei Farben: wird in diesem YouTube-Video von Angiies Wollplaudereien gezeigt.
    In den Rippen 21 bis 44 wird nur Farbe 1 verwendet. Um einen langen nachgezogenen Faden in Farbe 2 zu vermeiden, ist es hilfreich Farbe zwei in Reihe 21 soweit wie möglich hinten einzuweben. Im Bild unten wird der Unterschied gezeigt - in den schwarzen Kreisen. Bei meinem ersten Versuch (oranges Herz, links) sieht man den unschönen Querfaden. Daher habe ich beim zweiten Versuch (rotes Herz, rechts) den Faden in Reihe 21 über die letzten drei Stiche auf der Rückseite eingewoben. Die Rückseite sieht damit deutlich ordentlicher aus.

Genereller Aufbau
Während der ersten Hälfte ist jede Rippe um eine Masche kürzer als die vorherige (von zuerst 32 Maschen bis hin zu nur einer Masche in Rippe 32).. Während der zweiten Hälfte ist dies genau umgekehrt. Die erste Rippe ist nur eine Masche lang und jede weitere ist jeweils eine Masche länger als die vorherige. Dasselbe gilt für die Farben: die Reihen der zweiten Hälfte sind in umgekehrter Reihenfolge, die der ersten Hälfte. Durch die verkürzten Reihen steht die zweite Hälfte in einem 90 Grad Winkel zur ersten Hälfte.
Die Anleitung ist in Rippen (= zwei Reihen) geschrieben. Auf der Rückseite wird jeder Stich in der Farbe gestrickt, den er auch in der Hinreihe hatte.

I ♥ Intarsia Washcloth - free knitting pattern

Anleitung

30 Maschen anschlagen
Allererste Reihe: alle Maschen rechts stricken
Rippe 1: F1 (31 re. M.  w+t, k re. M. bis zum Ende)
Rippen 2 to 5: F1 (re. M. bis zum Stich vor der letzten Wickelmasche, w+t, re. M. bis zum Ende der Reihe)
Rippe 6: F1 (12 re. M.); F2 (15 re. M., w+t, 15 re. M.); F1 (12 re. M.)
Rippe 7: F1 (9 re. M.); F2 (17 re. M., w+t, 17 re. M.); F1 (9 re. M.)
Rippe 8: F1 (7 re. M.); F2 (18 re. M., w+t, 18 re. M.); F1 (7 re. M.)
Rippe 9: F1 (6 re. M.); F2 (18 re. M., w+t, 18 re. M.); F1 (6 re. M.)
Rippe 10: F1 (5 re. M.); F2 (18 re. M., w+t, 18 re. M.); F1 (5 re. M.)
Rippe 11: F1 (5 re. M.); F2 (17 re. M., w+t, 17 re. M.); F1 (5 re. M.)
Rippe 12: F1 (4 re. M.); F2 (17 re. M., w+t, 17 re. M.); F1 (4 re. M.)
Rippe 13: F1 (4 re. M.); F2 (16 re. M., w+t, 16 re. M.); F1 (4 re. M.)
Rippe 14: F1 (4 re. M.); F2 (15 re. M., w+t, 15 re. M.); F1 (4 re. M.)
Rippe 15: F1 (4 re. M.); F2 (14 re. M., w+t, 14 re. M.); F1 (4 re. M.)
Rippe 16: F1 (5 re. M.); F2 (12 re. M., w+t, 12 re. M.); F1 (5 re. M.)
Rippe 17: F1 (5 re. M.); F2 (11 re. M., w+t, 11 re. M.); F1 (5 re. M.)
Rippe 18: F1 (6 re. M.); F2 (9 re. M., w+t, 9 re. M.); F1 (6 re. M.)
Rippe 19: F1 (7 re. M.); F2 (7 re. M., w+t, 7 re. M.); F1 (7 re. M.)
Rippe 20: F1 (9 re. M.); F2 (4 re. M., w+t, 4 re. M.); F1 (9 re. M.)
Rippe 21: F1 (re. M. bis zum Stich vor der letzten Wickelmasche (F2 während der letzten 3 Stiche auf der Rückseite verweben), w+t, re.M. bis zum Ende der Reihe)
Rippen 22 to 31: F1 (re. M. bis zum Stich vor der letzten Wickelmasche, w+t, k re.M. bis zum Ende der Reihe)
Rippe 32: F1(1 re. M., w+t, 1  re. M.)


I ♥ Intarsia Washcloth - free knitting pattern


Ab jetzt werden die Rippen 1 bis 32 in umgekehrter Reihenfolge gestrickt.
Rippe 33:  F1(1 re. M., w+t, 1  re. M.)
Rippe 34 to 44: F1 (re. M. bis zur letzten Wickelmasche, diese gewickelte Masche re. abstricken, w+t, k re.M. bis zum Ende der Reihe)
Rippe 45:  F1 (9 re. M.); F2 (3 re. M., gewickelte Masche abstricken und dabei Umwicklung abheben, w+t, 4 re. M.); F1 (9 re. M.)
Rippe 46: F1 (7 re. M.); F2 (7 re. M., w+t, 7 re. M.); F1 (7 re. M.)
Rippe 47: (6 re. M.); F2 (9 re. M., w+t, 9 re. M.); F1 (6 re. M.)
Rippe 48:  F1 (5 re. M.); F2 (11 re. M., w+t, 11 re. M.); F1 (5 re. M.)
Rippe 49: F1 (5 re. M.); F2 (12 re. M., w+t, 12 re. M.); F1 (5 re. M.)
Rippe 50: F1 (4 re. M.); F2 (14 re. M., w+t, 14 re. M.); F1 (4 re. M.)
Rippe 51: (4 re. M.); F2 (15 re. M., w+t, 15 re. M.); F1 (4 re. M.)
Rippe 52: (4 re. M.); F2 (16 re. M., w+t, 16 re. M.); F1 (4 re. M.)
Rippe 53: (4 re. M.); F2 (17 re. M., w+t, 17 re. M.); F1 (4 re. M.)
Rippe 54: (5 re. M.); F2 (17 re. M., w+t, 17 re. M.); F1 (5 re. M.)
Rippe 55: F1 (5 re. M.); F2 (18 re. M., w+t, 18 re. M.); F1 (5 re. M.)
Rippe 56: F1 (6 re. M.); F2 (18 re. M., w+t, 18 re. M.); F1 (6 re. M.)
Rippe 57: F1 (7 re. M.); F2 (18 re. M., w+t, 18 re. M.); F1 (7 re. M.)
Rippe 58: F1 (9 re. M.); F2 (17 re. M., w+t, 17 re. M.); F1 (9 re. M.)
Rippe 59: F1 (12 re. M.); F2 (15 re. M., w+t, 15 re. M.); F1 (12 re. M.)
Rippe 60: F1 (re. M. bis zur letzten Wickelmasche, diese gewickelte Masche abstricken und dabei die Umwicklung abheben, w+t, re. M. bis zum Ende der Reihe)
Rippen 61 to 64: F1 (re. M. bis zum Stich vor der letzten Wickelmasche, w+t, re. M. bis zum Ende der Reihe)
Letzte Reihe: alle Maschen abketten.


Diagramm
Unten findet sich die Anleitung zusätzich noch als Diagramm. Die violetten Pfeile geben jeweils die Strickrichtung an.
Neben den Reihen ist jeweils aufgeführt, wie viele Stiche in welcher Farbe gemacht werden - jeweils in schwarz für Farbe 1 und in rot für Farbe 2.
I ♥ Intarsia Washcloth - free knitting pattern
Diagramm - zum Vergrössern klicken