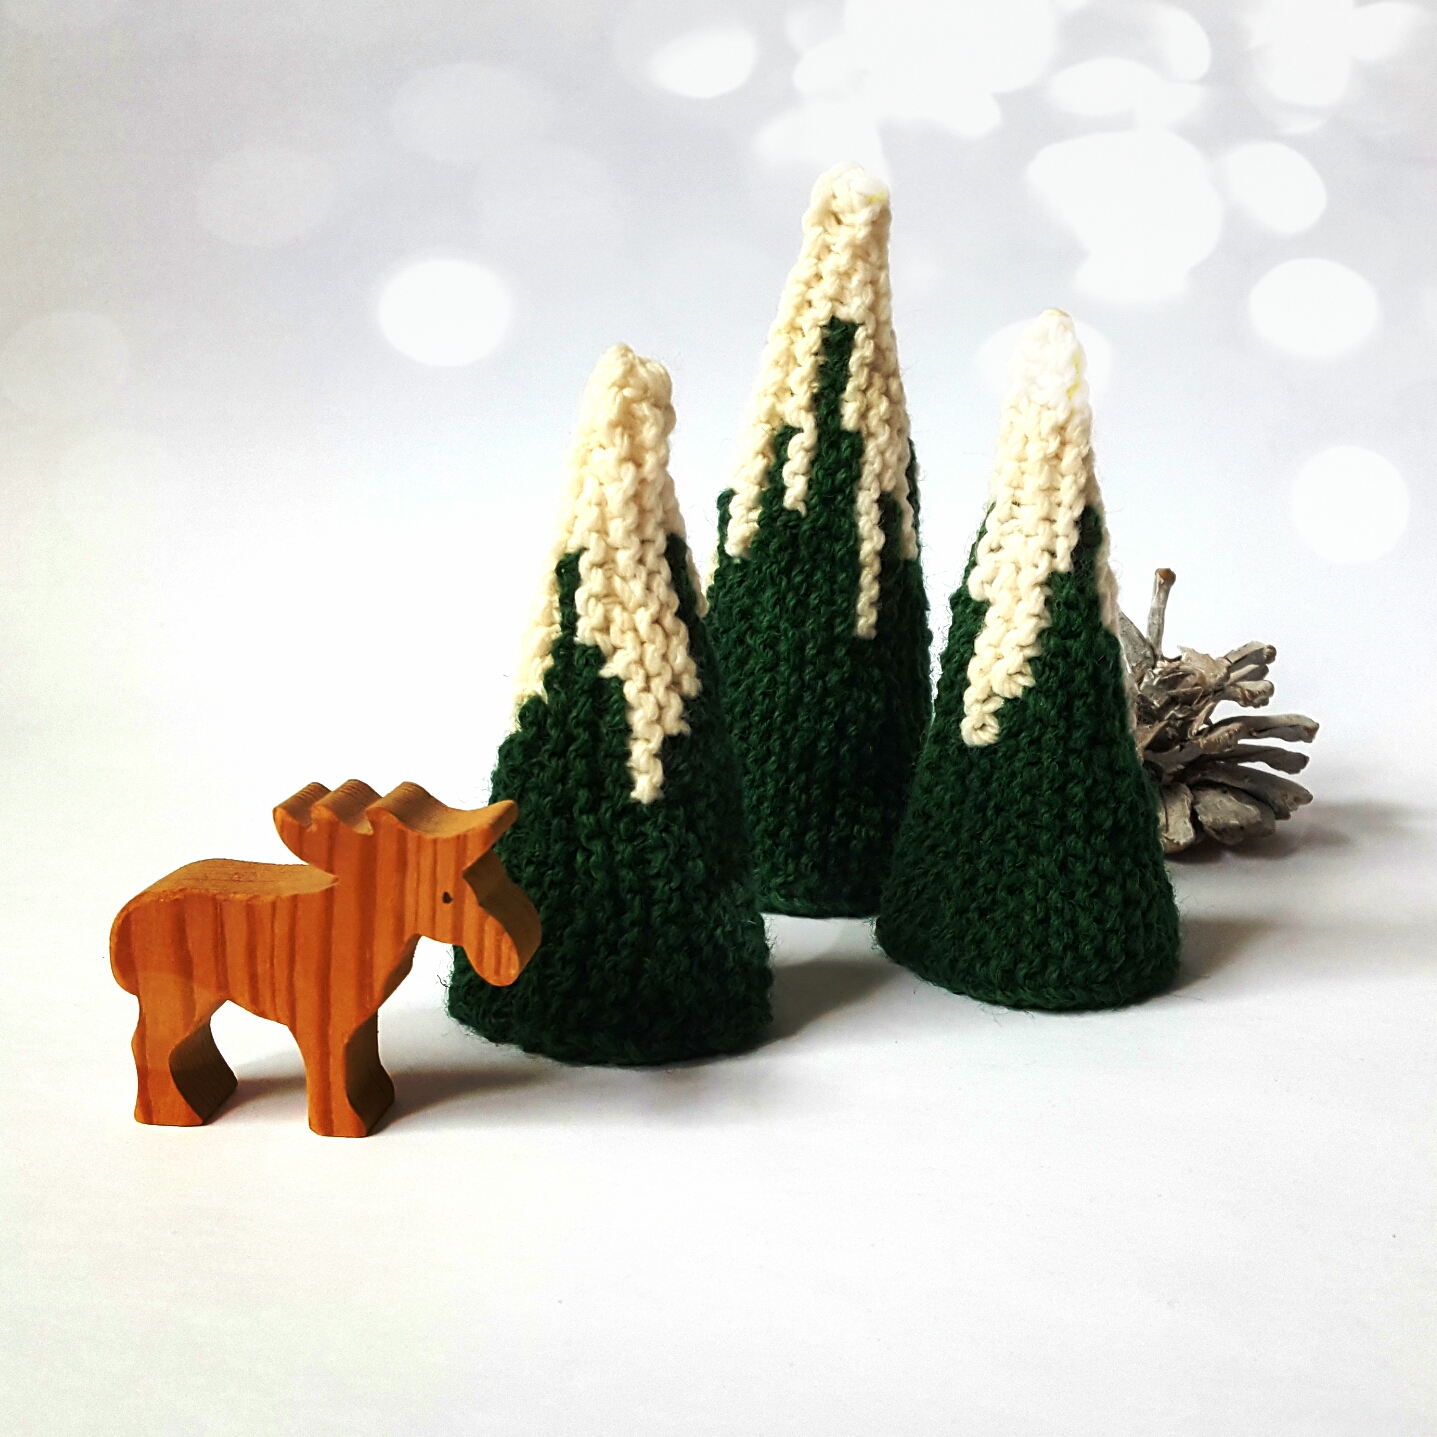
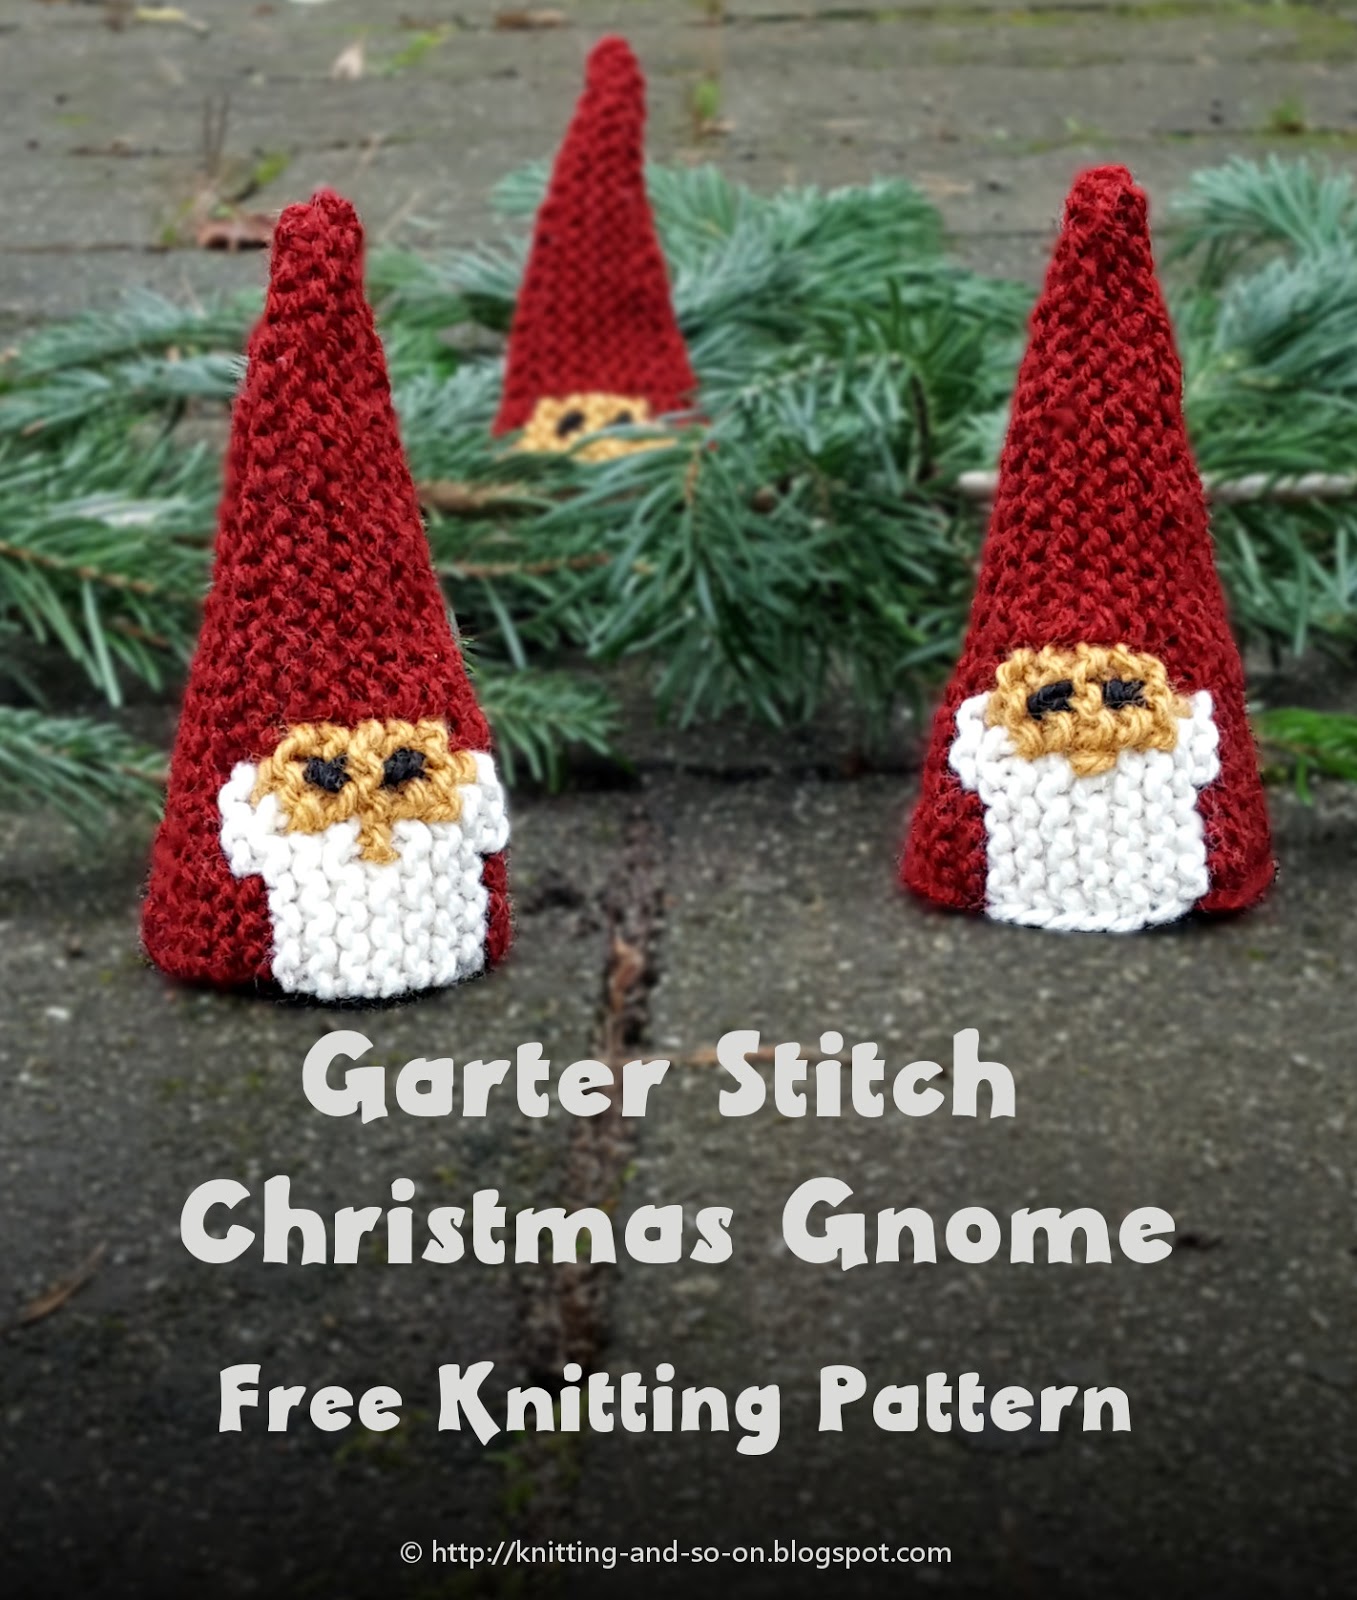
Hold a star in your hands with these beautiful fingerless gloves. They are knitted all in garter stitch with a star around your thumb.
The mitts are basically shaped like the
Starburst Mitts I published a while ago, but with added colorwork to form a star around the thumbs.

This work by
Knitting and so on is licensed under a
Creative Commons Attribution-NonCommercial-ShareAlike 4.0 International License.

 Materials
- a total of 35 to 40 grams of fingering weight yarn in two colors (about 25 grams of color 1, C1, beige in the photos and about 15 grams of color 2, C2, blue in the photos)
- 3mm knitting needles
- 3 stitch markers (2 of which safety pins of similar)
- tapestry needle (for grafting and to weave in ends)
Gauge / Measurements
The finished mitts measure about 16 cm in circumference (around the wrists) and 18 cm high. (Gauge in garter stitch: 6 stitches and 14 rows/7ridges = 1 inch)
Techniques
- Short Rows (t+p): Short rows are one of my favorite knitting techniques because they not only allow you to shape your knitting but also to created interesting graphical pattern. There are several techniques for short rows – and it’s a matter of taste which one you prefer. I’ve recently learned a technique called German short rows: when you turn, bring yarn to the front and pull it back so that a sort of double-stitch is created, then knit back as usual - when you have to knit the double-stitch, be careful to knit it as one stitch (see also https://www.youtube.com/watch?v=P6n561SMZXQ); this method has the advantage the no picking up of stitches is necessary. In the pattern, this stitch will be called t+p (turn and pull).
- Provisional Cast-On: This method of cast-on usually uses some waste yarn that can be remove later to get live stitches, these stitches can either be used to continue knitting in the opposite direction or to graft these stitches to the rest of your piece. My favourite method is the one using a crochet hook (http://www.youtube.com/watch?v=UeExgbgTOgs). The first time you use your working yarn, will be called setup row in this pattern.
There are other methods as well. E.g. the one explained in knitty (
http://www.knitty.com/ISSUEfall05/FEATfall05TT.html). If you use this method, you don’t need to knit the setup row (14 sts of C2 and 9 sts of C1), because you already have your first row of stitches in working yarn.
- Grafting: Grafting (also called kitchener stitch) is a great way to finish garments without a visible seam (If you want to know more about grafting – it’s different stitches and mechanics – you should read the “5 Grafting Myths”-series by Joni Coniglio on knittingdaily.com).
To finish these mitts you need to be able to graft in garter stitch.
- Grafting in garter stitch (and here’s a video from knittinghelp.com that shows the technique: www.knittinghelp.com/video/play/grafting-garter-kitchener-stitch):
Set-up stitch:
- front needle: insert purlwise and leave stitch on needle;
- back needle: insert purlwise and leave stitch on needle;
Then repeat the following actions:
- front needle: insert knitwise needle into first and slide from needles (knit slip), insert needle purlwise into next stitch and leave on needle (purl leave)
- back needle: insert knitwise needle into first and slide from needles (knit slip), insert needle purlwise into next stitch and leave on needle (purl leave)
- Picking up stitches from the edge and joining as you go: to attach the first stitch of one row to the edge stitch of the row opposite, slip the last stitch and insert the right needle in a loop of the edge stitch from the opposite side, reinsert the left needle into the last 2 loops and knit them together (like doing a ssk); this will be called ssk+c (ssk and connect) in this pattern (see illustration photo 3 below) - a similar method is shown in this video: http://youtu.be/3zPXZ4cu66Q.
Alternatively, you can just knit the last stitch of each row in section F and G and sew the two sides together afterwards.
 |
| Illustration photos |
General Construction

The mitts are knitted flat in eight sections (from A to H).
The diagram shows how the sections form the complete mitt, how many stitches there are between the edge and M1 (inner blue circle), as well as how the stitch count changes.
It also shows where the mitt is to be folded and which parts are to be attached to which when finishing the mitts (or while you're knitting sections F and G).
Sections E, F, G, and H are mirror images of sections D, C, B, and A respectively, i.e. where there is an increase in A, there is an decrease in H - and the short row lenghts are mirrored as well.
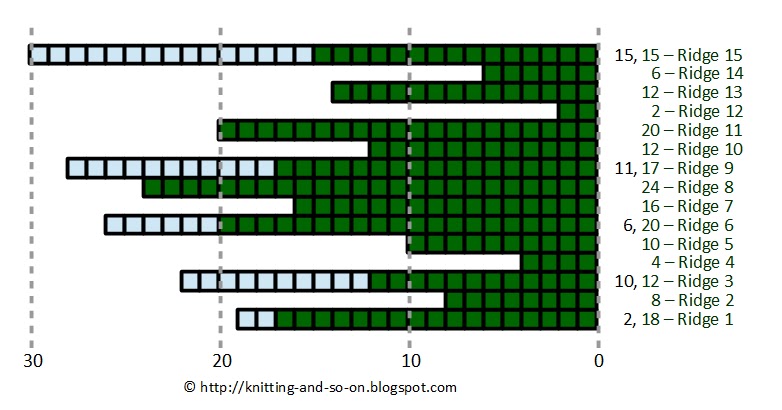
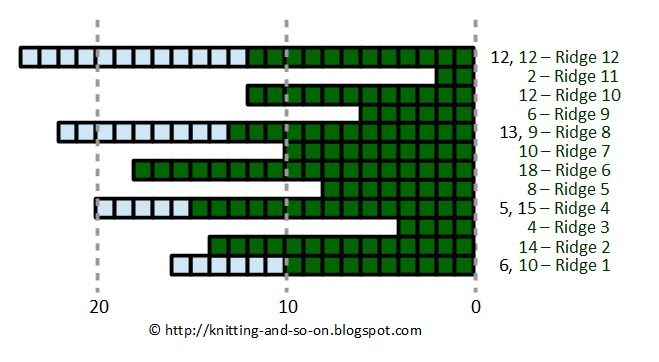
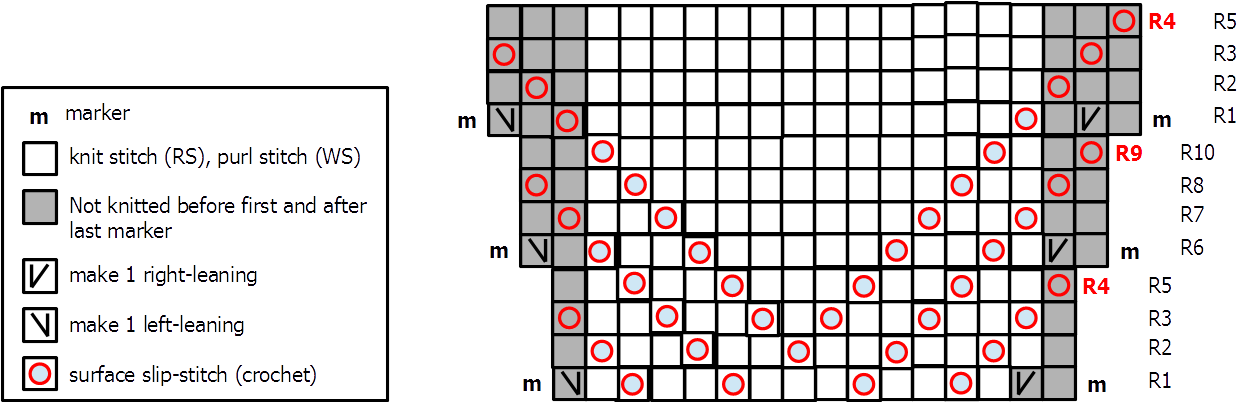
Color Charts - How to Read Them
When I started this pattern, I drew charts on squared paper because I found this much easier to work with. That's why I'm including the charts here, too.
Here's how to read the charts (example chart for sections A and H).
 |
| Example: Chart for sections A and H |
- For the first section A you work from top to bottom. For the last section H you work from bottom to top - this is indicated by the big arrows on the side.
- One row indicates on ridge, i.e. one RS row and one WS row.
- White squares are knit-stitches in C1. Blue squares are knit-stitches in C2. The numbers in front of the row indicate how many stitches per color are in that row - the black number gives the number of stitches for C1 and the blue number the number of stitches for C2.
- The first stitch in every RS row is slipped to get a nice edge that can be attached to the other side easily. However, it is counted in the charts, i.e. if the chart tells you that the row begings with 7 C1 stitches, you do sl1, k6.
- When knitting the WS row, you knit each stitch in the color that they appear on your needles, i.e. any C1 stitch is knitted with C1 and any C2 stitch is knitted with C2.
- The blue vertical line marks the start of the thumb, i.e. the placement of the marker M1.
The gray vertical dashed lines are only there as a counting aid, there are placed every five stitches from the beginning of the first row.
- The triangles mark that there is an increase or decrease. Both increases and decreases are made just before the last stitch of the WS row. That means for increases that you knit up to the 2nd stitch before the end and then do a kfb, k1. For decreases it means that you knit up to the last 3 stitches and then do an k2tog, k1. For sections A, B, C, and D I made the increases/decreases in the ridge with the triangle - for sections E, F, G and H in the ridge below; that way the stitch numbers work out.
These explanations and the charts below are sufficient to knit the mitts. Since some people don't like to work with charts, I spelled out all the sections below.
Instructions
Section A
Provisionally CO 23 stitches
Setup Row: with C2 k9, place marker (M1), k5; with C1 k9 - after you've done this, your piece should look similar to illustration photo 1.
Rigde 1: sl1, k6 (C1), k16 (C2), turn, sl1, k15 (C2), k to end (C1)
Ridge 2: sl1, k8 (C1), k5 (C2), t+p, k4 (C2), k to end (C1)
Ridge 3: sl1, k3 (C1), t+p, k to end (C1)
Ridge 4: sl1, k6 (C1), t+p, k to end (C1)
Ridge 5: sl1, k10 (C1), k4 (C2), t+p, k3 (C2), k to end (C1)
Ridge 6: sl1, k8 (C1), t+p, k to end (C1)
Ridge 7: sl1, k5 (C1), t+p, k to end (C1)
Ridge 8: sl1, k9 (C1), t+p, k to end (C1)
Ridge 9: sl1, k12 (C1), k3 (C2), t+p, k2 (C2), k to last 2 sts (C1),
kfb, k1
Ridge 10: sl1, k8 (C1), t+p, k to end (C1)
Ridge 11: sl1, k11 (C1), k3 (C2), t+p, k2 (C2), k to end (C1)
Ridge 12: sl1, k6 (C1), t+p, k to last 2 sts (C1),
kfb, k1
Ridge 13: sl1, k8 (C1), t+p, k to end (C1)
Ridge 14: sl1, k10 (C1), k5 (C2), t+p, k4 (C2), k to end (C1)
Ridge 15: sl1, k5 (C1), t+p, k to last 2 sts (C1),
kfb, k1
Ridge 16: sl1, k7 (C1), t+p, k to end (C1)
Ridge 17: sl1, k9 (C1), k16 (C2), turn, sl1, k15 (C2), k to end (C1)
When you've finished section A, place marker (e.g. safety pin) in the first stitch on your needles ("marker A").
Section B
Ridge 1: sl1, k11 (C1), k14 (C2), turn, sl1, k13 (C2), k to end (C1)
Ridge 2: sl1, k3 (C1), t+p, k to end (C1)
Ridge 3: sl1, k5 (C1), t+p, k to end (C1)
Ridge 4: sl1, k13 (C1), k3 (C2), turn, sl1, k2 (C2), k to end (C1)
Ridge 5: sl1, k7 (C1), t+p, k to end (C1)
Ridge 6: sl1, k11 (C1), t+p, k to end (C1)
Ridge 7: sl1, k9 (C1), t+p, k to end (C1)
Ridge 8: sl1, k15 (C1), k4 (C2), t+p, k3 (C2), k to last 2 sts (C1)
kfb, k1
Rigde 9: sl1, k12 (C1), t+p, k to end (C1)
Ridge 10: sl1, k7 (C1), t+p, k to end (C1)
Ridge 11: sl1, k14 (C1), k4 (C2), turn, sl1, k3 (C2), k to end (C1)
Ridge 12: sl1, k10 (C1), t+p, k to end (C1)
Ridge 13: sl1, k12 (C1), k5 (C2), turn, sl1, k4 (C2), k to end (C1)
Ridge 14: sl1, k6 (C1), t+p, k to end (C1)
Ridge 15: sl1, k9 (C1), t+p, k to end (C1)
Ridge 16: sl1, k10 (C1), k16 (C2), turn, sl1, k15 (C2), k to end (C1)
 |
| Chart B: Sections B and G |
Section C
Ridge 1: sl1, k12 (C1), k14 (C2), turn, sl1, k13 (C2), k to end (C1)
Ridge 2: sl1, k6 (C1), t+p, k to end (C1)
Ridge 3: sl1, k8 (C1), t+p, k to end (C1)
Ridge 4: sl1, k4 (C1), t+p, k to end (C1)
Ridge 5: sl1, k11 (C1), t+p, k to end (C1)
Ridge 6: sl1, k14 (C1), k4 (C2), t+p, k3 (C2), k (C1) to last 2 sts,
kfb, k1
Ridge 7: sl1, k8 (C1), t+p, k to end (C1)
Ridge 8: sl1, k5 (C1), t+p, k to end (C1)
Ridge 9: sl1, k12 (C1), t+p, k to end (C1)
Ridge 10: sl1, k17 (C1), k4 (C2), t+p, k3 (C2), k to end (C1)
Ridge 11: sl1, k5 (C1), t+p, k (C1) to last 2 sts,
kfb, k1
Ridge 12: sl1, k9 (C1), t+p, k to end (C1)
Ridge 13: sl1, k12 (C1), t+p, k to end (C1)
Ridge 14: sl1, k14 (C1), t+p, k to end (C1)
Ridge 15: sl1, k5 (C1), t+p, k to end (C1)
Ridge 16: sl1, k16 (C1), k4 (C2), t+p, k3 (C2), k (C1) to last 2 sts,
kfb, k1
Ridge 17: sl1, k11 (C1), t+p, k to end (C1)
Ridge 18: sl1, k6 (C1), t+p, k to end (C1)
Ridge 19: sl1, k13 (C1), t+p, k to end (C1)
Ridge 20: sl1, k15 (C1), k7 (C2), t+p, k6 (C2), k (C1) to last 2 sts,
kfb, k1
Ridge 21: sl1, k9 (C1), t+p, k to end (C1)
Ridge 22: sl1, k12 (C1), t+p, k to end (C1)
Ridge 23: sl1, k4 (C1), t+p, k to end (C1)
Ridge 24: sl1, k14 (C1), k16 (C2), turn, sl1, k15 (C2), k to end (C1)
When you've finished section C, place marker (e.g. safety pin) in the first stitch on your needles ("marker C")
 |
| Chart C: Sections C and F |
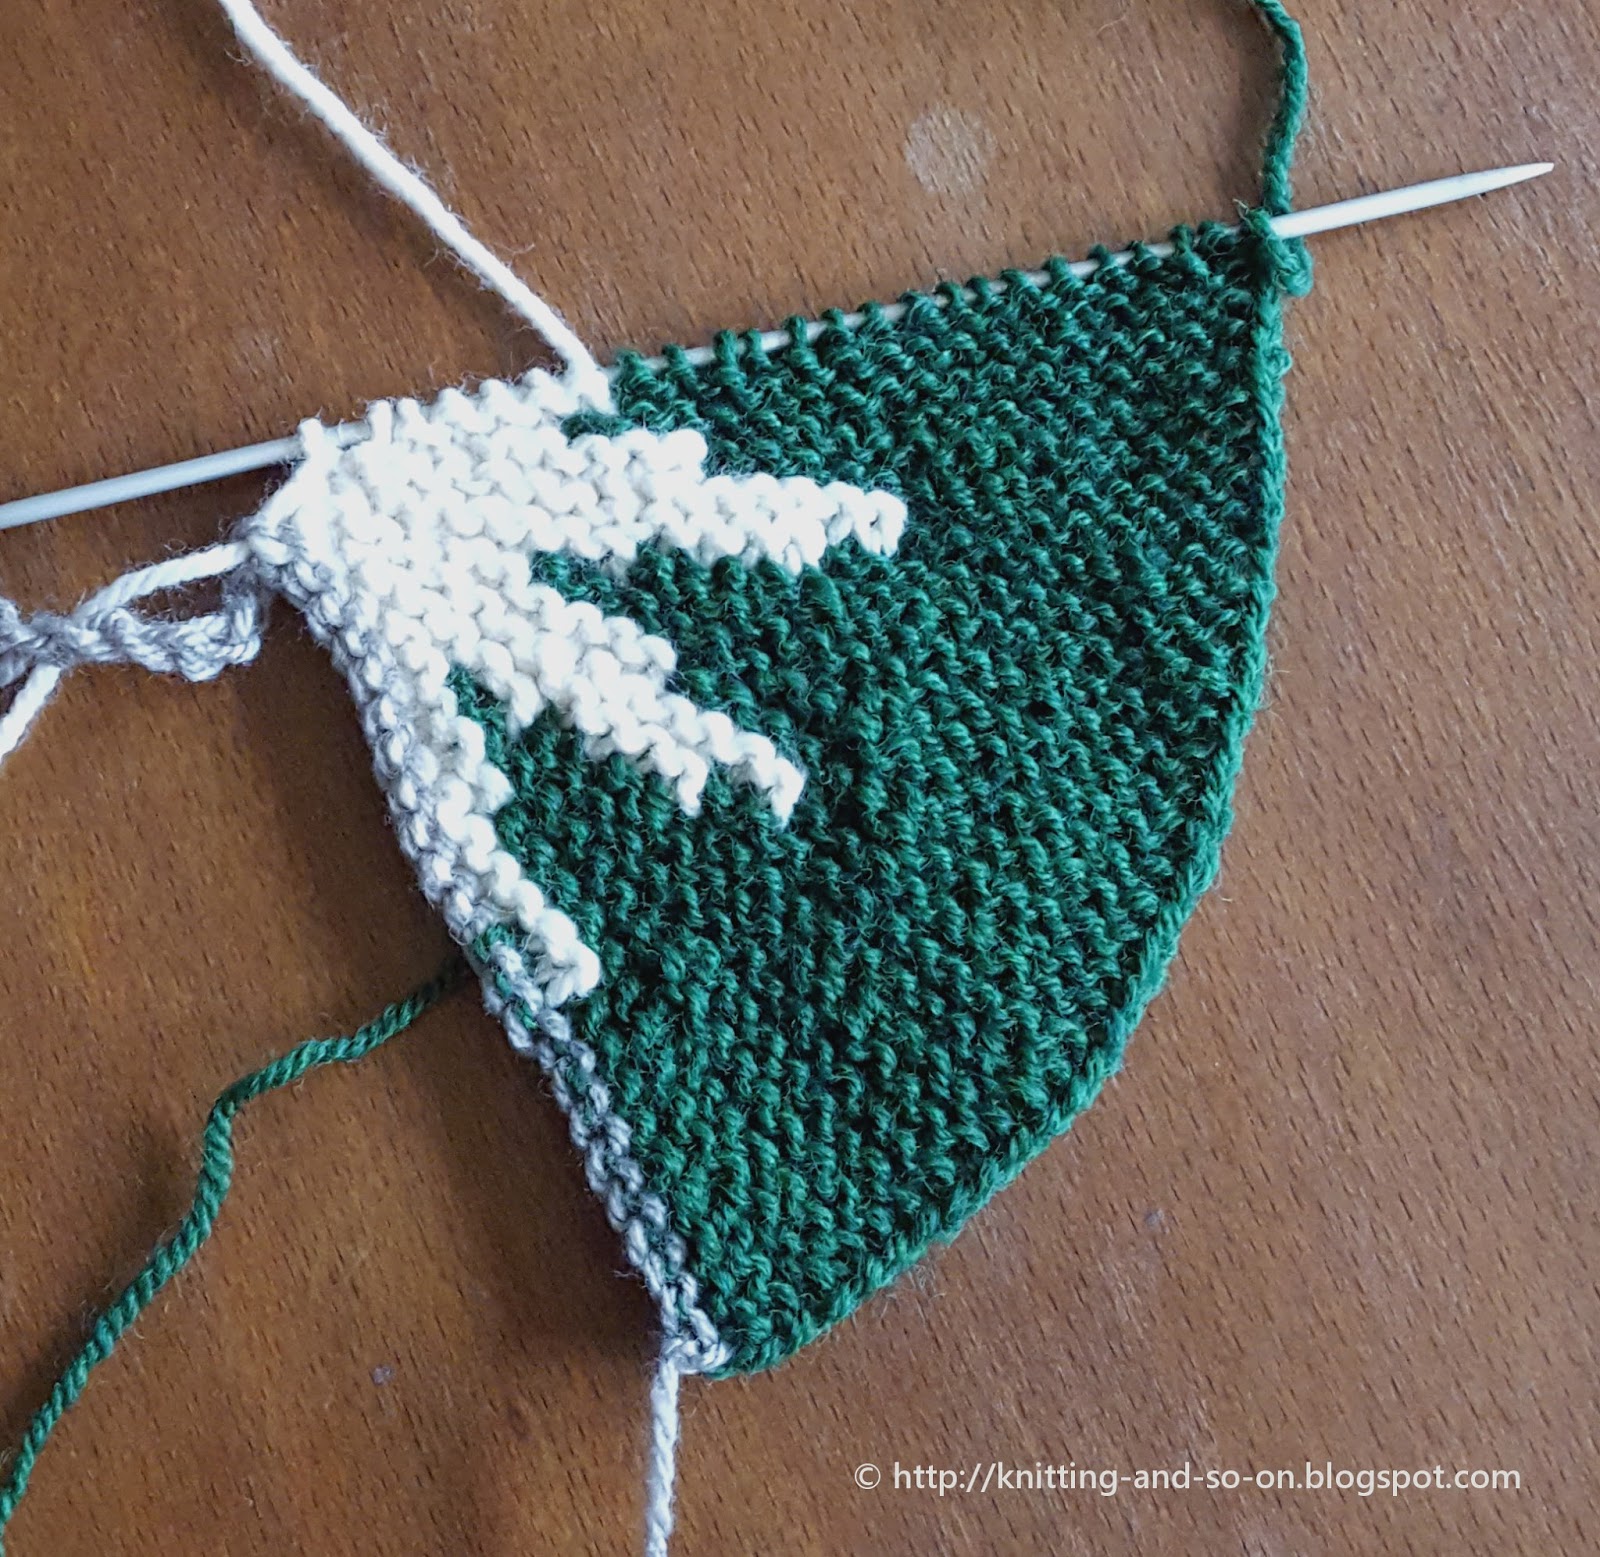
When you've finished section C, place marker (e.g. safety pin) in the first stitch on your needles (marker C). Your piece should now look similar to the illustration photo 2.
Section D
Ridge 1: sl1, k16 (C1), k14 (C2), turn, k14 (C2), k to end (C1)
Ridge 2: sl1, k3 (C1), t+p, k to end (C1)
Ridge 3: sl1, k4 (C1), t+p, k to end (C1)
Ridge 4: sl1, k6 (C1), t+p, k to end (C1)
Ridge 5: sl1, k10 (C1), t+p, k to end (C1)
Ridge 6: sl1, k17 (C1), k4 (C2), t+p, k3 (C2), k to last 3 sts (C1),
ssk, k1
Ridge 7: sl1, k12 (C1), t+p, k to end (C1)
Ridge 8: sl1, k19 (C1), k4 (C2), t+p, k3 (C2), k to end (C1)
Ridge 9: sl1, k11 (C1), t+p, k to end (C1)
Ridge 10: sl1, k15 (C1), t+p, k to end (C1)
Ridge 11: sl1, k17 (C1), k4 (C2), t+p, k3 (C2), k to end (C1)
Ridge 12: sl1, k15 (C1), t+p, k to last 3 sts (C1),
ssk, k1
Ridge 13: sl1, k6 (C1), t+p, k to end (C1)
Ridge 14: sl1, k14 (C1), k to end (C2), turn, k14 (C2), k to end (C1)
Ridge 15: sl1, k6 (C1), t+p, k to end (C1)
Ridge 16: sl1, k10 (C1), t+p, k to end (C1)
Ridge 17: sl1, k8 (C1), t+p, k to end (C1)
Ridge 18: sl1, k12 (C1), k8 (C2), t+p, k7 (C2), k to end (C1)
 |
| Chart D: Sections D and E |
Section E (i.e. section D backwards)
Ridge 1: sl1, k8 (C1), t+p, k to end (C1)
Ridge 2: sl1, k10 (C1), t+p, k to end (C1)
Ridge 3: sl1, k6 (C1), t+p, k to end (C1)
Ridge 4: sl1, k14 (C1), k to end (C2), turn, k14 (C2), k to end (C1)
Ridge 5: sl1, k6 (C1), t+p, k to last 2 sts (C1),
kfb, k1
Ridge 6: sl1, k15 (C1), t+p, k to end (C1)
Ridge 7: sl1, k17 (C1), k4 (C2), t+p, k3 (C2), k to end (C1)
Ridge 8: sl1, k15 (C1), t+p, k to end (C1)
Ridge 9: sl1, k11 (C1), t+p, k to end (C1)
Ridge 10: sl1, k19 (C1), k4 (C2), t+p, k3 (C2), k to end (C1)
Ridge 11: sl1, k12 (C1), t+p, k to last 2 sts (C1),
kfb, k1
Ridge 12: sl1, k17 (C1), k4 (C2), t+p, k3 (C2), k to end (C1)
Ridge 13: sl1, k10 (C1), t+p, k to end (C1)
Ridge 14: sl1, k6 (C1), t+p, k to end (C1)
Ridge 15: sl1, k4 (C1), t+p, k to end (C1)
Ridge 16: sl1, k3 (C1), t+p, k to end (C1)
Ridge 17: sl1, k16 (C1), k14 (C2), turn, k14 (C2), k to end (C1)
Section F (i.e. section C backwards)
During sections F and G, you will attach the last stitch of each ridge with an edge stitch of section C and section B respectively. For this you need to fold the mitt along the folding line (right sides out) and attach the sides as you go along - as explained above in "Techniques" and abbreviated with
ssk+c in the pattern. Picture 4 shows how the mitt looks after you have knitted a few rows of section F when you connect the halves as you go.
Alternatively, you can just knit the last stitch of each row of section F and G; and sew the two edges together afterwards.
Start connecting the last stitch of the first row to the stitch that is marked by marker C folding the mitt wrong sides out and work your way upwards.
Ridge 1: sl1, k14 (C1), k16 (C2), turn, sl1, k15 (C2), k to last stitch (C1), ssk+c
Ridge 2: sl1, k4 (C1), t+p, k to last stitch (C1), ssk+c
Ridge 3: sl1, k12 (C1), t+p, k to last stitch (C1), ssk+c
Ridge 4: sl1, k9 (C1), t+p, k (C1) to last 3 sts,
ssk, ssk+c
Ridge 5: sl1, k15 (C1), k7 (C2), t+p, k6 (C2), k to last stitch (C1), ssk+c
Ridge 6: sl1, k13 (C1), t+p, k to last stitch (C1), ssk+c
Ridge 7: sl1, k6 (C1), t+p, k to last stitch (C1), ssk+c
Ridge 8: sl1, k11 (C1), t+p, k (C1) to last 3 sts,
ssk, ssk+c
Ridge 9: sl1, k16 (C1), k4 (C2), t+p, k3 (C2), k to last stitch (C1), ssk+c
Ridge 10: sl1, k5 (C1), t+p, k to last stitch (C1), ssk+c
Ridge 11: sl1, k14 (C1), t+p, k to last stitch (C1), ssk+c
Ridge 12: sl1, k12 (C1), t+p, k to last stitch (C1), ssk+c
Ridge 13: sl1, k9 (C1), t+p, k (C1) to last 3 sts,
ssk, ssk+c
Ridge 14: sl1, k5 (C1), t+p, k to last stitch (C1), ssk+c)
Ridge 15: sl1, k17 (C1), k4 (C2), t+p, k3 (C2), k to last stitch (C1), ssk+c
Ridge 16: sl1, k12 (C1), t+p, k to last stitch (C1), ssk+c
Ridge 17: sl1, k5 (C1), t+p, k to last stitch (C1), ssk+c
Ridge 18: sl1, k8 (C1), t+p, k (C1) to last 3 sts,
ssk, ssk+c
Ridge 19: sl1, k14 (C1), k4 (C2), t+p, k3 (C2), k to last stitch (C1), ssk+c
Ridge 20: sl1, k11 (C1), t+p, k to last stitch (C1), ssk+c
Ridge 21: sl1, k4 (C1), t+p, k to last stitch (C1), ssk+c
Ridge 22: sl1, k8 (C1), t+p, k to last stitch (C1), ssk+c
Ridge 23: sl1, k6 (C1), t+p, k to last stitch (C1), ssk+c
Ridge 24: sl1, k12 (C1), k14 (C2), turn, sl1, k13 (C2), k to last stitch (C1), ssk+c
Section G (i.e. section B backwards)
Ridge 1: sl1, k10 (C1), k16 (C2), turn, sl1, k15 (C2), k to last stitch (C1), ssk+c
Ridge 2: sl1, k9 (C1), t+p, k to last stitch (C1), ssk+c
Ridge 3: sl1, k6 (C1), t+p, k to last stitch (C1), ssk+c
Ridge 4: sl1, k12 (C1), k5 (C2), turn, sl1, k4 (C2), k to last stitch (C1), ssk+c
Ridge 5: sl1, k10 (C1), t+p, k to last stitch (C1), ssk+c
Ridge 6: sl1, k14 (C1), k4 (C2), turn, sl1, k3 (C2), k to last stitch (C1), ssk+c
Ridge 7: sl1, k7 (C1), t+p, k to last stitch (C1), ssk+c
Rigde 8: sl1, k12 (C1), t+p, k to 3 sts before end (C1),
ssk, ssk+c
Ridge 9: sl1, k15 (C1), k4 (C2), t+p, k3 (C2), k to last stitch (C1), ssk+c
Ridge 10: sl1, k9 (C1), t+p, k to last stitch (C1), ssk+c
Ridge 11: sl1, k11 (C1), t+p, k to last stitch (C1), ssk+c
Ridge 12: sl1, k7 (C1), t+p, k to last stitch (C1), ssk+c
Ridge 13: sl1, k13 (C1), k3 (C2), turn, sl1, k2 (C2), k to last stitch (C1), ssk+c
Ridge 14: sl1, k5 (C1), t+p, k to last stitch (C1), ssk+c
Ridge 15: sl1, k3 (C1), t+p, k to last stitch (C1), ssk+c
Ridge 16: sl1, k11 (C1), k14 (C2), turn, sl1, k13 (C2), k to last stitch (C1), ssk+c
After connecting the edge stitches of sections F and G to the edge stitches of section C and B you should have reached marker A.
Section H (i.e. section A backwards)
Ridge 17: sl1, k9 (C1), k16 (C2), turn, sl1, k15 (C2), k to end (C1)
Ridge 16: sl1, k7 (C1), t+p, k to last 3 sts (C1),
ssk, k1
Ridge 15: sl1, k5 (C1), t+p, k to end (C1)
Ridge 14: sl1, k10 (C1), k5 (C2), t+p, k4 (C2), k to end (C1)
Ridge 13: sl1, k8 (C1), t+p, k to last 3 sts (C1),
ssk, k1
Ridge 12: sl1, k6 (C1), t+p, k to end (C1)
Ridge 11: sl1, k11 (C1), k3 (C2), t+p, k2 (C2), k to end (C1)
Ridge 10: sl1, k8 (C1), t+p, k to last 3 sts (C1),
ssk, k1
Ridge 9: sl1, k12 (C1), k3 (C2), t+p, k2 (C2), k to end (C1)
Ridge 8: sl1, k9 (C1), t+p, k to end (C1)
Ridge 7: sl1, k5 (C1), t+p, k to end (C1)
Ridge 6: sl1, k8 (C1), t+p, k to end (C1)
Ridge 5: sl1, k10 (C1), k4 (C2), t+p, k3 (C2), k to end (C1)
Ridge 4: sl1, k6 (C1), t+p, k to end (C1)
Ridge 3: sl1, k3 (C1), t+p, k to end (C1)
Cut yarn both strands of yarn but leave tails of about 50 cm. Take out your scrap yarn of the provisional cast on and put the live stitches on a knitting needle. Graft in garter stitch: 9 stitches in C1 and the rest of the stitches in C2.
Weave in ends.
Make two.
This post was featured at
Pinbellish Link Party No. 17.


