Posts mit dem Label Cowl werden angezeigt. Alle Posts anzeigen

Montag, 5. Dezember 2016

Attempt at Intarsia

Usually I'm not very good at knitting intarsia. I have two patterns on my blog that use this technique (Xmas Star Mitts and Cordillera Scarf), but it's not exactly my speciality.

That's why I was really surprised, when a photo of this attempt of an intarsia cowl got a huge amounts of likes on my Instagram account. To be honest, before it got this attention, I wasn't even sure whether I would go on knitting it or whether I would frog it ... But now, I guess I will finish it (and later publish the pattern). At least it's good practice for colorwork knitting and it's fun to knit :)


Montag, 21. November 2016

Burgdorf Rundschal

Garne mit langem Farbverlauf eignen sich besonders gut für modulares Stricken, d.h. für Strickstücke, die sich aus mehreren geometrischen Formen zusammensetzen - so auch für diesen Rundschal, der sich aus gestrickten Trapezen zusammensetzt.


Creative Commons License
This work by Knitting and so on is licensed under a Creative Commons Attribution-NonCommercial-ShareAlike 4.0 International License.


Die englische Version dieser Anleitung findet sich hier.
An english version of this pattern can be found in this blogpost.

Material
  • ca.100 gramm Lace Garn - Ich habe Schachenmayr Merino Extrafine 285 verwendet
  • 3.25mm Nadeln - ich habe eine lange Rundstricknadel verwendet, man kann aber auch gerade Nadeln verwenden, hierbei ist es aber bequemer wenn man eine dritte Nadel hat, da man jeweils rechtwinklig zur Arbeit Maschen aufnimmt
  • einen Maschenmarkierer
  • Garnrest (für den provisorischen Maschenanschlag)
  • eine Nähnadel für den Maschenstich

Techniken

Maschenprobe und Grösse
Kraus rechts gestrickt ergaben sich bei mir 13 Stiche auf 5 cm Breite und 24 Reihen auf 5 cm Höhe.
Ich mag es am liebsten, wenn ich Rundschals zweimal um den Hals legen kann, daher habe ich instgesamt 24 Trapeze gestrickt. Der Schal war 22 cm breit und hatte einen Umfang von 120 cm, und ich habe 100 gr Lace-Garn verstrickt.

Konstruktion
Die Zeichnung unten zeigt, wie der Schal konstruiert ist. Er besteht aus trapezförmigen Modulen, die rechtwinklig ineinandergreifen. Am oberen Ende des Schals wird das letzte Trapez mit dem zweiten Trapez verbunden und das vorletzte mit dem zu allerst gestrickten.

 
Auf dem Bild auf der rechten Seite sieht man, wie die Trapeze übereinander liegen. Trapez 2 liegt rechtwinklig auf der kürzeren Schenkelseite von Trapez 1. Von dieser Seite werden Stiche aufgenommen und abgestrickt - dazu kommen die restlichen Stiche des provisorischen Maschenanschlags.
Trapez 3 liegt wiederum rechtwinklig auf Trapez 2. Hierfür werden Stiche von der Schenkelseite von Trapez 2 aufgenommen und abgestrickt - hinzu kommen die restlichen Stiche von Trapez 1.
Jedes weitere Trapez liegt rechtwinklig auf dem vorherigen auf - d.h. es werden Stiche von der kurzen Schenkelseite aufgenommen - und es verwendet die restlichen Stiche vom vorletzten Trapez.
 
 
Anleitung

Provisorischer Maschenanschlag von 80 Maschen, d.h. 80 Maschen mit Garnrest auf die Nadel aufhäkeln.

Davon 30 Maschen auf die rechte Nadel nehmen (ohne sie mit dem Arbeitsgarn abzustricken - diese Stiche werden erst wieder für Trapez 2 benötigt), dann einen Maschenmarkierer setzen, und die restlichen 50 Stiche normal abstricken (mit Arbeitsgarn)


Trapez 1
R1: ssk, bis zum Ende rechts stricken
R2: erste Masche wie zum links stricken abheben, bis zum Ende rechts stricken
R3: ssk, bis zum Ende rechts stricken
Reihen 2 und 3 noch 18 weitere Male stricken.
Die letzte Reihe bestand aus 30 Maschen - diese werden erst wieder für Trapez 3 benötigt.
Das Strickstück sollte jetzt etwa wie in Foto 1 aussehen.

Trapez 2
R1: den Maschenmarkierer platzieren, dann 20 Stiche von der kurzen Seite (Kettrand) von Trapez 1 aufnehmen und abstricken, anschliessend die restlichen 30 Stiche vom provisorischen Maschenanschlag abstricken. Nun sollten zwischen Maschenmarkierer und Ende wieder 50 Stiche sein und das Strickstück sollte ähnlich wie in Foto 2 aussehen.
R2: ssk, bis zum Ende rechts stricken
R3: erste Masche wie zum links stricken abheben, bis zum Ende rechts stricken
R4: ssk, bis zum Ende rechts stricken
Reihen 3 und 4 noch 18 weitere Male stricken. Jetzt sollten zwischen dem Ende der Reihe und dem Maschenmarkierer noch 30 "aktive" Stiche von Trapez zwei sein. Diese werden für das nächste Trapez stillgelegt und erst im übernächsten wieder verwendet.


Trapez 3
R1: den Maschenmarkierer platzieren, dann 20 Stiche von der kurzen Seite von Trapez 1 aufnehmen und abstricken, anschliessend die restlichen 30 Stiche vom provisorischen Maschenanschlag abstricken. Zwischen Maschenmarkierer und dem Ende der Reihe sollten jetzt 50 Stiche sein. Das Strickstück sollte ähnlich aussehen wie auf Foto 3 gezeigt.
R2: ssk, bis zum Ende rechts stricken
R3: erste Masche wie zum links stricken abheben, bis zum Ende rechts stricken
R4: ssk, bis zum Ende rechts stricken
Die Reihen 3 und 4 noch 18 weitere Male wiederholen (nach einigen Wiederholungen sollte das Strickstück ähnlich aussehen wie auf Foto 4) - nach den Wiederholungen befinden sich 30 "aktive" Stiche zwischen dem Maschenmarkierer und dem Ende der Reihe - diese Stiche werden für das nächste Trapez stillgelegt und erst wieder im übernächsten Trapez gestrickt.
Repeat rows 3 and 4, 18 more times (after a few times the upper edge of your piece should look similar to photo 4) -> there are now 30 "active" stitches for this trapezoid - these stitches will not be knitted during the next trapezoid.

Trapez 4 = Trapez 3

Trapeze 3 und 4 so lange wiederholen bis das Strickstück die gewünschte Länge hat.
Für den Rundschal auf den Fotos habe ich insgesamt 24 Trapeze gestrickt. Dies gab eine Länge, die bequem 2x um den Hals passt.

Das Garn abschneiden, aber einen genügend langen Rest dran lassen, um 30 Stiche (Maschenstich) zu stricken.

Die Stiche vom provisorischen Maschenstich auf eine Nadel nehmen (ich hatte keine zweite 3.25mm-Nadel, daher habe ich eine etwas kleinere genommen (3mm) - das geht auch.
Zur Orientierung ist es hilfreich, dabei einen Maschenmarkierer zwischen die beiden ersten Trapeze zu setzen (d.h. unter dem allerersten Trapez befinden sich 50 Stiche, unter dem zweiten 30).

Nun das zuletzt gestrickte Trapez mit dem zweiten zusammenhalten (siehe Foto 5) und mit Maschenstich verbinden - hierzu das Garn verwenden, dass am Ende des Strickens übriggelassen wurde.

Von der Seite (Kettrand) des letzten Trapezes 20 Stiche aufnehmen, aber dabei nicht abstricken. Zusammen mit den restlichen Stiches des vorletzten Trapezes sind jetzt 50 Maschen auf dieser Nadel. Diese mit dem unteren Rand des allerersten Trapezes zusammenhalten (siehe Foto 6) und mit Maschenstich verbinden.

Die Enden vernähen und vorsichtig aufspannen.

Mittwoch, 5. Oktober 2016

Patchwork Cowl

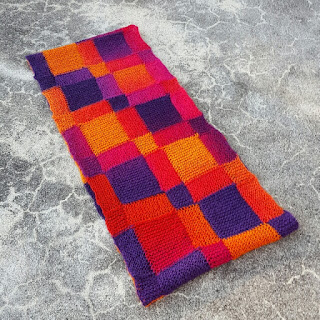
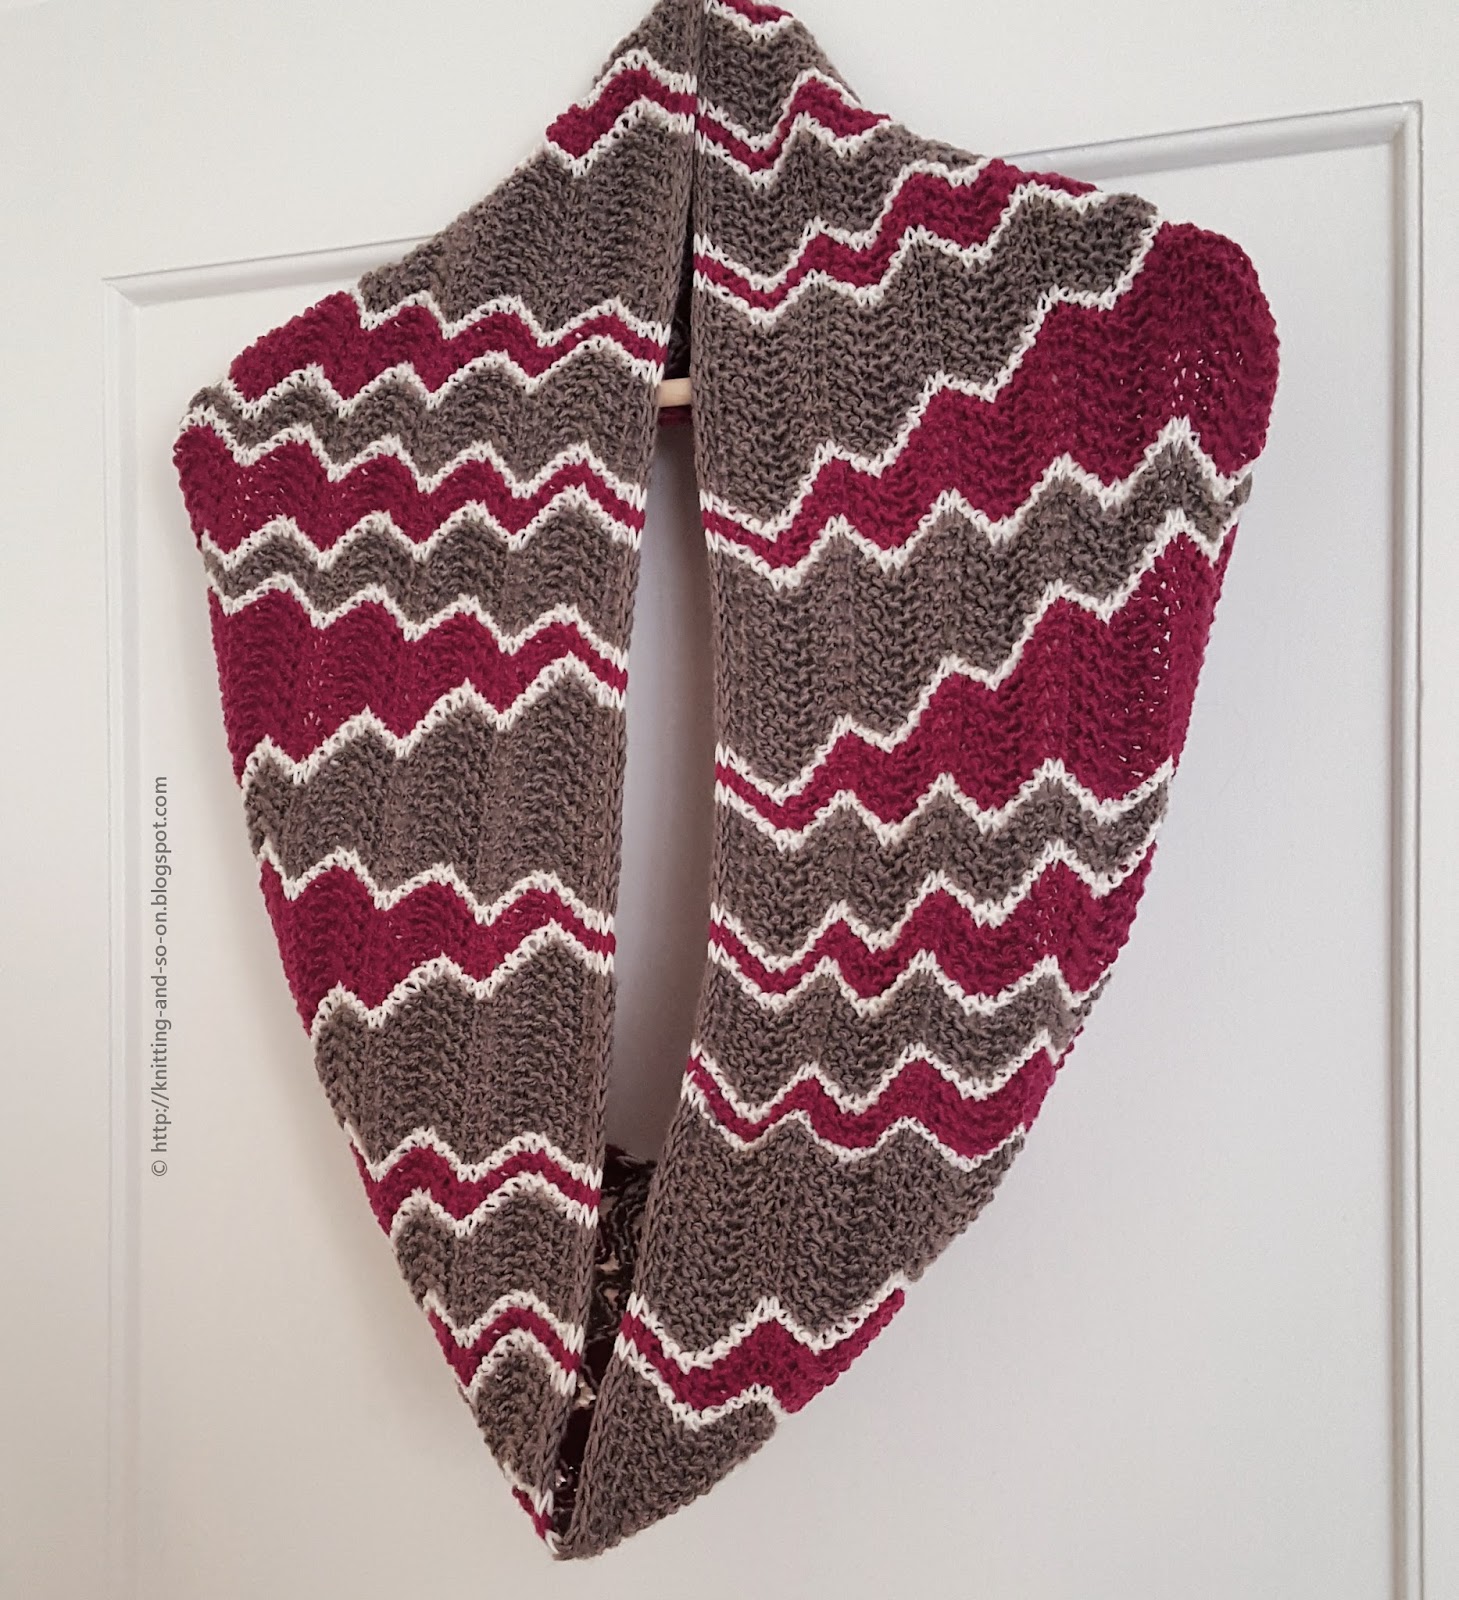
As the days get colder and greyer, knit yourself this lovely and colourful cowl. It is knitted flat and all in garter stitch. Due to its unique construction it brings out the best of your variegated yarn, e.g. your Zauberball or your Noro yarn. It is basically a variation of an entrelac pattern, but with blocks (squares and rectangles) of different sizes.


Creative Commons License
This work by Knitting and so on is licensed under a Creative Commons Attribution-NonCommercial-ShareAlike 4.0 International License.


Materials
  • about 200 grams of fingering weight yarn - preferably variegated yarn
  • 3.25mm needles (straight or circulars) 
  • a third needle (for three-needle BO)
  • a tapestry needle (to weave in ends)


Techniques and Stitches


Construction
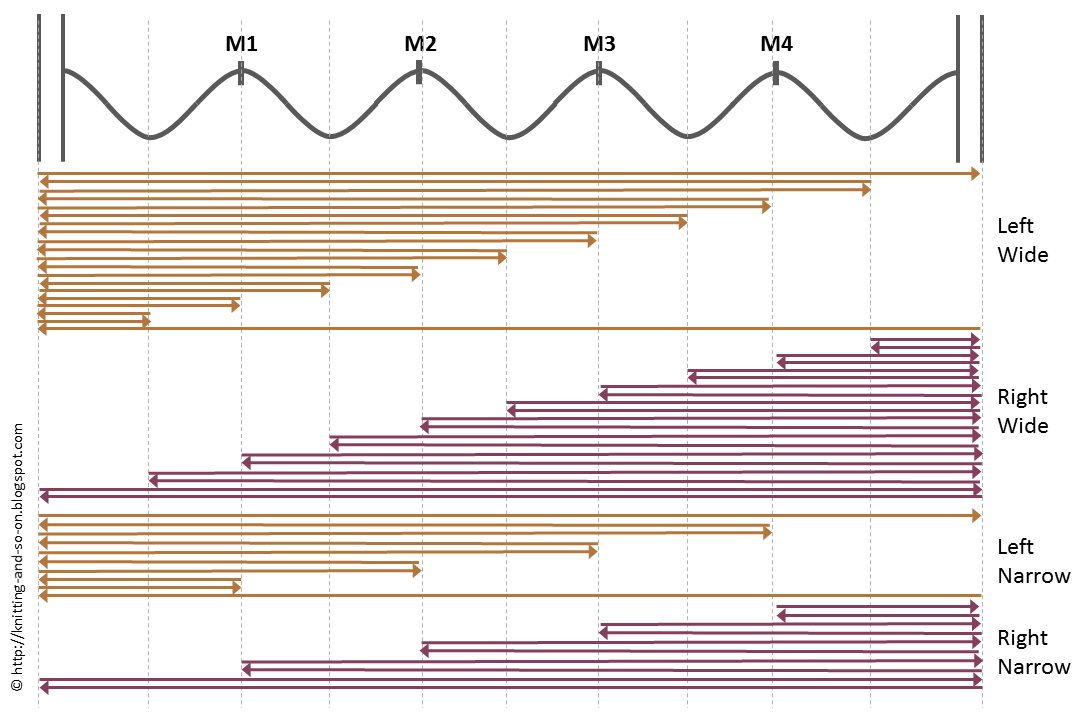
Figure X shows the general construction of the cowl. It is knitted flat and connected in the end (i.e. after the last layer or connected while knitting the last layer).

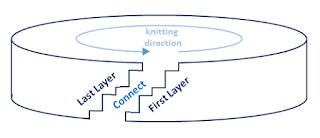
Figure 1: General Construction


Figure 2 shows how the layers make up the cowl. Odd-numbered layers consist of rectangles: 3 rectangles that are 8 stitches wide and 8 ridges high, and 2 rectangles that are 16 stitches wide and 16 ridges high. Even-numbered layers consist of rectangles: 3 that are 16 stitches wide and 8 ridges high, and 2 that are 8 stitches wide and 16 ridges high.
Rectangles/squares from one layer are knitted at a 90 degree angle to the knitting direction of the layer below.

Figure 2: Layers
In even numbered layers, rectangle 1 connects to square 5 of the layer below, rectangle 2 uses stitches picked up from square 5 of the layer below as base and is connected at the side to square of of the layer below, rectangle 3 is based on picked up stitches from the side of square 4 of the layer below and is connected to square 3 of the layer below ... and so on.

In layer 3 and the following odd numbered layers, square 1 is based on stitches from the side of rectangle 5 of the layer below and connected at the side to rectangle 4 of the layer below, and so on. The last square of an odd numbered layer is based on the stitches from rectangle 1 of the layer below and not connected while knitting it.


Instructions

Layer 1

Square 1 
CO8 stitches with knitted CO
Rows 1-16: sl1, k7

Square 2
CO 16 stitches with knitted CO (your piece should look as shown in photo 1 of picture A)
Rows 1-32: sl1, k15

Square 3 (=  Square 1)
CO8 stitches (with knitted CO)
Rows 1-16: sl1, k7

Square 4 (= Square 2)
CO 16 stitches with knitted CO 
Rows 1-32: sl1, k15
(Now your piece should look similar to photo 1 of picture A)

Square 5 (= Square 1)
CO8 stitches (with knitted CO)
Rows 1-16: sl1, k7


Layer 2

Rectangle 1
CO15 with knitted CO (your piece should now look like photo 3 of picture A)
Row 1: sl1, k14 (newly CO stitch), k1 (last stitch of square 5 of layer below), turn
Row 2: sl1, k to end, turn
Row 3: sl1, k14, k2tog-join
Row 4: sl1, k to end, turn
Repeat rows 3 and 4 six (6) more times
Row 15: sl1 k14, k2tog-join, DO NOT TURN but go on in the same direction

Rectangle 2
Pick up and knit 8 stitches
Row 1: sl1, k7, turn
Row 2: sl1, k6, k2tog-join (last stitch of the picked up stitches and next stitch of square 4 of layer below), turn
Row 3: sl1, k7, turn
Repeat rows 2 and 3 fourteen (14) more times.
Row 31: sl1, k6, k2tog-join, DO NOT TURN but go on in the same direction

Rectangle 3
Pick up and knit 16 stitches
Row 1: sl1, k15, turn
Row 2: sl1, k14, k2tog-join, (last stitch of the picked up stitches and next stitch of square 3 of layer below), turn
Row 3: sl1, k15 turn
Repeat rows 2 and 3 six (6) more times
Row 15: sl1, k14,  k2tog-join, DO NOT TURN but go on in the same direction

Rectangle 4
Pick up and knit 8 stitches
Row 1: sl1, k7, turn
Row 2: sl1, k6, k2tog-join (last stitch of the picked up stitches and next stitch of square 2 of layer below), turn
Row 3: sl1, k7, turn
Repeat rows 2 and 3 fourteen (14) more times.
Row 31: sl1, k6, k2tog-join, DO NOT TURN but go on in the same direction

Rectangle 5
Pick up and knit 16 stitches
Row 1: sl1, k15, turn
Row 2: sl1, k14, k2tog-join, (last stitch of the picked up stitches and next stitch of square 1 of layer below), turn
Row 3: sl1, k15 turn
Repeat rows 2 and 3 six more times
Row  15: sl1, k14,  k2tog-join
Row 16: BO15 stitches

Picture A: Illustrations for Layers 1 and 2


Layer 3

Square 1
Row 1: pick up and knit 7 stitches from the side of the last rectangle (rectangle 5 of layer below), you have now 8 stitches on your needles
Row 2: sl1, k to end
Row 3: sl1, k6, k2tog-join (with next stitch from rectangle 4 of layer below)
Repeat rows 2 and 3 six (6) times
Row 15: sl1, k to end
Row 16: sl1, k6 k2tog-join, DO NOT TURN but go on in the same direction

Square 2
Row 1: pick up and knit 16 stitches from the side of rectangle 4 of the layer below, TURN
Row 2: sl1, k15, TURN
Row 3: sl1, k14, k2tog-join (with next stitch from rectangle 3 of layer below)
Repeat rows 2 and 3 fourteen (14) times
Row 31: sl1, k15, TURN
Row 32: sl1, k14, k2tog-join (with last stitch from rectangle 3 of layer below), DO NOT TURN but go on in the same direction

Square 3
Row 1: pick up and knit 7 stitches from the side of the last rectangle (rectangle 3 of layer below), you have now 8 stitches on your needles
Row 2: sl1, k7, TURN
Row 3: sl1, k6, k2tog-join (with next stitch from rectangle 2 of layer below)
Repeat rows 2 and 3  six (6) times
Row 15: sl1, k to end
Row 16: sl1, k6 k2tog-join, DO NOT TURN but go on in the same direction
  
Square 4
Row 1: pick up and knit 16 stitches from the side of rectangle 2 of the layer below, TURN
Row 2: sl1, k15, TURN
Row 3: sl1, k14, k2tog-join (with next stitch from rectangle 1 of layer below)
Repeat rows 2 and 3  fourteen (14) times
Row 31: sl1, k15, TURN
Row 32: sl1, k14, k2tog-join (with last stitch from rectangle 1 of layer below), DO NOT TURN but go on in the same direction

Square 5
Row 1: pick up and knit 8 stitches from side of rectangle 1 of layer below
Rows 2-15: sl1, k7
DO NOT TURN but go on knitted CO of next layer


Repeat Layers 2 and 3 until the piece is roughly as long as you want it. Make sure to end with a layer 3.

 
Picture B: Illustrations for Last Layer


Last Layer

The last layer is basically the same as layer 2 with connections to the very first layer. This requires connecting the very first CO and connecting to the last knitted layer at the same time which can feel a bit awkward ... if you want to avoid this, you can just knit one more layer 2 and then sew the edges together.

However, here's how to do it without sewing.

Fold the scarf in a way so that the first layer faces the last layer with a gap about one layer wide (see photo 1 of picture B)

Rectangle 1
CO15 with knitted CO
With a third needle pick up 7 stitches from the CO of square 5 of the very first layer.
Rectangle 1 will not only be connected to the last layer but also to these stitches picked up from the first layer. See photo 2 in picture B.
Row 1: sl1, k14 (newly CO stitch), k1 (last stitch of square 5 of layer below), turn
Row 2: sl1, k 14, k2tog-join (with first stitch picked up of side of square 5 of layer 1)
Row 3: sl1, k 14, k2tog-join (with next stitch of square 5 of layer below)
Row 4: sl1, k 14, k2tog-join (with next stitch of square 5 of layer 1)
Repeat rows 3 and 4 six (6) more times
Now you have 18 stitches left (16 from this rectangle and 2 from the squares of other layers). Transfer these stitches to one needle (-> working needle)
With the third needle pick up 16 stitches from the side of square 4 of layer 1.
Your piece should now look like photo 3 of picture B
Row 15: do a three-needle BO of these stitches on these to needles - while doing a k2tog of the first and last stitch on the working needle. (See photo 4 of picture B)

Rectangle 2
Pick up and knit 8 stitches (from the side of square 4 of the layer below)
With the third needle pick up 16 stitches from the CO of square 4 of layer 1).
Rectangle 2 will be connected to square 4 of the layer below and square 4 of the first layer.
See photo 5 of picture B.
Row 1: sl1, k6, k2tog-join (with square 4 of layer 1)
Row 2: sl1, k6, k2tog-join (last stitch of the picked up stitches and next stitch of square 4 of layer below), turn
Row 3: sl1, k7, k2tog-join (with square 4 of layer 1)
Repeat rows 2 and 3 fourteen (14) more times.
Now you have 10 stitches left (8 from this rectangle and two from the adjoining squares). Transfer these to one needle
With third needle pick up 8 stitches from the side of square 3 of layer 1.
Row 31:  do a three-needle BO of these stitches on these to needles - while doing a k2tog of the first and last stitch on the working needle.

Rectangle 3
Pick up and knit 16 stitches
With a third needle pick up 7 stitches from the CO of square 3 of the very first layer.
Row 1: sl1, k14 (newly CO stitch), k1 (last stitch of square 3 of layer below), turn
Row 2: sl1, k 14, k2tog-join (with first stitch picked up of side of square 3 of layer 1)
Row 3: sl1, k 14, k2tog-join (with next stitch of square 3 of layer below)
Row 4: sl1, k 14, k2tog-join (with next stitch of square 3 of layer 1)
Repeat rows 3 and 4 six (6) more times.
Now you have 18 stitches left (16 from this rectangle and 2 from the squares of other layers). Transfer these stitches to one needle (-> working needle)
With the third needle pick up 16 stitches from the side of square 2 of layer 1.
Row 15: do a three-needle BO of these stitches on these to needles - while doing a k2tog of the first and last stitch on the working needle.

Rectangle 4
Pick up and knit 8 stitches
With the third needle pick up 16 stitches from the CO of square 2 of layer 1). See photo 6 of picture B.
Rectangle 2 will be connected to square 2 of the layer below and square 2 of the first layer.
Row 1: sl1, k6, k2tog-join (with square 2 of layer 1)
Row 2: sl1, k6, k2tog-join (last stitch of the picked up stitches and next stitch of square 2 of layer below), turn
Row 3: sl1, k7, k2tog-join (with square 2 of layer 1)
Repeat rows 2 and 3 fourteen (14) more times.
Now you have 10 stitches left (8 from this rectangle and two from the adjoining squares). Transfer these to one needle
With third needle pick up 8 stitches from the side of square 1 of layer 1.
Row 31:  do a three-needle BO of these stitches on these to needles - while doing a k2tog of the first and last stitch on the working needle.

Rectangle 5
Pick up and knit 16 stitches
With a third needle pick up 7 stitches from the CO of square 1 of the very first layer.
Row 1: sl1, k14 (newly CO stitch), k1 (last stitch of square 1 of layer below), turn
Row 2: sl1, k 14, k2tog-join (with first stitch picked up of side of square 1 of layer 1)
Row 3: sl1, k 14, k2tog-join (with next stitch of square 1 of layer below)
Row 4: sl1, k 14, k2tog-join (with next stitch of square 1 of layer 1)
Repeat rows 3 and 4 seven (7) more times.
Row 18: BO all stitches  

Weave in ends and block gently.


Underground Crafter

Freitag, 4. März 2016

Stack Overflow Cowl

Stacked stitches are a wonderful way to achieve lovely and intriguing color patterns. This cowl is knitted flat - started with a provsional cast on and ended by grafting. It may take a while to get the hang of knitting stacked stitches but it's definitely a worthwhile activity - since the finished piece is not your average garter stitch cowl.

The first pattern with stacked stitches I saw was Xandy Peters' Fox Paws Pattern - absolutely stunning! Another one of hers is called Ribbon Candy and available on knitty.com. In this pattern I'm going to use a similar notation to hers for the stacked stitches.

As to the pattern name - a stack overflow is a computing term. It means that an execution stack (a part of the computer's memory) grows beyond the memory that is reserved for it - which can lead to computer security vulnerabilities. For more details see this Wikipedia article.


Creative Commons License
This work by Knitting and so on is licensed under a Creative Commons Attribution-NonCommercial-ShareAlike 4.0 International License.


Materials
  • about 150 grams of fingering weight yarn in two colors
  • 3.25mm needles (straight or circulars)
  • a tapestry needle to weave in ends


Special Stitches and Techniques

Stack Overflow Cowl - free knitting pattern by Knitting and so on

Size

I did a cast-on of 51 stitches and total of 38 pattern repeast (38 times the 6 rows). My scarf has a width of 29 cm and a circumference of 150 cm.

Stack Overflow Cowl - Free Knitting Pattern by Knitting and so on


Instructions

Provisionally CO51 (or if you'd like to vary the width, cast on a multiple of 4 plus 3 (4n+3))
Row 1 (WS): k all
Row 2 (RS):  k1 * inc1-9, k3 repeat from * until there are only two stitches stitch left, inc1-9, k1
Row 3 (WS): * k2tog k2 kfb k1 kfb k2 ssk k1 repeat from * until there are only 11 sts left, k2tog k2 kfb k1 kfb k2 ssk
Change color
Row 4 (RS) = Row 3
Row 5 (WS) = Row 3
Row 6 (RS): BO4 (and carry up yarn from other color), k2, * dec9-1, k3 repeat from * until there are only 4 sts left, BBO4

Repeat rows 1 to 6 and change color everytime you get to row 4, i.e. you knit 6 rows with each color (rows 4 to 6 and 1 to 3).

Repeat until your cowl has reached the desired lenght - make sure to end with the color you started with. Leave a tail of about 1 meter for grafting. Place the stitches from the provisional CO on the second needle, hold the ends together (RS out) and graft in garter stitch.

Weave in ends an block.

Stack Overflow Cowl - Free Knitting Pattern by Knitting and so on

This page was featured as "Most Clicked" at Pinbellish Link Party #28 and at the Kntting Love Link Party in May 2016

Featured on Knitting Love Link Party with Jessie At Home and Underground Crafter

Sonntag, 21. Februar 2016

Stacked Stitches

I've long admired the beautiful patterns with stacked stitches created by Xandy Peters - available on Ravelry or from her website "So I make stuff", e.g. the absolutely gorgeous Fow Paws pattern or Ribbon Candy. I really wanted to be able to do this technique and design something with it.

When I first tried the technique, it took me a while to get the hang of it - because, frankly, the stacked stitches all bungled up on the needles feel weird. But once I got over that (and got my maths right), stacked stitches have a certain rhythm to them and are really fun to knit.

The piece shown below is going to be a double-length cowl, knitted flat with the ends grafted together. (I like that construction :)


Videos explaining how to do stacked increases and stacked decreases can be found on the "So I make Stuff"-YouTube channel.

Samstag, 28. November 2015

Jolly Waves Cowl

With an eye-catching design and beautiful colors this cowl will keep your spirits up this winter. The gorgeous graphical effect is achieved by the combination of short rows with a feather and fan pattern.


Creative Commons License
This work by Knitting and so on is licensed under a Creative Commons Attribution-NonCommercial-ShareAlike 4.0 International License.


Materials
  • about 220 grams of DK weight yarn in 3 colors, 100 grams of the main colors each (beige and maroon in the photos - called MC1 and MC2) and 20 grams of the contrast color (off-white in the photos - called CC) - this will yield a double length cowl, i.e. about 125 cm in circumference.
  • 3.75 mm knitting needles (straight or circular)
  • 6 stitch markers (2 stitch markers to mark the edges and 4 markers to mark the ends of the short rows - these 4 markers will be called M1 to M4)


Techniques

Short Row Sections

The pattern consists of different short row sections that are divided by a garter stitch ridge in the neutral color.


There are four types of section - as shown in the picture above.
  • Right Narrow Section
  • Left Narrow Section
  • Right Wide Section and
  • Left Wide Section.
The diagram below shows how the short rows stack up for each section type. Both the photo and the diagram show the RS of the cowl.


Basically, you knit 4 narrow sections (right-left-right-left) and 4 wide sections (also right-left-right-left) with a rigde in a neutral color inbetween. All "right"-sections (i.e. right narrow and right wide section) are knitted in color 1 (MC1), all "left"-sections (i.e. left narrow and left wide section) are knitted in color 2 (MC2) - and all contrast ridges are knitted with the contrast color CC.


Instructions

Provisionally CO 66 stitches and knit one row with CC - leaving a tail long enough to graft these 66 stitches in the end and placing the markers as follows: k3 pm (edge marker) k12 pm (=M1) k12 pm (=M2) k12 pm (=M3) k12 pm (=M4) k12 pm (edge marker) k3

Knit a right narrow section as follows:
With MC1
R1 (RS): k all stitches
R2 (WS): sl3wyif, * kfb kfb ssk ssk ssk ssk kfb kfb repeat from * until there are only 3 sts left, sl3wyif
R3, R4 (RS, WS): k up to M1, w+t, * kfb kfb ssk ssk ssk ssk kfb kfb repeat from * until there are only 3 sts left, sl3wyif
R5, R6 (RS, WS): k up to M2, w+t, * kfb kfb ssk ssk ssk ssk kfb kfb repeat from * until there are only 3 sts left, sl3wyif
R7, R8 (RS, WS): k up to M3, w+t, * kfb kfb ssk ssk ssk ssk kfb kfb repeat from * until there are only 3 sts left, sl3wyif
R9, R10 (RS, WS): k up to M4, w+t, * kfb kfb ssk ssk ssk ssk kfb kfb repeat from * until there are only 3 sts left, sl3wyif

Knit a contrast ridge as follows
With CC
R1 (RS): k all stitches
R2 (WS): sl3wyif, * kfb kfb ssk ssk ssk ssk kfb kfb repeat from * until there are only 3 sts left, sl3wyif

Knit a left narow section as follows
With MC2
R1 (RS): k all stitches
R2, R3 (WS, RS): sl3wyif, kfb kfb ssk ssk ssk ssk kfb kfb (you're now at M1), w+t, k all stitches
R4, R5 (WS, RS): sl3wyif, * kfb kfb ssk ssk ssk ssk kfb kfb repeat from * until you are at M2, w+t, k all stitches
R6, R7 (WS, RS): sl3wyif, * kfb kfb ssk ssk ssk ssk kfb kfb repeat from * until you are at M3, w+t, k all stitches
R8, R9 (WS, RS): sl3wyif, * kfb kfb ssk ssk ssk ssk kfb kfb repeat from * until you are at M4, w+t, k all stitches
R10 (WS): sl3wyif, * kfb kfb ssk ssk ssk ssk kfb kfb repeat from * until there are only 3 sts left, sl3wyif

Knit a contrast ridge.
Knit a right narrow section.
Knit a contrast ridge.
Knit a left narrow section.
Knit a contrast ridge.

Knit a right wide section as follows
With MC1
R1 (RS): k all stitches
R2 (WS): sl3wyif, * kfb kfb ssk ssk ssk ssk kfb kfb repeat from * until there are only 3 sts left, sl3wyif
R3, R4 (RS, WS): k up to M1, k6, w+t, ssk ssk kfb kfb, * kfb kfb ssk ssk ssk ssk kfb kfb repeat from * until there are only 3 sts left, sl3wyif
R5, R6 (RS, WS): k up to M1, w+t, * kfb kfb ssk ssk ssk ssk kfb kfb repeat from * until there are only 3 sts left, sl3wyif
R7, R8 (RS, WS): k up to M2, k6, w+t,  ssk ssk kfb kfb, * kfb kfb ssk ssk ssk ssk kfb kfb repeat from * until there are only 3 sts left, sl3wyif
R9, R10 (RS, WS): k up to M2, w+t, * kfb kfb ssk ssk ssk ssk kfb kfb repeat from * until there are only 3 sts left, sl3wyif
R11, R12 (RS, WS): k up to M3, k6, w+t, ssk ssk kfb kfb,* kfb kfb ssk ssk ssk ssk kfb kfb repeat from * until there are only 3 sts left, sl3wyif
R13, R14 (RS, WS): k up to M3, w+t, * kfb kfb ssk ssk ssk ssk kfb kfb repeat from * until there are only 3 sts left, sl3wyif
R15, R16 (RS, WS): k up to M4, k6, w+t, ssk ssk kfb kfb, * kfb kfb ssk ssk ssk ssk kfb kfb repeat from * until there are only 3 sts left, sl3wyif
R17, R18 (RS, WS): k up to M4, w+t, * kfb kfb ssk ssk ssk ssk kfb kfb repeat from * until there are only 3 sts left, sl3wyif
R19, R20 (RS, WS), k3, k6, w+t, ssk ssk kfb kfb, sl3wyif

Knit a contrast ridge.

Knit a left wide section as follows
With MC2
R1 (RS): k all stitches
R2, R3 (WS, RS): sl3wyif, kfb kfb ssk ssk, w+t, k all stitches
R4, R5 (WS, RS): sl3wyif, kfb kfb ssk ssk ssk ssk kfb kfb (you're now at M1), w+t, k all stitches
R6, R7 (WS, RS): sl3wyif, kfb kfb ssk ssk ssk ssk kfb kfb (you're now at M1), kfb kfb ssk ssk, w+t, k all stitches
R8, R9 (WS, RS): sl3wyif, * kfb kfb ssk ssk ssk ssk kfb kfb repeat from * until you are at M2, w+t, k all stitches
R10, R11 (WS, RS): sl3wyif, * kfb kfb ssk ssk ssk ssk kfb kfb repeat from * until you are at M2, kfb kfb ssk ssk.  w+t, k all stitches
R12, R13 (WS, RS): sl3wyif, * kfb kfb ssk ssk ssk ssk kfb kfb repeat from * until you are at M3, w+t, k all stitches
R14, R15 (WS, RS): sl3wyif, * kfb kfb ssk ssk ssk ssk kfb kfb repeat from * until you are at M3, kfb kfb ssk ssk. w+t, k all stitches
R16, R17 (WS, RS): sl3wyif, * kfb kfb ssk ssk ssk ssk kfb kfb repeat from * until you are at M4, w+t, k all stitches
R18, R19 (WS, RS): sl3wyif, * kfb kfb ssk ssk ssk ssk kfb kfb repeat from * until you are at M4, kfb kfb ssk ssk.  w+t, k all stitches
R20 (WS): sl3wyif, * kfb kfb ssk ssk ssk ssk kfb kfb repeat from * until there are only 3 sts left, sl3wyif

Knit a contrast ridge.
Knit a right wide section.
Knit a contrast ridge
Knit a left wide section.

Repeat this series of sections (right narrow, left narrow, right narrow, left narrow and right wide, left wide, right wide, left wide) - always divided by a ridge in the neutral color - until the cowl is long enough for you. End with a left wide section.

Put the stitches from your provisional cast-on on a needle and graft both ends together - 3 sts in stockinette, then 60 sts in garter stitch and the last 3 again in stockinette stitch. (If you need more detailed instructions for the grafting part, it's the same that has been used for the Mixed Wave Cowl on this blog. Follow the link and you'll find detailed instructions written by Joni Coniglio.

Weave in ends and block.


Oombawka Design

Montag, 15. September 2014

Almendra Cowl

Free Knitting Pattern: Almendra Cowl This cowl is made up of almond shaped short row sequences - with full rows in a contrast colour inbetween.

I like my cowls to fit around my neck twice. Threrefore this cowl is double-length, with a circumference of 140 cm - after blocking. It measures between 20 and 25 cm in height.


Creative Commons License
This work by Knitting and so on is licensed under a Creative Commons Attribution-NonCommercial-ShareAlike 4.0 International License.


A Czech translation has been provided by Raveler Nemravka. It is available here. Děkuju mnohokrát!


Materials
  • 150 grams of worsted weight yarn in Main Colour (MC)
  • 50 grams of worsted weight yarn in Contrast Colour (CC, beige on the photos)
  • 5.5mm circular knitting needles
  • 11 stitch markers (one different from the others)
  • tapestry needle to weave in ends

I used some Noro Kurayon (Colourway 40 as MC and Colourway 211E as CC) that I've had in my stash for quite a while.

General Construction
Knitted in the round, this cowl consist of almond shaped short row sequences that are knitted one after another. When one layer is finished,  two full rows are knitted in a contrast colour. The next layer starts with an offset of 10 stitches.

Almendra Cowl - General Construction


Techniques
  • Short rows with double stitches (German short rows, t+p): when you turn, bring yarn to the front and pull it back so that a sort of "double-stitch" is created, then knit back as usual - when you have to knit the double-stitch, be careful to knit it as one stitch (see also https://www.youtube.com/watch?v=P6n561SMZXQ); this method has the advantage the no picking up of stitches is necessary. In the pattern, this stitch will be called t+p (turn and pull).
  • Cheats to avoid cutting yarn: Since I try out a lot (and consequently frog a lot), I avoid cutting yarn at all costs. That's why I'd rather strand yarn over a few stitches (or more) or slip a few stitches. In case of this pattern, this is necessary to get either MC or CC yarn to the start of the new row.
    The picture below shows how this stranding looks from the WS. The encircled numbers show where a new layer starts ("1" = start of first layer, "2" = start of second layer etc.)
Almendra Cowl - how to strand the yarn


Instructions
With CC CO 200 putting a stitch marker after every 20th stitch
Place last stitch marker and join in round (careful not to twist the stitches)
Purl one round, place a different marker to mark the end or round (this marker ("end marker") will be moved).

First Layer (Odd-numbered Layers)
Attach MC and with MC knit the first almond-section as follows
R1 (RS): k20 (i.e. to next marker, left border marker), t+p (turn and pull, see Techniques section)
R2 (WS): k20 (i.e. back to last marker and one stitch further), t+p
R3 (RS): k18, t+p
R4 (WS): k16, t+p
R5 (RS): k14, t+p
R6 (WS): k12, t+p
R7 (RS): k10, t+p
R8 (WS): k8, t+p
R9 (RS): k6, t+p
R10 (WS): k4, t+p
R11 (RS): k5, t+p
R12 (WS): k6, t+p
R13 (RS): k8, t+p
R14 (WS): k10, t+p
R15 (RS): k12, t+p
R16 (WS): k14, t+p
R17 (RS): k16, t+p
R18 (WS): k18, t+p
R19 (RS): k19 (i.e. to left border marker), and DON'T TURN
Continue from Row 1 and knit the next almond-section.

The picture below gives a sketch of the rows in relation to the stitch markers in odd numbered layers.


When you have finished the "almond section" that reaches the end marker or after you have knitted 10 "almonds" switch to CC.

With CC knit one round (stranding MC over the first 10 stitches) - please be careful to knit the double-stitches as one stitch (here the double stitches are the one just before and just after the stitch marker)
Purl one round. Remove the end marker, slip ten stitches, place the end marker.
(If - unlike me - you haven't got a problem with cutting yarn, you can alternatively break MC, knit one round in CC, purl one round in CC, cut CC, remove end marker, slip ten stitches, place end marker and then attach MC to start again.)

Second Layer (Even-Numbered Layers)
With MC start knitting the next almond - however, it is not knitted in the 20 sts between two stitch markers, but around one stitch marker (10 stitches on the left hand side and 10 stitches on the right hand side of the stitch marker).

R1 (RS): k20 (i.e. to next marker, left border marker), t+p (turn and pull, see Techniques section)
R2 (WS): k20 (i.e. back to last marker and one stitch further), t+p
R3 (RS): k18, t+p
R4 (WS): k16, t+p
R5 (RS): k14, t+p
R6 (WS): k12, t+p
R7 (RS): k10, t+p
R8 (WS): k8, t+p
R9 (RS): k6, t+p
R10 (WS): k4, t+p
R11 (RS): k5, t+p
R12 (WS): k6, t+p
R13 (RS): k8, t+p
R14 (WS): k10, t+p
R15 (RS): k12, t+p
R16 (WS): k14, t+p
R17 (RS): k16, t+p
R18 (WS): k18, t+p
R19 (RS): k19 (i.e. to left border marker), and DON'T TURN
Continue from Row 1 and knit the next almond-section.

Almendra Cowl - free knitting pattern by Knitting and so on


When you have finished the "almond section" that reaches the end marker or after you have knitted 10 "almonds" switch to CC.

With CC knit one round (stranding MC over the first 10 stitches) - please be careful to knit the double-stitches as one stitch (here the double stitches are the one just before and just after the stitch marker)
Purl one round. Remove the end marker, slip ten stitches, place the end marker.
(If - unlike me - you haven't got a problem with cutting yarn, you can alternatively break MC, knit one round in CC, purl one round in CC, cut CC, remove the end marker, slip ten stitches , place the end marker, and then attach MC to start again.)

The picture below gives a sketch of the rows in relation to the stitch markers in even numbered layers.


Repeat first and second layer until the cowl is wide enough for you. I knitted a total of 5 layers (3x odd-numbered layers and 2x even-numbered layers).

Finish with one knit row in CC and bind off purling in CC.

Free Knitting Pattern - Almendra Cowl