Posts mit dem Label Cowl werden angezeigt. Alle Posts anzeigen

Mittwoch, 7. Februar 2018

Bartkauz Shoulder Warmer

Like many women I tend to feel cold ... practically always except in high summer. That's why I wanted a sort of shoulder warmer or poncho to keep me warm at work.
I chose a light-weight merino yarn in different grey tones that - colors that are compatible with an office environment.
The piece is knitted flat - starting with a provisional cast on and knitted sideways with a combination of short row ribs and a lace pattern to make it interesting, and it is finished with Kitchener stitch.
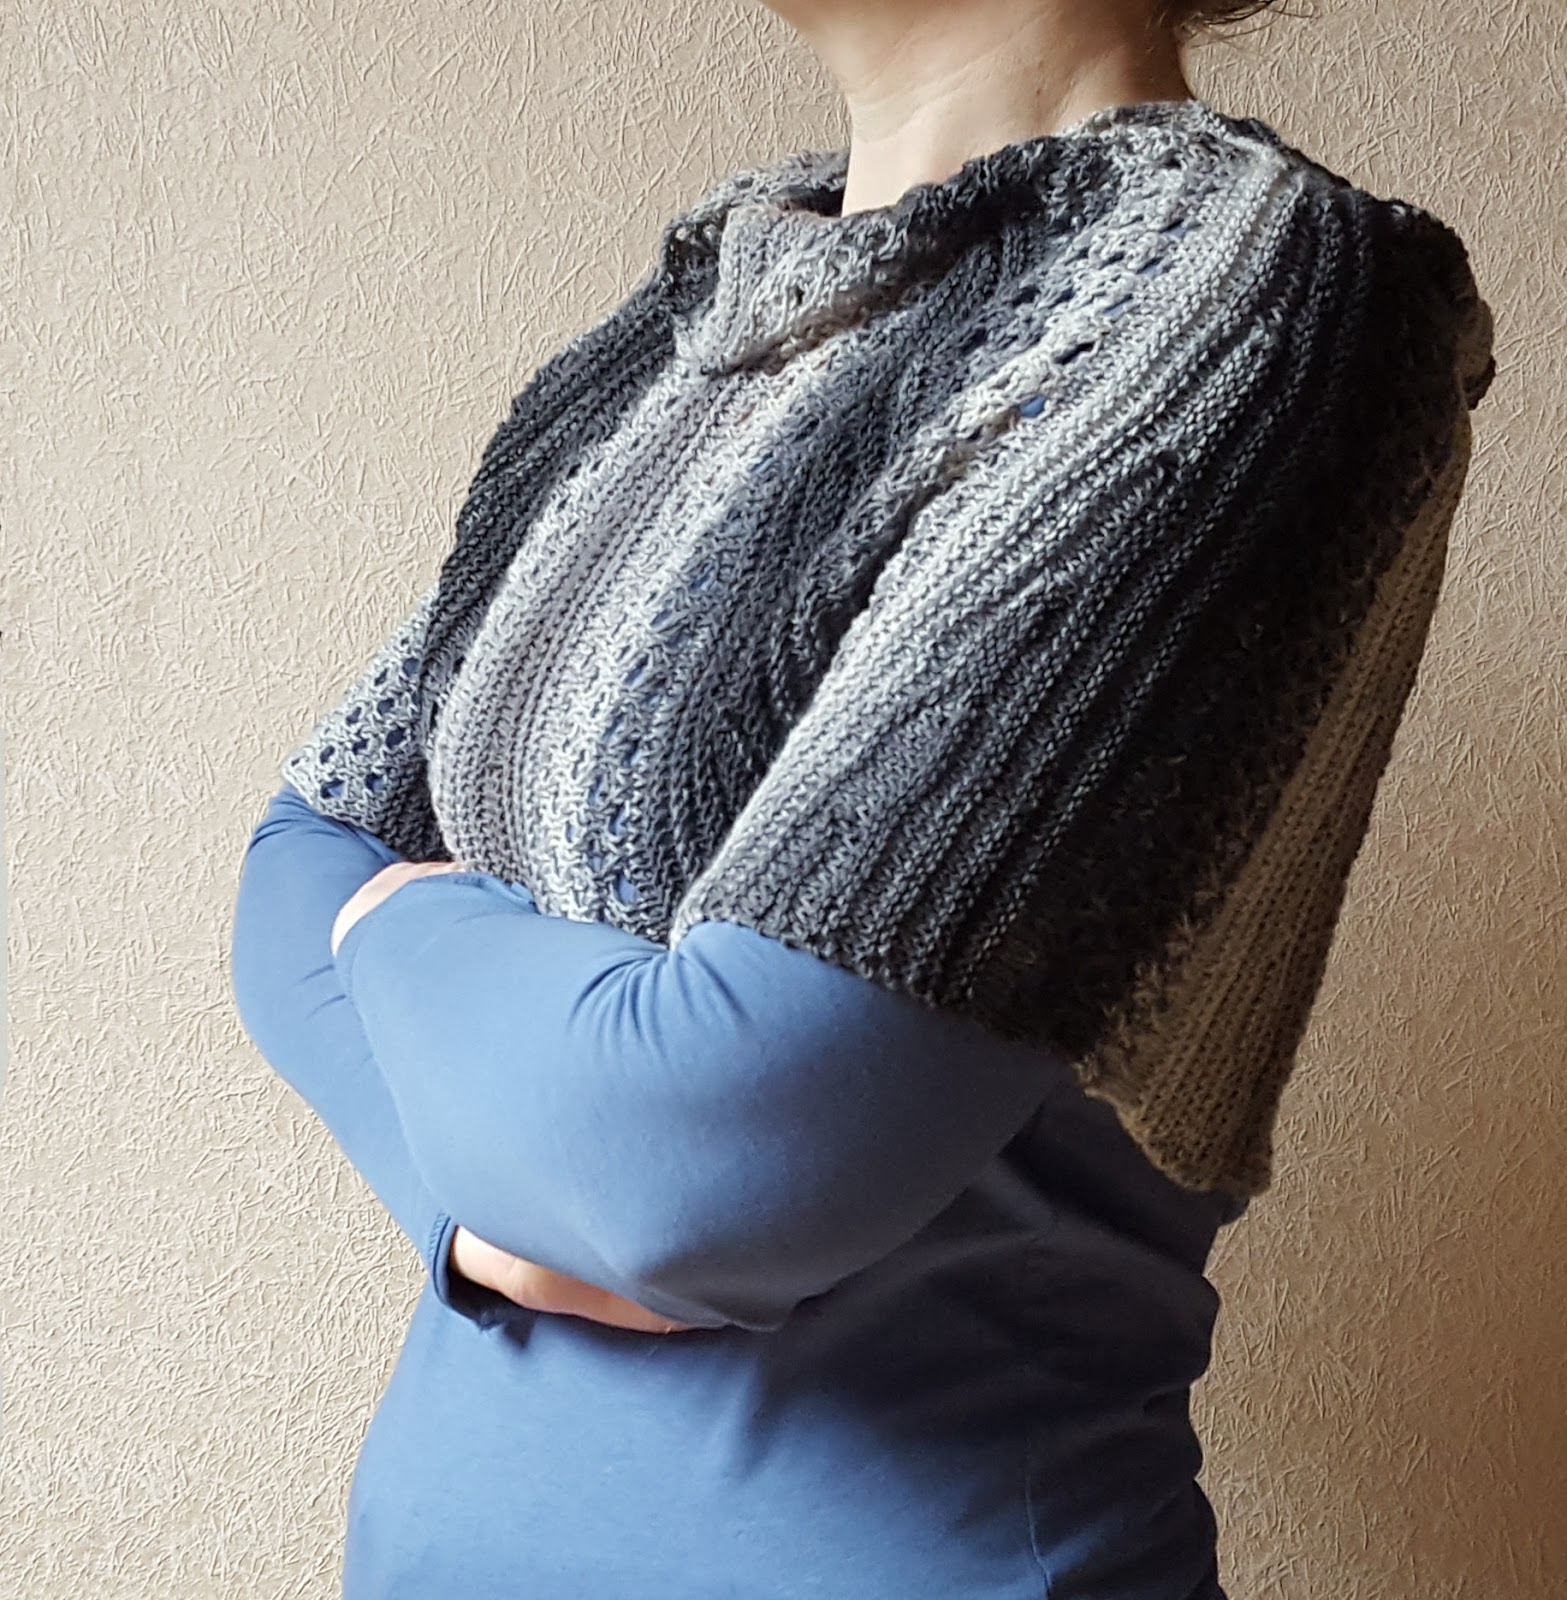
Because of the short rows, this piece is wider at the bottom than at the top - so that it fits nicely around your shoulders. You can wear it either as a cowl or as a shoulder warmer / poncho.


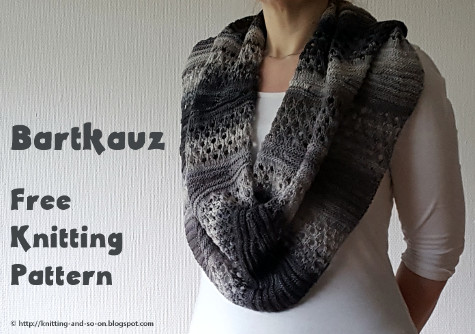
Bartkauz is the german name for the Great Grey Owl. The color of the cowl reminded me of its plumage.

Creative Commons License
This work by Knitting and so on is licensed under a Creative Commons Attribution-NonCommercial-ShareAlike 4.0 International License.


Materials
  • about 100 grams of lace weight yarn - I used Schachenmeyer Merino Extra Fine Lace (link to the yarn's Ravelry page)
  • 3.75mm needles (straight or circular)
  • scrap yarn and a crochet hook for provisional CO
  • tapestry needle for grafting and to weave in ends


Techniques
  • Provisional CO: My favorite method for a provision CO is the crochet provisional CO - it is shown in this Youtube video by New Stitch a Day.
  • Shadow Wrap Short Rows: the last stitch you knit (or purl) before turning, is worked into the stitch in the row below (also called the "mother-stitch"), which also leaves you with a pair of stitches that has to be worked as one in the row above. This method is shown in this YouTube video by Lee Meredith
  • Grafting in stockinette stitch (also called Kitchener Stitch): a way to seamlessly join two rows of live stitches - as shown in this YouTube video by WEBS America's Yarn Store.

Gauge and Size
When knitting in garter stitch 12 stitches gave about 5 cm in width, and 11 garter stitch ridges (i.e. 22 rows) about 5 cm in height.
After blocking, the finished piece measures 40 cm in height. The circumference in 140 cm at the lower edge and 75 cm at the upper edge - however, the pattern is written in a way that the circumference can be adapted.

Lace Chart
If you prefer to knit lace from a chart, here's a chart for the lace pattern. The part within the red rectangles is one repeat of the lace pattern.


Row 1: k all
Row 2: p all
Row 3: k3, *k2tog, yo, yo, ssk repeat from * until 3 sts from end, k3
Row 4: p3 * p1, (k1, p1) into double yo, p1 repeat from * until 3 sts from end, p3
Row 5: k all
Row 6: p all
Row 7: k1, *k2tog, yo, yo, ssk repeat from * until 1 st from end, k1
Row 8: p1 * p1, (k1, p1) into double yo, p1 repeat from * until 1 st from end, p1


Instructions

Do a provisional CO of 90 sts

Setup Rows
Row 1: p all
Row 2: k all
Row 3: k all
Row 4: p all

Part A) Short Row Sequence
Ridge 1: p70, k into mother stitch and turn, k to end
Ridge 2: k60, p into mother stitch and p to end
Ridge 3: p50, k into mother stitch and turn, k to end
Ridge 4: k40, p into mother stitch and p to end
Ridge 5: p30, k into mother stitch and turn, k to end
Ridge 6: k20, p into mother stitch and p to end
Ridge 7: p10, k into mother stitch and turn, k to end
Ridge 8: k19, k into mother stitch and p to end
Ridge 9: p29, p into mother stitch and turn, k to end
Ridge 10: k39, k into mother stitch and p to end
Ridge 11: p49, p into mother stitch and turn, k to end
Ridge 12: k59, k into mother stitch and p to end
Ridge 13: p69, p into mother stitch and turn, k to end

Part B) Transition to Lace
Row 1: k all
Row 2: p all
Row 3: p all
Row 4: k all
Row 5: k all
Row 6: p all

Part C) Lace Pattern
Row 1: k all
Row 2: p all
Row 3: k3, *k2tog, yo, yo, ssk repeat from * until 3 sts from end, k3
Row 4: p3 * p1, (k1, p1) into double yo, p1 repeat from * until 3 sts from end, p3
Row 5: k all
Row 6: p all
Row 7: k1, *k2tog, yo, yo, ssk repeat from * until 1 st from end, k1
Row 8: p1 * p1, (k1, p1) into double yo, p1 repeat from * until 1 st from end, p1
Repeat rows 1 to 8 once more
Then knit rows 1 to 6 once.

Part D) Transition to Short Row Sequence
= Part B

Repeat Parts A to D six times more or until the lower edge nearly fits around your shoulders.
Then repeat parts A to C once more.

Graft in stockinette stitch.


Donnerstag, 11. Januar 2018

Braid Theory Cowl

For Christmas I wanted to knit a new cowl for my Mum. So I took her to the yarn store and asked her to choose a yarn she liked. She picked a fluffy bulky yarn with a part of mohair, i.e. something far out of yarn comfort zone, because I prefer yarn that's a lot thinner and also yarn that you can frog at least a few times ... and that's difficult with mohair yarn. Plus, the yarn had no color gradient at all, so my usual idea of doing something with short rows wouldn't show up at all.

After only one false start, I came up with the idea of very thick cables that would show up even with this yarn: a cowl that is knitted flat all in k1p1-ribbing. Since it is knitted in ribbing it is completely reverseable. This comfy cowl is also superlong and will fit three times around your neck.


Usually, I'm really bad at inventing names for my patterns. In case of this pattern I was searching the web for inspiration - looking up everything relating to "Zopf" (the German name for cables in knitting). To my delight, I found that there is actually a branch of mathematics that is called Braid Theory which started out as a study of the geometric properties of braids, but then found other fields of application as well.
If you want to know more about Braid Theory, here's the link to the Wikipedia article or here's a link to a paper on the subject "An Introduction to Braid Theory" by Maurice Chiodo.

Creative Commons License
This work by Knitting and so on is licensed under a Creative Commons Attribution-NonCommercial-ShareAlike 4.0 International License.


Materials
  • 3 skeins (=150 grams) of bulky yarn - I used Lana Grossa Lala Berlin Fluffy (here's the link to the yarn's Ravelry page)
  • 5mm knitting needles
  • a cabling needles
  • scrap yarn and crochet hook for the provisonal CO
  • tapestry needle for grafting and to weave in ends
  • a removable stitch marker to mark RS - a safety pin or some scrap yarn works as well

Gauge and Size
The finished piece measures 23 cm at its widest point - and 170 cm in circumference. Ir fits around my neck three times.
I didn't knit a swatch, but measured on the finished cowl 17 sts in k1p1-ribbing gave 10 cm in width, and about 20 rows (also k1p1-ribbing) gave 10 cm in height.


Techniques and Notation
  • Provisional CO: My favorite method for a provision CO is the crochet provisional CO - it is shown in this Youtube video by New Stitch a Day.
  • Grafting: A technique to get an invisible (knitted) seam. Depending on the pattern (stockinette, garter etc.), different ways of moving the tapestry needle must be used. For k1p1-ribbing, I used the technique described in this blogpost by Sunday Knits.
    A really good series of grafting was written by Joni Coniglio and is available on Interweave - in the 2nd article of the series she explains how to graft ribbing and also explains how to avoid a jog of one half-stitch, e.g. by making sure to pick up the first half-stitch of the provisional CO. 
  • Cabling: A technique to cross one group of stitches over another. In this pattern the following abbreviations will be used.
    • C20F-rib: put the first 10 sts on a cable needle and hold it in front of your piece, knit the following 10 sts from the left-hand needle in k1p1 ribbing, now knit the stitches from the cable needle in k1p1 ribbing
    • C20B-rib: put the first 10 sts on a cable needle and hold it on the back of your knitting, knit the following 10 sts from the left-hand needel in k1p1 ribbing, now knit the stitches from the cable needle in k1p1 ribbing


Instructions

Provisionally CO 40 sts
Setup Row: k all

Row 1 (RS): * k1 p1 repeat from * to end of row
Row 2 (WS): * k1 p1 repeat from * to end of row
Repeat rows 1 and 2 for times more
Row 11 (RS): * k1 p1 repeat from * four more times, C20F-rib, * k1 p1 repeat from * to end of row
Row 12 (WS) = Row 2
Row 13 (RS) = Row 1
Row 14 (WS) = Row 2
Repeat rows 13 and 14 three more times
Row 21 (RS): C20B-rib, C20B-rib
Rows 22 - 30 = Rows 12 - 20
Row 31 (RS) = Row 11
Row 32 (WS) = Row 2
Row 33 (RS) = Row 1
Row 34 (WS) = Row 2
Repeat rows 33 and 34 14 more times
Now you've just finished row 60.

Repeat rows 1 to 60 four more times.
Then knit rows 1 to 58.

Put the stitches from the provisional CO on your second needle and graft in ribbing - as follows:

Setup sequence:
  • Front Needle: insert needle purlwise in first sts and leave it
  • Back Needle: insert needle purlwise in first sts and slip it from needle, insert needle knitwise into next stitch and leave it - make sure that the first stitch on the back needle is the half-stitch mentioned above (see Techniques and Notation)
  • Front Needle:  insert needle knitwise in first sts and slip it from needle, insert needle knitwise into next stitch and leave it
  • Back Needle: insert needle knitwise in first sts and slip it from needle, insert needle purlwise into next stitch and leave it

Now repeat the following sequence until you've used up all your stitches
  • Front Needle:  insert needle purlwise in first sts and slip it from needle, insert needle purlwise into next stitch and leave it
  • Back Needle: insert needle purlwise in first sts and slip it from needle, insert needle knitwise into next stitch and leave it
  • Front Needle:  insert needle knitwise in first sts and slip it from needle, insert needle knitwise into next stitch and leave it
  • Back Needle: insert needle knitwise in first sts and slip it from needle, insert needle purlwise into next stitch and leave it

Weave in ends and block gently.


Montag, 18. Dezember 2017

Halsvarmer med chevrons - Chevrons All Round Cowl in Danish

In addition to translating the Hexagon Mitts into Danish, Marianne Holmen from strikkeglad.dk has also written a translation for the cowl that matches these mitts, the Chevrons All Round Cowl. The translation called "Halsvarmer med chevrons" is available here on strikkeglad.dk. Thank you very much for this translation!

The original english version of this pattern can be found here.


Creative Commons License
This work by Knitting and so on is licensed under a Creative Commons Attribution-NonCommercial-ShareAlike 4.0 International License.

Samstag, 21. Oktober 2017

Rainbow Pearls Cowl

I was searching through my stash in order to find something for a new brioche scarf when I found this one beautiful 50 gram skein of Schulana Colorelli - a variegated yarn in a wonderful rainbow palette. I had bought it a few years ago with a view of knitting a pair of fingerless gloves for a friend (who wears bolder colors than I do), but somehow I never got round to knitting them and so the yarn was slumbering peacefully in one of my yarn boxes.

The Rainbow Pearls Cowl is knitted in the round from bottom to top and all in seed stitch. It is comfortably wide around the lower edge and narrows towards the top. It's an easy knitting project that is suitable for beginners. Since it is knitted with needles that are rather big for the yarn weight it has a very soft texture.

As to the name, Perlmuster ("pearl pattern" or "pearl stitch") is the german name for seed stitch.

Creative Commons License
This work by Knitting and so on is licensed under a Creative Commons Attribution-NonCommercial-ShareAlike 4.0 International License.


Materials
  • 50 grams of Light Fingering weight yarn - I used one skein of Schulana Colorelli (colorway 2) - here's a link to the yarn's Ravelry page.
  • 5 mm circular needles (I used 40 cm long ones), but you can use longer ones if you use the Magic Loop method
  • a 5 mm crochet hook if you use the crochet CO (or - if you want to do another CO method a 6 mm or 7 mm knitting needle for a stretchy CO).
  • two stitch markers - one different from the other
  • a tapestry needle to weave in ends

Techniques and Abbreviations
  • Seed stitch: basically you just switch between one knit stitch and one purl stitch, in the next row, you do a purl stitch over the stitch that appears as a knit stitch in the row below and a knit stitch on the top of last row's purl stitch - here's a YouTube video by Studio Knit that shows how to do seed stitch.
  • k2tog: knit 2 sts together
  • p2tog: purl 2 sts together
I wanted to have very stretchy edges, that meant using CO and BO methods that are quite stretchy. I used the methods listed below. Alternatively, you can use bigger size needles for the CO and BO row.


Size and Gauge
In pattern (seed stitch) and blocked 8 stitches gave about 5 cm in width and 13 rounds 5 cm in height.
The finished cowl is 36 cm high and has a circumference of 92 cm on the bottom edge and 70 cm on the top edge.

Construction
The cowl is knitted in the round and all in seed stitch. It is started at the lower edge and decreased towards the top. Since it's seed stitch all decreases have to be done in pairs - in order to stay in pattern.


Instructions

CO141 sts and join in round - be careful not to twist the stitches and place a stitch marker (the "end-of-round marker)
Round 1: p1, * k1, p1 repeat from * until end of round
Round 2: k1, * p1, k1 repeat from * until end of round
Repeat rounds 1 and 2 six more times

Round 15: p2tog, k2tog, * p1, k1 repeat from * 10 times, place 2nd marker (called "moving marker"),  *p1, k1 repeat from * until end of round
Round 16: k1, * p1, k1 repeat from * until end of round
Round 17: p1, * k1, p1 repeat from * until end of round
Round 18: k1, * p1, k1 repeat from * until end of round
Repeat round 13 and 14 twice more (i.e. you've knitted a total of 22 rounds)

Round 23: * p1, k1 repeat from * until you reach the moving marker, remove marker, p2tog, k2tog, * p1, k1 repeat from * 10 times, replace moving marker, *p1, k1 repeat from * until end of round
Round 24: k1, * p1, k1 repeat from * until end of round
Round 25: p1, * k1, p1 repeat from * until end of round
Round 26: k1, * p1, k1 repeat from * until end of round
Repeat round 25 and 26 twice more  (i.e. you've knitted a total of 30 rounds)

Repeat rounds 23 to 30 eight more times, i.e. you've knitted 10 rounds with decreases and a total of 94 rounds.
Round 95 = Round 1
Round 96 = Round 2
Repeat rounds 95 and 96 once more - or until there are about 5 meters of yarn left over.

Bind off loosely in pattern.

Weave in ends and block gently.


Samstag, 30. September 2017

Mixed Wave Cowl in Danish

Marianne Holmen from strikkeglad.dk has written a Danish translation of the Mixed Wave Cowl pattern. Thank you very much or rather "mange tak"!
Here is a link to the Danish version of this pattern on strikkeglad.dk.
The original (English) version can be found here.

Halsvarmer med bølgemønster - free knitting pattern by Knitting and so on

A list of all translated versions of my patterns can be found in this blogpost.


Creative Commons License
This work by Knitting and so on is licensed under a Creative Commons Attribution-NonCommercial-ShareAlike 4.0 International License.


Donnerstag, 7. September 2017

Skew Symmtery Cowl

This spring I experimented a lot with a combination of intarsia technique and short rows - on smaller projects such as washcloths and potholders (such as I ♥ Intarsia Washcloth) and on a bigger scarf (Wedges Wrap). I did like the resulting patterns so I wanted to try it out on a cowl as well - and this time with an interesting black and white contrast.
So, if you like bold geometric patterns, this cowl is for you. It is knitted all in garter stitch with two skeins or bobbins of each color.
As to the name: This Wikipedia page explains the concept of a skew symmetric matrix.


This pattern is available for purchase 

The pattern contains a written description, a chart, some schematics and some explanations on techniques.


Materials
  • about 200 grams of Sports weight yarn in two colors: 100 grams of color 1 (divided into two skeins or bobbins) and 100 grams of color 2 (also divided into two skeins or bobbins)
  • 4mm knitting needles - I used circulars, but straight needles will do as well
  • a tapestry needle to weave in ends


Gauge and Size
In garter stitch 9 ridges (i.e. 18 rows) gave 5 cm in height – and 9 stitches gave 5 cm in width.
The finished cowl is 29 cm wide and measures 124 cm in circumference.


Necessary Skills
To complete this cowl you need the following knitting skills (besides basic garter stitch):
  • Intarsia
  • Short rows with wrap and turn
  • Picking up stitches from a side edge


This blogpost was featured at Oombawka Design's Wednesday Link Party. Thank you!

Freitag, 12. Mai 2017

Eifel Cowl

Currently, I love knitting with cotton because it is lovely to wear in summer. But since I am always feeling chilly, I like to wear a cowl in bed - here cotton is also my material of choice.
For this cowl I wanted something to sit snugly around my neck but a bit wider near the shoulders. That's why I used short rows for shaping - but in case of this cowl they are done in a contrast color and therefore provide a decorative element as well.


The Eifel is a low mountain range west of Cologne. I thought the name was suitable because of the modest height of the cowl and the peak decoration from the short rows.


Creative Commons License
This work by Knitting and so on is licensed under a Creative Commons Attribution-NonCommercial-ShareAlike 4.0 International License.


Materials
  • about 50 grams of fingering weight yarn in two colors - of the main color (orange in the photos) I used about 40 grams and 10 grams of the contrast color (white in the photos)
  • 3.25mm knitting needles (straight or circulars)
  • scrap yarn (for provisional CO)
  • a tapestry needle for grafting

Size and Gauge
  • I had the follwing gauge: 21 rows in garter stitch gave 5 cm in height, and 12 stitches in garter stitch gave 5 cm in width. 
  • The finished cowl measures about 19 cm in height - and about 44 cm in circumference at the top, and about 66 cm in circumferenc at the bottom.
Suggestions how to change the size can be found below.


Techniques
  • Provisional CO: My favorite method for a provision CO is the crochet provisional CO - it is shown in this Youtube video by New Stitch a Day.
  • Short rows with wrap and turn (w+t) - as shown in this YouTube video by Very Pink Knits. Since the wraps are in a different color than the wrapped stitch, it looks better if the wraps are picked up. Here's a YouTube video that shows how to pick up your wraps (also by Very Pink Knits).
  • Grafting in Garter Stitch: A technique to get an invisible (knitted) seam - this technique is shown in this YouTube Video by knittinghelp.com.

Instructions

With scrap yarn provisionally CO 45 stitches.
Setup row: k all stitches in Main Color (MC)
Ridge 1 (Contrast Color, CC): k3, w+t, k to end
Ridge 2 and 3 (MC): k to end, turn, k to end
Ridge 4 (CC): k6, w+t, k to end
Ridges 5 and 6 (MC) = Ridges 2 and 3
Ridge 7 (CC): k9, w+t, k to end
Ridges 8 and 9 (MC) = Ridges 2 and 3
Ridge 10 (CC): k12, w+t, k to end
Ridges 11 and 12 (MC) = Ridges 2 and 3
Ridge 13 (CC): k15, w+t, k to end
Ridges 14 and 15 (MC) = Ridges 2 and 3
Ridge 16 (CC): k18, w+t, k to end
Ridges 17 and 18 (MC) = Ridges 2 and 3
Ridge 19 (CC): k21, w+t, k to end
Ridges 20 and 21 (MC) = Ridges 2 and 3
Ridge 22 (CC): k24, w+t, k to end
Ridges 23 and 24 (MC) = Ridges 2 and 3
Ridge 25 (CC): k27, w+t, k to end
Ridges 26 and 27 (MC) = Ridges 2 and 3
Ridge 28 (CC): k30, w+t, k to end
Ridges 29 and 30 (MC) = Ridges 2 and 3
Ridge 31 (CC): k33, w+t, k to end
Ridges 32 and 33 (MC) = Ridges 2 and 3
Ridge 34 (CC): k36, w+t, k to end
Ridges 35 and 36 (MC) = Ridges 2 and 3
Ridge 37 (CC): k33, w+t, k to end
Ridges 38 and 39 (MC) = Ridges 2 and 3
Ridge 40 (CC): k30, w+t, k to end
Ridges 41 and 42 (MC) = Ridges 2 and 3
Ridge 43 (CC): k27, w+t, k to end
Ridges 44 and 45 (MC) = Ridges 2 and 3
Ridge 46 (CC): k24, w+t, k to end
Ridges 47 and 48 (MC) = Ridges 2 and 3
Ridge 49 (CC): k21, w+t, k to end
Ridges 50 and 51 (MC) = Ridges 2 and 3
Ridge 52 (CC): k18, w+t, k to end
Ridges 53 and 54 (MC) = Ridges 2 and 3
Ridge 55 (CC): k15, w+t, k to end
Ridges 56 and 57 (MC) = Ridges 2 and 3
Ridge 58 (CC): k12, w+t, k to end
Ridges 59 and 60 (MC) = Ridges 2 and 3
Ridge 61 (CC): k9, w+t, k to end
Ridges 62 and 63 (MC) = Ridges 2 and 3
Ridge 64 (CC): k6, w+t, k to end
Ridges 65 and 66 (MC) = Ridges 2 and 3

Repeat ridges 1 to 65.
Cut yarns but leave a tail long enough for grafting of MC . Put the stitches from the provisional CO on your second needles and graft in garter stitch with main color.

Weave in ends.


How to Change the Size
If you have different gauge or if you want to change the size of the piece, here are a few suggestions:
  • For a narrower cowl, CO fewer stitches.
  • If you want a cowl that is much longer you could just knit the sequence (row 1 to 65) one more times. 
  • As you may have notice when reading the pattern, there is a sequence of short rows in a contrast color. These short rows are knitted every 3rd ridge and each short row ridge in the contrast color is either 3 sts longer or 3 sts shorter than the short row ridge knitted before. In this pattern, the length of the short rows starts at 3 sts and grows to 36 sts before decreasing back to 3 sts. Each of this up-and-down sequences measures about 22 cm at the shorter side and about 33 cm at the longer side.
    So, if you want a length inbetween you could shorten this sequence, e.g. knit ridges 1 to 24 (the CC short row is now 24 sts long), and then continue with ridge 49 (here the CC short row is 3 sts shorter, namely 21 sts long) and continue to ridge 66. Then repeat this until you've reached the desired length.

Donnerstag, 9. März 2017

Amplitude Cowl

I like cowls that are knitted flat. A technique that's better used on flat pieces than on pieces worked in the round is intarsia. Here's a new pattern for a knitted cowl with a wavy intarsia pattern in shape of a sinus curve. It's all in garter stitch and therefore very easy to knit.


Creative Commons License
This work by Knitting and so on is licensed under a Creative Commons Attribution-NonCommercial-ShareAlike 4.0 International License.


Materials
  • 100 grams of fingering weight yarn in color 1 (C1)
  • 100 grams of fingering weight yarn in color 2 (C2)
  • 3.5mm knitting needles - if you're using circulars you'll need another needle of roughly the same size (for grafting)
  • a stitch marker
  • a tapestry needle (for grafting)

Techniques and Notation
  • Provisional CO: My favorite method for a provisional CO is the crochet provisional CO - it is shown in this Youtube video by New Stitch a Day.
  • Intarsia: Changing colors with the intarsia technique - as shown in this YouTube video by knitwithpat; or this YouTube video by Francoise Danoy.
  • Grafting in Garter Stitch: A technique to get an invisible (knitted) seam - this technique is shown in this YouTube Video by knittinghelp.com. 
  • Throughout the pattern, the following notation will be used: k31 (C1); k29 (C2) means knit 31 stitches in color 1 and then 29 stitches in color 2 - i.e. color is indicated in brackets after the stitches and color changes are indicated by a semicolon.

Gauge and Size
9 ridges (i.e. 18 garter stitch rows) gave about 5 cm in height, and 11 stitches about 5 cm in width.
The cowl I knitted (with a total of 5 pattern repaeats) measures 24 cm in width and 140 cm in circumference.
If you have different gauge or want another width, cast on the appropriate (even) number of stitches and place the stitch marker in the middle of the row. To adjust for lenght, knit a different number of pattern repeats.


Instructions

Provisionally CO60 sts
Setup Row 1: (C1) k30, place marker (C2) k30
Ridge 1: (C1) k to m, k1, (C2) k to end;
   turn; (C2) k to 1 bef m, (C1), k to end
Ridge 2: (C1) k to m, k2, (C2) k to end;
   turn; (C2) k to 2 bef m, (C1), k to end
Ridge 3: (C1) k to m, k3, (C2) k to end;
   turn; (C2) k to 3 bef m, (C1), k to end
Ridge 4: (C1) k to m, k4, (C2) k to end;
   turn; (C2) k to 4 bef m, (C1), k to end
Ridge 5: (C1) k to m, k5, (C2) k to end;
   turn; (C2) k to 5 bef m, (C1), k to end
Ridge 6 = Ridge 5
Ridge 7: (C1) k to m, k6, (C2) k to end;
   turn; (C2) k to 6 bef m, (C1), k to end
Ridge 8 = Ridge 7
Ridge 9: (C1) k to m, k7, (C2) k to end;
   turn; (C2) k to 7 bef m, (C1), k to end
Ridge 10 = Ridge 9
Ridge 11 = Ridge 9
Ridge 12: (C1) k to m, k8, (C2) k to end;
   turn; (C2) k to 8 bef m, (C1), k to end
Ridge 13 = Ridge 12
Ridge 14 = Ridge 12
Ridge 15 = Ridge 12
Ridge 16 = Ridge 9
Ridge 17 = Ridge 9
Ridge 18 = Ridge 9
Ridge 19 = Ridge 7
Ridge 20 = Ridge 7
Ridge 21 = Ridge 5
Ridge 22 = Ridge 5
Ridge 23 = Ridge 4
Ridge 24 = Ridge 3
Ridge 25 = Ridge 2
Ridge 26 = Ridge 1
Ridge 27: (C1) k to m, (C2) k to end;
   turn; (C2) k to m, (C1), k to end
Ridge 28: (C1) k to 1 bef m, (C2) k to end;
   turn; (C2) k to m, k1, (C1), k to end
Ridge 29: (C1) k to 2 bef m, (C2) k to end;
   turn; (C2) k to m, k2, (C1), k to end
Ridge 30: (C1) k to 3 bef m, (C2) k to end;
   turn; (C2) k to m, k3, (C1), k to end
Ridge 31: (C1) k to 4 bef m, (C2) k to end;
   turn; (C2) k to m, k4, (C1), k to end
Ridge 32: (C1) k to 5 bef m, (C2) k to end;
   turn; (C2) k to m, k5, (C1), k to end
Ridge 33 = Ridge 32
Ridge 34: (C1) k to 6 bef m, (C2) k to end;
   turn; (C2) k to m, k6, (C1), k to end
Ridge 35 = Ridge 34
Ridge 36: (C1) k to 7 bef m, (C2) k to end;
   turn; (C2) k to m, k7, (C1), k to end
Ridge 37 = Ridge 36
Ridge 38 = Ridge 36
Ridge 39: (C1) k to 8 bef m, (C2) k to end;
   turn; (C2) k to m, k8, (C1), k to end
Ridge 40 = Ridge 39
Ridge 41 = Ridge 39
Ridge 42 = Ridge 39
Ridge 43 = Ridge 36
Ridge 44 = Ridge 36
Ridge 45 = Ridge 36
Ridge 46 = Ridge 34
Ridge 47 = Ridge 34
Ridge 48 = Ridge 32
Ridge 49 = Ridge 32
Ridge 50 = Ridge 31
Ridge 51 = Ridge 30
Ridge 52 = Ridge 29
Ridge 53 = Ridge 28
Ridge 54 = Ridge 27

Repeat ridges 1 to 54 until the piece is as long as you'd like it to be, but end with ridge 53.
For the cowl in the pictures I knitted the sequence a total of 5 times.


Put the stitches of the provisional CO on another knitting needle. Hold ends together (see photo above). Then graft in garter stitch as follows: (C1) graft to marker; (C2) graft to end.


Chart
Below you can find the pattern as a chart - not the total width but the interesting bit around the stitch marker.
  • The dark purple line shows where the stitch marker is.
  • The pink line shows where to change the knitting color. As an additional help, the numbers in the chart show, how far from the marker the color change happens, i.e. how many stitches before or after the marker.
  • The background color (light pink or weight) is only there to make it easier to count the rows. It changes every 5 rows.


Dienstag, 7. März 2017

Cowls Knitted Flat

Personally I prefer infitity scarfs (or cowls) to flat scarfs, because they are more comfortable to wear (at least for me :) and the ends don't dangle around loosely. However, I usually prefer knitting flat to knitting in the round. So over the years I have created quite a few cowls that were knitted flat and later made into a tube (i.e. cowl) shape.

Any flat piece of cloth can be turned into a tube just by sewing the sides together, but with handknitted items it usually looks better to go for a techniques that makes the piece look seamless.

To avoid a visible seam - I prefer to use the following two techniques:
  • Provisional CO: My favorite method for a provision CO is the crochet provisional CO - it is shown in this Youtube video by New Stitch a Day.
  • Grafting: Grafting (or Kitchener stitch) is a way to join two piece of knitting in a manner that it is practically invisible. The best (free) information on grafting that I know of is a five part series on Interweave Knitting by Joni Coniglio. The first of these articles can be found here. Alternatively, you can also use a three needle BO to create a seam that is nearly invisible (it is show e.g. in this YouTube video by planetpurl)


Most of the patterns shown above are from this blog, but the list below includes lots of other  free patterns of other designers as well.

The following links show different techniques and how they are incorporated in flat-knitted cowl patterns. Starting off with patterns shown in the photo:
  1. This was one of the first patterns I knitted back in 2011 (I had just taken up knitting again) and I really liked this cowl I found on Ravelry. It's called Color Theory and designed by Xandy Peters - even though it is easy to knit (in stripes with a slant) the effect is gorgeous. (Side note: this designer has other more stunning designs: here's her designer page on Ravelry, her YouTube channel and her blog are well worth a visit. Her patterns were the ones that made me try out stacked stitches ... which neatly leads to the second cowl :)
  2. The Stack Overflow Cowl was my first attempt to knit stacked stitches.
  3. As soon as I had seen patterns with short row waves, I wanted to knit something like that myself. One of the patterns that resulted was the Mixed Wave Cowl - it's not only knitted with short row waves but also slanted sideways.
  4. Burgdorf Cowl: Modular knitting can also be turned into a cowl. 
  5. Chevrons All Round Cowl: Knitted with two skeins of variegated yarn - and changing the yarn after every second row.
  6. Patchwork Cowl: Another example of modular knitting
  7. Jolly Waves Cowl: A combination of chevrons and short rows  
  8. One of my first ventures into intarsia was the Ice Maiden Cowl
Other cowls that used different and interesting techniques are the following (patterns not pictured above). Unless otherwise indicated I have not tried to knit them, but I did like the design.
Of course there are lots of other great cowl patterns available. Therefore, finally, here's a link to get all free knitting patterns for cowls knitted flat (or rather patterns with the category "cowl" and the attribute "worked-flat") on Ravelry - and here's the link to get all pattens (not only the free one) with these attibutes.

Donnerstag, 2. Februar 2017

Ice Maiden Cowl

This winter give a sparkle to your outfit with this beautiful colorwork cowl. It is knitted flat and all in garter stitch.


This knitting pattern is available for purchase 

The pattern PDF contains both a written version and a chart.

To knit this cowl you need the following skills:


Materials used to knit this cowl:
  • about 210 grams of Sports weight yarn – in two colors, about 140 grams of the main color (blue in the photos) and 70 grams of the contrast color (white in the photos) - I used some beautiful Bilum yarn that I bought at Swisswullefestival (Bilum Lifestyle, to be precise) and some white merino as a contrast color. If you want to use a similar yarn - here's a link to Bilum's etsy shop
  • 3.75 mm knitting needles
  • scrap yarn for provisional CO
  • a tapestry needle for grafting and for weaving in ends