Posts mit dem Label Home Decor werden angezeigt. Alle Posts anzeigen

Freitag, 7. Februar 2020

Herzchen

Next week is St. Valentine's Day <3
So why not knit a few of these lovely little hearts to decorate your home, presents etc. I found that they could be quite addictive and once I started, I couldn't stop knitting them.
Even though these hearts are 3-dimensional they are knitted back and forth. They are constructed of short rows and knitted all in garter stitch. They come in three different sizes.
These little garter stitch hearts may also be a lovely way to practice your knitting skills – especially magic CO and grafting in garter stitch.
As to the name, "Herzchen" is the German word for little heart.


This pattern is available:
The PDF of the pattern is 10 pages long and contains:
  • an explanation of the general construction
  • six explanatory photos
  • row-by-row patterns for these hearts in 3 sizes
  • charts for hearts in 2 sizes


Materials
  • yarn – basically leftovers - I different kinds of yarn – and self-striping fingering weight yarn)
  • knitting needles – I used straight knitting needles, 2 mm for fingering weight yarn, i.e. always smaller needles than the yarn called for – in order to get a tight texture
  • stuffing - I used the yarn ends and fabric scraps that I had saved from previous knitting or sewing projects
  • a tapestry needle for grafting and weaving in ends
  • one removable stitch marker

Skills
In order to knit such a three-dimensional heart, you need the following knitting skills
  • Magic CO
  • Short rows - with wrap and turn
  • Grafting in garter stitch
  • Basic increases and decreases (ssk and kfb)


Sonntag, 8. Dezember 2019

Pixel Star

After publishing the Stella potholders pattern, I thought it might be a good idea to do an 8-pointed star within a knitted square. I had done similar constructions before (e.g. Tannenbäumchen potholders) - i.e. something within a square, using short rows combined with intarsia.
In the end, it didn't look exactly the way I wanted - more like a pixelized star :) But I realized that this was something more or less built in with this kind of construction - and so I didn't change it.
So here it is. Enjoy!


Creative Commons License
This work by Knitting and so on is licensed under a Creative Commons Attribution-NonCommercial-NoDerivatives 4.0 International License.


Materials
  • a total of about 30 grams of DK weight cotton yarn in two colors (C1 = background color, C2 = color of star)
  • 3 mm needles - if you use yarn of a different weight, use a needle that is one size below the size that the yarn calls for
  • scrap yarn for provisional CO
  • a tapestry needle for grafting and to weave in ends


Techniques and Notation
  • Provisional CO: My favorite method for a provision CO is the crochet provisional CO - it is shown in this Youtube video by New Stitch a Day.
  • Short rows with wrap and turn (w+t) - as shown in this YouTube video by Very Pink Knits.
    Note: in some rows the wrap has to be made just at the color change in the row below, e.g. Ridge B11 where you knit 11 sts in C1 and the 12 stitch that is to be wrapped was knitted in C2. In this case, it's advisable to change the color (as if to knit the next stitch in the new color), wrap and turn in the new color, and then to change back. This gives nicer color edges.
  • Grafting in Garter Stitch: A technique to get an invisible (knitted) seam - this technique is shown in this YouTube Video by knittinghelp.com.
  • Intarsia: Changing colors with the intarsia technique - as shown in this YouTube video by knitwithpat; or this YouTube video by Francoise Danoy. That way you don't have to carry long strands on the WS. The picture below shows the RS and WS of the piece.
    Throughout the pattern, the following notation is used:  C1 (k4), C2 (k10, w+t, k10), C1 (k to end) means, knit 4 stitches in C1, change to C2 and knit 10 sts, do a wrap and turn, knit 10 stitches and then change back to C1 and k to end. I.e. color is indicated before the knitting instructions for that yarn and the knitting instructions for that yarn are given in brackets after the color. 

Construction

This potholder is knitted in 4 parts. It starts with a provisional CO. Then each row is a stitch shorter than the last one, One part ends,
  • when the row is only 1 stitch (plus 1 w+t) long - then the next part begins and each row is one stitch longer than the last one until all stitches are knitted and we've sucessfully knitted around a corner - or
  • when the row length is knitted to the end and after a normal turn (as opposed to a w+t) starts with a slip stitch; then the row  length is getting shorter as you approach the next corner.
After knitting around four corners, the two sides (CO and last row) are grafted in garter stitch.
The photo on the right shows the piece, just before taking out the stitches of the provisional CO and grafting this to the last row.

Size
Knitted in DK yarn, the piece measures about 15 cm x 15 cm.


Instructions
With scrap yarn provisionally CO 17 stitches

Part A:
Setup row (WS): C2 (k14), C1 (k3)
Ridge 1: C1 (k5), C2 (k11, w+t, k11), C1 (k5)
Ridge 2: C1 (k7), C2 (k8, w+t, k8), C1 (k7)
Ridge 3: C1 (k9), C2 (k5, w+t, k5), C1 (k9)
Ridge 4: C1 (k10), C2 (k3, w+t, k3), C1 (k10)
Ridge 5: C1 (k9), C2 (k3, w+t, k3), C1 (k9)
Ridge 6: C1 (k9), C2 (k2, w+t, k2), C1 (k9)
Ridge 7: C1 (k8), C2 (k2, w+t, k2), C1 (k8)
Ridge 8: C1 (k8), C2 (k1, w+t, k1), C1 (k8)
Ridge 9: C1 (k7), C2 (k1, w+t, k1), C1 (k7)
Ridge 10: C1 (k6), C2 (k1, w+t, k1), C1 (k6)
Ridge 11: C1 (k6), C2 (w+t), C1 (k6)
Ridge 12: C1 (k5, w+t, k5)
Ridge 13: C1 (k4, w+t, k4)
Ridge 14: C1 (k3, w+t, k3)
Ridge 15: C1 (k2, w+t, k2)
Ridge 16: C1 (k1, w+t, k1)

Ridge 17 = Ridge 16
Ridge 18 = Ridge 15
Ridge 19 = Ridge 14
Ridge 20 = Ridge 13
Ridge 21 = Ridge 12
Ridge 22 = Ridge 11
Ridge 23 = Ridge 10
Ridge 24 = Ridge 9
Ridge 25 = Ridge 8
Ridge 26 = Ridge 7
Ridge 27 = Ridge 6
Ridge 28 = Ridge 5
Ridge 29 = Ridge 4
Ridge 30 = Ridge 3
Ridge 31 = Ridge 2
Ridge 32 = Ridge 1
Ridge 33:  C1 (k3), C2 (k14, turn, sl1, k13), C1 (k3)

That's the first part finished.

Now repeat this (ridges 1 to 33) two more times (parts 2 and 3) - and then once again ridges 1 to 32 (part 4).

Take out your scrap yarn of the provisional cast on and put the live stitches on a knitting needle. Cut your yarns but leave tails long enough for grafting.
Graft in garter stitch: 3 sts in C1 and 14 sts in C2.

After grafting there is still a small hole in the middle of the piece - you can sew this closed with your C2 yarn tail. Sew in ends afterwards.


Chart
The chart below shows one forth of the potholder. The numbers indicate the number of stitches per color of each ridge. The orange number gives the stitches in C2 and the black number the stitches in C1.

Samstag, 16. November 2019

Stella - Star-Shaped Potholders

Christmas is the time to decorate the space around you with pretty things. And as a knitter, in the run-up to Christmas I like to knit decorations. And if these decorations are also useful, it's even better. These 8-pointed stars can be used as hotpads, doilies or coasters.
They are knitted in one piece and all in garter stithc– starting with a provisional CO, then point by point around the center. Grafting the first and last rows together gives it a seamless look. The construction uses short rows and basic increases and decreases.
So, if you want a quick knit to get you into a Christmas mood – and maybe learning a couple of new techniques along the way – this pattern is for you.


The pattern is available for purchase 
The pattern PDF 14 pages long and contains:

  • the complete written patterns for stars in two sizes including charts
  • a general pattern how to knit stars in other sizes – containing also a photo tutorial
  • three further variations of this pattern (see photos below)
    • lacy variation of this star – written pattern and a chart
    • a pattern for a two-colour variation – written pattern, a chart and detailed instructions how to undo the provisional CO in two colours and how to do the grafting in two colours
    • a three-colour variation – chart only 
  • short photo tutorials for the following techniques
    • provisional cast on with a crochet hook and how to undo it
    • grafting in garter stitch
    • intarsia


Skills you need to knit this pattern:
  • provisional CO
  • short rows with wrap and turn
  • grafting in garter stich
  • basic increases (kfb) and decreases (ssk and k2tog)


Materials
  • yarn – I used cotton yarns, for the off white ones in Aran weight (15 grams for the small star, 30 grams for the bigger star) and Sports weight yarn for the orange lacy star (about 40 grams)
  • knitting needles that are smaller than what the yarn calls for – I used 2.5mm needles
  • scrap yarn and a crochet hook for a provisional CO
  • a tapestry needle for grafting

Sizes
The bigger star in Aran weight measures 24 cm from tip to tip, the smaller one 16 cm.
The big lacy star in Sports weight yarn measures about 36 cm.


Montag, 12. August 2019

Sideways Garter Stitch Basket

I never have enough places to store my unfinished knitting or crochet projects. Usually, I prefer bowls or baskets. So, since I had a lot of old T-shirt yarn lying around, I decided to knit a new basket using this yarn.
This basket is knitted sideways all in garter stitch - with short rows for shaping. Because I used a provisional CO and grafted beginning and end together, the piece is seamless.
Of course it can also be used to store or to present other things, e.g. it could be used as a basket for your breakfast rolls :)


Creative Commons License
This work by Knitting and so on is licensed under a Creative Commons Attribution-NonCommercial-NoDerivatives 4.0 International License.


Materials
  • T-shirt yarn, but other heavy weight yarns (e.g. Cotton) will also work - I used about 200 grams of old T-shirt yarn (cut from ribbed jersey) - I worked in stripes. changing after each ridge
  • knitting needles that are rather too small for your yarn (to give it stability) - I used 10mm knitting needles
  • a really big tapestry needle for grafting

Techniques


Instructions

Do a provisional CO of 20 sts
Row 0 (Setup Row): k all sts
Ridge 1: k19 w+t k to end
Ridge 2: k18 w+t k to end
Ridge 3: k17 w+t k to end
Ridge 4: k16 w+t k to end
Ridge 5: k15 w+t k to end
Ridge 6: k14 w+t k to end
Ridge 7: k15 w+t k to end
Ridge 8: k16 w+t k to end
Ridge 9: k17 w+t k to end
Ridge 10: k18 w+t k to end
Ridge 11: k19 w+t k to end
Ridge 12 k all, turn, k all
Repeat ridges 1 to 12 twice more, then knit ridges 1 to 11 once.

Put the stitches from the provisional CO on a second needle.
Cut the yarn, but leave a tail long enough for grafting.
Graft in garter stitch.


If you're not comfortable with provisional CO and grafting, you can change the pattern as follows:
  • instead of row 0, knit one ridge with all stitches
  • then knit ridges 1 to 12 a total of four times - binding off in the last row of the last ridge 12
  • sew the two sides (CO and BO) together


How to Adapt the Size

To make this bigger (or smaller) do more (or fewer) stitches in the provisional CO.
Since I wanted my basket to be about as high as it was wide, I did short rows up to about a third of the total number of stitches.
If you want a different ratio, you have to adapt the number of short rows - e.g. for a wider basket more (and shorter) short rows.


Freitag, 12. April 2019

Easter Bunny

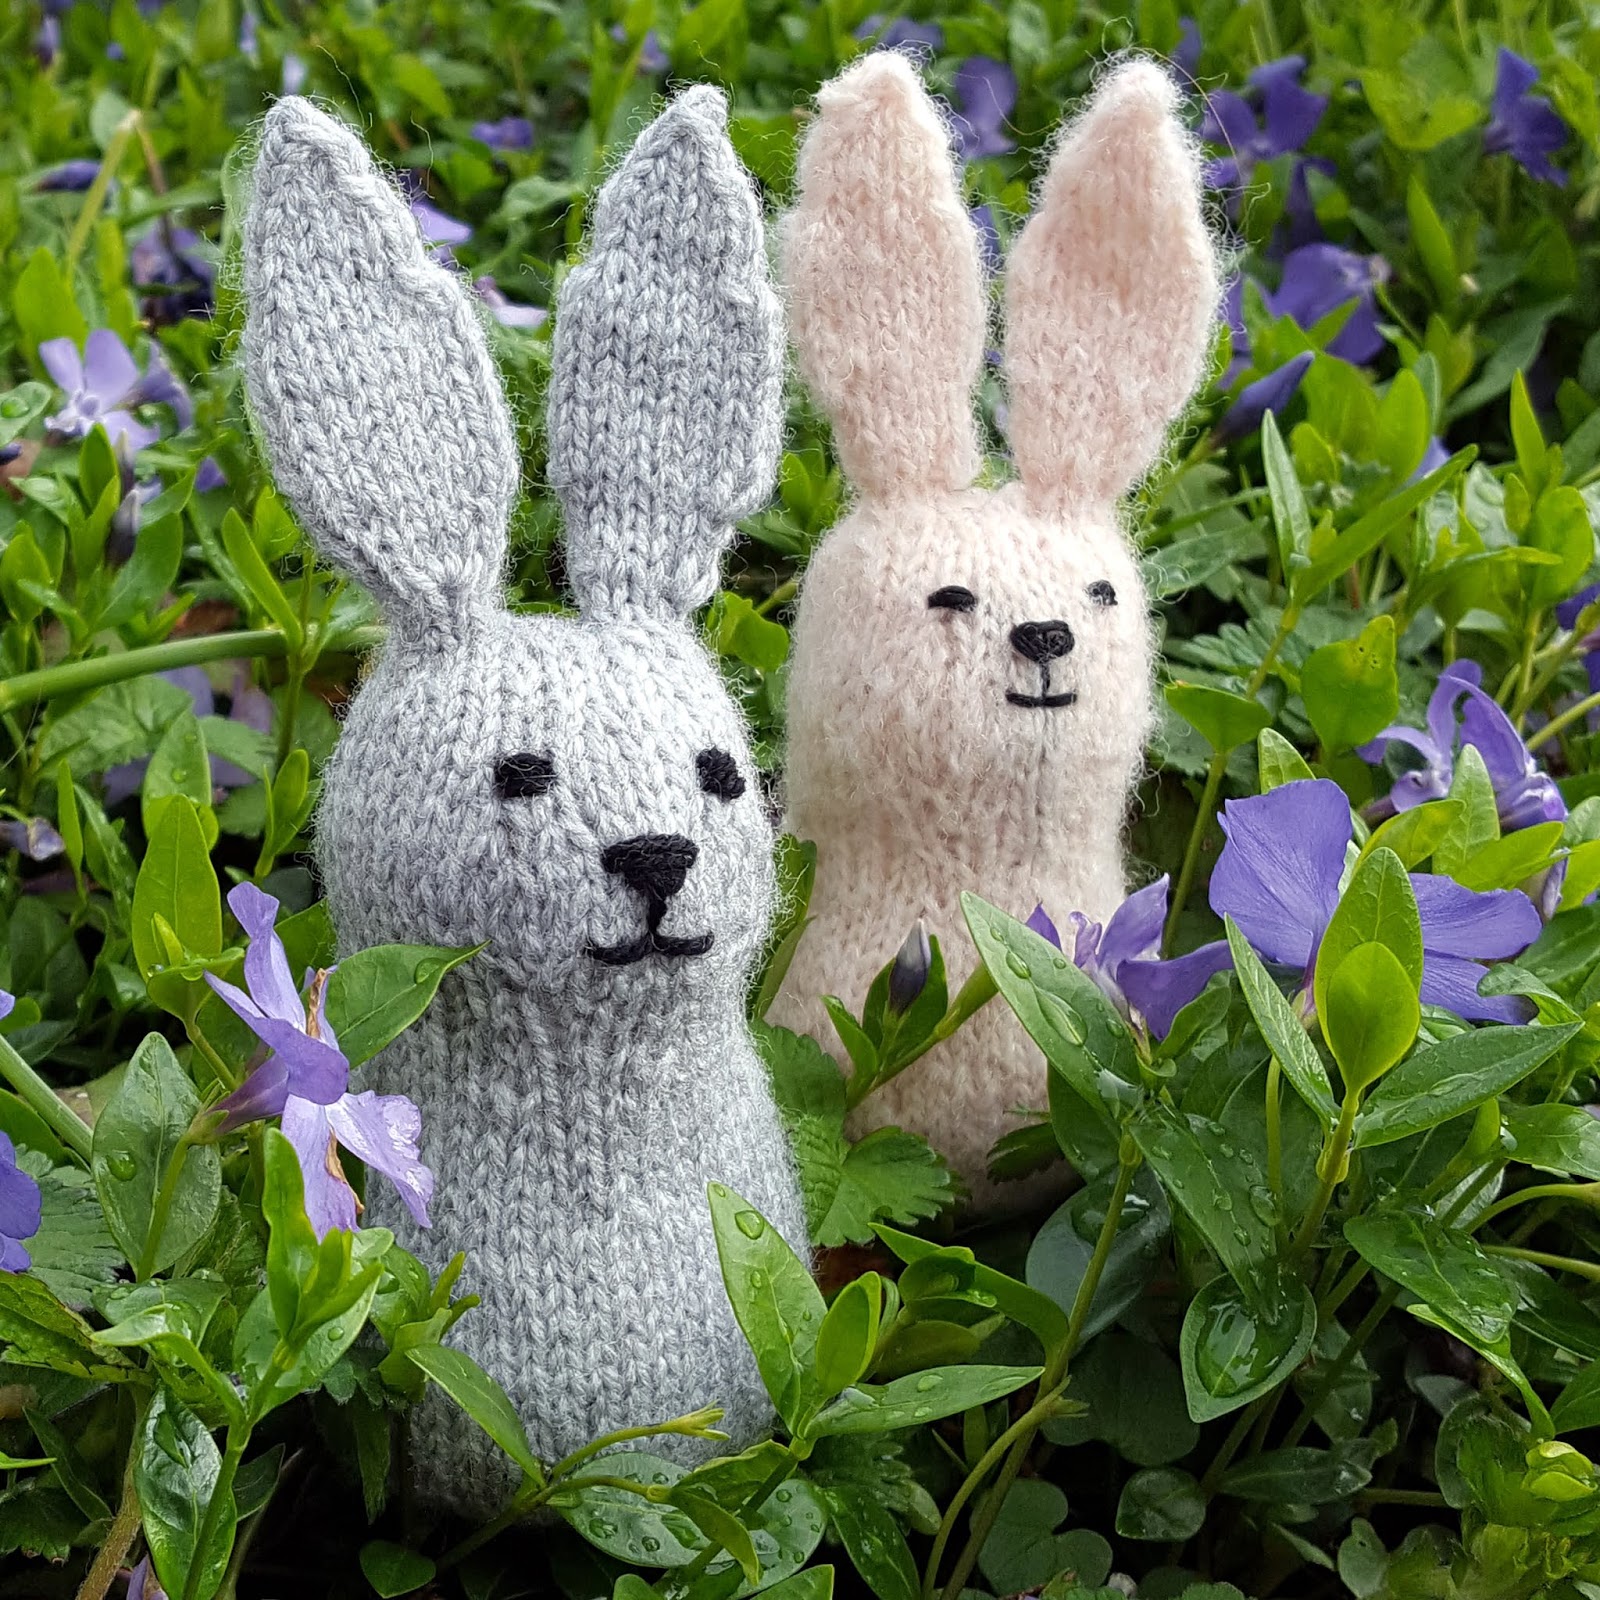
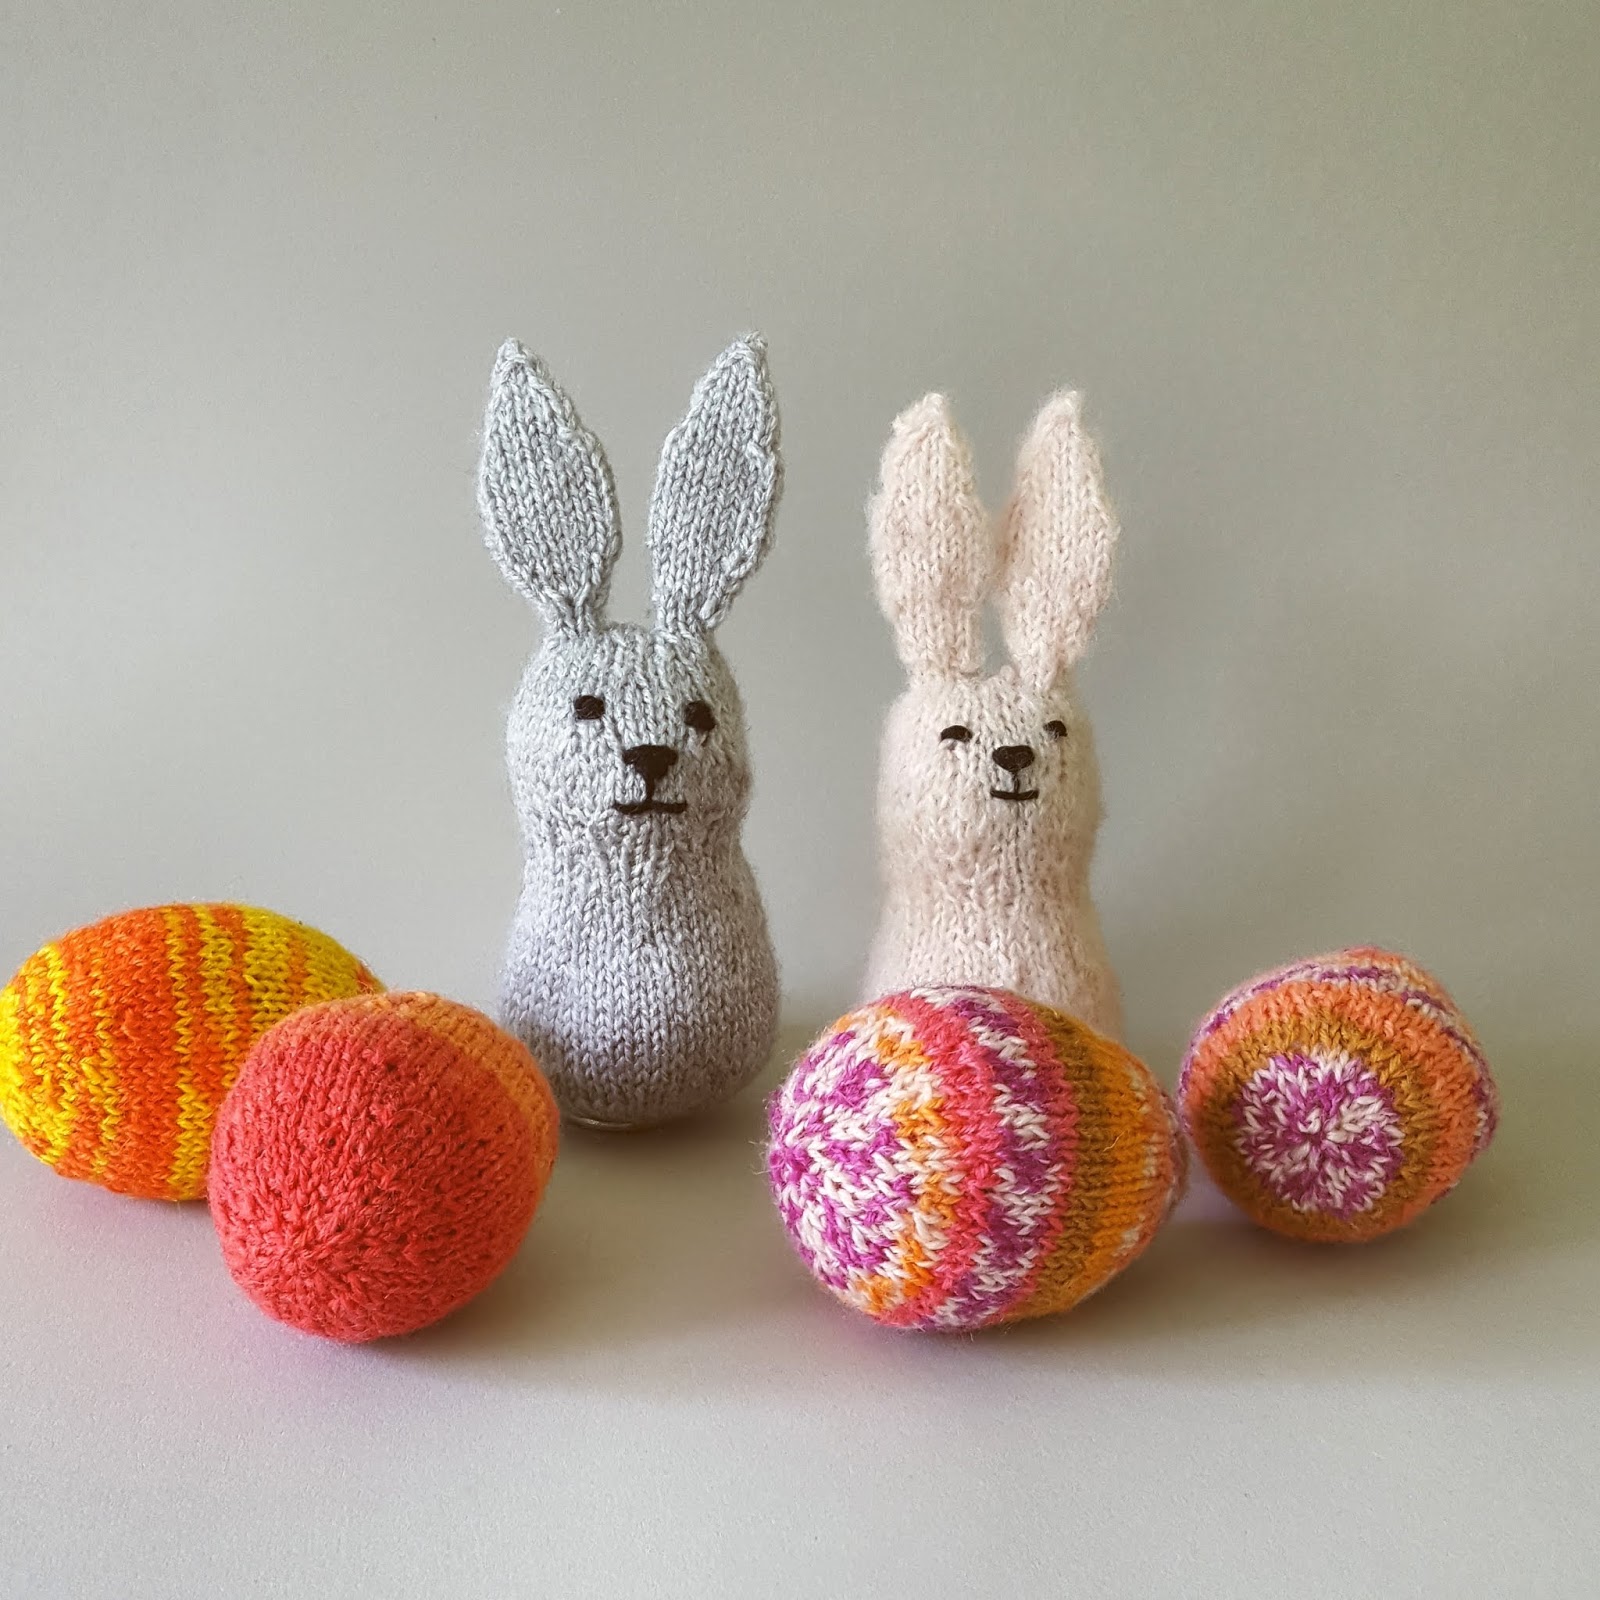
I love knitting small seasonal and decorative pieces - especially for Easter and Christmas. This time I wanted to knit little easter bunnies to add a touch of cuteness to the Easter egg nests. I used a construction in the round and in stockinette stitch - knitted from the bottom up.
The finished bunnies are about 15 cm high - they are great to use up yarn leftovers.
Please note, this is fiddly work - esprecially the cast on, the first few rounds, and the finishing. But I really like the result.


Creative Commons License
This work by Knitting and so on is licensed under a Creative Commons Attribution-NonCommercial-NoDerivatives 4.0 International License.


Materials
  • light colored leftover yarn - I guess I used less than 10 grams of fingering weight yarn
  • 2.5mm knitting needles - I used Addi Trios, but you can also use dpns or circulars (magic loop method)
  • black embroidery floss or black fingering weight yarn to stitch on the face
  • an embroidery needle
  • stuffing - I used yarn leftovers and to give them some stability I even put a couple of pebbles right into the bottom of the lower half of their body

Techniques
  • Shadow Wrap Short Rows - used throughout the pattern: as shown in this YouTube video by Lee Meredith. A video by Miriam Felton that shows how to do a heel with shadow wraps can be found here on YouTube. However, the heel knitted here is knitted slightly different because here there are two rounds between the two parts of the heel, i.e. there won't be any triple stitches.
    • Knitting the Shadow Wraps: In a knit row (i.e. you're knitting on the outside of your socks), you knit up to the stitch where you want to turn, and then knit into the stitch in the row below, i.e. you insert the right hand needle from the front into the stitch below the next stitch and pull your working yarn through. Then you put the loop onto the left hand needle (creating a double stitch from the stitch below) - keeping the yarn on the back. Then you turn and your yarn is now in front, tighten it to make sure that all stitches have the same size and start to purl in the opposite direction. This sequence (knitting int the stitch below and turning) will be called kbelow in the pattern.
      If you're in a purl row, you purl into the stitch of the row below, i.e. insert the right hand needle from the back into the stitch below and draw your yarn through and put the stitch onto your left hand needle - creating a double stitch. The yarn is in front while you're doing this. Turn your work. The yarn is now on the back of your knitting. Make sure that the stitch is as tight as the other stitches on your needles and start knitting in the opposite direction. This sequence will be called pbelow in the pattern.
    • Knitting the double stitch.: When you come to a double stitch you can simply knit / purl it as one. This looks well when you're working it in the same direction it was created (i.e. the double stitch was created in a purl row and is also worked in a purl row). However, when you have to knit a double stitch that was created in a purl row, the following sequence made the result look a bit neater. I slipped the first loop of the double stitch to the right hand needle, turned the second loop so that the front leg was now in the back and put the first loop back facing the same way (i.e. the former front leg was now in the back). Then I knitted both loops through the back loop.


Instructions

Body

CO 8 sts an join in round
Round 1: k all
Round 2: * kfb repeat from * to end (16 sts)
Round 3: k all
Round 4: * k1, kfb repeat from * to end (24 sts)
Round 5: k all
Round 6: * kfb, k2 repeat from * to end (32 sts)
Round 7: k all
Round 8: * k2, kfb, k1 repeat from * to end  (40 sts)
Rounds 9-10: k all
Round 11: * k1, kfb, k3 repeat from * to end (48 sts)
Round 12: k10, kfb, kfb, kfb, kfb, kblelow, p8, pbelow, k to end (the little bulge that will be created during the next rounds will be the tail - it's on the first half of the round)
Round 13: k18, kbelow, p8, pbelow,, k7, kbelow, p6, pbelow, k to end
Round 14: k10, ssk, ssk, k2tog, k2tog, k to end  (your total stitch count is back to 48 sts)
Round 15-17: k all
Round 18: * k5, k2tog, k5 repeat from * to end (44 sts)
Round 19: k all
Round 20: * k2tog, k9 repeat from * to end (40 sts)
Round 21: k all
Round 22: * k2, k2tog, k6 repeat from * to end (36 sts)
Round 23: k all
Round 24: * k7, k2tog, repeat from * to end (32 sts)
Round 25: k all
Round 26: * k2, k2tog repeat from * to end (24 sts)
Round 27: k all
Start stuffing the lower part of the body


Head
Round 1: * k1, mk1, k2 repeat from * to end (32 sts)
Round 2: k all
Round 3: k16, k5, mk1, k6, mk1, k5 (the bulge that will be created now, is the snout, it's on the 2nd half of the round)
Round 4: k16, k5, kfb, kfb, k4, kfb, kfb, k5
Round 5: k4, mk1, k8, mk1, k4; k4, mk1, k14, mk1, k14
Round 6: k all
Round 7: k18; k4, ssk k12, k2tog k4
Round 8: k18; k5, ssk, ssk, k4, k2tog, k2tog, k5 (2 x 18 sts = 36 sts)
Round 9: k all
Round 10: k3, ssk, k4, k3, ssk, k4; k4, ssk, k6, k2tog, k4 (32 sts)
Round 11: k all
Round 12: * k2tog, k6 repeat from * to end (28 sts)
Round 13: k all
Round 14: * k4, k2tog, k1 repeat from * to end (24 sts)
Round 15: k all
Round 16: * k1, k2tog, k3 * repeat from * to end (20 sts)
I stitched on the face after finishing this. Then I stuffed the head.
However, it is an option to stitch on the face after you finish knitting the rabbit.

Ear 1
You now have 20 sts on your needles. To knit the first ear, you will only need the first 4 sts and the last 4 sts of that round. So:
Round 1: k2tog, k2, put the next 12 sts on two stitch holders (safety pins or scrap yarn), k2, k2tog
Round 2: (only knitting the stitches that are still on your needles): k all
Round 3: kfb, k1, kfb; kbf, k1, kfb (your piece should now look similar to illustration 1)
Round 4-6: k all
Round 7: kbf, k3, kfb, kfb, k3, kfb
Rounds 8-14: k all
Round 15: ssk, k3, k2tog, ssk, k3, k2tog
Round 16-18: k all
Round 19: ssk, k1, k2tog, ssk, k1, k2tog
Round 20: k all
Round 21: sl1, k2tog, psso; sl1, k2tog, psso
BO

Illustrations

Ear 2
From the top, your piece should look like illustration 2. The second ear will be knitted over the 8 sts that are furthest away from the first ear, i.e. the stitches that are on the left of illustration 2.
Put 2 x 4 stitch from the stitch holders back on your needles. There will be 2 x 2 sts left over - unknitted and on the stitch holders.
Now knit rounds 1 to 21 of Ear 1 and BO.

Finishing
There are 2x2 unknitted stitches left on your stitch holders. Put these on your needles (see illustration 3).
If you haven't stuffed your bunny yet, now is the last chance to do it.
Connect the 2 rows of 2 stitches using the kitchener stitch.
Weave in ends.


Variations
If you want a bunny that is a bit bigger (like the one on the left on the picture above), you can knit a few more "k all" rounds between round 15-17 of the body.

Easter bunnies together with knitted Easter Eggs (free pattern available)


Mittwoch, 2. Januar 2019

Hanabi Potholder

Quite often my knitting ideas just do not work out the way they were planned - usually they are then frogged and started again in a slightly different manner - or abandoned completely :) But just once in a blue moon something - even though it did not go to plan - turns out to look just lovely.
And that's what happened with this piece. I had planned to knit a potholder with a star with 6 points ... or 8 points at most. But due to an error, I ended up with slimmer points than planned. Plus the points did not look as I had planned.
However, I continued knitting it and I grew to like it. So it was finished and here is the pattern for it. As with many of my small potholders it is started with a provisional cast-on, constructed with short rows and intarsia and finished by grafting in garter stitch.
The piece can be used as a potholder, washcloth or coaster.


Creative Commons License
This work by Knitting and so on is licensed under a Creative Commons Attribution-NonCommercial-NoDerivatives 4.0 International License.


Materials
  • about 40 grams of Aran weight yarn in 2 colors - I used dark blue as color 1 (C1) and light yellow as color 2 (C2)
  • 3mm kntting needles
  • scrap yarn and a crochet hook for provisional cast on
  • a tapestry needle for grafting and to weave in ends


Techniques and Abbreviations
  • Intarsia: Changing colors with the intarsia technique - as shown in this YouTube video by knitwithpat; or this YouTube video by Francoise Danoy. That way you don't have to carry long strands on the WS. The picture below shows the RS and WS of the piece.
    Throughout the pattern, the following notation will be used: "C1 (k2); C2 (k3, w&t, k3); C1 (k2)" means "knit 2 sts with C1; change to C2 and knit 3 sts with C2, wrap and turn, knit another 3 sts with C2, then change back to C1 and knit 2 sts with it". I.e. color is indicated before the knitting instructions for that yarn. the knitting instructions for that yarn are given in brackets after the color and color changes are indicated by a semicolon.
  • Provisional CO: My favorite method for a provision CO is the crochet provisional CO - it is shown in this Youtube video by New Stitch a Day.
  • Short rows with wrap and turn (w&t) - as shown in this YouTube video by Very Pink Knits.
  • Grafting in Garter Stitch: A technique to get an invisible (knitted) seam - this technique is shown in this YouTube Video by knittinghelp.com.


Instructions

The piece is started with a provisional CO, knitted in 10 wedges of short rows to complete a circle and then finished by grafting.

With scrap yarn do a provisional CO of 21 sts and knit row 0
Row 0 (WS): C2 (k7); C1 (k14)
Ridge 1 (RS/WS): C1 (k12); C2 (k6, w&t, k6); C1 (k12)
Ridge 2 (RS/WS): C1 (k10); C2 (k5, w&t, k5); C1 (k10)
Ridge 3 (RS/WS): C1 (k8); C2 (k4, w&t, k4); C1 (k8)
Ridge 4 (RS/WS): C1 (k6); C2 (k3, w&t, k3); C1 (k6)
Ridge 5 (RS/WS): C1 (k4); C2 (k2, w&t, k2); C1 (k4)
Ridge 6 (RS/WS): C1 (k3); C2 (w&t); C1 (k3)
Ridge 7 (RS/WS): C1 (k2); C2 (k16, w&t, k16); C1 (k2)
Ridge 8 = Ridge 6
Ridge 9 = Ridge 5
Ridge 10 = Ridge 4
Ridge 11 = Ridge 3
Ridge 12 = Ridge 2
Ridge 13 = Ridge 1
Ridge 14 (RS/WS): C1 (k14); C2 (k7, turn, k7); C1 (k14)

Repeat ridges 1 to 14 8 more times.
Then knit rigdes 1 to 13.
Cut yarns but leave tails long enough for grafting.

Graft 14 sts in C1 and 7 sts in C2.
Use the C2 tail to close the hole in the middle of the piece.
Weave in ends.


Chart

In addition to the written instructions above, here's also a chart that shows how one wedge is knitted.
The number written in blue is the number of stitches with skein a of C1, the number written in black is the number of stitches knitted with C2.

Chart - click to enlarge

Here with my current favorite Oat Cookies - here's a link to the recipe (in German)

Mittwoch, 19. Dezember 2018

Last Minute Christmas Tree

When my Dad was still alive. we used to have a real Christmas tree. Ever since he died, we didn't. So when I went shopping a couple of days before Xmas last year and saw a packet of really small discounted baubles, I thought that I might as well knit a small tree. It took me less than an afternoon and the project got me a bit into a Christmas mood.
This Christmas tree is knitted sideways and in garter stitch. It is constructed with short rows and finished using a three-needle BO. Afterwards it is decorated with surface crochet and by sewing on baubles.


The instructions below are the knitting pattern for the tree on the left - the one with the baubles. The one I knitted is about 17 cm high. For the smaller trees on the right you can find the free pattern here.


Creative Commons License
This work by Knitting and so on is licensed under a Creative Commons Attribution-NonCommercial-NoDerivatives 4.0 International License.


Materials
  • green yarn - I used (really) old DK weight yarn
  • golden yarn
  • small christmas baubles - the ones I used have a diameter of about 1.5 cm
  • knitting needles that are slightly smaller than what the yarn calls for, I used 3 mm dpns
  • a third needle for the three needle BO 
  • scrap yarn for provisional CO
  • a crochet hook for provisional CO and for the surface crochet
  • a tapestry needle to sew on the baubles

Techniques & Notation

Instructions

Do a provisional CO of 42 sts

With green yarn:
Setup row: k all
Ridge 1: k all, turn, sl1, k all
Ridge 2: k30, w+t, k to end
Ridge 3: k 10, w+t, k to end
Ridge 4: k 39, w+t, k to end
Ridge 5: k 5, w+t, k to end
Ridge 6: k 20, w+t, k to end
Ridge 7: k 10, w+t, k to end
Ridge 8: k 35, w+t, k to end
Ridge 9: k 25, w+t, k to end
Ridge 10: k 8, w+t, k to end
Ridge 11: k 15, w+t, k to end
Ridge 12: k 3, w+t, k to end
Ridge 13: k 22, w+t, k to end

Repeat ridges 1 to 13 four times.

Now you have a piece that looks like a piece of pizza.

Put the stitches from the provisional CO on a knitting needle. Hold the piece rights sides together and do a three needle bind off. Bind off 15 stitches with green yarn, and 15 stitches with white yarn. Afterwards, turn the piece right sides out. Use a pen or something similar to get into the top.

With golden yarn and crochet hook:
Starting from the lower edge work your way up with surface crochet in a spiral - until you reach the top of the tree.

If the yarn you used was rather soft, you might want to stabilize the tree. You can do this by cutting out a piece of paper or soft cardboard in the shape of a 90° pizza slice (similar to the tree before the three needle BO) and insert it into the tree.
The yarn I used was stiff enough that there wasn't any need for stabilization.

As a further decoration I put a small star on the top.


Freitag, 7. Dezember 2018

Little Snowman

I like knitted Christmas ornaments. This year I wanted to knit a snowman. I first tried it with a sideways garter stitch construction that I had used before (e.g. Xmas trees or little Xmas Gnomes), but I didn't get the shaping right (see this photo on Instagram). So I decided  to do a stockinette, bottom-up construction. After finishing, the snowmen also got little hats and scarfs.

Please note, this is fiddly work - esprecially the cast on and the first few rounds, but the resulting snowmen are really cute.


Creative Commons License
This work by Knitting and so on is licensed under a Creative Commons Attribution-NonCommercial-NoDerivatives 4.0 International License.


Materials
  • white yarn - I used approximately 15 grams of (probably) worsted weight yarn
  • leftover orange yarn - I used old (probably) sports weight yarn
  • leftover black yarn - I used old (probably) worsted weight yarn
  • leftover yarn of a different color for hat and scarf (less than 5 grams of fingering weight yarn)
  • 2.25 dpns and 2.5 dpns - I used needles that were too small for the given yarn weight
  • a stitch marker to mark the end of the round
  • stuffing - to give them some stability I even put a couple of pebbles right into the bottom of the lower half of their body
  • a tapestry needle


Size and Variations
The snowmen wearing stocking caps are knitted exactly to the instructions (with 2.5mm needles) and are about 10 cm high.
The one wearing a top hat is knitted with thicker yarn and with 3.25mm needles. Here I left out rows 24 - 28 (k all rows in the middle of the body) - so he's a bit rounder and shorter in proportion.


Instructions

Carrot

With orange yarn CO4 sts and join in round
Knit 4 rounds - increasing by 1 st every round - now you have 8 sts on your needles
Knit 4 rounds - increasing by 1 st every other round - now you have 10 sts on your needles
Bind off.

Leave the tail of your bind off - it will be used for stitching the carrot on later.
Stuff the tail from your CO into the carrot.


Snowman

You can stitch face and the (coal) buttons after you've finished, but I've done it while knitting - and that is how it is described in the pattern

With white yarn CO8 and join in round
Round 1: * kfb repeat from * to end
Round 2: k all
Round 3: * k1, kfb repeat from * to end
Round 4: k all
Round 5: * kfb, k2 repeat from * to end
Rounds 6 and 7: k all
Round 8: * k2, kfb, k1 repeat from * to end
Rounds 9 - 11: k all
Round 12: * k4, kfb repeat from * to end - you now have 48 sts on your needles
Rounds 13 - 28: k all
Round 29: * k2, ssk, k2 repeat from * to end
Rounds 30 and 31: k all

With black yarn and tapestry needle stitch on 3 coal buttons. Start to stuff the body.
Continue knitting with white yarn.

Round 32: * ssk, k3 repeat from * to end
Round 33: k all
Round 34: * k1, ssk, k1 repeat from * to end
Round 35: * ssk, k1 repeat from * to end
Round 36: k all

Round 37: * k1, kfb repeat from * to end
Round 38: k all
Round 39: * kfb, k2 repeat from * to end
Rounds 40 - 44: k all
Round 45: * ssk, k2 repeat from * to end
Round 46 - 48: k all

With the tail of the carrot, stitch on the carrot. Make sure to align it on top of the coal buttons.
With black yarn stitch on two coals for the eyes and 5 coals as a mouth.
Fill in stuffing. You can use the blunt end of a pencil to make sure that the stuffing gets everywhere.

Round 49: * k1, ssk repeat from * to end
Round 50: k all
Round 51: * ssk repeat from * to end

Fill in a bit more stuffing.
Cut white yarn and thread the tail into a tapestry needle. Catch the remaining 8 stitches with the needle and pull tight. Fasten off and weave in ends.


Hat: Stocking Cap
CO4 and join in round.
Knit in rounds increasing by 1 st per round - until the hat fits over the head of your snowman.
(I knitted until I had 32 sts on my needles).
Finish with 4 rounds of ribbing (either k1p1 or k2p2).
BO in ribbing pattern.

Attach a small pompom to the top of the hat. (I used this method and a dessert fork to make a pompom - but it still was a big too big.)
Weave in ends


Scarf
CO8 sts
Knit the same ribbing you did for the hat - either k1p1 or k2p2 - until your scarf measures about 25 cm (or until it is long enough to fit around the snowman's neck).
BO and weave in ends.


Alternative: Top Hat
CO8 and join in round
Round 1: * kfb repeat from * to end
Round 2: k all
Round 3: * k1, kfb repeat from * to end
Round 4: k all
Round 5: * kfb, k2 repeat from * to end
Round 6: p all
Round 7: * k1, ssk, k5 repeat from * to end
Rounds 8 to 16: k all
Round 17: * k4, ssk, k1 repeat from * to end
Round 18: k all
Round 19: * k1, kfb, k1 repeat from * to end
Round 20: k all
Round 21: * k3, kfb repeat from * to end
Round 22: k all
Round 24: * kfb, k4 repeat from * to end
BO and weave in ends.

Mittwoch, 14. November 2018

Sternchen - Star-Shaped Ornament

Now that we're in the middle of November, Christmas decorations are starting to be seen again. To get into the right mood, I tried to a knit small 3-dimensional star. And once I finished one, I couldn't stop and did quite a few more - because they really look cute and it's fun knitting them.
Even though these stars are 3-dimensional they are knitted flat. They have six points, are constructed of short rows and knitted (nearly) all in garter stitch. They come in four sizes and can be used to decorate your house for Christmas.
As to the name, "Sternchen" is the German word for little star.


The pattern is available as a PDF
The pattern PDF contains
  • a written pattern for all four sizes
  • a chart for two sizes
  • photo illustrations for various stages of star


Skills
In order to knit one of these stars, you need the following knitting skills:
  • Provisional CO
  • Short rows with wrap and turn - there is also an explanation how to adapt it to use german short rows
  • Grafting in garter stitch
  • Grafting in stockinette
  • kfb and ssk

Materials
To knit these stars you need
  • yarn - leftovers will do, when using fingering weight yarn, I used about 5 grams of yarn to knit a bigger star, with Sports weight it was about 10 grams
  • straight knitting needles - I used a size that was a bit too small for the yarn to get a tight texture
  • crochet hook and scrap yarn for provisional CO
  • stuffing - I used old yarn ends that I had collected from my last knitting projects
  • a tapestry needle for grafting and to weave in ends
  • one stitch marker