Posts mit dem Label Scarf werden angezeigt. Alle Posts anzeigen

Donnerstag, 14. Juli 2016

Rettangolini Scarf

Crochet yourself a fun summer accessory with this breezy scarf. It's constructed of rectangular modules that are connected as you go.

Rettangolini Scarf - free crochet pattern by Knitting and so on


This scarf is the crochet version of my (knitted) Little Rectangles Summer Scarf.


Abbreviations and Special Techniques:
  • DC = double crochet (US terminology) - as shown in this YouTube video by HappyBerry Crochet 
  • Chainless Double Crochet Foundation Stitch (CDCF): A way of starting with double crochet stitches without doing chain stitches first. It is shown in this YouTube video by Gleeful Things.  
  • Connected Chainless Double Crochet Foundation Stitch (cCDCF): Yarn over and insert your hook into the bottom of the last CDCF (see picture 1 below), yarn over and pull the yarn through once (see picture 2), then insert the hook of the edge of the next rectangle of the layer below (see picture 3), yarn over and pull through two loops (the one picked up from the next rectangle and the next on your hook (see picture 4), then finish like a normal DC.
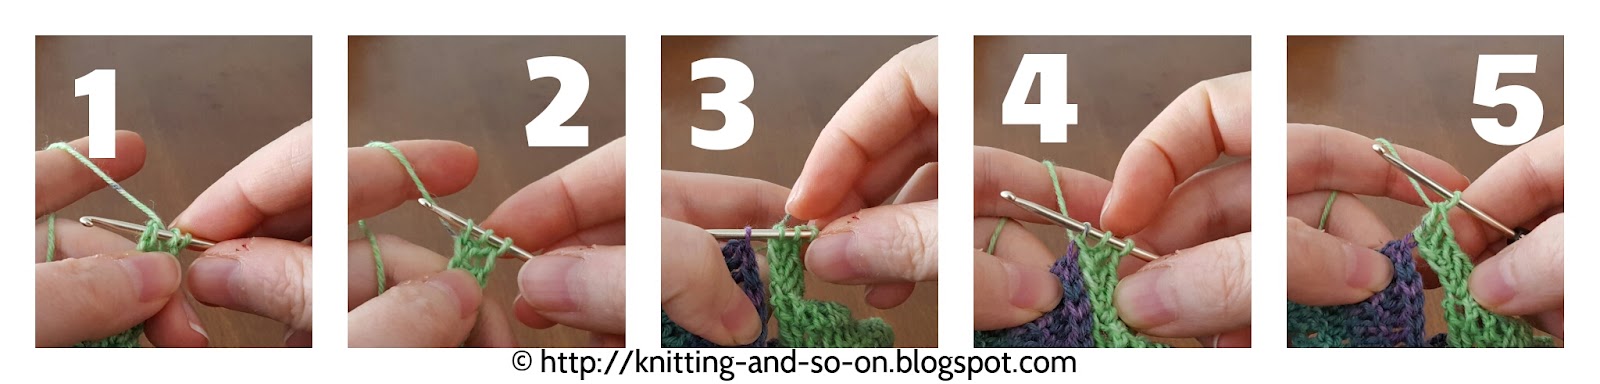
How to do a Connected Chainless Double Crochet Foundation Stitch (click on image to enlarge)


Materials
Since gauge doesn't matter here, you can basically use any yarn weight to crochet this scarf. I used the following

  • about 120 grams of fingering weight yarn
  • a 3.5 mm crochet hook
  • a tapestry needle to weave in ends


Rettangolini Scarf - free crochet pattern by Knitting and so on

Construction

This scarf is constructed in layers of DC rectangles (12 DCs wide and 4 rows high). Each layer consists of 5 rectangles one on top of the last one but with an offset of 8 stitches. The layers are at right angles to the layer below - at bit like entrelac, but with spaces inbetween.
The first rectangle of one layer connects with the fifth or last rectangle of the layer below, the second with the fourth rectangle, the third with the third of the row below, the fourth with the second and the fifth with the first from the row below. This construction is shown in the picture below.


If you like your patterns charted, here's a chart of the whole pattern. If you rather like written instructions see below.
Rettangolini Scarf - full chart
Chart (click on image to enlarge)

Instructions

First Layer

First rectangle
Row 1: ch 4, do a double crochet into the first chain, do 10 CDFCs, turn
Row 2: ch3, do 11 DCs (one into each double crochet in the row below), turn
Row 3 = Row 2
Row 4 = Row 2

Second to fifth rectangle
Row 1: starting with the 2nd DC in the row below, do 8 slip stitches, chain 3, do 3 DCs into the remaining DCs of the row below, do 8 CDFCs, turn
Row 2: ch3, do 11 DC (one into each double crochet in the row below), turn
Row 3 = Row 2
Row 4 = Row 2


Rettangolini Scarf - free crochet pattern by Knitting and so on


Second Layer (and all subsequent layers)

First rectangle
Row 0: ch 7 (see illustration A1)
Row 1: ch 3, do 7 DCs (one into each ch of row 0). do 4 DCs into the side of rectangle 5 of the layer below, turn  (see illustration A2)
Row 2: ch3, do 11 DCs (one into each double crochet in the row below), turn
Row 3 = Row 2
Row 4 = Row 2 (see illustration A3)
First rectangle of layers 2 and following (click on image to enlarge)

Second to fifth rectangle
Row 1: starting with the 2nd DC in the row below, do 8 slip stitches, chain 3, do 3 DCs into the remaining DCs of the row below (see illustration B1), do 3 CDFCs, 1cCDFC (connecting it to the corner of the next rectangle in the layer below, see illustration B2), do 4 DCs into the side of this rectangle (see illustration B3), turn
Row 2: ch3, do 11 DCs (one into each double crochet in the row below),
Row 3 = Row 2
Row 4 = Row 2
Second to fifth rectangle of layers 2 and following (click on image to enlarge)

Repeat this layer until the scarf is as long as you want it to be.
Weave in ends and block gently.


This post was featured at Fiber Tuesday Link Party #77 at OuiCrochet. Thank you!

Freitag, 17. Juni 2016

Modular Crochet

After I'd finished a huge knitted scarf for a friend, I didn't have an interesting UFO lying around. I played around a little with leftover yarn, but nothing seemed to interest me. Eventually, I started a crochet version of the Little Rectangles Scarf I published about a year ago. Even though, at first I didn't like it much, it seems to grow on me and it's actually fun to crochet :)


Mittwoch, 18. Mai 2016

Papagena Scarf

This new playful scarf is great to display the lovely colors of yarn with a long color gradient. It's made up of stacked stitches for the fringes and modularly knitted diamonds.


As to the name: When I posted a picture of this scarf progress, somebody felt reminded of the Queen of the Night from Mozart's opera "The Magic Flute". I really liked this association - however, I felt that the scarf looks a bit too ragged to belong to the very elegant and cold figure of the Queen of the Night, but better fitted to the persona of Papagena.


Creative Commons License
This work by Knitting and so on is licensed under a Creative Commons Attribution-NonCommercial-ShareAlike 4.0 International License.


Other languages

русский / Russian: Fellow Raveller lutik made a video explaining this pattern (in Russian): It can be found here on YouTube. Спасибо!

Dansk / Danish: A danish version was written by MarianneHo (Ravelry name). It can be found here on strikkeglad.dk or here as a PDF. Mange tak!


Materials
  • 3.5 mm knitting needles - I used long circulars
  • about 170 grams of fingering weight yarn - I used Noro Taiyo Sock
  • a lot of stitch markers
  • 1 removable stitch markers to mark RS (called "RS-marker")
  • tapestry needle to weave in ends


Special Stitches and Techniques
  • SB = slip back the number of sts to the left hand needle
  • dec9-1 = k3, sl1, [k2tog, psso, SB1] 3 times
  • This is called stacked decrease. There is a YouTube-video from So, I make stuff's YouTube channel that shows how to do stacked decreases.
  • Short Rows (t+p): There are several techniques for short rows – and it’s a matter of taste which one you prefer. I’ve recently learned a technique called German short rows: when you turn, bring yarn to the front and pull it back so that a sort of double-stitch is created, then knit back as usual - when you have to knit the double-stitch, be careful to knit it as one stitch (see also https://www.youtube.com/watch?v=P6n561SMZXQ); this method has the advantage the no picking up of stitches is necessary. In the pattern, this stitch will be called t+p (turn and pull).
  • Knitted Cast-On: http://youtu.be/IzVy8fRfOw0
  • Stretchy Bind-Off: http://youtu.be/cGHItYwr1us


General Construction

The schematic below shows the general construction of the scarf. It starts with a module at the tip and then grows by layers. Each row starts with an increasing module (called type Inc-B) and ends with another (slightly different) increasing module (called type Inc-A). Inbetween these increasing modules, there are normal basic modules (called type Basic) - starting from the second layer after knitting the tip. Since the layers are knitted in different directions, the RS and WS will switch when a layer changes.
General Construction
Here's how a basic module is knitted:
Row 1 (RS): k25, t+p
Row 2 (WS): k24, t+p
Row 3 (RS): k22, t+p
Row 4 (WS): k20, t+p
Row 5 (RS): k18, t+p
Row 6 (WS): k16, t+p
Row 7 (RS): k14, t+p
Row 8 (WS): k12, t+p
Row 9 (RS): k10, t+p
Row 10 (WS): k8, t+p
Row 11 (RS): k6, t+p
Row 12 (WS): k5, t+p
Row 13 (RS): k6, t+p
Row 14 (WS): k8, t+p
Row 15 (RS): k10, t+p
Row 16 (WS): k12, t+p
Row 17 (RS): k14, t+p
Row 18 (WS): k16, t+p
Row 19 (RS): k18, t+p
Row 20 (WS): k20, t+p
Row 21 (RS): k22, t+p
Row 22 (WS): k24, t+p
Row 23 (RS): k24 ... then go on knitting the next module without turning

Depending on where the module is placed, it may be changed a bit as explained in the instructions.

How to knit a basic module

Instructions

Knitting the tip of the scarf

CO88 (use any CO method you like)
Row A: k all
Row B: k1, * dec9-1, k2 repeat from * 7 times (or until there are only 10 sts left), dec9-1, k1
Row C: k12 place marker k12
Then knit R2 to R22 of the basic module and place the removable marker on the RS when it is possible to attach it.


Layer 1

Inc-B Type Module
Place marker at the end of the row and CO44 sts (with knitted CO)
Row A: k43, ktbl, slip marker, ktbl, k11, t+p
Row B: k11, slip marker,  k1, * dec9-1, k2 repeat from * 3 times (or until there are only 10 sts left), dec9-1, k1
Row C: sl1, k24 t+p
Then knit R2 to R21 of the basic module
Row 22: sl1, k24, t+p
Row 23: sl1, k23


Move the RS-marker to the other side of your knitting

Inc-A Type Module
Knit 12 sts, place marker at the end of the row and CO44 sts (with knitted CO)
Row A: k43, ktbl, slip marker, ktbl, k10, t+p
Row B: k11, slip marker,  k1, * dec9-1, k2 repeat from * 3 times (or until there are only 10 sts left), dec9-1, k1
Then knit R1 to R22 of the basic module (don't turn)

The photos on the right show how the piece looks while knitting Rows A and B of an Inc-A type module.


Layer 2 and all subsequent layers

Knit an Inc-B type module
Knit Basic Module(s) until there are only 12 sts left
Move the stitch markers to the other side of the piece
Knit an Inc-A type module


The last layer

Knit an Inc-B type module up to and including row 22.
Row 23: BO24

Knit rows 1 to 22 of a normal module
Row 23: BO24

Knit an Inc-A type module up to and including row 22
Row 23: BO24

Weave in ends and block it.


Oombawka Design Featured on Knitting Love Link Party with Jessie At Home and Underground Crafter

Freitag, 19. Februar 2016

Cordillera Scarf

A beautiful scarf to show off the contrast of two skeins of the same variegated yarn started at different places in the color sequence. It is knitted from end to end all in garter stitch.

Cordillera Scarf - Free Knitting Pattern by Knitting and so on


Creative Commons License
This work by Knitting and so on is licensed under a Creative Commons Attribution-NonCommercial-ShareAlike 4.0 International License.


Materials
  • a total about 150 grams of fingering weight yarn - in two colors  (I used two skeins of Noro Taiyo Sock but started at a different point in the color sequence)
  • 3.5 mm needles (straights or circular)
  • 1 stitch marker

Techniques and Notation

Size
I did a total of 9 repeats before I started decreasing. My scarf is about 190 long and - at its widest point - 40 cm wide.


Cordillera Scarf - Free knitting pattern by Knitting and so on


Instructions
CO8 (C1) and CO8 (C2)
Setup Row 0: sl1, k7 (C1); place marker; k8 (C2)

Increasing Part
Ridge 1: sl1, k to 1 st bef marker (C1); k to end (C2) // turn // sl1, k to marker, k1 (C2); k to end (C1)
Ridge 2: sl1, k to 2 sts bef marker (C1); k to end (C2) // turn // sl1, k to marker, k2 (C2); k to end (C1)
Ridge 3: sl1, k to 3 sts bef marker (C1); k to end (C2) // turn // sl1, k to marker, k3 (C2); k to end (C1)
Ridge 4: sl1, k to 4 sts bef marker (C1); k to end (C2) // turn // sl1, k to marker, k4 (C2); k to end (C1)
Ridge 5: sl1, kfb, k to 5 sts bef marker (C1); k to last 2 sts, kfb, k1 (C2) // turn // sl1, k to marker, k5 (C2); k to end (C1)
Ridge 6: sl1, k to 4 sts bef marker (C1); k to end (C2) // turn // sl1, k to marker, k4 (C2); k to end (C1)
Ridge 7: sl1, k to 3 sts bef marker (C1); k to end (C2) // turn // sl1, k to marker, k3 (C2); k to end (C1)
Ridge 8: sl1, k to 2 sts bef marker (C1); k to end (C2) // turn // sl1, k to marker, k2 (C2); k to end (C1)
Ridge 9: sl1, k to 1 st bef marker (C1); k to end (C2) // turn // sl1, k to marker, k1 (C2); k to end (C1)
Ridge 10: sl1, kfb, k to marker (C1); k to last 2 sts, kfb, k1 (C2) // turn // sl1, k to marker, k5 (C2); k to end (C1)
Ridge 11: sl1, k to marker, k1 (C1); k to end (C2) // turn // sl1, k to 1 st bef marker (C2); k to end (C1)
Ridge 12: sl1, k to marker, k2 (C1); k to end (C2) // turn // sl1, k to 2 sts bef marker (C2); k to end (C1)
Ridge 13: sl1, k to marker, k3 (C1); k to end (C2) // turn // sl1, k to 3 sts bef marker (C2); k to end (C1)
Ridge 14: sl1, k to marker, k4 (C1); k to end (C2) // turn // sl1, k to 4 sts bef marker (C2); k to end (C1)
Ridge 15: sl1, kfb, k to marker, k5 (C1); k to last 2 sts, kfb, k1 (C2) // turn // sl1, k to 5 sts bef marker (C2); k to end (C1)
Ridge 16: sl1, k to marker, k4 (C1); k to end (C2) // turn // sl1, k to 4 sts bef marker (C2); k to end (C1)
Ridge 17: sl1, k to marker, k3 (C1); k to end (C2) // turn // sl1, k to 3 sts bef marker (C2); k to end (C1)
Ridge 18: sl1, k to marker, k2 (C1); k to end (C2) // turn // sl1, k to 2 sts bef marker (C2); k to end (C1)
Ridge 19: sl1, k to marker, k1 (C1); k to end (C2) // turn // sl1, k to 1 st bef marker (C2); k to end (C1)
Ridge 20: sl1, kfb, k to marker (C1); k to last 2 sts, kfb, k1 (C2) // turn // sl1, k to marker (C2); k to end (C1)

If you prefer to work with charts, here's a chart of the increasing part.
Chart of Cordillera Scarf - Free Knitting Pattern by Knitting and so on
Chart 1: Increasing Part of Cordillera Scarf
Repeat Rows 1 to 20 until you have reach half of your desired length.

Decreasing Part
Ridge 1: sl1, k2tog, k to 1 st bef marker (C1); k to last 3 sts, ssk, k1 (C2) // turn // sl1, k to marker, k1 (C2); k to end (C1)
Ridge 2: sl1, k to 2 sts bef marker (C1); k to end (C2) // turn // sl1, k to marker, k2 (C2); k to end (C1)
Ridge 3: sl1, k to 3 sts bef marker (C1); k to end (C2) // turn // sl1, k to marker, k3 (C2); k to end (C1)
Ridge 4: sl1, k to 4 sts bef marker (C1); k to end (C2) // turn // sl1, k to marker, k4 (C2); k to end (C1)
Ridge 5: sl1, k to 5 sts bef marker (C1); k to end (C2) // turn // sl1, k to marker, k5 (C2); k to end (C1)
Ridge 6: sl1, k2tog, k to 4 sts bef marker (C1); k to last 3 sts, ssk, k1, (C2) // turn // sl1, k to marker, k4 (C2); k to end (C1)
Ridge 7: sl1, k to 3 sts bef marker (C1); k to end (C2) // turn // sl1, k to marker, k3 (C2); k to end (C1)
Ridge 8: sl1, k to 2 sts bef marker (C1); k to end (C2) // turn // sl1, k to marker, k2 (C2); k to end (C1)
Ridge 9: sl1, k to 1 st bef marker (C1); k to end (C2) // turn // sl1, k to marker, k1 (C2); k to end (C1)
Ridge 10: sl1, k to marker (C1); k to end (C2) // turn // sl1, k to marker, k5 (C2); k to end (C1)
Ridge 11: sl1, k2tog, k to marker, k1 (C1); k to last 3 sts, ssk, k1 (C2) // turn // sl1, k to 1 st bef marker (C2); k to end (C1)
Ridge 12: sl1, k to marker, k2 (C1); k to end (C2) // turn // sl1, k to 2 sts bef marker (C2); k to end (C1)
Ridge 13: sl1, k to marker, k3 (C1); k to end (C2) // turn // sl1, k to 3 sts bef marker (C2); k to end (C1)
Ridge 14: sl1, k to marker, k4 (C1); k to end (C2) // turn // sl1, k to 4 sts bef marker (C2); k to end (C1)
Ridge 15: sl1, k to marker, k5 (C1); k to last end (C2) // turn // sl1, k to 5 sts bef marker (C2); k to end (C1)
Ridge 16: sl1, k2tog, k to marker, k4 (C1); k to last 3 sts, ssk, k1 (C2) // turn // sl1, k to 4 sts bef marker (C2); k to end (C1)
Ridge 17: sl1, k to marker, k3 (C1); k to end (C2) // turn // sl1, k to 3 sts bef marker (C2); k to end (C1)
Ridge 18: sl1, k to marker, k2 (C1); k to end (C2) // turn // sl1, k to 2 sts bef marker (C2); k to end (C1)
Ridge 19: sl1, k to marker, k1 (C1); k to end (C2) // turn // sl1, k to 1 st bef marker (C2); k to end (C1)
Ridge 20: sl1, k to marker (C1); k to end (C2) // turn // sl1, k to marker (C2); k to end (C1)

Chart of Cordillera Scarf - Free Knitting Pattern by Knitting and so on
Chart 2: Decreasing Part of Cordillera Scarf
Repeat until there are only 8 sts of each color left. Instead of a the last WS row bind off in pattern.
Weave in ends and block.

Cordillera Scarf - Free knitting pattern by Knitting and so on


This page was feature on Fiber Tuesday Link Party #51 by Ouicrochet and on the Knitting Love Monthly Link Party #8. Thank you!

Oui Crochet  Featured on Knitting Love Link Party with Jessie At Home and Underground Crafter

Freitag, 16. Oktober 2015

Vermicelli Autumn Wrap

This year I went to some yarn festivals for the first time ever and bought some beautiful hand-painted yarn. However, these yarns are always different, i.e. no two skeins are the same ... and one 100 gram skein is not enough for a nice big scarf that I love to wrap myself into when it's getting colder outside. That's why I got the idea of combining this yarn with a semi-solid yarn. This shows off the colors of the hand-painted or hand-dyed yarn even better.

Wide stripes of garter stitch show off the beautiful features of the hand-painted yarn while a lace pattern makes the most of the (semi-)solid yarn.

Vermicelli Autumn Wrap - Free Knitting Pattern by Knitting and so on

It's called Vermicelli because the lace pattern looks a bit like little caterpillars and because the brown color reminded me of one of my favorite autumn desserts - Vermicelles.

Creative Commons License
This work by Knitting and so on is licensed under a Creative Commons Attribution-NonCommercial-ShareAlike 4.0 International License.


Materials
  • 3.5 mm needles
  • 100 grams of yarn in color 1 (C1), here I used some beautiful hand-dyed yarn (by Wolleverliebt that I bought at Wollefestival).
  • 150 grams of yarn in color 2 (C2), here I used some semi-solid Wollmeise Pure Merino that I bought some years ago
  • tapestry needle to weave in ends

Construction

Vermicelli Autumn Wrap - Free Knitting Pattern by Knitting and so onThe vermicelli wrap forms a rectangle but is knitted diagonally. You start with only a few stitches and increase on both sides (part 1). During the next part the stitch count stays the same but you increase on one side and decrease on the other (part 2). When the scarf is long enough you decrease on both sides and finish (part 3).


Techniques


Instructions

Part 1

In color 1
CO4
R1: k all stitches
R2: kfb, k to last stitch, kfb
-> repeat 12 more times (i.e. you have knitted a total of 26 rows with C1 and there are 30 sts on your needles)

Color 2
Setup Row 1: k all stitches
Setup Row 2: kfb, p to last stitch, kfb
-> then knit chart 1 for the next 34 rows (i.e. you have knitted a total of 36 rows with C2 and now there are 66 sts on your needles)

Here's the pattern from chart 1 spelled out:
R1: k1, * k2tog, yo, k1 repeat from * until there is only one stitch left, k1
R2 and all even numbered rows: kfb, p to last stitch, kfb
R3: k2, * yo, k1, k2tog repeat from * until there are only two stitches left, k2
R5: k3, * k1, k2tog, yo repeat from * until there are three stitches left, k3

The pattern is a repeat of six rows - the charts show 12 rows of it to illustrate how to handle the increases or decreases.

Vermicelli Autumn Wrap - Free Knitting Pattern by Knitting and so on


Color 1
R1: k all stitches
R2: kfb, k to last stitch, kfb
-> repeat 11 more times (i.e. you have knitted 24 rows with C1 and there are now 90 stitches on your needles)

Color 2
Setup Row 1: k all stitches
Setup Row 2: kfb, p to last stitch, kfb
-> then knit chart 1 for the next 34 rows (i.e. you have knitted a total of 36 rows with C2 and now there are 126 sts on your needles)

Color 1
R1: k all stitches
R2: kfb, k to last stitch, kfb
-> repeat 11 more times (i.e. you have knitted 24 rows with C1 and there are now 150 stitches on your needles)

If you want your wrap to be wider you can repeat the last two stripes again.


Part 2

First stripe of part 2 with color 2
Setup Row 1: k all stitches
Setup Row 2: kfb, p to last stitch, kfb (-> now there are 152 stitches)
-> then knit chart 2 for the next 34 rows (i.e. you have knitted a total of 36 rows with C2, since there is always an decrease at the beginning of an even-numbered row and an increase at the end of it, the stitch count will from now on stay the same during part 2)

Here's the pattern of chart 2 spelled out
R1: k1, * k2tog, yo, k1 repeat from * until there is only one stitch left, k1
R2 and all even numbered rows: ssk, p to last stitch, kfb
R3: k2, * yo, k1, k2tog repeat from * to end
R5: k3, * k1, k2tog, yo repeat from * until there are two stitches left, k2


Color 1
R1: k all stitches
R2: ssk, k to last, kfb
-> repeat 11 more times (i.e. you have knitted 24 rows with C1)

Color 2
Setup Row 1: k all stitches
Setup Row 2: ssk, p to last stitch, kfb
-> then knit chart 2 for the next 34 rows (i.e. you have knitted a total of 36 rows with C2)

Repeat the last two stripes of color 1 and 2 until your wrap has the desired length.

Vermicelli Autumn Wrap - Free Knitting Pattern by Knitting and so on

Part 3

Color 1
R1: k all stitches
R2: ssk, k to last, k2tog
-> repeat 11 more times (i.e. you have knitted 24 rows with C1 - there are now 128 sts on your needles, i.e. if you subtract 2 edge stitches there are 126 stitches - a number that's divisible by 3)

Color 2
Setup Row 1: k all stitches
Setup Row 2: ssk, p to last stitch, k2tog
-> then knit chart 3 for the next 34 rows (i.e. you have knitted a total of 36 rows with C2, and there are 92 stitches on your needles)

Here's the pattern of chart 3 spelled out:
R1: k1, * k2tog, yo, k1 repeat from * until there is only one stitch left, k1
R2 and all even numbered rows: ssk, p to last stitch, k2tog
R3: k3, * yo, k1, k2tog repeat from * to end
R5: k2, * k1, k2tog, yo repeat from * until there are two stitches left, k2

Repeat these two stripes (color 1 and color 2) once more - now there are only 32 stitches left.

With color 1 repeat the following rows until there are only 4 stitches left
R1: k all stitches
R2: ssk, k to last, k2tog
Then bind off.

Weave in ends and block.


Freitag, 21. August 2015

Random Bubbles Lace Scarf

As light as gossamer and as delicate as flower petals - this scarf is knitted from only one 50 gram skein of lace weight yarn.

Exploring the random lace technique a bit further - I wanted to knit a shaped scarf. And to make the counting a bit easier, I thought I'd use the shaping of the Seifenblasen Lace Scarf - which worked quite well in the end. This means that random lace sections will be alternated with sections of garter stitch with short rows.

Please note: This is not a stitch-by-stitch pattern. The Random sections are knitted, well, at random – giving you a unique piece of knitware. Therefore, there are no detailed pattern instructions for these sections. However, the instructions give you rules and guidelines on how to produce a piece of random lace that looks similar to the one in the pictures.


Creative Commons License
This work by Knitting and so on is licensed under a Creative Commons Attribution-NonCommercial-ShareAlike 4.0 International License.


русский / Russian Version: lutik (Ravelry name) made a video (in Russian) explaining how to do this scarf. It's available on YouTube here.


Materials or What You Need to Knit
  • Yarn, I’d suggest something that blocks well (i.e. with a high percentage of wool) in fingering weight or finer. For the scarf in the pictures, I used a bit less than 50 grams of lace weight yarn Lace Top by Lana Stop 
  • Needles (a bit bigger than what the yarn calls for), I used 3.25 mm needles.
  • Tapestry needle to weave in ends
  • The ability and the willingness to count your stitches over and over again … since there are not pattern repeats or anything that could help, it’s easy to lose track of where you are in the row. This is a concentration exercise, i.e. NOT something that I would take to my local knitting group. Since it’s be impossible for me to follow a conversation and count stitches at the same time, it’d make me very unsocial :)
  • The patience to knit a piece that will look extremely crumpled and not very attractive, while you are knitting it. I will look so much better after blocking - see picture below. 


Techniques and Abbreviations


Instructions to knit the scarf

CO12 sts
Step 1: Knit one random lace section, i.e. 16 rows of random lace
Step 2: Knit one increasing short row section (see instructions below)
Repeat steps 1 and 2 until your scarf is about half as wide as you want it to be and knit another random lace section (16 rows of random lace)
(for me this was the case after 14 random lace sections)

Step 3: Knit a neutral short row section (see instructions below)
Step 4: Knit on random lace section, i.e. 16 rows of random lace

Step 5: Knit a decreasing short row section (see instructions below)
Step 6: Knit a random lace section, i.e. 16 rows of random lace
Repeat steps 5 and 6 until there are 12 sts on your needles (the number of increasing short row sections should be equal to the number of decreasing short row sections)

Bind off loosly.
Weave in ends and block.


How to Knit Random Lace Section
  • Basically, knit decreases and yarn-overs in a random manner and make sure that after a row you have the same number of stitches you started with. That’s it.
  • Distribute the increases and decreases evenly within one row, i.e. don’t make too many decreases before you do increases (and vice-versa) – or else your piece will look crooked – at least before blocking.
  • After a bit of trying, I only counted the increases and decreases, i.e. “plus one” for every yarn over and “minus one” for every decrease, and making sure that the count is zero at the end of a row. This worked fine for the first few random sections (i.e. section with less than 25 or so stitches), but after the rows got longer, it became difficult to keep track and I had to recount the row. I guess it doesn’t matter if you lose one stitch in a row, as long as you make it up in the next one.
  • To have a knit-effect on RS, I only did “knit-decreases” (e.g. k2tog, ssk, sl1-k2tog-psso) on RS and purl-decreases (e.g. p2tog, p2togtbl, p3tog) on WS. For increases I only did yarn overs or yarn over twice (instead of mk1-stitches) to get “lacy” holes.
  • To get a nice edging, I started every RS row with sl1 purl-wise and every WS row with sl1 knit-wise.
  • About 20-25 percent of my stitches per row were yarn overs – with of course the matching number of decreases. If you do more, the lace will look more delicate; if you do less, it will look more structure – but both that’s a question of taste.
  • As a last advice, do not overthink this! If you get your stitch count right (roughly), it is practically impossible to mess this up.

Short Row Section - Increasing
Before knitting the section, devide the number of on your needles stitches by 4. This is your number X for the coming short row section.
(Since the scarf is started with 12 sts, for the 1st short row section X is 3 (12/4=3), then there are 4 sts more on your needles and for the 2nd short row section X=4 (16/4=4), for the 3rd X=5 (20/4=5), for the 4th X=6 and so on.)

Ridge 1: sl1 (k-wise), k to end, turn, sl1 (p-wise), k to last 2 sts, kfb, k
Ridge 2: sl1 (k-wise), k up to and including Xth st before end, w+t, k to last 2 sts, kfb, k
Ridge 3: sl1 (k-wise), k up to and including Xth st before last wrap, w+t, k to last 2 sts, kfb, k
Ridge 4: sl1 (k-wise), k up to and including Xth st before last wrap, w+t, k to last 2 sts, kfb, k
Ridge 5: sl1 (k-wise), k to end (you can pick up the wraps, but since it's garter stitch you don't have to), turn, sl1 (p-wise), k to end
During this short row section your stitch count was increased by 4 stitches.

Short Row Section - Neutral
Devide the number of on your needles stitches by 4. This is your number X for the coming short row section. (Here X should be one higher as X for the last increasing section.)
Ridge 1: sl1 (k-wise), k to end, turn, sl1 (p-wise), k to end
Ridge 2: sl1 (k-wise), k up to and including Xth st before end, w+t, k to end
Ridge 3: sl1 (k-wise), k up to and including Xth st before last wrap, w+t, k to end
Ridge 4: sl1 (k-wise), k up to and including Xth st before last wrap, w+t, k to end
Ridge 5: sl1 (k-wise), k to end (you can pick up the wraps, but since it's garter stitch you don't have to), turn, sl1 (p-wise), k to end
The number of stitches wasn't changed.

Short Row Section - Decreasing
Before knitting the section, devide the number of on your needles stitches by 4. This is your number X for the coming short row section. (X for the first decreasing short row section should be equal to X in the neutral short row section - for the following sections, X will always be one less than for the section before.)
Ridge 1: sl1 (k-wise), k to end, turn, sl1 (p-wise), k to last 3 sts, k2tog, k
Ridge 2: sl1 (k-wise), k X sts, w+t, k to last 3 sts, k2tog, k
Ridge 3: sl1 (k-wise), k up to and including the last wrapped stitch, k X sts, w+t, k to last 3 sts, k2tog, k
Ridge 4: sl1 (k-wise), k up to and including the last wrapped stitch, k X sts, w+t, k to last 3 sts, k2tog, k
Ridge 5: sl1 (k-wise), k to end (you can pick up the wraps, but since it's garter stitch you don't have to), turn, sl1 (p-wise), k to end
During this short row section your stitch count was decreased by 4 stitches.


This design was featured at Oombawka Design Link & Share Wednesday - Link Party 108. Thank you!

Oombawka Design