Posts mit dem Label Scarf werden angezeigt. Alle Posts anzeigen

Freitag, 20. Juli 2018

Negative Spaces Scarf

I like experimenting with my knitting. At the same time I think limitations lead to (more) creative solutions and designs. One of my preferred limitations is that I do not like to cut my yarn before I've completely finished a knitted piece. So when I saw a picture of knitted “holes” somewhere on the internet, I resolved to find a way to do this without cutting yarn.
This scarf is knitted in garter stitch only, but with square shaped holes. Once you've mastered how to do the square holes, it's good TV or travel knitting.


This pattern contains a photo tutorial on how to knit the square holes without cutting the yarn, instructions on how to knit a small swatch to get the hang of the technique and of course the instructions to knit this scarf.

The PDF is 6 pages long and available for purchase


Materials
  • about 300 grams of lace weight yarn  – I used Wollmeise Lace – colorway “Pfefferminz Prinz”
  • 3.25 mm knitting needles - I used circulars, but straight needles will do as well
  • a removable stitch marker to mark the RS (scrap yarn or a safety pin works as well)
  • a tapestry needle to weave in ends

Gauge and Size
In garter stitch 10 ridges (i.e. 20 rows) gave 5 cm in height, 11 stitches gave 5 cm in width. This was measured on a unblocked piece.
The finished scarf measures about 42 cm in width and about 200 cm in length (blocked).


Necessary Skills
Besides plain garter stitch you need the following skills to complete this project:
  • Backwards Loop CO
  • k2togtbl - knitting two stitches together through the back loop

Donnerstag, 3. August 2017

Esprit de l'escalier

L'esprit de l'escalier was designed in July 2017 after I paid a visit to the Rohrspatz & Wollmeise store in Pfaffenhofen/Ilm while I stayed with a friend in Bavaria.

L'esprit de l'escalier is knitted sideways – mainly in garter stitch with an easy lace pattern. This scarf is designed to be knitted with one skein of Wollmeise Pure (or 150 grams of another fingering weight yarn). If you want yours to be bigger, you will need more yarn – in fact, I had to frog nearly half of my scarf, because I knitted one increasing tier too many.

I wanted something simple to show off the beautiful colors of this yarn, but not too boring, so I included some lacy rectangles. The lower edge forms a staircase pattern - hence the name L'Esprit de l'escalier (or staircase wit).


This pattern is available for purchase

The price is 4 EURO (plus VAT).


Materials
  • about 150 grams of fingering weight yarn - I used Wollmeise Pure (colorway "Campari Orange")
  • 3.25 mm needles
  • a removable stitch marker - scrap yarn or a safety PIN work as well
  • a tapestry needle to weave in ends
Size
Blocked the scarf measures about 165 cm from side to side. At its widest point (in the middle) it measures about 39 cm in width.


Necessary Skills
To knit this scarf, you need to know the following techniques:
  • Garter stitch
  • Yarn Over
  • K2tog
  • Knitted Cast-On


This post was featured on the Wednesday Link Party by Oombawkadesign Crochet. Thank you!

Mittwoch, 3. Mai 2017

Wedges Wrap

Combine your favorite colors to create a very special piece that will keep you warm – in winter as well as in summer nights. It's a rectangular wrap or wide scarf with a bold graphical pattern which is knitted with short rows and intarsia technique.

Wedges Wrap - knitting pattern by Knitting and so on

This pattern is available for purchase

The PDF includes a written version and a shorthand version of the pattern. It also contains a chart to show how the short rows stack up to form the wedges.


Materials
  • about 250 grams of DK weight yarn in your main color (I used Rico Essentials Merino DK, but other yarns will do as well)
  • about 100 grams of DK weight yarn in contrast color 1
  • about 100 grams of DK weight yarn in contrast color 2
  • about 100 grams of DK weight yarn in contrast color 3
  • 4.5mm knitting needles (I used circulars, but straight will do as well)
Wedges Wrap - knitting pattern by Knitting and so on


Size
Unblocked the scarf measures about 40 cm in width and 185 cm in length. I guess blocked it would be about 5 cm wider and 20 cm longer.
(Even though I'm a firm believer in blocking (it evens out the stitches and make a garment look better), I didn't block this wrap for a number of reasons. It was big enough already and since I used merino which stretches quite a bit. Beside the stitch tension looked good and (on a more practical note) the blocking mat I use wasn't quite big enough.)

Wedges Wrap - knitting pattern by Knitting and so on

Necessary Skills
Besides being able to knit plain garter stitch you need the following knitting skills to complete this wrap:
  • Short rows with wrap and turn
  • Intarsia
Helpful skills (but not absolutely necessary):
  • Weaving in ends while knitting
  • Stranding yarn upwards
Wedges Wrap - knitting pattern by Knitting and so on

Wedges Wrap - knitting pattern by Knitting and so on


This blogpost has been featured at New Tuesday Pin-spiration Link Party. Thank you!
Tuesday Pin-spiration Link Party

Donnerstag, 13. April 2017

Mermaid's Garden Scarf

This scarf was knitted as a birthday present for a friend of mine. She chose the yarn and I designed and knitted it. Short rows are used to create a light wavy pattern. Lace rows inbetween create a bubbly effect. Since it is basically all garter stitch with a simple lace pattern inbetween, it's easy to knit but has a stunning effect.


The pattern is available for purchase on


It contains written instructions as well as illustrations how the short rows stack up.


Besides garter stitch you need the following skills to knit this scarf:
  • Basic lace stitches: i.e yo (yarn over), k2tog (k2 together), ssk (slip slip knit)
  • Short rows with double stitches (also called German Short Rows): when you turn, bring yarn to the front and pull it back so that both legs of the stitch are visible on your neeedle, i.e. a double-stitch is created, then knit back as usual - when you have to knit the double-stitch, be careful to knit it as one stitch (see also this YouTube video by leethal knits).
    In addition, the pattern explains how to adapt it to use the "wrap and turn"-method, as well.


Materials needed to knit this scarf
  • about 200 grams of fingering weight yarn – something with a long color gradient (I used two skeins of Lang Yarns Jawoll Magic Dégradé), but a solid color will look fine, too
  • 3.5 mm needles – I used circulars, but straight needles will do as well
  • 5 stitch markers
  • a removable stitch marker can be used to mark the RS which is helpful when doing the short row sequences
  • a tapestry needle to weave in ends

Size
The finished piece measures about 46 cm in width and 170 cm in length.


This blogpost was featured at Oombawka Design's 190th Link & Share Wednesday Link Party. Thank you! 
Oombawka Design

Donnerstag, 30. März 2017

Candy Corners

Add a sparkle of color to your spring outfit with this light and playful scarf. It is easy to knit because it consists of garter stitch short rows alternated with a lace pattern. As with nearly all short row patterns, it's great to show off your variegated yarn.


This pattern is available for purchase 


The pattern PDF is 5 pages long and contains written instructions and some illustrations explaining the short rows.


Skills Needed
Besides the plain knit stitch (garter stitch) you need the following skills to knit this scarf:
  • Short rows with wrap and turn (w+t)
  • Decrease with slip-slip-knit (ssk), alternatively you can use a k2tog
  • Increase with yarn-over (yo)


Materials
  • 300 grams of DK weight yarn - the yarn I used for the scarf in the pictures is Austermann Step 6 Irish Rainbow Colors (link to the yarn's Ravelry page)
  • 4mm needles (straight or circulars)
  • 1 stitch marker
  • tapestry needle to weave in ends


Gauge and Size
Unblocked my gauge was as follows: 10 sts and 21 rows gave 5 cm. Unblocked the scarf measured 140 cm x 33 cm, blocked it grew to 170 cm x 36 cm


This pattern was featured at Oombawka Design's 188th Link and Share Wednesday Link Party and at the Crafty Love Link Party #21 at the Undergroud Crafter. Thank you!

Oombawka Design

Sonntag, 16. Oktober 2016

Bauklötze Scarf


Do you want a fun accessory that's perfect for autumn - here's the pattern for you: a scarf with an interesting graphic effect, that is great for variegated yarn. It is very easy to knit - basically garter stitch only - except for the stitches connecting one piece to another. Joined as you go, so no sewing pieces in the end. The only finishing techniques you need, is weaving in your ends.

As usual, I had some difficulties in finding a name for this scarf - so again I asked the members of knittingparadise.com for suggestions (here's the link to the thread), I loved some of the suggestions but in the end I decided to go for the bricks theme (suggested several times) - but I used a different language :) - "Bauklötze" is the German word for building bricks or toy bricks.


Creative Commons License
This work by Knitting and so on is licensed under a Creative Commons Attribution-NonCommercial-ShareAlike 4.0 International License.


German Version: Eine deutsche Version dieser Anleitung gibt es in diesem Blogbeitrag.

 
Materials
  • about 200 grams of bulky yarn
  • 7mm needles (straight or circular)
  • tapestry needle to weave in ends
 
 
Techniques
  • Knitted CO: a method to cast on stitches at the end of a row, as shown in this video by VeryPinkKnits.
  • Pickup and knit stitches (from side): insert the right hand needle into the upper bump of the last stitch of the row (photos 1 and 2), and draw your yarn through the loop (photos 3 and 4)
 
  • Pick up and connect (with a bind-off row): When you've turned your piece insert the left hand needle from below into the front leg of the bind off stitch (photo 1), then - as if to k2tog - insert the left hand needle into the first stitch on the needle and into the leg of the bind off stitch (photo 2) and draw your yarn through both loops (photo 3). In the pattern this sequence will be called (k2tog-connect).
 

Gauge and Measurements

In garter stitch, about 13 stitches equal 10 cm in width - and 7 ridges (14 rows) equal 5 cm in height. My finished scarf (unblocked) is about 22 cm wide and 186 long (I knitted 8 blocks).

 
General Construction
 
The picture on the right shows the general construction of this scarf. It consists of a number of blocks that in turn consists of 4 rectangles.
 
Each rectangle is 18 stitches wide and 12 garter stitch ridges high. For each block the rectangles are knit in the sequence A, B, C, D. The rectangles are connected to each other
  • either by picking up and knitting stitches from the side or top of the last rectangle
  • or by picking up and connecting with stitches from a bind-off.
 
Instructions
 
Block 1
 
Rectangle A
CO 18 (with knitted CO)
Knit 11 ridges of garter stitch (knit all stitches)
Last row: BO all except last stitch
 
Rectangle B
CO5 (with knitted CO)
Knit 6, pick up and knit 12 sts from the side of rectangle A (your piece should now look similar to photo 1)
Knit 11 ridges of garter stitch
Last row: BO all except last stitch
 
Rectangle C
Pick up and knit 12 stitches from the side of rectangle B, CO5 (with knitted CO) (your piece should now look similar to photo 2)
Knit 11 rigdes of garter stitch
Last row: BO all except last stitch


Rectangle D
Pick up and knit 12 stitches from the side of rectangle C, CO5 (with knitted CO) (your piece should now look similar to photo 3)
Row 1: k2tog-connect, k to end (connect your first row to the 12th stitch of rectangle A counted from the left hand edge of the piece, see photo 4)
Row 2: k all
Repeat rows 1 and 2 ten more times - after a few rows your piece should look similar to photo 4
Row 13: k2tog-connect, BO all except last stitch 
 
 
Block 2
 
Rectangle A
Pick up and knit 17 stitches from rectangles D and C of the block below
Knit 11 ridges of garter stitch
Last row: BO all except last stitch
 
Rectangle B
CO5 (with knitted CO)
Knit 6, pick up and knit 12 from rectangle A
Row 1: k2tog-connect to BO of rectangle C of block below, k to end (start to connect right next to the last picked up stitch from rectangle A, i.e. don't leave a gap)
Row 2: k all
Repeat rows 1 and 2 ten more times
Last row: BO all except last stitch
  
Rectangle C = Rectangle C of block 1
Pick up and knit 12 stitches from the side of rectangle B, CO5 (with knitted CO)
Knit 11 rigdes of garter stitch
Last row: BO all except last stitch
 
Rectangle D = Rectangle D of block 1
Pick up and knit 12 stitches from the side of rectangle C, CO5 (with knitted CO) (your piece should now look similar to photo 3)
Row 1: k2tog-connect, k to end (connect your first row to the 12th stitch counted of rectangle A from the left hand side edge of the piece)
Row 2: k all
Repeat rows 1 and 2 ten more times
Row 13: k2tog-connect, BO all except last stitch 
 
Repeat block 2 until your scarf is as long as you want it.
 
In the last block change row 13 of rectangle D as follows:
Row 13: k2tog-connect, BO all
 
I knitted a total of 8 rectangles.
 
Weave in ends and block lightly.
 

Donnerstag, 1. September 2016

Checkered Lace Scarf

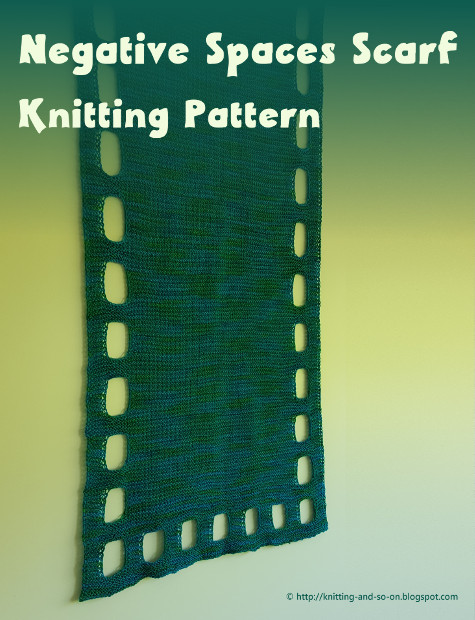
In preparation for autumn, my mum asked me to knit a new black scarf for her to match her black mitts.

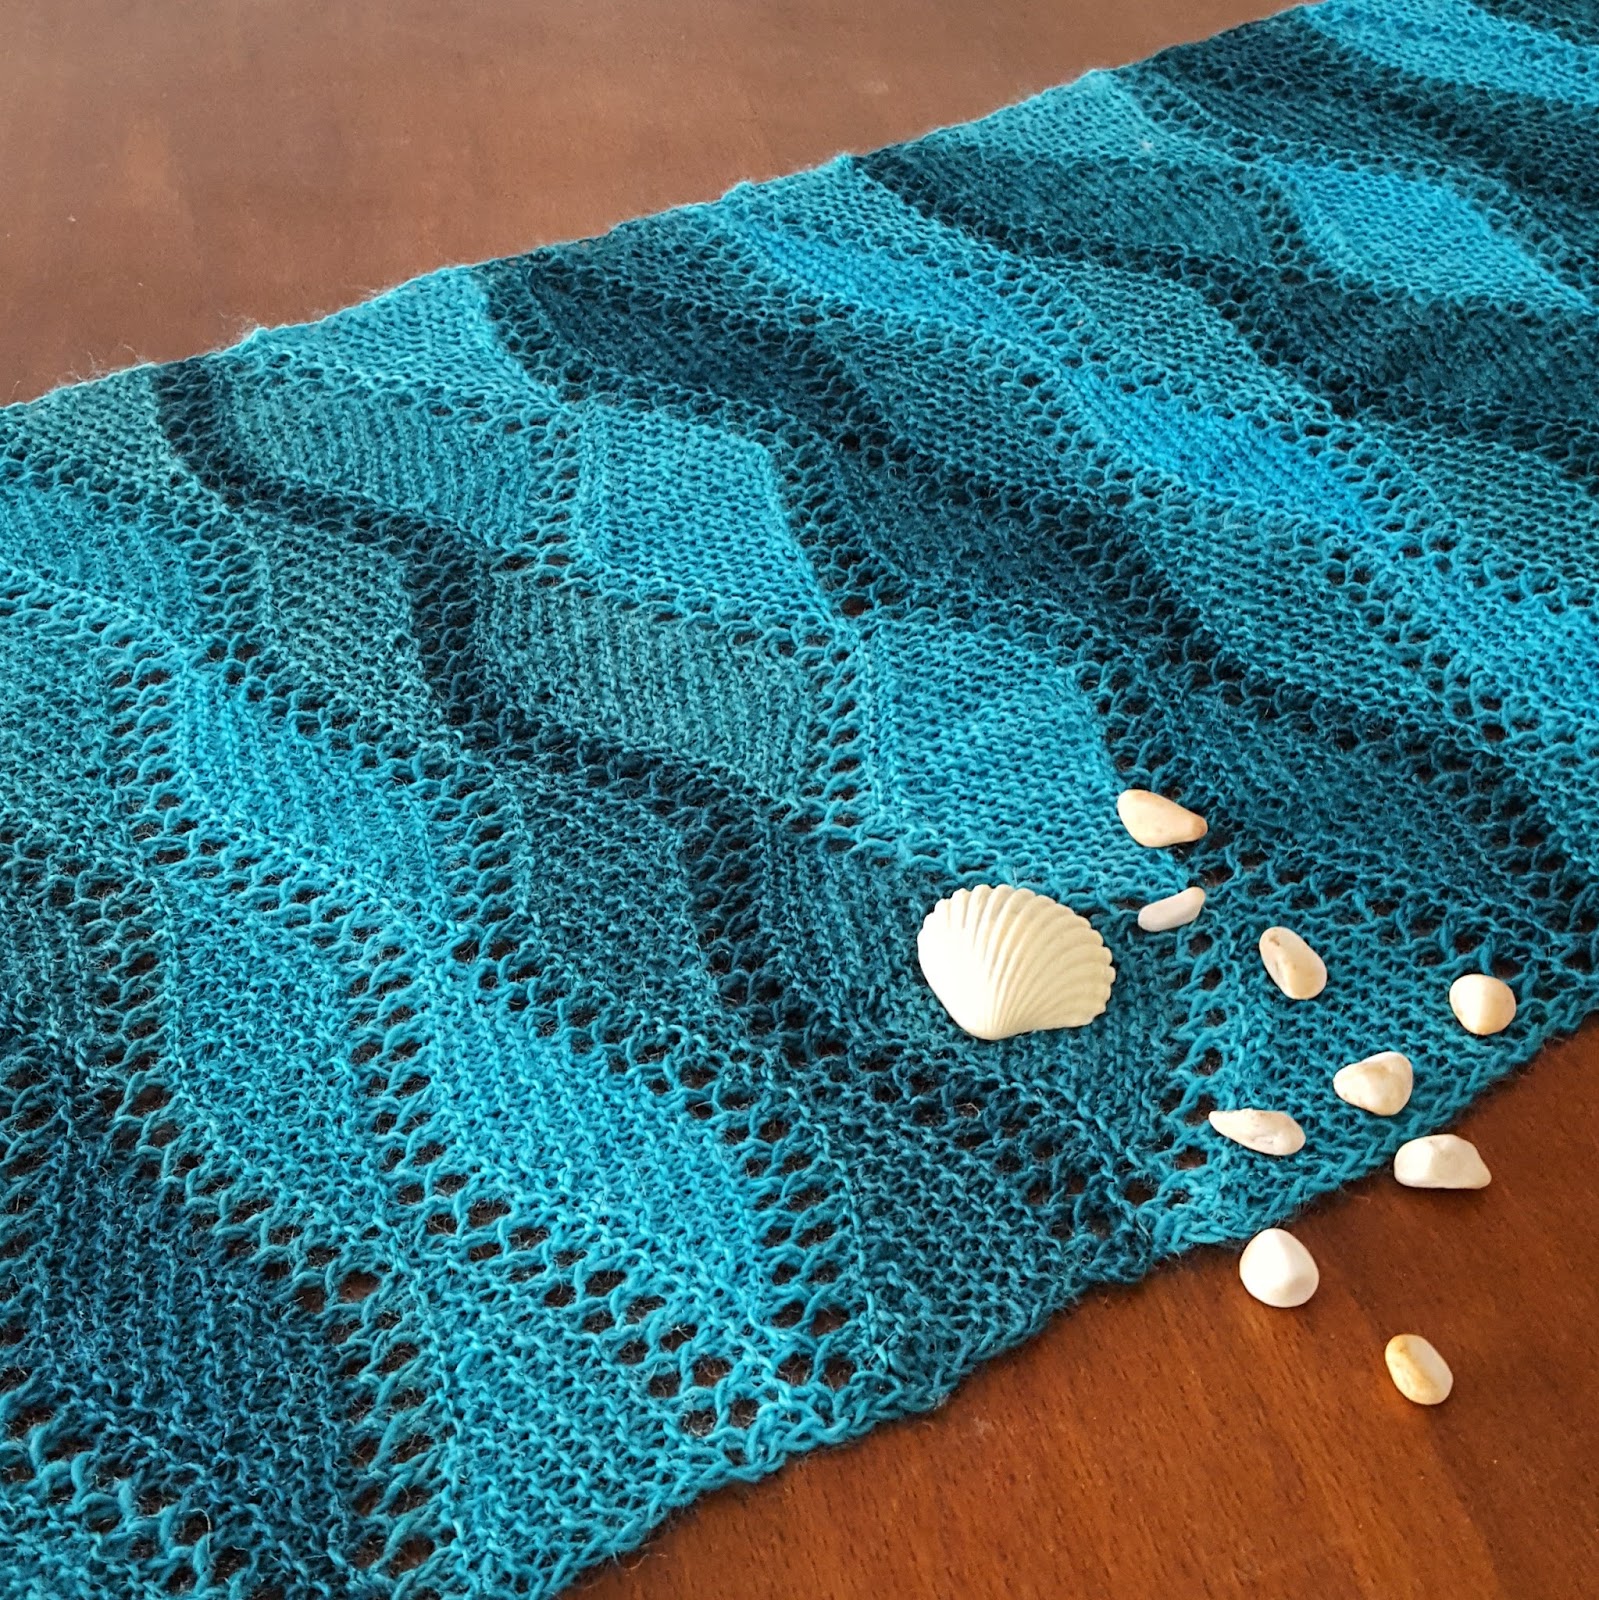
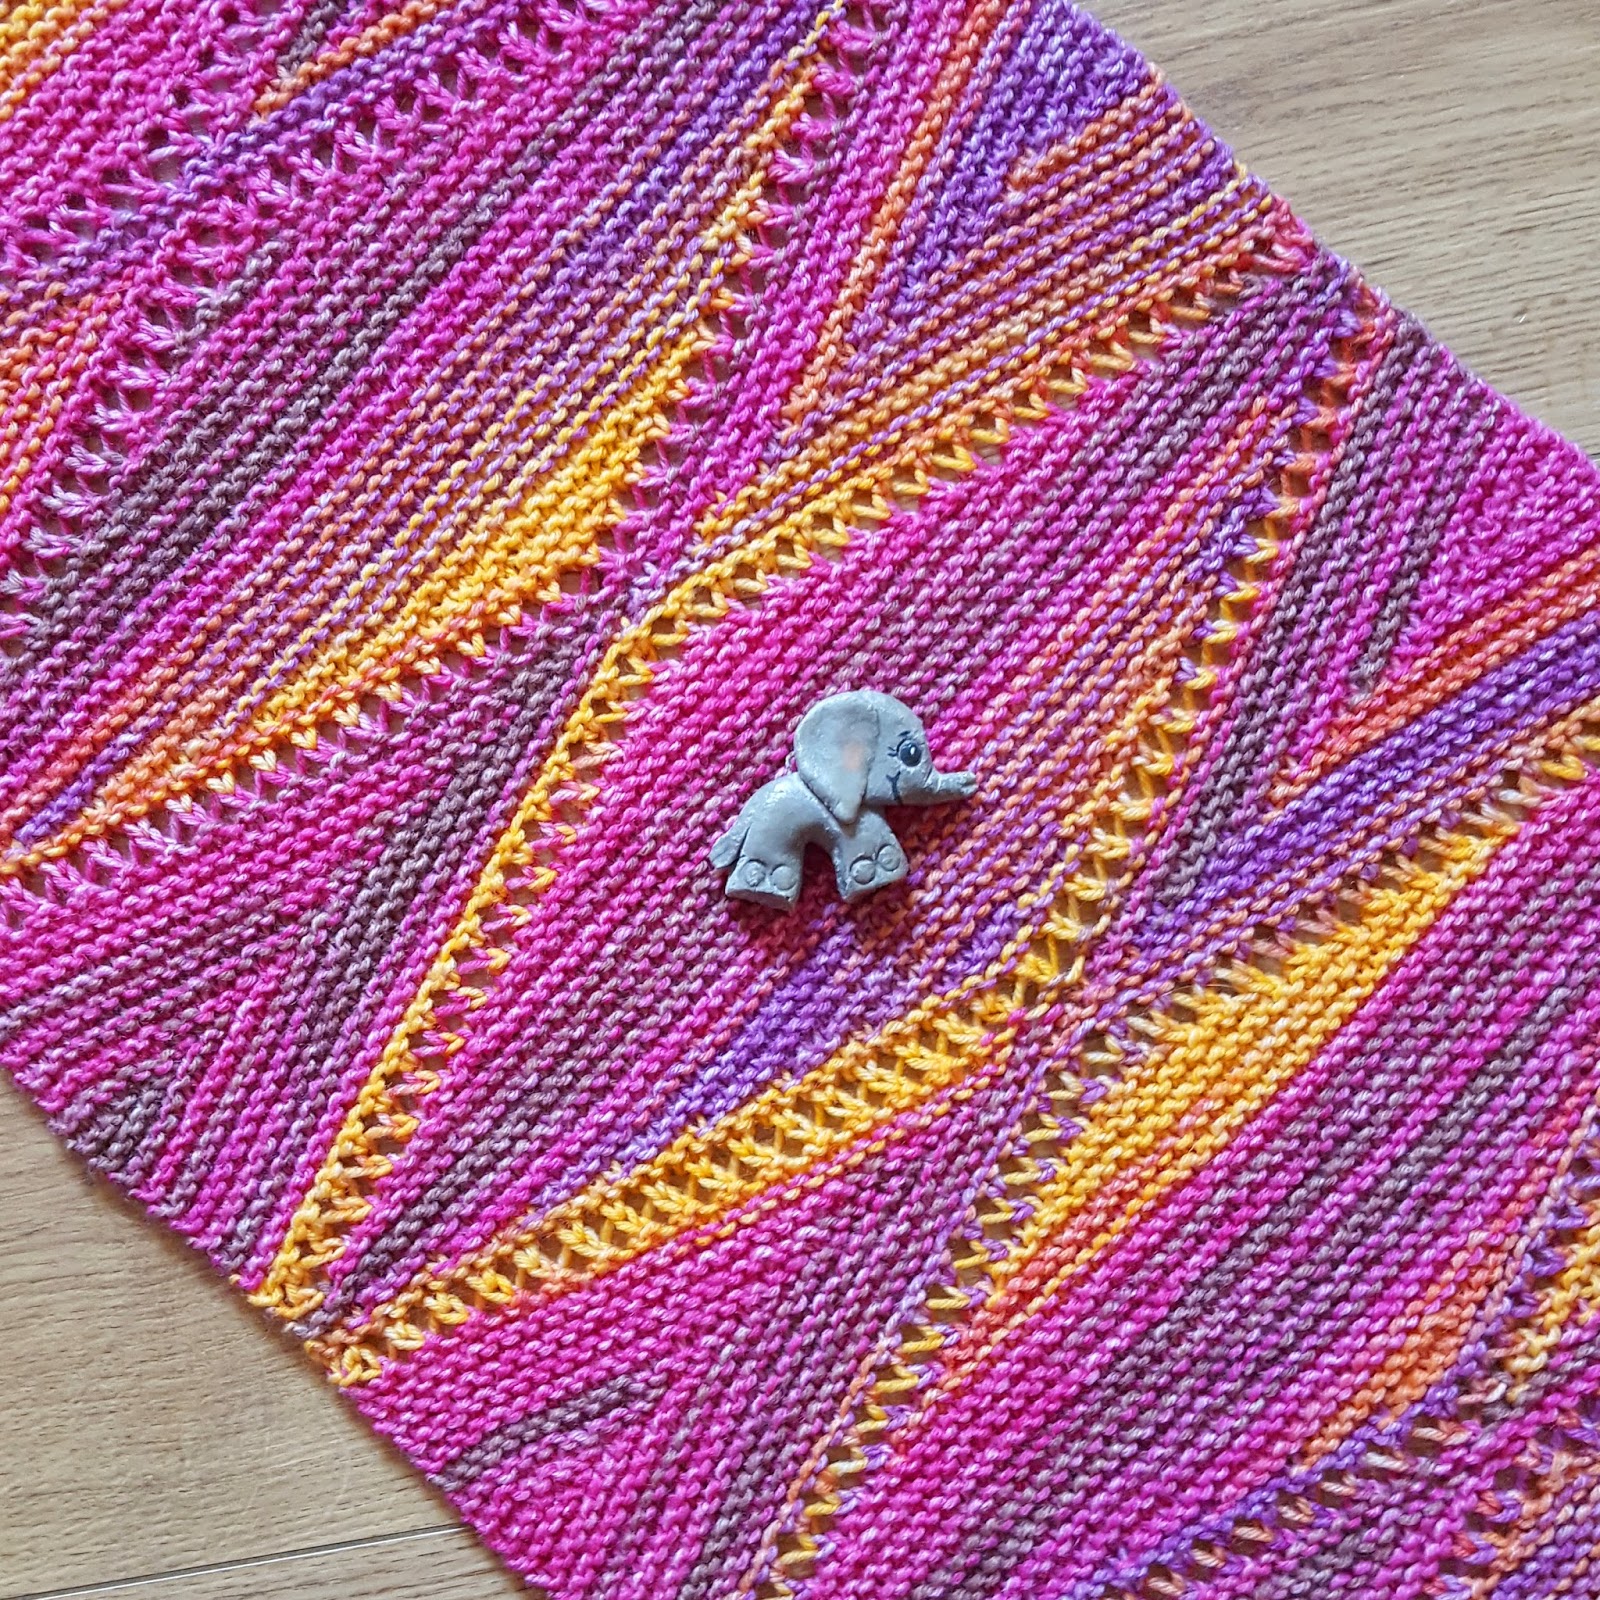
I wanted to do something no completely black, so I tried to introduce some kind of "pattern" with lace stitches to loosen up the black a bit. I ended up with a checkered pattern, with rectangles of lace alternating with garter-stitch-only rectangles.

The pattern looks the same from RS and WS, i.e. it is completely reversible.

Checkered Lace Scarf - free knitting pattern by Knitting and so on


Creative Commons License
This work by Knitting and so on is licensed under a Creative Commons Attribution-NonCommercial-ShareAlike 4.0 International License.


Materials
  • 150 to 200 grams of fingering weight yarn
  • 3.5mm needles
  • 4 stitch markers
  • a tapestry needle to weave in ends

Construction

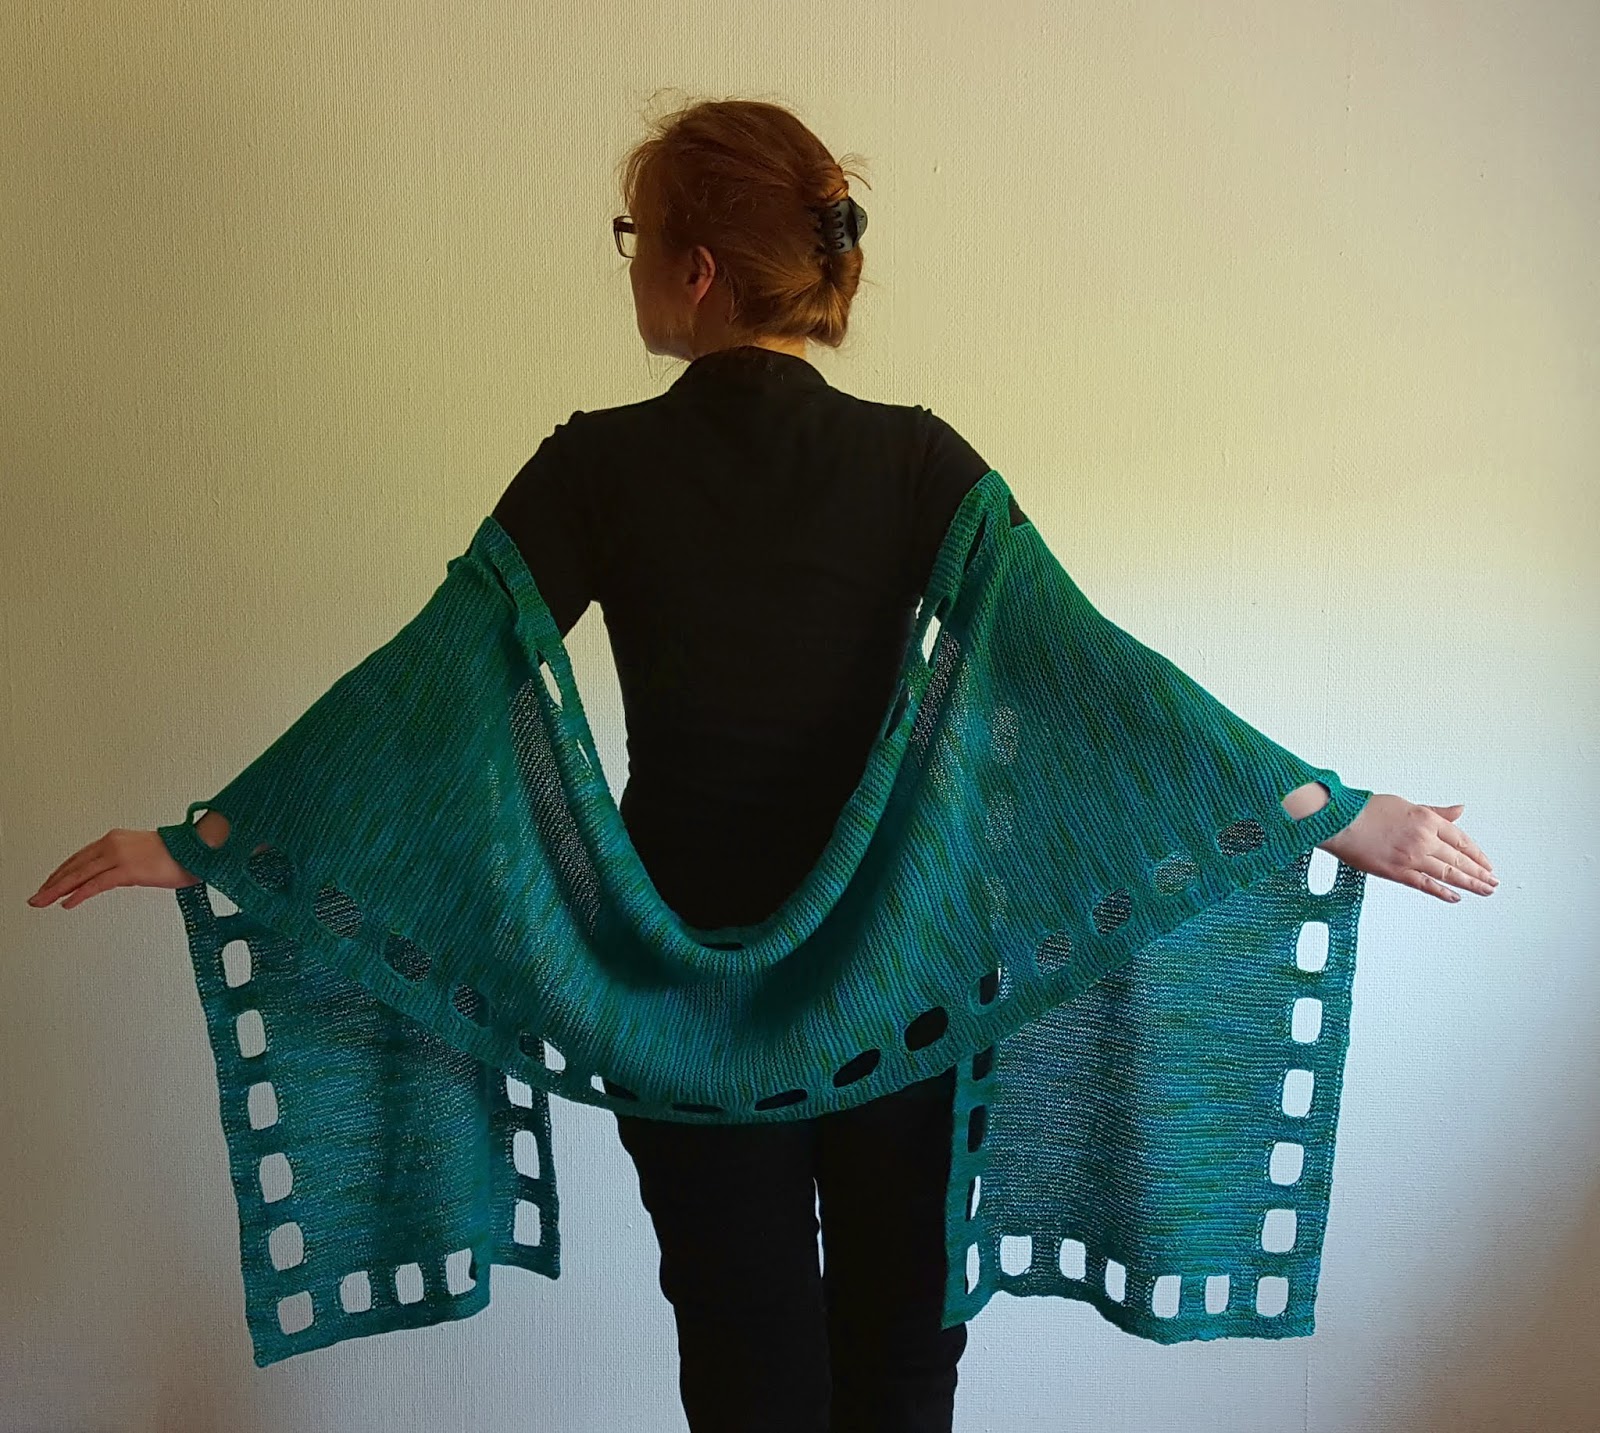
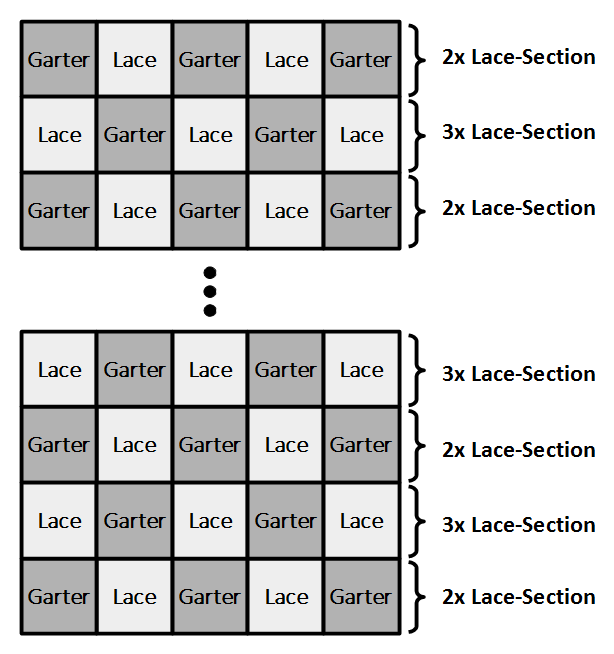
The scarf consists of 5 squares (or nearly squares) in width - alternating garter stitch squares with lace squares. The arrangement of the squares is shown in the picture below.


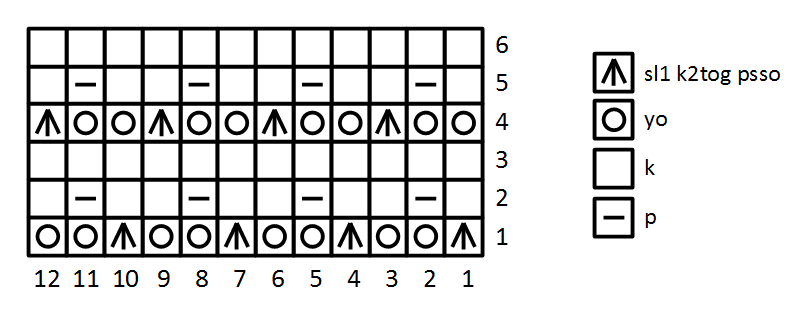
How to Knit the Lace Squares

Row 1: * sl1, k2tog, psso, yo twice, repeat from *
Row 2: * k1 p1 into double yo, k1, repeat from *
Row 3: k all
Row 4: * sl1, k2tog, psso, yo twice, repeat from *
Row 5: * k1 p1 into double yo, k1, repeat from *
Row 6: k all


When knitting one of the side rectangles, the lace part is widened with 2 edge stitches.


Checkered Lace Scarf - free knitting pattern by Knitting and so on


Instructions

CO64
Setup Row: sl1 k13, pm (= place marker), k12, pm, k12, pm, k12, pm, k14

Since the pattern is reversible and looks the same from RS and WS, I'd advise you to mark the RS as soon as possible.

2x Lace Section
Row 1a (RS): sl1, k to marker, * sl1, k2tog, psso, yo twice, repeat from * until you reach the marker, k to next marker, * sl1, k2tog, psso, yo twice, repeat from * until you reach the marker, k to end
Row 2a (WS): sl1, k to marker, * k1 p1 into double yo, k1, repeat from * until you reach the marker, k to marker, * k1 p1 into double yo, k1, repeat from * until you reach the marker, k to end
Row 3a (RS):  sl1, k all
Row 4a (WS): sl1, k to marker, * sl1, k2tog, psso, yo twice, repeat from * until you reach the marker, k to next marker, * sl1, k2tog, psso, yo twice, repeat from * until you reach the marker, k to end
Row 5a (RS): sl1, k to marker, * k1 p1 into double yo, k1, repeat from * until you reach the marker, k to marker, * k1 p1 into double yo, k1, repeat from * until you reach the marker, k to end
Row 6a (WS): sl1, k all
Knit rows 1a to 6a two more times
Inbetween row (RS): sl1, k all

3x Lace-Section
Row 1b (WS): sl1, k1 * sl1, k2tog, psso, yo twice, repeat from * until you reach the marker, k to marker, * sl1, k2tog, psso, yo twice, repeat from * until you reach the marker, k to marker, * sl1, k2tog, psso, yo twice, repeat from * until there are only 2 sts left, k2
Row 2b (RS): sl1, k1, * k1 p1 into double yo, k1, repeat from * until you reach the marker, k to marker, * k1 p1 into double yo, k1, repeat from * until you reach the marker, k to marker, * k1 p1 into double yo, k1, repeat from * until there are only 2 sts left, k2
Row 3b (WS): sl1, k all
Row 4b (RS):  sl1, k1 * sl1, k2tog, psso, yo twice, repeat from * until you reach the marker, k to marker, * sl1, k2tog, psso, yo twice, repeat from * until you reach the marker, k to marker, * sl1, k2tog, psso, yo twice, repeat from * until there are only 2 sts left, k2
Row 5b (WS): sl1, k1, * k1 p1 into double yo, k1, repeat from * until you reach the marker, k to marker, * k1 p1 into double yo, k1, repeat from * until you reach the marker, k to marker, * k1 p1 into double yo, k1, repeat from * until there are only 2 sts left, k2
Row 6b (RS): sl1, k all
Knit rows 1b to 6b two more times
Inbetween row (WS): sl1, k all

Repeat alternating 2x Lace-Sections and 3xLace-Sections until the scarf is about as long as you'd like it.

End with 2x Lace-Section as follows
Row 1a (RS): sl1, k to marker, * sl1, k2tog, psso, yo twice, repeat from * until you reach the marker, k to next marker, * sl1, k2tog, psso, yo twice, repeat from * until you reach the marker, k to end
Row 2a (WS): sl1, k to marker, * k1 p1 into double yo, k1, repeat from * until you reach the marker, k to marker, * k1 p1 into double yo, k1, repeat from * until you reach the marker, k to end
Row 3a (RS):  sl1, k all
Row 4a (WS): sl1, k to marker, * sl1, k2tog, psso, yo twice, repeat from * until you reach the marker, k to next marker, * sl1, k2tog, psso, yo twice, repeat from * until you reach the marker, k to end
Row 5a (RS): sl1, k to marker, * k1 p1 into double yo, k1, repeat from * until you reach the marker, k to marker, * k1 p1 into double yo, k1, repeat from * until you reach the marker, k to end
Row 6a (WS): sl1, k all
Knit rows 1a to 6a two more times
BO loosely.

Weave in ends and block gently.

Checkered Lace Scarf - free knitting pattern by Knitting and so on