Posts mit dem Label Socks werden angezeigt. Alle Posts anzeigen

Montag, 26. Dezember 2016

An Idea for Knitted Socks

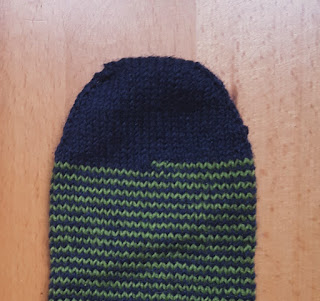
In this frosty winter weather, nice wollen socks are a comfort for cold feet. That's why I am currently knitting socks, socks and even more socks. I also wanted to try a few different techniques for knitting socks. The helix knitting allows for jogless stripes and is great to use up leftovers of sock yarn that are not enough for a complete pair of socks.


This is definitely NOT a complete pattern, but a sketch or idea for a pair of socks that explains some points to pay attention to when knitting socks with this helix knitting technique.


Creative Commons License
This work by Knitting and so on is licensed under a Creative Commons Attribution-NonCommercial-ShareAlike 4.0 International License.


Materials
  • about 60 to 70 grams of fingering weight yarn
  • 3mm dpns (I usually distribute my stitches on four needles when knitting socks)
  • scrap yarn for afterthought heel
  • a tapestry needle to weave in ends

Techniques


"Instructions" or what to bear in mind

Knit a toe in one color and distribute your stitches on four needles. After finishing the toe, skip one needle and start the 2nd color in the middle of the sole side of your sock (see photo on the right hand side).


Knit two needles with the 2nd color, then go back to the 1st color yarn and knit two needles with your 1st color. Switch to the needle where the yarn of the 2nd color is currently and knit two needles from there. Go on alternating between both colors.

For this kind of helix knitting you need a heel that does not rely on rows on the top of the foot. The only heel with this property that I know of is the afterthought heel. Make sure to insert the scrap yarn for the afterthought heel after knitting the two heel needles in one color, i.e. do not insert the scrap yarn for the afterthought heel over a color change.

Then go on with your helix pattern - make sure to end the 2nd color also in the middle of the back of the sock. I used the first color to knit the rib and also to knit the afterthought heel.


Mittwoch, 10. August 2016

Bitilasana Yoga Socks

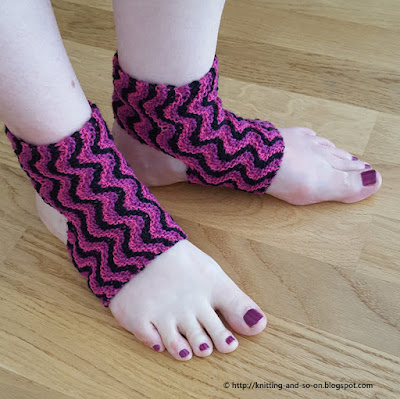
Recently, a friend asked me to knit some yoga socks for her – she only specified the colors she wanted: black and fuchsia. So, first of all I went stash-diving and found that I had three yarns (in fingering weight) that would fit that color scheme – and then I thought about the design. As usual, I wanted something without any yarn cutting while knitting one piece. Unfortunately, I didn’t reach that specific goal but nevertheless, I quite like the look of these yoga socks.

This pattern describes how to do this in three colors. Of course you can adjust it and knit it only with one yarn or in two colors. I guess it would look interesting with some variegated sock yarn (and with one yarn you wouldn’t even have to break your yarn while knitting one sock :)

Bitilasana Yoga Socks - free knitting pattern by Knitting and so on

As to the name: the wavy lines reminded me of the cat-cow-sequence in yoga; and Bitilasana is the name for cow pose.

Creative Commons License
This work by Knitting and so on is licensed under a Creative Commons Attribution-NonCommercial-ShareAlike 4.0 International License.


Materials
  • a total of about 30 grams of fingering weight yarn in 3 colors
  • 3 knitting needles (3mm), it’s best to use double pointed needles (e.g. one circular and one straight needle)
  • a tapestry needle for grafting and to weave in ends
  • scrap yarn for crochet provisional CO
  • a crochet hook for crochet provisional CO

Bitilasana Yoga Socks - free knitting pattern by Knitting and so on


Techniques
  • Provisional Cast-On: My preferred method of a provisional cast-on is the crochet provisional CO – as shown in this YouTube Video
  • Grafting: Joni Coniglio has written a series on grafting (“5 Grafting Myths”) on the knitting daily blog. All her post can be found here: http://www.knittingdaily.com/author/joni-coniglio/).
    The techniques used here, can be found in this blog post.
  • Here's a short (!) description of the grafting techniques used for this pattern:
    • If you want to graft in garter stitch you can do it in two ways – depending on the way you hold your knitting and which yarn you’re using.
    • (1) If you do it with your working yarn (in case of this pattern the needle you knitted your last row with is the front needle), you’d want to have the knit valley in front and the purl ridge on the back needle.
      Here the formula is (in short): Front needle: knit slip, purl leave; back needle: knit slip, purl leave
      Or spelled out: 
      • First stitch: on front needle insert needle purlwise and leave stitch on the needle, on the back needle do the same 
      • For all following stitches:
        Front needle: insert needle knitwise and slip stitch from needle, insert needle purlwise into the next stitch and leave the stitch on your needle
        Back needle: do the same, i.e. insert needle knitwise and slip stitch from needle, insert needle purlwise into the next stitch and leave the stitch on your needle
    • (2) If you work with yarn that you kept when casting on your stitches (in case of this pattern, your front needle contains the stitches of the provisional CO), you’d want the purl ridge on the front needle and the knit valley on the back needle.
      • Here is the formula in short: Front needle: purl slip, knit leave; back needle: purl slip, knit leave
      • Or spelled out:
        First stitch: on front needle insert needle knitwise and leave stitch on the needle, on the back needle do the same
        For all following stitches:
        Front needle: insert needle purlwise and slip stitch from needle, insert needle knitwise into the next stitch and leave the stitch on your needle
        Back needle: do the same, i.e. insert needle purlwise and slip stitch from needle, insert needle knitwise into the next stitch and leave the stitch on your needle
    • (3) If you want to decrease a stitch while grafting, you need to push the … needle through two stitches instead of one, both when it’s left on the needle, and when you’re about to slip it off.
      E.g. when you want to decrease a stitch on your front needle in the middle of a row in garter stitch:
      • Front needle: insert needle knitwise and slip stitch (stitch before the decrease), insert needle purlwise through the next two stitches (the decrease) and leave on needle 
      • Back needle: insert needle knitwise and slip stitch from needle, insert needle purlwise into the next stitch and leave the stitch on your needle
      • Front needle: insert needle knitwise into the first two stitches (as if to k2tog) and slip from needle, insert needle purlwise into the next stitch and leave the stitch on your needle
      • Back needle: insert needle knitwise and slip stitch from needle, insert needle purlwise into the next stitch and leave the stitch on your needle

Gauge and What to Measure
Before starting to knit measure the circumference of your ankles. You will be asked to knit until you have reached half of that circumference.

Bitilasana Yoga Socks - free knitting pattern by Knitting and so on


General Construction
The picture below shows the general construction. You start with half of the intended lenght of the sock for the first provisional CO. Then you knit half of the sock's circumference and afterwards provisionally CO the other half of the intended stitches. The part that is knitted next is used to cover the back of the foot and the front part of your ankles (wide part in the middle).
When this is finished, the first provisional CO is grafted to the upper stitches creating the first tube of your sock. Then you continue in another narrow strip of horizontal ribs and finish with a second graft to complete the second part of the tube.


Instructions

Lower narrow part

With scrap yarn provisionally CO22 sts, leave a tail long enough to graft and knit the first row with colour 1.
With color 2:
Row 1 (RS): k1, * kfb k2, ssk, k2tog, k2, kfb, repeat from * until there is only one stitch left
Row 2 (WS): k all
With color 3:
Row 3 (RS): k1, * kfb k2, ssk, k2tog, k2, kfb, repeat from * until there is only one stitch left
Row 4 (WS): k all
With color 1:
Row 5 (RS): k1, * kfb k2, ssk, k2tog, k2, kfb, repeat from * until there is only one stitch left
Row 6 (WS): k all
With color 2:
Row 7 (RS): k1, * kfb k2, ssk, k2tog, k2, kfb, repeat from * until there is only one stitch left
Row 8 (WS): k all
With color 3:
Row 9 (RS): k1, * kfb k2, ssk, k2tog, k2, kfb, repeat from * until there is only one stitch left
Row 10 (WS): k all
Repeat rows 5 to 10 until the piece as long as half the circumference of your feet.


Wide part

With color 1:
Row 1 (RS): k1, * kfb k2, ssk, k2tog, k2, kfb, repeat from * until there is only one stitch left
Row 2 (WS): k all - on a third needle provisionally cast on 20 stitches and continue knitting row 2.
(see photos 1 and 2 in the illustration below).
With color 2:
Row 3 (RS): k1, * kfb k2, ssk, k2tog, k2, kfb, repeat from * until there is only one stitch left
Row 4 (WS): k all
With color 3:
Row 5 (RS): k1, * kfb k2, ssk, k2tog, k2, kfb, repeat from * until there is only one stitch left
Row 6 (WS): k all
With color 1:
Row 7 (RS): k1, * kfb k2, ssk, k2tog, k2, kfb, repeat from * until there is only one stitch left
Row 8 (WS): k all
With color 2:
Row 9 (RS): k1, * kfb k2, ssk, k2tog, k2, kfb, repeat from * until there is only one stitch left
Row 10 (WS): k all
With color 3:
Row 11 (RS): k1, * kfb k2, ssk, k2tog, k2, kfb, repeat from * until there is only one stitch left
Row 12 (WS): k all

Repeat rows 7 to 12 until the piece as long as the circumference of your feet.
Slip stitches to other side of the needle.

Put the first provisionally CO stitches on another needle (photo 3), fold it over (photo 4) and graft these 22 stitches to 20 of the that are on the working needle with the yarn tail in color 1.

The needle holding the stitches from the former provisional CO is now the front needle.
Use the grafting technique (2) as described above while decreasing the first and last stitch on your front needle (as described under grafting techniques (3) above).

Upper narrow part

With color 1:
Row 1 (RS): k1, * kfb k2, ssk, k2tog, k2, kfb, repeat from * until there is only one stitch left
Row 2 (WS): k all
With color 2:
Row 3 (RS): k1, * kfb k2, ssk, k2tog, k2, kfb, repeat from * until there is only one stitch left
Row 4 (WS): k all
With color 3:
Row 5 (RS): k1, * kfb k2, ssk, k2tog, k2, kfb, repeat from * until there is only one stitch left
Row 6 (WS): k all
Repeat rows 1 to 6 until you have reached the circumference of your feet - measuring from the second provisional CO 

Cut your yarn but leave a tail long enough for grafting.

Put the 20 stitches from the 2nd provisional CO on another needle (photo 5) and graft it to the 22 sts on the working needle (photo 6). The former working needle is your front needle while grafting
Use grafting technique (1) as described above and decrease the fifth stitch on the front needle and the fifth stitch before the last.

Weave in ends.

Make two.

Bitilasana Yoga Socks - free knitting pattern by Knitting and so on

Freitag, 10. Juni 2016

Undecided Slippers

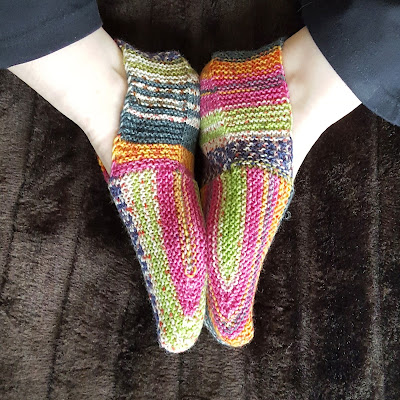
A pair of slippers is always useful to warm your feet. This design is mostly in garter stitch, but with an unusual construction that shows up nicely when you use selfstriping yarn.

Undecided Slippers - Free Knitting Pattern by Knitting and so on

Materials
  • 3mm circular needles (even though everything is knitted back and forth)
  • about 45 grams of fingering weight yarn
  • tapestry needle for grafting and to weave in ends
  • 3 stitch markers - at least one of them should be removable (e.g. a safety pin)

Techniques


Size, Gauge and What You Need to Measure

The pattern is written in a way that you can adapt it to the width and length of your feet. Before you start, measure around the widest point of your feet.

I had a gauge of 5 cm to 12 sts, and 5cm to 13 ridges in garter stitch (i.e. 26 rows in garter stitch) and 2 cm to 8 rows of stockinette stitch. With this gauge and with a CO of 2x18 sts, the tip bit is 12 cm long. You can adjust the length of this part by casting on more or less stitches.

Undecided Slippers - Free Knitting Pattern by Knitting and so on


Instructions

Part 1:

Magic CO 2x18 sts (i.e. 18 sts on each needles).

Now turn your needles around in a way that you're looking at the garter stitch bumps.
All rows of part 1 will be knitted in a U-shape, i.e. you knit the stitches on the first needle turn the piece upside down (this point will be called turning-point ("TP") and knit the stitches on the other needle. Then you turn your knitting to the WS and knit back.

Setup Row: k18 to TP, turn ktbl 18
Rows 1 to 9: sl1, k to 1 st before TP, kfb, turn, kfb, k to end (after a few rows your piece should look similar to photo no. 1)
Row 10: sl1, k to end
Row 11 = Row 1
Row 12 = Row 10
Row 13 = Row 1
Row 14, 15 = Row 10
Row 16 = Row 1
Row 17 and following: continue knitting rows without increases (i.e. Row 10) until the piece is wide enough to fit halfway around your feet (i.e. its half the width of the widest point of your feet) - and remember how many rows without increases you have knitted. Your piece should now look like photo no. 2. For me to reach a width of 11 cm, I had to knit 9 rows without decreases. Place a removable stitch marker in the first stitch of the next row. (This is where you will start to pick up the stitches for part 2.)

Knit the same number of rows without increases again.

Basically now rows 1 to 16 are knitted backwards with decreases instead of increases. i.e.

Row 35: sl , k to 2 sts before TP, ssk, turn, k2tog, k to end
Row 36, 37: sl1, k to end
Row 38 = Row 35
Row 39 = Row 36
Rows 40 to 50 = Row 35
Row 51: sl1, k18 (i.e. to the middle of the row) 
Break yarn leaving a tail of about 40 cm and start grafting in garter stitch. (See photo no. 3)
Graft both sides together in garter stitch. 
Part 2:

Starting at the point where you put the removable stitch marker, pick up and knit stitches around the rim of the tip (one stitch per garter stitch ridge) - see photo no. 4. 
Part 2 is knitted back and forth (not in rounds), so one row is knitted from the inside of the slipper and the next row from the outside.

Count the stitches and devide the number by 4 (this number will be called X). In row 1, you will place two markers, one X stitches away from the beginning of the row and another X stitches away from the end of the row.

Row 1 (inside) : sl1, k X-1 sts, place marker, p to last X sts, place marker, k to end
Row 2 (outside): sl1, k to end
Row 3 (inside): sl1 k to marker, p to marker, k to end
Row 4 (outside) = Row 2
Row 5 (inside) = Row 3
Row 6 (outside) = Row 2
Row 7 (inside) = Row 3
Row 8 (outside): sl1, kfb, k to last 2 sts, kfb, k1
Row 9 (inside) = Row 3
Repeat rows 2 to 9 once more
Then repeat rows 2 and 3 until the length of the slippers are  4 cm short of the total length of your feet.

Now the heel decreases are started:
Row 1 (outside): sl1, k to marker, ssk, k to 2 sts before marker, k2tog, k to end
Row 2 (inside): sl1, k to marker, p to marker, k to end
Repeat these 2 rows 3 more times.

Now, between the two markers there should be as many stitches left, as there were garter stitch ridges without increases or decreases in part 1.

From now on only one of the upper parts (in garter stitch) are worked, the stitches between the markers will be decreased row-by-row and the second garter stitch bit will not be worked until the kitchener stitch in the end.

Row 1: sl1, k to marker, ssk, turn, sl1, k to end
Repeat row 1 until there are only two stitches between the two markers

Then knit the following (last) row: sl1, k to 1 sts before marker, do a double central decrease

Now there should be the same number of stitches on both needles.
Graft in garter stitch.

Weave in ends.
Make two. 


Undecided Slippers - Free Knitting Pattern by Knitting and so on


This blogpost was featured at the Really Crafty Link Party #34, at the Linky Ladies Community Link Party No. 99 and at the New Tuesday Pin-spiration Link Party {36}. Thank you!

Linky Ladies Tuesday Pin-spiration Link Party

Montag, 18. April 2016

Geranium Knitted Slippers

I am currently going through a "slipper phase" and I am experimenting a bit with the idea. I've not come to different constructions (yet?), but there is no harm in knitting something not so complicated once in a while.

So, here's a variation for the April Knitted Slippers I published a few weeks ago, a seamless, toe-up pattern. Actually, the only difference lies in a triangular garter stitch pattern on the top of the foot.


Creative Commons License
This work by Knitting and so on is licensed under a Creative Commons Attribution-NonCommercial-ShareAlike 4.0 International License.


Materials
  • about 40 to 50 grams of fingering weight yarn
  • 3mm knitting needles (dpns or circular)
  • three stitch markers
  • a tapestry needle for grafting and to weave in ends

Techniques


Instructions

Make a cardboard template of your feet. Draw a line that marks half the length of your feet ("half line") - see picture on the right. The heel line will be drawn once you've finished knitting your toe.

Part 1 (Toe, worked in the round):

Magic CO 12 stitches per needle (your piece should look like illustration photo 1)
Knit one round and place one marker after 12 sts and another marker at the end of the round.

To get a shaped toe you first do 4 rounds with 4 increases each (around the markers). Then you alternate 1 neutral round (no increases) with 1 increase round (increases around the markers) twice. Then alternate 2 neutral rounds and 1 increase round - twice. Then alternate 3 neutral rounds and 1 increase round - and repeat this (3 neutral, 1 increase round) until the slipper is wide enough to fit your feet.

In order to mirror the increases in the toe, with decreases in the heel, I find that it helps to keep notes. I usually keep a tally: one normal tick for a neutral row, one squiggly line for an increase row.

Spelled out this means:
Round 0 (knitted directly after Magic CO): k12, place marker, k12, place marker (these markers will be called side markers).
Round 1 (Increase round): kfb, k to 1 st before marker kfb, slip marker, kfb, k to last st, kfb
Rounds 2 - 4: Increase rounds (= round 1)
Round 5: k all
Round 6: Increase round
Round 7: Neutral round (=  round 5)
Round 8: Increase round
Round 9, 10: Neutral round
Round 11: Increase round
Round 12, 13: Neutral round
Round 14: Increase round
Round 15, 16, 17: Neutral round
Round 18: Increase round
Repeat Rounds 15-18 until the piece is wide enough to fit your foot.

After you've finished your toe - measure its length. Then draw a line on your template that's the same distance from the heel end. This line is called toe line on the picture above. Heel and toe will have the same length since the heel decreases will be exactly like the toe increases - backwards.

Depending on the yarn, I had 56 or 60 stitches in total on my needles.


Part 2 (worked in the round):

Count the number of stitches on your needles. Divide by 4 and remember this number. (For 56 stitches, this number was 14 - for 60 stitches in total, it was 15.)

When you knit the first round, knit the calculated number of stitches, place a marker here ("mid marker) and knit on. Leave the side markers in, they will be needed later.

Knit rounds until your piece is about 5 cm short of the half line.

Triangle Pattern
Then start the triangle pattern (see schematic) around the mid marker. All stitches that are not noted in the schematic are knit stitches.

Spelled out this means
Round 1: k to 2 sts bef mid marker, p2, k to end
Round 2: k to mid marker, p2, k to end
Round 3: k to 4 sts bef mid marker, p4, k to end
Round 4: k to mid marker, p4
Round 5: k to 6 sts before mid marker, p6, k to end
Round 6: k to mid marker, p6, k to end

I guess the general idea is clear, knit 2 more purl stitches to either side of the mid marker every second row.

Or put in general terms:
Round X (odd numbered round): k to X+1 sts before mid marker, p X sts, k to end
Round X+1 (even numbered round): k to mid marker, p X+1 sts, k to end

Go on until all stitches between the side markers have been purled at least once. End with an odd-numbered row.


Part 3 (worked in rows):

Row 0: Knit to mid marker and turn.
Row 1 (WS, inside): sl1, k to marker, p to marker, k to end of row marker and turn
Row 2 (RS, outside), sl1, k all (to end of row marker) and turn

Repeat rows 1 and 2 a total of 4 times

Row 9 (WS) = Row 1
Row 10 (RS), sl1, kfb, k to 2 sts before end, kfb, k1

Repeat rows 1 to 10 once more.

Repeat rows 1 and 2 until the piece is long enough to reach the heel line.

After a while you will see the end of row without the mid marker, so you can remove it.


Part 4a (Heel, worked in rows):

To get a shaped heel you have to decrease the part between the markers the same way that the increases in part 1 were done on one side of the toe.
This means that you will alternate between one decrease row and 3 normal rows (just as many times as you did for the toe), then twice alternate between one decrease row and 2 normal rows, then alternate twice one decrease row and one normal row, and then knit only decrease rows until there are only 12 stitches between your markers.

A normal row is knitted as follows:
Normal Row (RS): sl1, k all
Normal Row (WS): sl1, k to marker, slip marker, p to marker, slip marker, k to end.

And a decrease row is knitted as follows
Decrease row (RS): sl1, k to marker, slip marker, ssk, k to 2 bef marker, k2tog, slip marker, k to end
Decrease row (WS): sl1, k to marker, slip marker, p2tog, p to 2 bef marker, p2togtbl, slip marker, k to end

Assuming that you knitted 18 rows for the toe, the heel would be knitted as follows:
R1 (RS, decrease row): sl1, k to marker, slip marker, ssk, k to 2 bef marker, k2tog, slip marker, k to end
R2 (WS, normal row): sl1, k to marker, slip marker, p to marker, slip marker, k to end.
R3 (RS, normal row): sl1, k to end
R4 (WS, normal row): sl1, k to marker, slip marker, p to marker, slip marker, k to end.
R5 (RS, decrease row): sl1, k to marker, slip marker, ssk, k to 2 bef marker, k2tog, slip marker, k to end
R6 (WS, normal row): sl1, k to marker, slip marker, p to marker, slip marker, k to end.
R7 (RS, normal row): sl1, k to end
R8 (WS, decrease row):  sl1, k to marker, slip marker, p2tog, p to 2 bef marker, p2togtbl, slip marker, k to end
R9 (RS, normal row): sl1, k to end
R10 (WS, normal row): sl1, k to marker, slip marker, p to marker, slip marker, k to end.
R11 (RS, decrease row): sl1, k to marker, slip marker, ssk, k to 2 bef marker, k2tog, slip marker, k to end
R12 (WS, normal row): sl1, k to marker, slip marker, p to marker, slip marker, k to end.
R13 (RS, decrease row): sl1, k to marker, slip marker, ssk, k to 2 bef marker, k2tog, slip marker, k to end
R14 (WS, normal row): sl1, k to marker, slip marker, p to marker, slip marker, k to end.
R15 (RS, decrease row): sl1, k to marker, slip marker, ssk, k to 2 bef marker, k2tog, slip marker, k to end
R16 (WS. decrease row): sl1, k to marker, slip marker, p2tog, p to 2 bef marker, p2togtbl, slip marker, k to end
R17 (RS, decrease row): sl1, k to marker, slip marker, ssk, k to 2 bef marker, k2tog, slip marker, k to end
R18 (WS. decrease row): sl1, k to marker, slip marker, p2tog, p to 2 bef marker, p2togtbl, slip marker, k to end

Photos of working that kind of heel can be found in the April Knitted Slippers pattern on this blog.

Part 4b: Heel flap (worked in rows)

Now only one of the upper parts (in garter stitch) is worked, the stitches between the markers will be decreased row-by-row and the second garter stitch bit will not be worked until the kitchener stitch in the end.

Row 1: sl1, k to marker, ssk, turn, sl1, k to end
Repeat row 1 until there are only two stitches between the two markers

Then knit the following (last) row: sl1, k to 1 sts before marker, do a double central decrease

Now there should be the same number of stitches on both needles.
Graft in garter stitch.

Weave in ends.
Make two.


This pattern was featured at Purfylle Pinbellish Link Party No. 36 and on Awesome Life Friday #67. Thank you!
  Awesome Life Friday - I Was Featured!

Mittwoch, 6. April 2016

April Knitted Slippers

A cozy pair of slippers to warm your feet on a lazy afternoon at home. They also make great gifts for a loved one. 

The slippers are knitted from the toe up and without a seam. The sole is all in stockinette stitch while the upper part switches to garter stitch.

These slippers look best when knitted with some self-striping sock yarn.


Creative Commons License
This work by Knitting and so on is licensed under a Creative Commons Attribution-NonCommercial-ShareAlike 4.0 International License.


This pattern is also listed at AllFreeKnitting.com.


Materials
  • about 40 to 50 grams of fingering weight yarn
  • 3mm knitting needles (dpns or circular)
  • three stitch markers
  • a tapestry needle for grafting and to weave in ends

Techniques


Instructions

Make a cardboard template of your feet. Draw a line that marks half the length of your feet ("half line") - see picture on the right. The heel line will be drawn once you've finished knitting your toe.

Part 1 (Toe, worked in the round):

Magic CO 12 stitches per needle (your piece should look like illustration photo 1)
Knit one round and place one marker after 12 sts and another marker at the end of the round.

To get a shaped toe you first do 4 rounds with 4 increases each (around the markers). Then you alternate 1 neutral round (no increases) with 1 increase round (increases around the markers) twice. Then alternate 2 neutral rounds and 1 increase round - twice. Then alternate 3 neutral rounds and 1 increase round - and repeat this (3 neutral, 1 increase round) until the slipper is wide enough to fit your feet.

In order to mirror the increases in the toe, with decreases in the heel, I find that it helps to keep notes. I usually keep a tally: one normal tick for a neutral row, one squiggly line for an increase row.

Spelled out this means:
Round 0 (knitted directly after Magic CO): k12, place marker, k12, place marker
Round 1 (Increase round): kfb, k to 1 st before marker kfb, slip marker, kfb, k to last st, kfb
Rounds 2 - 4: Increase rounds (= round 1)
Round 5: k all stitches
Round 6: Increase round
Round 7: Neutral round (= round 5)
Round 8: Increase round
Round 9, 10: Neutral round
Round 11: Increase round
Round 12, 13: Neutral round
Round 14: Increase round
Round 15, 16, 17: Neutral round
Round 18: Increase round
Repeat Rounds 15-18 until the piece is wide enough to fit your foot.

After you've finished your toe - measure its length. Then draw a line on your template that's the same distance from the heel end. This line is called toe line on the picture above. Heel and toe will have the same length since the heel decreases will be exactly like the toe increases - backwards.

Depending on the yarn, I had 56 or 60 stitches in total on my needles.


Part 2 (worked in the round):
Knit rounds until your piece is long enough to reach the half line.
Leave the markers in, they will be needed later.

Part 3 (worked in rows):
Count the number of stitches on your needles. Divide by 4 and remember this number. (For 56 stitches, this number was 14 - for 60 stitches in total, it was 15.)

Row 0: Knit the calculated number of stitches, place a marker here ("end of row marker) and turn.
Row 1 (WS, inside): sl1, k to marker, p to marker, k to end of row marker and turn
Row 2 (RS, outside), sl1, k all (to end of row marker) and turn

Repeat rows 1 and 2 a total of 4 times

Row 9 (WS) = Row 1
Row 10 (RS), sl1, kfb, k to 2 sts before end, kfb, k1

Repeat rows 1 to 10 once more.

Repeat rows 1 and 2 until the piece is long enough to reach the heel line.

After a while you will see the end of row without the marker, so you can remove it.

Illustration Photos

Part 4a (Heel, worked in rows):

To get a shaped heel you have to decrease the part between the markers the same way that the increases in part 1 were done on one side of the toe.
This means that you will alternate between one decrease row and 3 normal rows (just as many times as you did for the toe), then twice alternate between one decrease row and 2 normal rows, then alternate twice one decrease row and one normal row, and then knit only decrease rows until there are only 12 stitches between your markers.

A normal row is knitted as follows:
Normal Row (RS): sl1, k all
Normal Row (WS): sl1, k to marker, slip marker, p to marker, slip marker, k to end.

And a decrease row is knitted as follows
Decrease row (RS): sl1, k to marker, slip marker, ssk, k to 2 bef marker, k2tog, slip marker, k to end
Decrease row (WS): sl1, k to marker, slip marker, p2tog, p to 2 bef marker, p2togtbl, slip marker, k to end

Photo illustration 2 shows how the piece should look after a while.

Assuming that you knitted 18 rows for the toe, the heel would be knitted as follows:
R1 (RS, decrease row): sl1, k to marker, slip marker, ssk, k to 2 bef marker, k2tog, slip marker, k to end
R2 (WS, normal row): sl1, k to marker, slip marker, p to marker, slip marker, k to end.
R3 (RS, normal row): sl1, k to end
R4 (WS, normal row): sl1, k to marker, slip marker, p to marker, slip marker, k to end.
R5 (RS, decrease row): sl1, k to marker, slip marker, ssk, k to 2 bef marker, k2tog, slip marker, k to end
R6 (WS, normal row): sl1, k to marker, slip marker, p to marker, slip marker, k to end.
R7 (RS, normal row): sl1, k to end
R8 (WS, decrease row):  sl1, k to marker, slip marker, p2tog, p to 2 bef marker, p2togtbl, slip marker, k to end
R9 (RS, normal row): sl1, k to end
R10 (WS, normal row): sl1, k to marker, slip marker, p to marker, slip marker, k to end.
R11 (RS, decrease row): sl1, k to marker, slip marker, ssk, k to 2 bef marker, k2tog, slip marker, k to end
R12 (WS, normal row): sl1, k to marker, slip marker, p to marker, slip marker, k to end.
R13 (RS, decrease row): sl1, k to marker, slip marker, ssk, k to 2 bef marker, k2tog, slip marker, k to end
R14 (WS, normal row): sl1, k to marker, slip marker, p to marker, slip marker, k to end.
R15 (RS, decrease row): sl1, k to marker, slip marker, ssk, k to 2 bef marker, k2tog, slip marker, k to end
R16 (WS. decrease row): sl1, k to marker, slip marker, p2tog, p to 2 bef marker, p2togtbl, slip marker, k to end
R17 (RS, decrease row): sl1, k to marker, slip marker, ssk, k to 2 bef marker, k2tog, slip marker, k to end
R18 (WS. decrease row): sl1, k to marker, slip marker, p2tog, p to 2 bef marker, p2togtbl, slip marker, k to end


Part 4b: Heel flap (worked in rows)

Now only one of the upper parts (in garter stitch) is worked, the stitches between the markers will be decreased row-by-row and the second garter stitch bit will not be worked until the kitchener stitch in the end.

Row 1: sl1, k to marker, ssk, turn, sl1, k to end
(Illustration photo 3 shows how the piece looks just before an ssk)
Repeat row 1 until there are only two stitches between the two markers

Then knit the following (last) row: sl1, k to 1 sts before marker, do a double central decrease

Illustration photo 4 shows how the piece should look just before the last row.

Now there should be the same number of stitches on both needles.
Graft in garter stitch.

Weave in ends.
Make two.


This blogpost was featured on Oombawkadesign Crochet's 144th Link and Share Wednesday. and at the New Tuesday PINspiration Link Party. Thank you!

Oombawka Design Tuesday Pin-spiration Link Party

Sonntag, 20. März 2016

Why take the easy way ...

… if there's a more complicated option on offer?


Sometimes I think that I am really too complicated. This time, I wanted to knit a pair of toe-up slippers - starting in stockinette and then changing to garter stitch on top but with stockinette on the soles. It looked great … but I hadn't foreseen that when switching from knitting in the round to knitting flat in garter stitch I would (at one of garter stitch parts) have to purl …

Another option would have been to just ignore the problem and do knitting rows - which would have resulted in a slight irregularity in the texture. But I didn't want that …

So I managed to have to knit garter stitch by doing purl rows only … I have to admit that I find this a bit tedious, even though I don't actually hate to purl like others seem to do.

Anyway, I do like the construction in general and I will finish this pair - even if it is rather a complicated way to get a garter stitch edging.
                                                   
Afterwards, I guess I will knit the same (sort of) slippers again - but this time without the problem of changing from knitting in the round and knitting flat in garter stitch.

Freitag, 11. März 2016

Osterspaziergang Socks

After some stressful months, I needed something hopeful ... That's why I decided to knit a pair of socks in fresh colors. Socks that look like spring is in the air. With a yarn in pastel colors and discreet and easy-to-knit lace pattern. The socks are knitted top-down with an afterthought heel.


Creative Commons License
This work by Knitting and so on is licensed under a Creative Commons Attribution-NonCommercial 4.0 International License.


The name "Osterspaziergang" (Easter walk) comes from a famous part of Faust (Part I). It starts like this:
Vom Eise befreit sind Strom und Bäche
Durch des Frühlings holden, belebenden Blick;
Im Tale grünet Hoffnungsglück;
... 
An english translation can be found here (scene II, rows 903ff.).


Materials
  • about 50 grams of fingering weight yarn (or more, depending on your foot size)
  • 2.5 mm dpns
  • scrap yarn (for the afterthought heel)
  • a tapestry needle to weave in ends

Gauge
12 sts to 4 cm, 16 rows to 4 cm

Special Techniques and Other Useful Information


Instructions

Use a stitch number that is a multiple of 4 (e.g. 56, 60 or 64).

Loosely CO the number of stitches advised by the sock knitting table and join in round.
I CO 60 stitches and  distributed the stitches on 3 needles.

Cuff
Knit 12 rows of ribbing: * k2 p2 repeat from * to end of round

Knit 6 repeats of the following pattern
Round 1: k all
Round 2: * k2tog yo k2 repeat from * to end of round
Round 3: k all
Round 4: k all
Round 5: * yo ssk k2 repeat from * to end of round
Round 6: k all
You can do more repeats if you want a longer cuff.

Foot
Knit half the stitches on your needles (for me these were 30 stitches) with scrap yarn, place marker, and slip these 30 stitches back to beginning of row.

Then knit repeats of the following 6 rows until the foot is as long a the desired total foot length minus 10 cm (toe and heel).

Round 1: k all
Round 2: k to marker; k2, * k2tog yo k2 repeat from * to end of round
Round 3: k all
Round 4: k all
Round 5: k to marker; k2, * yo ssk k2 repeat from * to end of round
Round 6: k all

Toe
My usual formula for toes is:

  • once: 1 decrease row, 3 normal rows (k all stitches)
  • twice: 1 decrease row, 2 normal rows
  • three times: 1 decrease row, 1 normal row
  • and then decrease rows only ... until there are only 24 sts in total, then graft in stockinette


This means
Round 1: k all
Round 2 (decrease row): * k1, ssk, to 3 bef marker, k2tog, k1 repeat from * to end of round
Round 3: k all
Round 4: k all
Round 5: k all
Round 6 = Row 2
Round 7: k all
Round 8: k all
Round 9 = Row 2
Round 10: k all
Round 11: k all
Round 12 = Row 2
Round 13: k all
Round 14 = Row 2
Round 15: k all
Round 16 = Row 2
Round 17: k all
Round 18 = Row 2
Repeat round 18 until there are only 24 sts on your needles
Graft in stockinette stitch.

Heel
Pick up the stitches of the rows directly below and above the scrap yarn. Then remove the scrap yarn.
In the first round pick up 2 or 3 stitches from the gap, i.e. between the upper and lower row.

Then I knitted the heel with the following formula

  • alternate 1 decrease row with 1 normal row (k all stitches)
  • ... until there are only 24 sts in total, then graft in stockinette

Or spelled out

Round 1: k all
Round 2 (decrease row): * k1, ssk, to 3 bef marker, k2tog, k1 repeat from * to end of round
Repeat rounds 1 to 2 until there are only 24 stitches left on your needles. Graft in stockinette stitch.

Weave in ends. Make two.