Sonntag, 18. Juni 2023

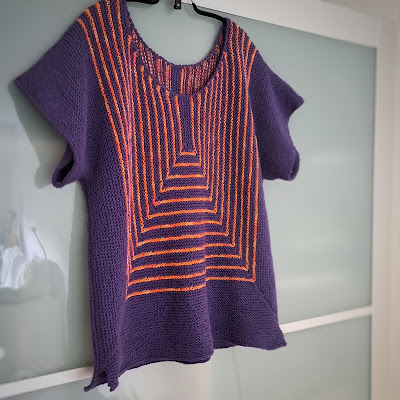
Art Deco Top

One of my favorite TV programs is the Great British Sewing Bee. It's not only very "feel-good" program with lovely contestants, it's also quite inspirational and also provides background information about the history of clothing. So when I saw episode 4 of season 7 of the Great British Sewing Bee (the  year before last) where the contestants had to sew a made to measure inspired by Frida Kahlo and especially the huipils that some of their designs were based on, I wanted to make something similar in knitting.

Even though the inspiration came (in a very roundabout manner) from Frida Kahlo and mexican Huipil garments, my finished top didn't look like it at all. And when somebody on Instagram said the top reminded them of Art Deco patterns, I loved it and it stuck as a name.

This is a boxy top with a round neckline, short sleeves and side slits at the bottom edge. It is started with a magic CO in the middle and knitted outwards to the side and bottom seams.

As with many of my sweater/top "patterns", this is NOT a row-by-row pattern for various sizes, but rather a rough recipe of the ideas behind the construction of this garment. I will give the numbers I used for myself as an example in purple.


Creative Commons License
This work by Knitting and so on is licensed under a Creative Commons Attribution-NonCommercial-ShareAlike 4.0 International License.


Materials

  • yarn: I used a total of 300 grams of Sports weight yarn, the purple yarn was from my first attempt of my Garter Stitch Summer top - that eventually got frogged, the orange yarn was leftovers from my Eifel Cowl - I can imagine that it would also look nice to knit the whole top in one variegated yarn
  • knitting needles: I used 3.5mm  circulars, (three pairs of circular needles, in the when front or back piece got big enough - one for each of the three edges)
  • a crochet hook of about the same size - for a crochet CO and for crocheting the neckline edge 
  • scrap yarn - as a stitch holder
  • stitch markers
  • a tapestry needle to weave in ends


Techniques & Definitions

  • Judy's Magic Cast-On is a technique that gives you live stitches on both sides of your needle - it is generally used for toe-up socks, but it can be used for other purposes as well. Here's a written description (from Knitty) and here's a YouTube-video by Cat Bordhi and another YouTube-video by Very Pink Knits. 
  • Pick up and knit: Picking up stitches from the side edge of your work as shown in this YouTube video by B.Hooked Crochet & Knitting
  • kfb: increasing by one stitch - by knitting into the front and back leg of a stitch; it is shown in this YouTube video by Knit Purl Hunter
  • kbf: a stitch that is symmetrical to a kfb; e.g. shown in this YouTube-video by Roxanne Richardson: https://youtu.be/OJMya9xaol4  (it's perfectly possible to do a kfb instead, I just prefered the symmetrical look for my stripe pattern)
  • Crochet CO: shown in this YouTube video by Knit Purl Hunter
  • Reverse Single Crochet (Crab Stitch): a crochet stitch that makes for a lovely edging - shown in this YouTube video by Tamara Kelly - Moogly
  • One garter stitch ridge equals two rows of garter stitch

Measuring, Calculating & Construction

The whole top has a boxy construction - based on a rectangles - that may not be the most flattering shape. If you want more shaping you could add short rows (maybe an underarm wedge) - however, this is not described here. Ideas to change the shape and dimensions of the piece can be found below in section "Other sizes".

Schematic - click on picture to enlarge

The top is constructed as follows:

  • each part (front & back) starts in the middle of the neckline with a magic CO;
  • then you will knit in an angled U-shape around this CO, with increases at the corners that form a rectangular pattern), if you knit according to the instructions, you will add five ridges to the length for each four ridges to the width on each side, i.e. the piece grows downwards and sideways;
  • meanwhile at the upper edge (neckline) you add increases to shape the rounded neckline - until you've reached the desired shoulder height; these neckline increases are different for front and back (the front neckline is deeper than the one in the back);
  • once you've reached the desired width, you only work on the lower edge to add length, the stitches on the sides are put on stitch holders (scrap yarn)
  • when you've finished front and back piece, you sew up the shoulder seams
  • for the arms, you pick up the required number of stitches around the shoulder seams (one half from the side seam of the back piece, the other half from the front piece) and knit them in rows
  • the sides are seamed up by holding rights sides together and doing a three needle BO
  • finally, the underarm seams and shoulder seans need to be sewn up

The picture below shows the measurements that you need to take.

Measurements - click on picture to enlarge

A = neck width
B = shoulder width
C = width of the piece (= A + 2xB)
Dfront = neck depth front 
Dback = neck depth back
Efront = length of magic CO front 
Eback = length of magic CO depth back
to get the same overall shape for front and back piece, the front neck depth plus the front CO must equal the back neck depth plus the back CO (Dfront + Efront  =  Dback +  Eback)
F = length of main piece (front & back)
G = additional length
H = shoulder to underarm (or half of the arm circumference at the top)
I = arm length

Knitted in garter stitch my yarn/needles combination gave 

  • 10 cm in height for 22 ridges (44 rows) and 
  • 10 cm in width for 22 sts.

My desired measurements were

A =  about 21 cm, i.e. 45 ridges (i.e. 1 ridge for the magic CO plus 22 on each side, 22x2 + 1)
B =  about 14,5 cm, i.e. 29 ridges
C = 50 cm ( = 2x14,5 + 21)
Dfront = 12 cm, i.e. 25 sts
Dback = 4.5 cm, i.e. 11 sts 
Efront = 7.5 cm, i.e. 18 sts
Eback = 15 cm, i.e. 33 sts 
F = 49 cm
G = 4 cm
H  = 21 cm , i.e. 46 sts
I = about 6.5 cm, i.e. 14 ridges

Even though you can adapt the size while knitting, I strongly suggest that you knit a swatch before starting, so that you have a rough idea of the number of stitches necessary (at least for the CO). 

Because of the construction (and the rate the piece grows), I would advise to do choose the magic CO to a length that Dfront + Efront  make up for about 40% of the overall length of the piece (that's the distance from the shoulder seams to the lower edge of the magic CO). This aims for C and F being roughly equal.

Another important issue: Make sure to take notes while you're knitting your pieces so that you can reconstruct it later, i.e. so that the back matches the front or the left sleeve matches the right.


Instructions

While you're knitting the main stripe pattern, you will at the same time have to increase along the neckline. Since - depending on your yarn weight and desired size - these issues need to be addressed separately, they are explained separately below. 


Front - Main stripe pattern

You start knitting in the middle of the neckline. I wanted a rounded, wide(-ish) neck and about 12 cm deep. So I "started" the mCO in the knowledge that there would be 25 sts to increase to shape the neckline.

In MC do a magic CO so that there is one stitch more on the top than on the bottom needle (the additional stitch will make up the horizontal line of the pattern (see picture 1, the top needle has one more stitch than the bottom one).

I did a magic CO of 2x18+1 sts (i.e. after the neck increases are added the lower edge of the magic CO is 18 + 25 = 43 sts away from the shoulder seam)

Turn the needle so that you look at the garter stitch bumps (see picture 2), the needle with the additional stitch is still on top, however, the last stitch is not secured. Therefore, before you start knitting twist tail and working yarn once to secure the first stitch of the row (see picture 3). 

In MC

Ridge 1: (RS) top needle, ktbl to last stitch on top needle, kfb, switch to bottom needle, k1, kbf, k to end
    (WS): k to 2 bef end of needle, pm, k2, switch to other needle, k1, pm, k to end

In case of my magic CO this was:
Ridge 1: (RS) ktbl 17, kfb, k1, kbf, k17, turn
    (WS) k18, pm, k3, pm, k18

Ridge 2: (RS) k all, turn
    (WS) k to 1 bef m, kfb, sm, kbf, k to 1 bef m, kfb, sm, kbf, k to end

In CC

Ridge 3 (RS): k all, turn
    (WS) k to 1 bef m, kfb, sm, kbf, k to 1 bef m, kfb, sm, kbf, k to end

in MC

Ridge 4: (RS) k all, turn
    (WS) k to 1 bef m, kfb, sm, kbf, k to 1 bef m, kfb, sm, kbf, k to end
Ridge 5: (RS) k to 1 bef m, kfb, sm, kbf, k to 1 bef m, kfb, sm, kbf, k to end, turn
    (WS) k to m, sm, k to m, turn; (RS) k to m, turn (WS) k to m, sm, pick up one stitch from edge, k to end

Pictures 4 to 6 illustrate how to pick up a stitch in the middle of a row. When knitting row 10 after you've turn for the second time and knitted up to the next marker you find a (short) edge (one ridge high) from which you have to pick up one stitch (see pointer in picture 4). You then insert the needle into that stitch (picture 5) and draw a loop of your working yarn through (picture 6).


The pictures also show that after a few ridges, I put the stitches between the markers (vertical part of the stripe pattern) on another needle. That way the piece is not distorted by being bunched up on two needles only. As the piece grew bigger I switched to 3 sets of circulars - one for each edge. (The "end of needle" did the job of the stitch marker.)

in CC

Ridge 6: (RS) k to m, sm, k to m, sm, pick up one stitch from edge, k to end, turn
    (WS: k to 1 bef m, kfb, sm, kbf, k to 1 bef m, kfb, sm, kbf, k to end

Repeat ridges 4 to 6 until the colored panel is as big as you want it.
Then continue repeating ridges 4 to 6 in MC only.

(It theory, you could do the increases (kfb/kbf) always on RS. The reason I alternated is that it looked better with the stripe pattern, i.e. if you do a kfb in the first row after a color change, you see a little bump of the color below and I wanted to avoid that.)

I knitted 12 repeats, i.e. I knitted 12 CC stripes. Than I added 5 more repeats in MC only.


Front - neckline shaping

WHILE you're knitting the main stripe pattern, you need to increase at the beginning and end of some rows to shape the neckline. Since I wanted a rounded neckline, I started with few increases, raising their number towards the outer edge of the neckline. 

I would advise that - once you calculated the width and height of your neckline - draft the desired shape on graph paper and do your increases accordingly.

The picture below shows the left half of the front neckline and how I distributed the increases - starting from the magic CO.

Neckline Shaping - click on picture to enlarge

Increase in the beginning and end of one row means that I did a kfb at the second and the second to last stitch, i.e.: 
    k1, kfb (instructions for this row until 1 bef end), kfb, k1

At last ridge I did a crochet CO of 9 stitches at the beginning and the end of the row.


Finishing the front piece

If your piece isn't long enough, knit a few more ridges using the stitches of the lower edge.
I lenghtened both pieces by 6 ridges (12 rows) before binding off.

Put the stitches of the side edges on scrap yarn.

Your last row is a WS row.


Back

The back piece is knit similar to the front piece EXCEPT that

  • the original magic CO is longer because the back neckline is shallower
  • the neckline increases are different

For my piece I wanted a neck depths of 10 sts, therefore I did a magic CO of 2x33 + 1 stitches (i.e. the total distance from the lower edge of the magic CO to the shoulder seam is 33 + 10 = 43 sts - the same as for the front piece.

The picture below shows one half of the back neckline - starting from the magic CO, i.e. the distribution of the back neck increases.


Lengthen the back (knitting rows over the stitches of the lower edge) by the same amount of rows as you did with your front piece.

Put the stitches of the side edges on scrap yarn. 

Your last row is a WS row.


Sleeves

Calculate how many stitches you need for your sleeves. 

For my arms I needed 2x46 sts. So I slipped the calculated number of the uppermost stitches of the right hand side of the front piece (starting from the 46th stitch) and the same number of the uppermost stitches of the right hand side of the back piece (starting from the shoulder) on a back.

Starting on RS of the piece, knit the required number of  rows to reach your desired sleeve length.

Do the same for the other sleeve.

I knitted just very short sleeves, i.e. only 14 ridges per arm before BO.


Finishing

With right sides together, put the left side stitches of front and back pieces from your scrap yarn on knitting needles and do a three needle BO (in my case it was 2 x 59 sts). Do the same with the right side stitches. That does not connect the additional (lengthening) rows you did at the end of the piece - which achieves a nice seam slit effect.

Sew up the open arm seams (underarm).

Sew up the shoulder seams.

If you like, add a crochet border to the neckline; I used the reverse single crochet stitches (also known as crab stitch). 

Weave in all ends.


Other Sizes
In order to adapt this top to other shapes (i.e. other than the square main piece described above) you could for example do the following:
  • Start with a longer (shorter) magic CO to get a narrower (wider) rectangular main piece.
  • Knit underarm short row triangles (before knitting the sleeves) to shape the piece around the bust; with the wide part on the top right under the arm; then - when starting the sleeves; when you start to knit your sleeves you need to start in the middle of the upper edge of that triangle by picking up stitches from the edge then knit the first row of the sleeve and then picking up stitches from the second half of the short row triangle edge. 
  • Knit darts by inserting decreases at breast height towards the last rows of the piece - equally on both vertical edges of the front piece. To make them less obvious, I would start them after finishing the stripe pattern. To make both pieces (front and back) the same underarm length, you need to adapt (decrase) the magic CO of the back piece by decreasing it accordingly, i.e. if there are 5 darts decreases on each edge of the front piece, the magic CO of the back piece needs to be 5 sts shorter.


Freitag, 31. März 2023

Aunt Dahlia

Knitting experiments are fun. You can try what's possible with a range of techniques. So, after knitting my Garter Stitch Snowflake, I wanted to try something similar with a contrasting color to contour the petals. 

This doily (placemat, potholder ...) consists of 60 short-row diamonds that stack up to be triangles which in turn form a (slightly angular) circle – or a spiky hexagon. It starts with a provisional cast on and is finished by grafting in garter stitch. It is quite fiddly and not a beginner pattern

This knitting pattern is available via


The pattern PDF contains 

  • written row-by-row instructions for knitting this piece – including 8 in-process photos
  • an explanation (plus schematic) of the construction, i.e. how the diamonds stack up to create the whole piece
  • chart(s) of one diamond
  • short photo tutorials for the following techniques
    • provisional CO with a crochet hook and undoing it
    • grafting in garter stitch
    • short rows with wrap and turn and picking up the wraps 
    • crochet CO (at the edge of a knitted piece)
    • weaving in yarn while carrying it (backwards and forwards)


To knit this piece you need the following materials:
  • Sports weight yarn 
    • 120 metres in MC (main colour)
    • 50 metres in CC (contour colour)
  • 2.5 mm knitting needles 
  • a crochet hook of a similar size (I used a 2.5mm hook)  
  • scrap yarn
  • a tapestry needle – for grafting and to weave in ends
The finished piece knitted in Sports weight yarn measures 30 - 33 cm in diameter.
Another one knitted in Lace weight yarn measured 26 - 29 cm in diameter.

Wrong side of the piece

Sonntag, 26. Februar 2023

Firebird

Short rows and variegated yarn are a gorgeous combination because of the yarn is shown in the best possible way. This shawl consists of rhombuses that stack up to be triangles which in turn form a (slightly angular) semi-circle – or to be precise half of an octagon.

Even though this shawl is knitted all in garter stitch, it is NOT an instant gratification project because it requires some concentration. 

Knitted in Lace weight yarn the finished and blocked piece measures about 159 cm in width and about 78 cm in depth. Since it is knitted all in garter stitch, it basically looks the same on both sides.


The pattern PDF is available via

The pattern PDF is 15 pages long and contains

  • written row-by-row instructions for knitting this piece
  • schematic of the construction, i.e. how the rhombuses stack up to create the shawl
  • chart(s) of one rhombus
  • a cheat sheet that summarizes the pattern on one page
  • short photo tutorials for the following techniques
    • short rows with wrap and turn and picking up the wraps
    • crochet CO (at the edge of a knitted piece)
    • backwards loop CO


To knit this piece you will need the following materials
  • about 1900 metres of Lace weight yarn – I used Wollmeise Lace (colorway Allegria) - here's a link to the yarn's Ravelry page
  • 3.25mm knitting needles – I used circulars that were 80 cm long
  • a crochet hook of a similar size (I used a 3.5mm hook)
  • a tapestry needle – for grafting and to weave in ends
  • 7 stitch markers
  • (at least) 1 removable stitch marker to mark the RS of the piece


Montag, 23. Januar 2023

Gateways Cowl

When it's not really cold, but still a bit chilly, a thick scarf may be a bit too much. So a lightweight cowl that fits around the neck is the perfect accessoire. 

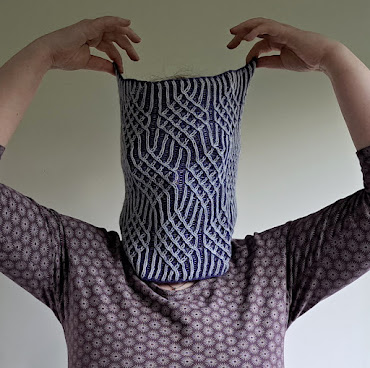
This cowl is knitted in the round in two-colour brioche. Two-colour brioche is a marvellous technique. With two contrasting colours you can create gorgeous effects and pattern. I especially love it, when brk-stitches cross and a lattice effect is created. The stitch used to do this can be combined in many ways. With this cowl it is combined with plain two-colour brioche to knit a diamond pattern at and offset.  

The finished cowl measures 61 cm in circumference and 29 cm in height. Using Lace weight wool and wool/silk blend, the finished piece weighs less than 50 grams.


The pattern PDF is available via


The pattern PDF is 8 pages long and contains:

  • row-by-row pattern instructions
  • a chart of a pattern repeat
  • photo tutorial for brioche stitch that creates the lattice effect
To knit this cowl you should have a basic knowledge of knitting two-colour brioche.

Dark side (inside) of this cowl


To knit this cowl you will need the following materials

  • about 400 metres (in total) of Lace weight yarn – in two colours. I used: 
  • 3 mm circular knitting needles (40 cm length)
  • 2 stitch markers
  • a tapestry needle for weaving in ends


Freitag, 7. Oktober 2022

WiFi Signal Cowl

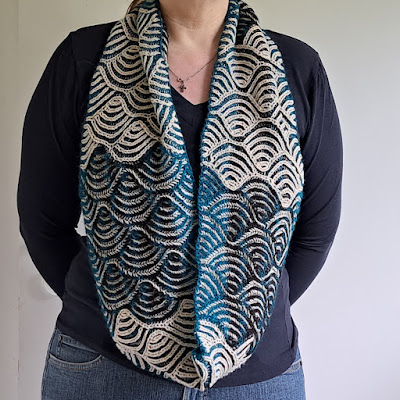
The WiFi Signal cowl is knitted in the round in two-colour brioche. The stitch pattern was first inspired by traditional japanese Seigaiha pattern (青海波), but when I looked at the finished piece it really reminded me of the symbol for a WiFi Signal.

The cowl is long enough to fit twice around your neck. Because it's two colour brioche it has a lovely squishy texture. 


The knitting pattern is available as a PDF via


The pattern PDF is 9 pages long and contains:

  • row-by-row pattern instructions 
  • charts of a pattern repeat
  • photo tutorials for the following brioche stitches
    • brk2inc
    • brk2Rdec
So to knit this cowl you should have a basic knowledge of knitting two-colour brioche.


The finished piece measures about 20 cm in height and 125 cm in circumference (blocked) – so that it fits twice around my neck. 
To knit this the following materials are needed:
  • a total of 125 grams of fingering weight yarn – about equal amounts of each colour, I used
    • as DY (dark turquois to black): Schoppel Zauberball 2038 Cafe Flair
    • as LY (light beige): Vendita Sock yarn 
  • 3.5 mm circular knitting needles 
  • 6 stitch markers
  • a tapestry needle for weaving in ends

Freitag, 30. September 2022

Wendepunkt-Mütze

Die Anleitung für U-Turn-Mütze gibt es schon seit fünf Jahren auf diesem Blog. Da sie sehr glatt am Kopf anliegt, eignet sie sich gut als Chemo-Cap. 

Angela Mühlpfordt (von bestrickendes.de) hatte die Idee, zusammen mit KnitPro ein Set zu entwickeln, das u.a. passendes Garn und hochwertige Nadeln enthält, um diese Mütze zu stricken. Für jedes Set werden 5 EUR an Brustkrebs Deutschland e.V. gespendet. Näheres zu ihrem Projekt findet sich hier auf ihrem Blog. Dieses Breast Cancer Awareness Set (Special Pink Set) kann man ab dem 01.10.2022 hier bei Knitty-Bitty bestellen.

Und hier ist die Strickanleitung für diese Mütze, die wir auf Deutsch "Wendepunkt-Mütze" genannt haben. 

Diese Mütze wird in offener Arbeit hin und her gestrickt und kommt vollständig ohne verkürzte Reihen aus. Man startet mit einem sogenannten “magischen Maschenanschlag” von einer Seite des Kopfes, strickt Zunahmen bis zur Mitte, nimmt anschließend Maschen ab und beendet mit einem “Abketten mit drei Nadeln”. 

Eine früher veröffentlichte englischer Version dieser Anleitung findet sich hier. In dieser wird auch das allgemeine Prinzip erklärt, mit dem man diese Mütze in anderen Grössen oder mit anderen Garnen stricken kann.

Here's the original english version of this knitting pattern.


Material

  • ca. 50 gr Sockenwolle (4-fädiges Garn ) 
  • 2.75 mm  Rundstricknadel 
  • 2  Maschenmarkierer
  • eine dritte Stricknadel (auch ca. 2.75 mm) um am Ende abketten zu können


Maschenprobe und Größe

In Krausrechts: 11 Rippen (22 Reihen) = 5 cm Höhe, 12 Maschen = 5 cm Breite

Die fertige Mütze hat etwa die Grösse S-M, d.h. sie hat einen Umfang von ca. 50 cm (am Bündchen) und ist flach ausgelegt 23 cm hoch. Das Bündchen ist aber sehr elastisch und kann bequem bis zu 56 cm gestreckt werden. 

Ja, hier braucht man leider eine Maschenprobe - und es ist auch ratsam den Kopf des vorgesehenen Trägers zu messen.


Techniken und Notation
Neben rechten und linken Maschen braucht man für diese Anleitung noch die folgenden Techniken.
Die hier verwendeten Zu- und Abnahmen sind 
  • kfb: aus einer Masche eine weitere herausstricken (einmal durch das vordere, dann durch das hintere Maschenglied) – dies entspricht der englischen Abkürzung “knit-front-back”), s.auch hier: https://youtu.be/q_KeANunPA8   
  • ssk:  zwei Maschen links geneigt zusammenstricken, dazu die erste Masche wie zum Rechtsstricken abheben, die zweite Masche wie zum rechtsstricken abheben, dann mit der linken Nadel durch beide Maschen hindurch stechen, und beide zusammen abstricken, (entspricht  dem “slip-slip-knit” in englischen Anleitungen), s. auch hier: https://youtu.be/LbzyZzMf5Jc 
  • Judys Magischer Maschenanschlag: eine Anschlag-Technik, bei der man Maschen an zwei Seiten erstellt, siehe die erste Technik in diesem YouTube-video von Sylvie Rasch – CraSy creative things: https://youtu.be/EdFcr31yqQI 
  • Abketten mit drei Nadeln: https://youtu.be/30GQlCrqUGQ (YouTube-Video von Stricken wir!)
  • Einen flachen Kreis aus der Mitte stricken in glattrechts: Man startet mit 8 Maschen, und nimmt in jeder zweiten Reihe jeweils – gleichmäßig verteilt – weitere 8 Maschen zu. Diese Technik wird hier auf einen Halbkreis angewendet, d.h. in jeder zweiten Reihen (also hier in jeder Hinreihe) werden 4 Maschen zugenommen. Um “Eckenbildung” zu vermeiden, strickt man die Zunahmen jeweils an unterschiedlichen Stellen. So wird es ein wirklich runder Halbkreis.
  • Auch wenn diese Mütze flach gestrickt wird (hin und her), ist es sinnvoll dies in der Magic Loop Methode auf der Rundstricknadel zu arbeiten. Hier ein Video, das diese Technik erläutern: https://youtu.be/mB7kCsUsGD0 (YouTube-Video von Maschenfein Berlin)
  • [X]*Y: bedeutet, dass die Folge X in den eckigen Klammern Y-mal gearbeitet werden soll, also z.B. [2 Mre. kfb]*3 bedeutet, dass die Folge “zwei rechte Maschen und ein kfb” insgesamt 3-mal gestrickt werden soll.
  • Weitere Abkürzungen
    • HR: Hinreihe
    • RR: Rückreihe
    • Mre: rechte Masche(n)
    • Mli: linke Masche(n)
    • MM: Maschenmarkierer
    • 2 M re. zus., 2 Maschen rechts zusammenstricken

Konstruktion
Diese Mütze wird in offener Arbeit gestrickt, in einer umgekehrten U-Form um den magischen Maschenanschlag herum. Jede Reihe besteht aus einem kraus-rechts gestrickten Teil (Rippen am Anfang und Ende jeder Reihe) und einem halbkreisförmigen glatt-rechts gestrickten Teil um den Wendepunkt herum. Die unterschiedliche Schräge wird durch eine Anpassung der Zu- bzw. Abnahmen erlangt. An den Seiten gibt es relativ viele Zu- und Abnahmen, zur Mitte hin weniger bis keine - siehe das Diagramm unten.
Zuerst sind es vier Zunahmen in jeder Hinreihe, was einem flachen Halbkreis entspricht, dann nur noch drei Zunahmen pro Hinreihe, dann nur noch zwei und schließlich gar keine Zunahme mehr. Nachdem man die Mitte der Mütze erreicht hat, wird das gleiche rückwärts gemacht, also zuerst keine Abnahme, dann zwei pro Hinreihe, dann drei und schließlich vier. Der letzte Schritt ist das Abketten mit drei Nadeln.


Anleitung

Magischer Maschenanschlag: 2x15 Maschen, d.h. auf jeder Nadel sind 15 Maschen.
Das Strickstück sieht nun aus wie auf Bild A.

Nun die Nadeln so drehen, dass die Krausrippe vorne sichtbar ist. Alle Reihen werden nun in einer U-Form gestrickt, d.h. erst werden die Maschen auf der oberen Nadel abgestrickt, dann wird das Strickstück gedreht (so dass oben und unten vertauscht werden) und anschließend die Maschen der zweiten Nadel abgestrickt.
Der Punkt, an dem die Drehung stattfindet, wird Wendepunkt (“WP”) genannt.  
 
Zuerst werden vier Zunahmen pro Hinreihe gestrickt.
Reihe 1 (RR): 18 Mre, Maschenmarkierer platzieren, 2 Mli, WP, 2Mi, Maschenmarkierer platzieren, 18 Mre - die Maschenmarkierer trennen den kraus-rechts Teil (Bündchen) vom glatt-rechts Teil (oberer Teil der Mütze)
Reihe 2 (HR):  1 M abh, 17 Mre, MM,  [kfb]*4, MM, 18 Mre - das Strickstück sieht jetzt aus wie in Illustration 1, die U-Form ist noch nicht ganz sichtbar
Reihe 3 und alle weiteren ungeraden Reihen: 1 M abh, Mre bis MM, MM, Mli bis zum nächsten MM, MM, Mre bis Ende
Reihe 4 (HR): 1 M abh., 17 Mre, [1 Mre, kfb]*4, 18 Mre
Reihe 6 (HR): 1 M abh., 17 Mre, [kfb, 2 Mre]*4, 18 Mre
Reihe 8 (HR): 1 M abh., 17 Mre, [k2, kfb, 1 Mre]*4, 18 Mre
Reihe 10 (HR): 1 M abh., 17 Mre, [1 Mre, kfb, 3 Mre]*4, 18 Mre
Reihe 12 (HR): 1 M abh., 17 Mre, [4 Mre, kfb, 1 Mre]*4, 18 Mre
Reihe 14 (HR): 1 M abh., 17 Mre, [kfb, 6 Mre]*4, 18 Mre
Reihe 16 (HR): 1 M abh., 17 Mre, [4 Mre, kfb, 3 Mre]*4, 18 Mre

Das Strickstück sieht nun in etwa so aus wie auf Bild B.

Ab jetzt werden jeweils 3 Zunahmen pro Hinreihe gestrickt. 
Reihe 18 (HR): 1 M abh., 17 Mre, [6 Mre, kfb, 5 Mre]*3, 18 Mre
Reihe 20 (HR): 1 M abh., 17 Mre, [2 Mre, kfb, 10 Mre]*3, 18 Mre
Reihe 22 (HR): 1 M abh., 17 Mre, [10 Mre, kfb, 3 Mre]*3, 18 Mre
Reihe 24 (HR): 1 M abh., 17 Mre, [1 Mre, kfb, 13 Mre]*3, 18 Mre
Reihe 26 (HR): 1 M abh., 17 Mre, [11 Mre, kfb, 4 Mre]*3, 18 Mre
Reihe 28 (HR): 1 M abh., 17 Mre, [5 Mre, kfb, 11 Mre]*3, 18 Mre
Reihe 30 (HR): 1 M abh., 17 Mre, [13 Mre, kfb, 4 Mre]*3, 18 Mre
Reihe 32 (HR): 1 M abh., 17 Mre, [Mre 2, kfb, 16 Mre]*3, 18 Mre

Das Strickstück sieht nun in etwa so aus wie auf Bild C.

Je nachdem wie lange die verwendete Rundstricknadel ist, nun von der Magic Loop Methode zum normalen Stricken wechseln, d.h. ohne dass ein Teil des Seiles heraussteht. Um das Zählen zu erleichtern, ist es ratsam, an die Stelle des WPs einen weiteren Maschenmarkierer einzufügen. 

Ab jetzt werden pro Hinreihe 2 Zunahmen gestrickt. 
Reihe 34 (HR): 1 M abh., 17 Mre, [20 Mre, kfb, 9 Mre]*2, 18 Mre
Reihe 36 (HR): 1 M abh., 17 Mre, [2 Mre, kfb, 28 Mre]*2, 18 Mre
Reihe 38 (HR): 1 M abh., 17 Mre, [10 Mre, kfb, 21 Mre]*2, 18 Mre
Reihe 40 (HR): 1 M abh., 17 Mre, [25 Mre, kfb, 7 Mre]*2, 18 Mre
Reihe 42 (HR): 1 M abh., 17 Mre, [13 Mre, kfb, 20 Mre]*2, 18 Mre

Das Strickstück sieht nun so aus wie auf Bild D.

Ab jetzt wird in jeder Hinreihe jetzt nur noch eine Masche zugenommen. 
Reihe 44 (HR): 1 M abh., 17 Mre, 27 Mre, kfb, Mre bis MM, 18 Mre
Reihe 45 (RR): 1 M abh., 17 Mre, Mli bis MM (d.h. 71 Mli), 18 Mre
Reihe 46 (HR): 1 M abh., 17 Mre, 53 Mre, kfb, Mre bis MM, 18 Mre
Reihe 48 (HR): 1 M abh., 17 Mre, 32 Mre, kfb, Mre bis MM, 18 Mre
Reihe 50 (HR): 1 M abh., 17 Mre, 39 Mre, kfb,Mre bis MM, 18 Mre

Nun folgen die Reihen ohne Zu- oder Abnahmen.
Reihe 52 (HR): 1 M abh., Mre bis zum Ende
Das Bündchen (Krausrippen am unteren Rand) sollte jetzt (leicht gestreckt) so lange sein wie die Hälfte des Kopfumfanges.
Reihe 54 (HR): 1 M abh., Mre bis zum Ende

Jeweils eine Abnahme pro Hinreihe.
Reihe 56 (HR): 1 M abh., 17 Mre, 38 Mre, ssk, Mre bis MM, 18 Mre
Reihe 58 (HR): 1 M abh., 17 Mre, 31 Mre, ssk, Mre bis MM, 18 Mre
Reihe 60 (HR): 1 M abh., 17 Mre, 52 Mre, ssk, Mre bis MM, 18 Mre
Reihe 62 (HR): 1 M abh., 17 Mre, 26 Mre, ssk, Mre bis MM, 18 Mre

In diesem Teil werden 2 Abnahmen pro Hinreihe gestrickt.
Reihe 64 (HR): 1 M abh., 17 Mre, [13 Mre, ssk, 20 Mre]*2, 18 Mre
Reihe 66 (HR): 1 M abh., 17 Mre, [25 Mre, ssk, 7 Mre]*2, 18 Mre
Reihe 68 (HR): 1 M abh., 17 Mre, [10 Mre, ssk, 21 Mre]*2, 18 Mre
Reihe 70 (HR): 1 M abh., 17 Mre, [2 Mre, ssk, 29 Mre]*2, 18 Mre
Reihe 72 (HR): 1 M abh., 17 Mre, [20 Mre, ssk, 9 Mre]*2, 18 Mre

Pro Hinreihe werden nun drei Maschen abgenommen. 
Reihe 74 (HR): 1 M abh., 17 Mre, [2 Mre, ssk, 16 Mre]*3, 18 Mre
Reihe 76 (HR): 1 M abh., 17 Mre, [13 Mre, ssk, 4 Mre]*3, 18 Mre
Reihe 78 (HR): 1 M abh., 17 Mre, [5 Mre, ssk, 11 Mre]*3, 18 Mre
Reihe 80 (HR): 1 M abh., 17 Mre, [11 Mre, ssk, 4 Mre]*3, 18 Mre
Reihe 82 (HR): 1 M abh., 17 Mre, [1 Mre, ssk, 13 Mre]*3, 18 Mre
Reihe 84 (HR): 1 M abh., 17 Mre, [10 Mre, ssk, 3 Mre]*3, 18 Mre
Reihe 86 (HR): 1 M abh., 17 Mre, [2 Mre, ssk, 10 Mre]*3, 18 Mre
Reihe 88 (HR): 1 M abh., 17 Mre, [6 Mre, ssk, 5 Mre]*3, 18 Mre

Und schliesslich vier Abnahmen pro Hinreihe.
Reihe 90 (HR): 1 M abh., 17 Mre, [4 Mre, ssk, 3 Mre]*4, 18 Mre
Reihe 92 (HR): 1 M abh., 17 Mre, [6 Mre, ssk]*4, 18 Mre
Reihe 94 (HR): 1 M abh., 17 Mre, [4 Mre, ssk, 1 Mre]*4, 18 Mre
Reihe 96 (HR): 1 M abh., 17 Mre, [1 Mre, ssk, 3 Mre]*4, 18 Mre
Reihe 98 (HR): 1 M abh., 17 Mre, [2 Mre, ssk, 1 Mre]*4, 18 Mre
Reihe 100 (HR): 1 M abh., 17 Mre, [ssk, 2 Mre]*4, 18 Mre
Reihe 102 (HR): 1 M abh., 17 Mre, [1 Mre, ssk]*3, k1,  2 M re. zus., 18 Mre - 
(Die letzte Abnahme wurde als rechtsgeneigt zusammengestrickt, weil dies einen schöneren Übergang zum Kraus-Rechts-Bündchen bildet.
Reihe 104 (HR): 1 M abh., 17 Mre, [ssk]*3, 2 M re. zus., 18 Mre
Reihe 105 (RR) = Reihe 3

Das Strickstück sieht nun in etwa aus wie auf Bild E.

Nach Beendigung der letzten Reihe sollte wieder dieselbe Anzahl Maschen vorhanden sein, wie ganz am Anfang nach dem Maschenanschlag (d.h. 2 x 20 Maschen).
Die Mütze nun auf links drehen, die beiden Seiten zusammenhalten und mit dem Abketten mit drei Nadeln zusammenstricken.

Nach dem Vernähen der Enden ist die Mütze fertig und zurück auf rechts gedreht werden.


Freitag, 2. September 2022

Garter Stitch Snowflake

I've always wanted to do a big lacy half-circle shawl all in garter stitch. This doily started out as a test piece for that kind of shawl. However, I liked the small piece quite a lot, so I tried to figure out how to do it in a seamless full circle – and here it is. 

This doily consists of diamonds that stack up to be triangles which in turn form a (slightly angular) circle. It starts with a provisional cast on and is finished by grafting in garter stitch (just before knitting and binding off the last stitches). It is NOT A BEGINNER PATTERN.


The knitting pattern is available via


The pattern PDF is 12 pages long and contains
  • written row-by-row instructions for knitting this piece – including 6 photos
  • schematic of the construction, i.e. how the diamonds stack up to create the whole piece
  • chart(s) of one diamond
  • short photo tutorials for the following techniques
    • provisional CO with a crochet hook and undoing it
    • grafting in garter stitch
    • short rows with wrap and turn and picking up the wraps 
    • crochet CO (at the edge of a knitted piece)
    • backwards loop CO


To knit this piece you need the following materials
  • about 250 metres of light fingering weight yarn (for the blue piece in the photos I used Creative Melange Lace by Rico Design, colorway 011 - here's the yarn's Ravelry page, the red one is made with Wollmeise Lace, colorway Allegria - here's the yarn's Ravelry page)
  • 2.5 mm knitting needles 
  • a crochet hook of a similar size (I used a 2.5mm hook)  
  • scrap yarn
  • a tapestry needle – for grafting and to weave in ends
Knitted in light fingering weight yarn the finished piece has a diameter of about 42 cm.
I did not knit a swatch, but measuring from the finished piece, 13 sts give about 5 cm in width.