
Sonntag, 8. November 2015
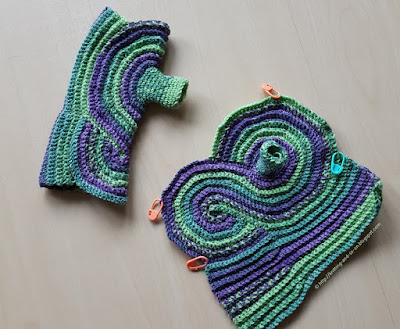
Pieces of Eight Mitts in Crochet
I never thought that it'd be fun to "rewrite" some of my knitting patterns to a crochet version - but it was. After publishing a crochet version for my Circle Mitts - called Kreisel Fingerless Gloves, I thought I might as well try the same thing with my Pieces of Eight Mitts. It worked better than I had thought and I really like the colors.

Samstag, 31. Oktober 2015
Kreisel Fingerless Gloves
 Keep your hands warm this winter with these stylish and unique fingerless gloves. They are crocheted around the thumb which allows you to show off your variegated yarn to the best effect.
These mitts are the crochet version of my knitted Circle Mitts.
Kreisel is the german word for (spinning) top.


This work by Knitting and so on is licensed under a Creative Commons Attribution-NonCommercial-ShareAlike 4.0 International License.


Materials
- about 40 to 45 grams of fingering weight yarn
- 3mm crochet hook
- 4 removable stitch marker (e.g. safety pins)
- tapestry needle to weave in ends
Stitches and Abbreviations
- ch: chain
- sc: single crochet
- sctbl: single crochet through back loop: http://crochet.about.com/od/crochetterms/tp/back-loops-only-or-blo.htm
- sl st: slip stitch: http://www.dummies.com/how-to/content/how-to-crochet-the-slip-stitch.html
- inc: increase by working 2 single crochet stitches into 1 sc below (in case of this pattern, it's 2 sctbl into the sctbl below): http://www.dummies.com/how-to/content/how-to-increase-with-single-crochet.html
- dec or sctog: decrease by working 2 single crochet stitches together: http://www.dummies.com/how-to/content/how-to-decrease-single-crochet.html
- join: joining pieces with crochet: in order to join to pieces (or, in case of this pattern, the two sides of one piece) hold the pieces together with wrong sides facing and insert the crochet hook into both pieces at the same time, a foto tutorial can be found here (scroll down to “Joining with Crochet” http://knitty.com/ISSUEwinter08/FEATwin08TT.php)
- [y]*x: work the sequence y (within the brackets) x times.
- crochet short rows (as done in this pattern (*)): work sc's (or sctbl's) up to the stitch indicated, then turn work (without a turning-chain) and start into the 2nd sc; when you're working over this turn in a following row, always crochet into the turning-sc as well.(*) there may be different methods out there, feel free to try them.
General Construction

Therefore, these mitts are constructed as follows: it starts with the thumb (part 1) which is finished by connecting the edges and creating a small tube (the thumb). Part 2 starts with crocheting around one edge of this tube and increases in circles. However after each "round" direction is changed (i.e. the round closed by a slip stitch and the piece is turned).
How to Crochet a Flat Circle
Start with a ring of 5 chains or a magic ring. Into this ring do a set-up row consisting 8 single crochets, close round with slip stitch.
In all following rounds, the stitch count should be increased by 8, i.e. in the first round every stitch, the 2nd row increase every 2nd stitch, in the 3rd row every 3rd, in the 4th row every 4th and so on ...
To avoid an octagon pattern, the increases should be made at different points, so the first rows may be
Round 0: sc to end, sl st into first sc, ch1 (-> 8 stitches)
Round 1: inc into every st, sl st into first sc, ch1 (every stitch was increase, now there are 16 stitches)
Round 2: [sc, inc] repeat to end, sl st into first sc, ch1 (every 2nd stitch was increased, now there are 24 stitches)
Round 3: [inc, sc 2] repeat to end, sl st into first sc, ch1 (every 3rd stitch was increased, now there are 32 stitches)
Round 4: [sc2, inc, sc1] repeat to end, sl st into first sc, ch1 (every 4th stitch was increased, now there are 40 stitches)
Round 5: [sc4, inc] repeat to end, sl st into first sc, ch1 (every 5th stitch was increased, now there are 48 stitches)
Round 6: [sc2, inc, sc3] repeat to end, sl st into first sc, ch1 (every 6th stitch was increase, now there are 56 stitches)
For this pattern the above recipe will be applied.

Gauge or What to Measure
If you're knitting for your own hands, you just have to try it on a few times before finishing. If you're knitting for somebody else, you'll need the following measurements:
- thumb circumference,
- hand circumference at wrist height
- hand circumference at base of thumb
- hand circumference at knuckle height

Instructions
 Part 1 (Thumb)
Row 0: ch 10 and 1 turning-chain
Row 1: sc 10; 1 turning-chain
Row 2: sctbl 10; 1 turning-chain
Row 3: sctbl 8, dec; 1 turning-chain
Row 4: sctbl 9; 1 turning-chain
Row 5: sctbl 7, dec; 1 turning-chain
Row 6: sctbl 8; 1 turning-chain
Row 7: sctbl 6, dec; 1 turning-chain
(Your piece should now be as high as half of your thumb circumference. If it's too small for that you can add an even number of "sctbl all, 1 turning-chain"-rounds.)
Row 8: sctbl 7; 1 turning-chain
Row 9: sctbl 6, inc; 1 turning-chain
Row 10: sctbl 8; 1 turning-chain
Row 11: sctbl 7, inc; 1 turning-chain
Row 12: stbl 9; 1 turning-chain
Row 13: sctbl 8, inc; 1 turning-chain
Row 14: sctbl 10; 1 turning-chain
Now your piece should look like in picture 1.
Fold the edges together (chain edge and your last row) and connect.

Part 2:
Setup Round: Chain 1, and stitch about 20 sc's into the rim of the thumb in the round (while you're doing this you're looking to the inside of the thumb), after about 20 stitches you should be back at the beginning. close with a slip stitch. Chain 1 and turn.
For the next rounds, do the circle crochet recipe from above, but crochet sctbl stitches. Don't forget to change crochet direction (ie. turn) after every round.
If you had to crochet a few rounds more during part 1, there may be more stitches. If you have between less than or excatly 24 stitches in the round, you the next round should be increasing every 3rd stitch. If you made the thumb bigger and have more than 25 stitches start with increasing every 4th stitch. After a few rounds your piece should look as like picture 2.
Continue until the distance between the thumb and the upper edge is high enough for you. Make sure to end on an outside row.
For me this was the case after 13 rows.
To get you started here are the first few rounds spelled out
Round 1 (outside, ie. while crocheting you're looking at the outside of your piece): [sctbl 2, inc] repeat to end (or until there are less than 3 stitches, sctbl to end), chain 1 and turn (i.e. increase every 3rd stitch)
Round 2 (inside, ie. while crocheting you're looking at the intside of your piece):[sctbl, inc, sctbl 2] repeat to end (or until there are less than 4 stitches, sctbl to end), chain 1 and turn (i.e. increase every 4th stitch)
Round 3 (outside): [sctbl 4, inc] repeat to end (or until there are less than 5 stitches, sctbl to end), chain 1 and turn (i.e. increase every 5th stitch)
Round 4 (inside): [sctbl 2, inc, sctbl 3] repeat to end (or until there are less than 6 stitches, sctbl to end), chain 1 and turn (i.e. increase every 6th stitch)
Round 5 (outside): [sctbl 5, inc, sctbl 1] repeat to end (or until there are less than 7 stitches, sctbl to end), chain 1 and turn (i.e. increase every 7th stitch)
Round 6 (intside): [sctbl 2, inc, sctbl 5] repeat to end (or until there are less than 8 stitches, sctbl to end), chain 1 and turn (i.e. increase every 8th stitch)
... and so on ...
When the distance between the thumb and the upper edge is high enough, move to part 3.
Don't do a chain and don't turn after the last round.

Part 3:
Count your stitches, place stitchmarkers at the beginning of the round, the middle of the round, and around 5 stitches before the middle marker and 5 stitches after the mittle marker. These last two markers mark the ends of the rows in part 3.
Don't turn but go on crocheting in the same direction, but now with slip stitches into the back loop until you have reached the marker that is placed 5 stitches before the middle marker.
The point of these slip stitches and the subsequent stitches into the stitch below, is to get an even texture on the outside - the slip stitches will be hidden behind the next row.
Your piece should now look as in picture 3.
Chain 1 and turn.
Row 1: dec, then sctbl into the stitch below and continue the circle increases (e.g. if you increased every 15th stitch in the last round of part 2, in this row you have to increase every 16th stitch) - for the first half (until the "beginning marker") stitch into the stitch below the slip stitches you just did; for the second half do normal sctbl's - until you are two stitches away from the other marker that is placed 5 stitches away from the middle marker, dec, chain 1 and turn
Row 2: dec, sctbl 9, turn, sctbl to last 2 stitches, dec; chain 1 and turn; dec, sctbl to last 2 stitches (while doing the circle increases) to the last 2 stitches, dec - this row with a short row is needed to widen the upper edge - your piece should now look similar to picture 4.
Row 3 = Row 2
Row 4: dec, sctbl (with circle increases) to last 2 stitches, dec
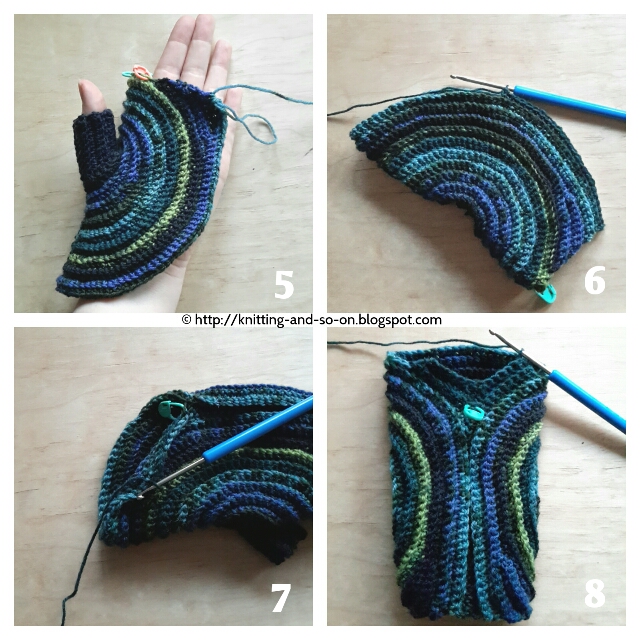
Repeat Row 4 until the the piece fits around your hand (or until the upper edge equals the hand circumference at the knuckles and the widest part equals the hand circumference at the base of the thumb) - see picture 5. If you want to widen the upper edge more, you can do one or more repeats of row 2 (i.e. using short rows).
Part 4:
 After you have finished, count your stitches again. Devide the number of stitches by 4 and add 2 or 3. This is the number of stitches that you're going to connect to the other side of the mitt.
I had 99 stitches - devided by 4 makes a bit less than 25, plus 2 makes 27.
Hold the right sides of the mitt together and connect the number of stitches that you just calculated.
Your piece should now look like in picture 6.
Turn the mitt back right sides out (be sure to secure your last loop while you're doing this) and put a stitch marker in the current stitch.
(You can remove all other stitch markers at this point).
For an even texture you need again to hide the next few slip stitches before continuing.
If the last row you knitted in part 3 was an even numbered-row, you need to do slip stitches up the right hand side as seen from the current stitch, if it was an even numbered row, you need need to do the following slip stitches towards the left.
In my case, I had crocheted 7 rows in part 3, so I did my slip stitches up the left side (see picture 7).
 Setup Row: sl st 14 on the inside of the mitt, turn
Now you can start to work on the little triangle on top of the joined stitches as follows (see picture 8). These are short rows, so you don't crochet a turning-chain but start with the second stitch.
Row 1: sctbl 11 (into the stitches below the slip stitches you just made), dec, (now you should be back at the marker), dec, sctbl 14, sl st 1, turn
Row 2: sctbl 11, dec (now you should be back at the marker), dec sctbl 8, sl st 1, turn
Row 3: sctbl 5, dec (marker) dec, sctbl 8, sl st, turn
Row 4: sctbl 5, dec (marker) dec, sctbl 2, sl st, turn
Row 5: dec (marker) and close with slip stitch, chain 1
Now do several more rounds of sctbl's until the shaft of the mitt is as long as you want it, i.e.
Round: sctbl to end, sl st into first stitch, chain 1, turn
Make sure to end each round with a slip stitch, chain 1 and turn - to keep up the regular stitch pattern.
Try your mitts on for size (or measure the circumference, it should equal your wrist circumference). If the shaft is too wide you can do some decreasing rounds as well, i.e.
Decreasing round: dec, sctbl to last 2 stitches, dec, sl st into first stitch, chain 1, turn
Weave in ends.
Make two.

This pattern was featured as most clicked at the Hookin on Hump Day Link Party 107. It was also featured in the Stash-buster Link Party on Linda's Crafty Corner in December 2015, on the Crafting Along Link Party #120 at Be a Crafter and at Yarn Fanstastic Party #54 at EyeLoveKnots.

Abonnieren
Posts (Atom)