Freitag, 30. September 2022

Wendepunkt-Mütze

Die Anleitung für U-Turn-Mütze gibt es schon seit fünf Jahren auf diesem Blog. Da sie sehr glatt am Kopf anliegt, eignet sie sich gut als Chemo-Cap. 

Angela Mühlpfordt (von bestrickendes.de) hatte die Idee, zusammen mit KnitPro ein Set zu entwickeln, das u.a. passendes Garn und hochwertige Nadeln enthält, um diese Mütze zu stricken. Für jedes Set werden 5 EUR an Brustkrebs Deutschland e.V. gespendet. Näheres zu ihrem Projekt findet sich hier auf ihrem Blog. Dieses Breast Cancer Awareness Set (Special Pink Set) kann man ab dem 01.10.2022 hier bei Knitty-Bitty bestellen.

Und hier ist die Strickanleitung für diese Mütze, die wir auf Deutsch "Wendepunkt-Mütze" genannt haben. 

Diese Mütze wird in offener Arbeit hin und her gestrickt und kommt vollständig ohne verkürzte Reihen aus. Man startet mit einem sogenannten “magischen Maschenanschlag” von einer Seite des Kopfes, strickt Zunahmen bis zur Mitte, nimmt anschließend Maschen ab und beendet mit einem “Abketten mit drei Nadeln”. 

Eine früher veröffentlichte englischer Version dieser Anleitung findet sich hier. In dieser wird auch das allgemeine Prinzip erklärt, mit dem man diese Mütze in anderen Grössen oder mit anderen Garnen stricken kann.

Here's the original english version of this knitting pattern.


Material

  • ca. 50 gr Sockenwolle (4-fädiges Garn ) 
  • 2.75 mm  Rundstricknadel 
  • 2  Maschenmarkierer
  • eine dritte Stricknadel (auch ca. 2.75 mm) um am Ende abketten zu können


Maschenprobe und Größe

In Krausrechts: 11 Rippen (22 Reihen) = 5 cm Höhe, 12 Maschen = 5 cm Breite

Die fertige Mütze hat etwa die Grösse S-M, d.h. sie hat einen Umfang von ca. 50 cm (am Bündchen) und ist flach ausgelegt 23 cm hoch. Das Bündchen ist aber sehr elastisch und kann bequem bis zu 56 cm gestreckt werden. 

Ja, hier braucht man leider eine Maschenprobe - und es ist auch ratsam den Kopf des vorgesehenen Trägers zu messen.


Techniken und Notation
Neben rechten und linken Maschen braucht man für diese Anleitung noch die folgenden Techniken.
Die hier verwendeten Zu- und Abnahmen sind 
  • kfb: aus einer Masche eine weitere herausstricken (einmal durch das vordere, dann durch das hintere Maschenglied) – dies entspricht der englischen Abkürzung “knit-front-back”), s.auch hier: https://youtu.be/q_KeANunPA8   
  • ssk:  zwei Maschen links geneigt zusammenstricken, dazu die erste Masche wie zum Rechtsstricken abheben, die zweite Masche wie zum rechtsstricken abheben, dann mit der linken Nadel durch beide Maschen hindurch stechen, und beide zusammen abstricken, (entspricht  dem “slip-slip-knit” in englischen Anleitungen), s. auch hier: https://youtu.be/LbzyZzMf5Jc 
  • Judys Magischer Maschenanschlag: eine Anschlag-Technik, bei der man Maschen an zwei Seiten erstellt, siehe die erste Technik in diesem YouTube-video von Sylvie Rasch – CraSy creative things: https://youtu.be/EdFcr31yqQI 
  • Abketten mit drei Nadeln: https://youtu.be/30GQlCrqUGQ (YouTube-Video von Stricken wir!)
  • Einen flachen Kreis aus der Mitte stricken in glattrechts: Man startet mit 8 Maschen, und nimmt in jeder zweiten Reihe jeweils – gleichmäßig verteilt – weitere 8 Maschen zu. Diese Technik wird hier auf einen Halbkreis angewendet, d.h. in jeder zweiten Reihen (also hier in jeder Hinreihe) werden 4 Maschen zugenommen. Um “Eckenbildung” zu vermeiden, strickt man die Zunahmen jeweils an unterschiedlichen Stellen. So wird es ein wirklich runder Halbkreis.
  • Auch wenn diese Mütze flach gestrickt wird (hin und her), ist es sinnvoll dies in der Magic Loop Methode auf der Rundstricknadel zu arbeiten. Hier ein Video, das diese Technik erläutern: https://youtu.be/mB7kCsUsGD0 (YouTube-Video von Maschenfein Berlin)
  • [X]*Y: bedeutet, dass die Folge X in den eckigen Klammern Y-mal gearbeitet werden soll, also z.B. [2 Mre. kfb]*3 bedeutet, dass die Folge “zwei rechte Maschen und ein kfb” insgesamt 3-mal gestrickt werden soll.
  • Weitere Abkürzungen
    • HR: Hinreihe
    • RR: Rückreihe
    • Mre: rechte Masche(n)
    • Mli: linke Masche(n)
    • MM: Maschenmarkierer
    • 2 M re. zus., 2 Maschen rechts zusammenstricken

Konstruktion
Diese Mütze wird in offener Arbeit gestrickt, in einer umgekehrten U-Form um den magischen Maschenanschlag herum. Jede Reihe besteht aus einem kraus-rechts gestrickten Teil (Rippen am Anfang und Ende jeder Reihe) und einem halbkreisförmigen glatt-rechts gestrickten Teil um den Wendepunkt herum. Die unterschiedliche Schräge wird durch eine Anpassung der Zu- bzw. Abnahmen erlangt. An den Seiten gibt es relativ viele Zu- und Abnahmen, zur Mitte hin weniger bis keine - siehe das Diagramm unten.
Zuerst sind es vier Zunahmen in jeder Hinreihe, was einem flachen Halbkreis entspricht, dann nur noch drei Zunahmen pro Hinreihe, dann nur noch zwei und schließlich gar keine Zunahme mehr. Nachdem man die Mitte der Mütze erreicht hat, wird das gleiche rückwärts gemacht, also zuerst keine Abnahme, dann zwei pro Hinreihe, dann drei und schließlich vier. Der letzte Schritt ist das Abketten mit drei Nadeln.


Anleitung

Magischer Maschenanschlag: 2x15 Maschen, d.h. auf jeder Nadel sind 15 Maschen.
Das Strickstück sieht nun aus wie auf Bild A.

Nun die Nadeln so drehen, dass die Krausrippe vorne sichtbar ist. Alle Reihen werden nun in einer U-Form gestrickt, d.h. erst werden die Maschen auf der oberen Nadel abgestrickt, dann wird das Strickstück gedreht (so dass oben und unten vertauscht werden) und anschließend die Maschen der zweiten Nadel abgestrickt.
Der Punkt, an dem die Drehung stattfindet, wird Wendepunkt (“WP”) genannt.  
 
Zuerst werden vier Zunahmen pro Hinreihe gestrickt.
Reihe 1 (RR): 18 Mre, Maschenmarkierer platzieren, 2 Mli, WP, 2Mi, Maschenmarkierer platzieren, 18 Mre - die Maschenmarkierer trennen den kraus-rechts Teil (Bündchen) vom glatt-rechts Teil (oberer Teil der Mütze)
Reihe 2 (HR):  1 M abh, 17 Mre, MM,  [kfb]*4, MM, 18 Mre - das Strickstück sieht jetzt aus wie in Illustration 1, die U-Form ist noch nicht ganz sichtbar
Reihe 3 und alle weiteren ungeraden Reihen: 1 M abh, Mre bis MM, MM, Mli bis zum nächsten MM, MM, Mre bis Ende
Reihe 4 (HR): 1 M abh., 17 Mre, [1 Mre, kfb]*4, 18 Mre
Reihe 6 (HR): 1 M abh., 17 Mre, [kfb, 2 Mre]*4, 18 Mre
Reihe 8 (HR): 1 M abh., 17 Mre, [k2, kfb, 1 Mre]*4, 18 Mre
Reihe 10 (HR): 1 M abh., 17 Mre, [1 Mre, kfb, 3 Mre]*4, 18 Mre
Reihe 12 (HR): 1 M abh., 17 Mre, [4 Mre, kfb, 1 Mre]*4, 18 Mre
Reihe 14 (HR): 1 M abh., 17 Mre, [kfb, 6 Mre]*4, 18 Mre
Reihe 16 (HR): 1 M abh., 17 Mre, [4 Mre, kfb, 3 Mre]*4, 18 Mre

Das Strickstück sieht nun in etwa so aus wie auf Bild B.

Ab jetzt werden jeweils 3 Zunahmen pro Hinreihe gestrickt. 
Reihe 18 (HR): 1 M abh., 17 Mre, [6 Mre, kfb, 5 Mre]*3, 18 Mre
Reihe 20 (HR): 1 M abh., 17 Mre, [2 Mre, kfb, 10 Mre]*3, 18 Mre
Reihe 22 (HR): 1 M abh., 17 Mre, [10 Mre, kfb, 3 Mre]*3, 18 Mre
Reihe 24 (HR): 1 M abh., 17 Mre, [1 Mre, kfb, 13 Mre]*3, 18 Mre
Reihe 26 (HR): 1 M abh., 17 Mre, [11 Mre, kfb, 4 Mre]*3, 18 Mre
Reihe 28 (HR): 1 M abh., 17 Mre, [5 Mre, kfb, 11 Mre]*3, 18 Mre
Reihe 30 (HR): 1 M abh., 17 Mre, [13 Mre, kfb, 4 Mre]*3, 18 Mre
Reihe 32 (HR): 1 M abh., 17 Mre, [Mre 2, kfb, 16 Mre]*3, 18 Mre

Das Strickstück sieht nun in etwa so aus wie auf Bild C.

Je nachdem wie lange die verwendete Rundstricknadel ist, nun von der Magic Loop Methode zum normalen Stricken wechseln, d.h. ohne dass ein Teil des Seiles heraussteht. Um das Zählen zu erleichtern, ist es ratsam, an die Stelle des WPs einen weiteren Maschenmarkierer einzufügen. 

Ab jetzt werden pro Hinreihe 2 Zunahmen gestrickt. 
Reihe 34 (HR): 1 M abh., 17 Mre, [20 Mre, kfb, 9 Mre]*2, 18 Mre
Reihe 36 (HR): 1 M abh., 17 Mre, [2 Mre, kfb, 28 Mre]*2, 18 Mre
Reihe 38 (HR): 1 M abh., 17 Mre, [10 Mre, kfb, 21 Mre]*2, 18 Mre
Reihe 40 (HR): 1 M abh., 17 Mre, [25 Mre, kfb, 7 Mre]*2, 18 Mre
Reihe 42 (HR): 1 M abh., 17 Mre, [13 Mre, kfb, 20 Mre]*2, 18 Mre

Das Strickstück sieht nun so aus wie auf Bild D.

Ab jetzt wird in jeder Hinreihe jetzt nur noch eine Masche zugenommen. 
Reihe 44 (HR): 1 M abh., 17 Mre, 27 Mre, kfb, Mre bis MM, 18 Mre
Reihe 45 (RR): 1 M abh., 17 Mre, Mli bis MM (d.h. 71 Mli), 18 Mre
Reihe 46 (HR): 1 M abh., 17 Mre, 53 Mre, kfb, Mre bis MM, 18 Mre
Reihe 48 (HR): 1 M abh., 17 Mre, 32 Mre, kfb, Mre bis MM, 18 Mre
Reihe 50 (HR): 1 M abh., 17 Mre, 39 Mre, kfb,Mre bis MM, 18 Mre

Nun folgen die Reihen ohne Zu- oder Abnahmen.
Reihe 52 (HR): 1 M abh., Mre bis zum Ende
Das Bündchen (Krausrippen am unteren Rand) sollte jetzt (leicht gestreckt) so lange sein wie die Hälfte des Kopfumfanges.
Reihe 54 (HR): 1 M abh., Mre bis zum Ende

Jeweils eine Abnahme pro Hinreihe.
Reihe 56 (HR): 1 M abh., 17 Mre, 38 Mre, ssk, Mre bis MM, 18 Mre
Reihe 58 (HR): 1 M abh., 17 Mre, 31 Mre, ssk, Mre bis MM, 18 Mre
Reihe 60 (HR): 1 M abh., 17 Mre, 52 Mre, ssk, Mre bis MM, 18 Mre
Reihe 62 (HR): 1 M abh., 17 Mre, 26 Mre, ssk, Mre bis MM, 18 Mre

In diesem Teil werden 2 Abnahmen pro Hinreihe gestrickt.
Reihe 64 (HR): 1 M abh., 17 Mre, [13 Mre, ssk, 20 Mre]*2, 18 Mre
Reihe 66 (HR): 1 M abh., 17 Mre, [25 Mre, ssk, 7 Mre]*2, 18 Mre
Reihe 68 (HR): 1 M abh., 17 Mre, [10 Mre, ssk, 21 Mre]*2, 18 Mre
Reihe 70 (HR): 1 M abh., 17 Mre, [2 Mre, ssk, 29 Mre]*2, 18 Mre
Reihe 72 (HR): 1 M abh., 17 Mre, [20 Mre, ssk, 9 Mre]*2, 18 Mre

Pro Hinreihe werden nun drei Maschen abgenommen. 
Reihe 74 (HR): 1 M abh., 17 Mre, [2 Mre, ssk, 16 Mre]*3, 18 Mre
Reihe 76 (HR): 1 M abh., 17 Mre, [13 Mre, ssk, 4 Mre]*3, 18 Mre
Reihe 78 (HR): 1 M abh., 17 Mre, [5 Mre, ssk, 11 Mre]*3, 18 Mre
Reihe 80 (HR): 1 M abh., 17 Mre, [11 Mre, ssk, 4 Mre]*3, 18 Mre
Reihe 82 (HR): 1 M abh., 17 Mre, [1 Mre, ssk, 13 Mre]*3, 18 Mre
Reihe 84 (HR): 1 M abh., 17 Mre, [10 Mre, ssk, 3 Mre]*3, 18 Mre
Reihe 86 (HR): 1 M abh., 17 Mre, [2 Mre, ssk, 10 Mre]*3, 18 Mre
Reihe 88 (HR): 1 M abh., 17 Mre, [6 Mre, ssk, 5 Mre]*3, 18 Mre

Und schliesslich vier Abnahmen pro Hinreihe.
Reihe 90 (HR): 1 M abh., 17 Mre, [4 Mre, ssk, 3 Mre]*4, 18 Mre
Reihe 92 (HR): 1 M abh., 17 Mre, [6 Mre, ssk]*4, 18 Mre
Reihe 94 (HR): 1 M abh., 17 Mre, [4 Mre, ssk, 1 Mre]*4, 18 Mre
Reihe 96 (HR): 1 M abh., 17 Mre, [1 Mre, ssk, 3 Mre]*4, 18 Mre
Reihe 98 (HR): 1 M abh., 17 Mre, [2 Mre, ssk, 1 Mre]*4, 18 Mre
Reihe 100 (HR): 1 M abh., 17 Mre, [ssk, 2 Mre]*4, 18 Mre
Reihe 102 (HR): 1 M abh., 17 Mre, [1 Mre, ssk]*3, k1,  2 M re. zus., 18 Mre - 
(Die letzte Abnahme wurde als rechtsgeneigt zusammengestrickt, weil dies einen schöneren Übergang zum Kraus-Rechts-Bündchen bildet.
Reihe 104 (HR): 1 M abh., 17 Mre, [ssk]*3, 2 M re. zus., 18 Mre
Reihe 105 (RR) = Reihe 3

Das Strickstück sieht nun in etwa aus wie auf Bild E.

Nach Beendigung der letzten Reihe sollte wieder dieselbe Anzahl Maschen vorhanden sein, wie ganz am Anfang nach dem Maschenanschlag (d.h. 2 x 20 Maschen).
Die Mütze nun auf links drehen, die beiden Seiten zusammenhalten und mit dem Abketten mit drei Nadeln zusammenstricken.

Nach dem Vernähen der Enden ist die Mütze fertig und zurück auf rechts gedreht werden.


Freitag, 2. September 2022

Garter Stitch Snowflake

I've always wanted to do a big lacy half-circle shawl all in garter stitch. This doily started out as a test piece for that kind of shawl. However, I liked the small piece quite a lot, so I tried to figure out how to do it in a seamless full circle – and here it is. 

This doily consists of diamonds that stack up to be triangles which in turn form a (slightly angular) circle. It starts with a provisional cast on and is finished by grafting in garter stitch (just before knitting and binding off the last stitches). It is NOT A BEGINNER PATTERN.


The knitting pattern is available via


The pattern PDF is 12 pages long and contains
  • written row-by-row instructions for knitting this piece – including 6 photos
  • schematic of the construction, i.e. how the diamonds stack up to create the whole piece
  • chart(s) of one diamond
  • short photo tutorials for the following techniques
    • provisional CO with a crochet hook and undoing it
    • grafting in garter stitch
    • short rows with wrap and turn and picking up the wraps 
    • crochet CO (at the edge of a knitted piece)
    • backwards loop CO


To knit this piece you need the following materials
  • about 250 metres of light fingering weight yarn (for the blue piece in the photos I used Creative Melange Lace by Rico Design, colorway 011 - here's the yarn's Ravelry page, the red one is made with Wollmeise Lace, colorway Allegria - here's the yarn's Ravelry page)
  • 2.5 mm knitting needles 
  • a crochet hook of a similar size (I used a 2.5mm hook)  
  • scrap yarn
  • a tapestry needle – for grafting and to weave in ends
Knitted in light fingering weight yarn the finished piece has a diameter of about 42 cm.
I did not knit a swatch, but measuring from the finished piece, 13 sts give about 5 cm in width.


Samstag, 13. August 2022

Sewing practice or you can't have too many pincushions ...

This summer, I started to sew a few t-shirts for myself (see e.g. this Instagram post). I am far from being a confident sewer - not very neat or exact. Even though you might get away with a few inaccuracies in Jersey, I decided I would use some of the leftover fabric to practice sewing exactly.  

The finished piece looks from above a bit like a paper fortune-teller (the childrens' game) or to be a bit more technical like an origami Blintz base.


If you want to do something similar yourself, here's how to do it:

1. Cut out four pieces of this pattern from leftover fabric. The outer (dotted) line is the cutting line - it already has a seam allowance of 1 cm.


2. Mark the sewing line (along the grey line in the pattern). 


3. Decide how to place the pieces. In the picture the parts are numbered for reference in the next steps.


4. Pin pieces 1 and 2 right sides together and sew along the highlighted (black dotted) line on the right hand side.


5. Now pin part 3 to part 2 (also right sides together) and again sew along the highlighted (black dotted) line. Make sure to not sew part 1.


6. Now pin part 4 to part 3 and again sew only the right hand seam. Now all four pieces are sewn together and there is an open seam between parts 4 and 1.

7. Now pin parts 4 and 1 together and sew the sides according to the picture below, i.e. leaving an opening through which you can turn the piece.

8. Now your piece looks as shown below - with only a small opening (where the arrow is).

9. Turn the piece right sides out and fill with stuffing through the opening (I always use the cuttings from my overlock machine for stuffing). Make sure that the stuffing gets into the corners, too.

10. Close the opening by hand sewing. And the pincushion is finished.

Unfortunately, my piece is not as neat as I would have liked - the bit in the middle (where all parts meet) . The reverse side is even worse :) I guess I need some more practice - i.e. I need to think of another scrappy project that requires a certain precision :)

Mittwoch, 6. Juli 2022

Shiki-Miki

I like tops with interesting constructions (see for example the Garter Stitch Bias Top). So when Angela from bestrickendes.de showed and offered me her Shiki-Miki pattern - in the summer of last year, I was really excited. It seemed a really good idea to use a lovely Lace weight yarn, I had seen at shop in town. It turns out, I was right and I am really happy with the result - however it took me some time to get there.

The pattern is available via Ravelry here: https://www.ravelry.com/patterns/library/shiki-miki-shirt


Once I had ordered and received the yarn (Creative Melange Lace by Rico Design, colorway 011 - here's the yarn's Ravelry page), the actual knitting wasn't the problem. I started in July and I had finished everything except the lower edges by August 2021. I don't know, why I didn't continue it, but this June I started again and finished knitting the final bits. 

Because I don't like sewing up seams, I try to avoid creating seams at the knitting stage. Here, e.g. I knitted the shoulder bits at once for the front and back - see picture on the right. I had originally planned to do the same at the sides, but decided against it, because I think a knitted piece doesn't warp as much if it has side seams. 

So after finishing I only had to seam the sides and to weave in all ends. Unsurprisingly, this task took me quite a few weeks, but I have finally done it. 

I really (really, really) like the summery colors and the light lacy texture - and I am looking forward to wearing it on a hot day.

Sonntag, 5. Juni 2022

June 2022 - Discount

During the month off June 2022 all my knitting patterns on Ravelry and Payhip are 20% off with coupon code "JUNE".

For example the ones shown below:


Freitag, 6. Mai 2022

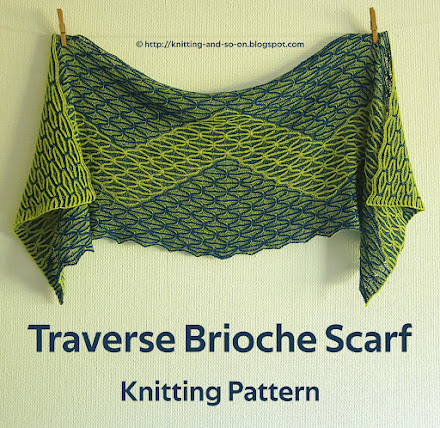
Traverse Brioche Scarf

Two-colour brioche is a marvellous technique. It creates a lovely, squishy texture that is comforable to wear and it can be used to create quite intricate geometric patterns. 

This rectangular scarf is knitted with a criss-cross pattern, i.e. a stitch that combines increases and decreases, combined with a zigzag effect that is created by switching the dominant colour within the row. Since it is done in two-colour brioche, both sides look great.

This scarf is made with Lace weight yarn, which provides a light summery touch. The one I knitted (half alpace, half merino) only weighs 170 grams; it measures 150 cm in length and 45 cm in width.


The pattern PDF is available via


The pattern PDF is 9 pages long and contains

  • row-by-row pattern instructions
  • photo tutorials for the techniques you need for this piece:
    • brk4inc
    • brk4dec 
    • brk4dec4inc
  • a schematic / cheat-sheet that explains the increases and decreases for this pattern
In order to knit this pattern you should be familiar with basic two-colour brioche knitting.


To knit a scarf like this you need the following materials

  • a total of about 1100 metres of lace weight yarn – in two colours,
    I used two (semi-)solid yarns: 
    • as LY I used light green Holst Garn, Titicaca (colorway “Wasabi”) 
    • as DY I used royal blue Wollmeise Lace (colorway “Kornblume”) 
  • 3 mm knitting needles – circulars or other needles with two points
  • 2 stitch markers 
  • a cable needle or a clippy stitch marker – for some of the brk4dec4inc and brk4dec stitches
  • tapestry needle for weaving in ends


Donnerstag, 21. April 2022

Pieces of Eight Mitts in Dutch - Gratis Breipatroon

Carolien (or mijikke on Ravelry) has provided a Dutch translation of the Pieces of Eight Mitts. Hartelijk bedankt!

The Dutch translation can be found here.

The original English version is available here - as well as links to German and Danish translations.


A list of all translations of my patterns can be found in this blogpost.

Samstag, 16. April 2022

Mauerblümchen

Here's another pattern for fingerless gloves - again knitted flat and in garter stitch. 

These fingerless gloves are knitted flat and in garter stitch. They are shaped with short rows around a point at the outer wrist, the thumb is created one half at a time (with a short knitted CO and a BO). The flower pattern is done in intarsia technique. The project starts with a provisional cast on and finishes with grafting in garter stitch. In the end the side seams are sewn up.

Since this is an intarsia project with three colours that also uses short rows, it can be quite fiddly.  It is NOT a beginner pattern.

As to the name, "Mauerblümchen" is the German word for wall flower - it ties in with my Blümchen Fingerless Gloves that have a flower motive around the thumb.

The knitting pattern in available via


The pattern PDF is 13 pages long and contains 

  • written row-by-row instructions for knitting a mitt in one size (slight adjustments can be made by using a different needle size) – including nine in-process photos  
  • a pattern chart
  • short photo tutorials for the following techniques
    • provisional CO with a crochet hook and how to undo it
    • grafting in garter stitch
    • short rows with wrap and turn and picking up the wraps 
    • intarsia knitting and weaving in yarn while carrying it (backwards and forwards)
    • knitted CO 


Gauge and Size
I knitted two pairs – one with 2.5 mm needles and one with 3 mm needles – see photo below.
With 2.5 mm needles 28 ridges (56 garter stitch rows) gave me 10 cm in height and 25 sts gave 10 cm in width (with an unblocked swatch, since I didn't block the mitts). The finished piece knitted with 2.5 mm needles is about 17 - 18 cm high (at it's highest point) and about 17 cm in diameter (without just below the thumb). 
With 3 mm needles 26 ridges (53 garter stitch rows) gave me 10 cm in height and 23 sts gave 10 cm in width (also with  unblocked swatch). The finished piece measures about 19 - 20 cm in height and about 19 cm in diameter (just below the thumb).
However, the pieces are all in garter stitch, so they are quite stretchy.


To knit a pair of these fingerless gloves you need the following materials:
  • a total of 30 to 35 grams of fingering weight yarn in two colors:
    • about 12 grams per mitt for C1 (background color)
    • about 4 grams per mitt for C2 (flower color)
  • 2.5 mm or 3 mm knitting needles (or another needle that gives you the gauge) – straight or circulars
  • scrap yarn and a crochet hook (about 3mm) for the provisional CO
  • a tapestry needles for grafting, sewing and to weave in ends


Donnerstag, 10. März 2022

Ripple Fingerless Gloves

Fingerless gloves are my favorite accessory – there are so many varieties and ways to construct them.

The ones here are knitted flat and in garter stitch with a wave pattern. One edge of the flat row is the thumb around which the mitt shaped in short rows. It starts with a provisional cast on and ends with a row of grafting in garter stitch. The wavy patternis created with increases and decreases.

This is NOT a beginner pattern.


The knitting pattern is available via


The pattern PDF is 12 pages long contains 

  • written row-by-row instructions for knitting a mitt in one size (slight adjustments can be made by using a different needle size)– including six photos of the different stages  
  • a full pattern chart
  • short photo tutorials for the following techniques:
    • provisional CO with a crochet hook and how to undo it
    • grafting in garter stitch
    • short rows with wrap and turn and picking up the wraps 


Gauge and Size

I knitted pairs in two needle sizes – with 2.5 mm needles and with 3 mm needles – see photo below:
  • With 2.5 mm needles 28 ridges (56 garter stitch rows) gave me 10 cm in height and 25 sts gave 10 cm in width (with an unblocked swatch, since I didn't block the mitts). The finished piece knitted with 2.5 mm needles is about 19 cm high (at it's highest point) and about 17 cm in diameter (without just below the thumb). 
  • With 3 mm needles 26 ridges (53 garter stitch rows) gave me 10 cm in height and 23 sts gave 10 cm in width (also with  unblocked swatch). The finished piece measures about 20 cm in height and about 19 cm in diameter (just below the thumb).

To knit a pair of these fingerless gloves you need:
  • a total of about 35 to 40 grams of fingering weight yarn - I used 
  • 2.5 mm or 3 mm knitting needles (or another needle that gives you the gauge) – straight or circulars
  • scrap yarn and a crochet hook (about 3mm) for the provisional CO
  • 10 stitch markers – 4 of which removable  
  • a tapestry needles for grafting and to weave in ends
One mitt finished - one mitt needs to be sewn up


Freitag, 26. November 2021

Starry Christmas Decorations - Knitted

The first sunday of advent is coming up, which is the time to decorate your space as christmassy as possible. And for me stars - knitted and otherwise - are the best way to do so. 

So here are two seasonal patterns that help to bring a starry sparkle to your home.

Stella Star-Shaped Potholders

These potholders (doilies, coasters) are knitted flat and in garter stitch. This pattern was published two years ago. Lately, I have completely reviewed it and added two more variations. 

The new pattern PDF 14 pages long and contains:

  • the complete written patterns for stars in two sizes including charts
  • a general pattern how to knit stars in other sizes – containing also a photo tutorial
  • three further variations of this pattern (see photos below)
    • a lacy variation of this star – written pattern and a chart
    • a pattern for a two-colour variation – written pattern, a chart and detailed instructions how to undo the provisional CO in two colours and how to do the grafting in two colours
    • a three-colour variation – chart only 
  • short photo tutorials for the following techniques
    • provisional cast on with a crochet hook and how to undo it
    • grafting in garter stitch
    • intarsia

You can buy this pattern


Sternchen 3D-Stars

Even though these stars are 3-dimensional they are knitted flat. They have six points, are constructed of short rows and knitted (nearly) all in garter stitch. They come in four sizes and can be used to decorate your house for Christmas.

The pattern PDF contains

  • a written pattern for four sizes of these little stars (ranging from 6 to 14 cm in diameter - if knitted in fingering weight yarn)
  • a chart for two sizes
  • photo illustrations for various stages of star

The pattern is available as a PDF


Samstag, 13. November 2021

U-Turn Hat in 6-Ply Yarn

About four years ago, I published a hat pattern that was based on the idea of a magic cast-on and knitting around it in a U-shape (U-Turn Hat) - as with many of my knitted accessories, it is knitted in fingering weight. Motivated by an online discussion with Angela from bestrickendes.de, I thought it might be a good idea to knit it in a thicker yarn. So the next time I went into a yarn store, I looked for some self-striping 6- or 8-ply yarn. I bought some Zwerger Opal Sweet Dreams (Colorway 9720 Sternentänzer, here's a link to the yarn's Ravelry page).

In this blogpost, I'll explain how I "adapted" the pattern to 6-ply yarn. 

If you like that kind of construction, I have used a similar idea before for fingerless gloves (U-Turn Mitts) and slipppers (U-Turn Slippers).


Step 1: Check the general construction

The hat is knitted flat an in a U-shape around the first magic CO. Each row consists of a garter stitch part (ribbing - at the beginning and end of each row) and a semicircular bit around the turning point of the U. The slope is achieved by changing the number of increases and decreases. See schematic below.

Construction - click to enlarge

First there are 4 decreases every 2nd row (section A), which basically creates a semicircle above the ribbing. Then only 3 increases (section B), then only 2 (section C), then only 1 (section D) and finally there will be a few rows without any increases at all (section E).

Once you've reached the middle of your piece, you will knit the same backwards, i.e. there will be decreases instead of increases. That means you start with no decreases (section F), then switch to 1 decrease every 2nd row (section G), then 2 decreases every 2nd row (section H), then 3 (section I) and finally 4 decreases every 2nd row (section J). Until there are only as many stitches left as in the original CO. The piece is finished with a three-needle BO.

To get the slope to fit around a standard head the pattern suggests that of the total number of rows necessary reach the middle of the piece should be divided as follows:

  • about 1/3 for RS rows with 4 in/decreases
  • about the same number for RS rows with 3 in/decreses
  • about 1/6 for RS rows with 2 in/decreases
  • divide the remaining rows equally into rows 1 in/decrease and no in/decrease. 

Step 2: Knit a swatch 

Yes, really. Even though I don't like swatching I knitted a small piece to find out how many rows I needed for the hat to fit around my head and how many stitches I needed to get my desired height of garter stitch ribbing.


Step 3: Calculate and distribute the rows

I decided that I wanted a ribbing about 6 cm high (13 stitches as per my swatch). For a quarter of the circumference of my head I calculated that I would need 27 ridges or 54 rows. 

I then divided the 27 ridges into the sections as follows:

  • section A /J: 9 ridges
  • section B/I: 8 ridges
  • section C/H: 5 ridges
  • section D/G: 3 ridges
  • section E/F: 2 ridges
  • => total number of ridges 27
As you can see, the distribution of the sections is not as exact as suggested by the pattern. But since the resulting fabric (knitting) is quite stretchy, that doesn't matter.


Step 4: Knit 

And while you're knitting, check and measure from time to time, if your calculations are correct and - if necessary - adapt.