Freitag, 2. September 2022

Garter Stitch Snowflake

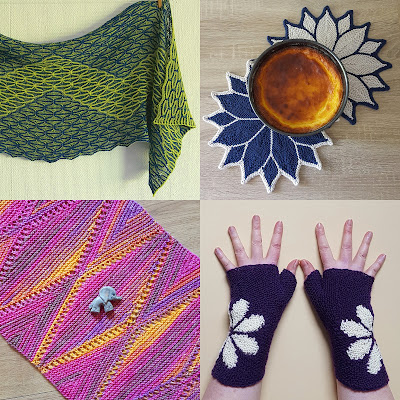
I've always wanted to do a big lacy half-circle shawl all in garter stitch. This doily started out as a test piece for that kind of shawl. However, I liked the small piece quite a lot, so I tried to figure out how to do it in a seamless full circle – and here it is. 

This doily consists of diamonds that stack up to be triangles which in turn form a (slightly angular) circle. It starts with a provisional cast on and is finished by grafting in garter stitch (just before knitting and binding off the last stitches). It is NOT A BEGINNER PATTERN.


The knitting pattern is available via


The pattern PDF is 12 pages long and contains
  • written row-by-row instructions for knitting this piece – including 6 photos
  • schematic of the construction, i.e. how the diamonds stack up to create the whole piece
  • chart(s) of one diamond
  • short photo tutorials for the following techniques
    • provisional CO with a crochet hook and undoing it
    • grafting in garter stitch
    • short rows with wrap and turn and picking up the wraps 
    • crochet CO (at the edge of a knitted piece)
    • backwards loop CO


To knit this piece you need the following materials
  • about 250 metres of light fingering weight yarn (for the blue piece in the photos I used Creative Melange Lace by Rico Design, colorway 011 - here's the yarn's Ravelry page, the red one is made with Wollmeise Lace, colorway Allegria - here's the yarn's Ravelry page)
  • 2.5 mm knitting needles 
  • a crochet hook of a similar size (I used a 2.5mm hook)  
  • scrap yarn
  • a tapestry needle – for grafting and to weave in ends
Knitted in light fingering weight yarn the finished piece has a diameter of about 42 cm.
I did not knit a swatch, but measuring from the finished piece, 13 sts give about 5 cm in width.


Samstag, 13. August 2022

Sewing practice or you can't have too many pincushions ...

This summer, I started to sew a few t-shirts for myself (see e.g. this Instagram post). I am far from being a confident sewer - not very neat or exact. Even though you might get away with a few inaccuracies in Jersey, I decided I would use some of the leftover fabric to practice sewing exactly.  

The finished piece looks from above a bit like a paper fortune-teller (the childrens' game) or to be a bit more technical like an origami Blintz base.


If you want to do something similar yourself, here's how to do it:

1. Cut out four pieces of this pattern from leftover fabric. The outer (dotted) line is the cutting line - it already has a seam allowance of 1 cm.


2. Mark the sewing line (along the grey line in the pattern). 


3. Decide how to place the pieces. In the picture the parts are numbered for reference in the next steps.


4. Pin pieces 1 and 2 right sides together and sew along the highlighted (black dotted) line on the right hand side.


5. Now pin part 3 to part 2 (also right sides together) and again sew along the highlighted (black dotted) line. Make sure to not sew part 1.


6. Now pin part 4 to part 3 and again sew only the right hand seam. Now all four pieces are sewn together and there is an open seam between parts 4 and 1.

7. Now pin parts 4 and 1 together and sew the sides according to the picture below, i.e. leaving an opening through which you can turn the piece.

8. Now your piece looks as shown below - with only a small opening (where the arrow is).

9. Turn the piece right sides out and fill with stuffing through the opening (I always use the cuttings from my overlock machine for stuffing). Make sure that the stuffing gets into the corners, too.

10. Close the opening by hand sewing. And the pincushion is finished.

Unfortunately, my piece is not as neat as I would have liked - the bit in the middle (where all parts meet) . The reverse side is even worse :) I guess I need some more practice - i.e. I need to think of another scrappy project that requires a certain precision :)

Mittwoch, 6. Juli 2022

Shiki-Miki

I like tops with interesting constructions (see for example the Garter Stitch Bias Top). So when Angela from bestrickendes.de showed and offered me her Shiki-Miki pattern - in the summer of last year, I was really excited. It seemed a really good idea to use a lovely Lace weight yarn, I had seen at shop in town. It turns out, I was right and I am really happy with the result - however it took me some time to get there.

The pattern is available via Ravelry here: https://www.ravelry.com/patterns/library/shiki-miki-shirt


Once I had ordered and received the yarn (Creative Melange Lace by Rico Design, colorway 011 - here's the yarn's Ravelry page), the actual knitting wasn't the problem. I started in July and I had finished everything except the lower edges by August 2021. I don't know, why I didn't continue it, but this June I started again and finished knitting the final bits. 

Because I don't like sewing up seams, I try to avoid creating seams at the knitting stage. Here, e.g. I knitted the shoulder bits at once for the front and back - see picture on the right. I had originally planned to do the same at the sides, but decided against it, because I think a knitted piece doesn't warp as much if it has side seams. 

So after finishing I only had to seam the sides and to weave in all ends. Unsurprisingly, this task took me quite a few weeks, but I have finally done it. 

I really (really, really) like the summery colors and the light lacy texture - and I am looking forward to wearing it on a hot day.

Sonntag, 5. Juni 2022

June 2022 - Discount

During the month off June 2022 all my knitting patterns on Ravelry and Payhip are 20% off with coupon code "JUNE".

For example the ones shown below:


Freitag, 6. Mai 2022

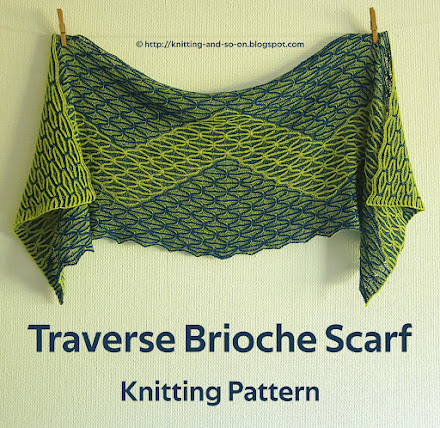
Traverse Brioche Scarf

Two-colour brioche is a marvellous technique. It creates a lovely, squishy texture that is comforable to wear and it can be used to create quite intricate geometric patterns. 

This rectangular scarf is knitted with a criss-cross pattern, i.e. a stitch that combines increases and decreases, combined with a zigzag effect that is created by switching the dominant colour within the row. Since it is done in two-colour brioche, both sides look great.

This scarf is made with Lace weight yarn, which provides a light summery touch. The one I knitted (half alpace, half merino) only weighs 170 grams; it measures 150 cm in length and 45 cm in width.


The pattern PDF is available via


The pattern PDF is 9 pages long and contains

  • row-by-row pattern instructions
  • photo tutorials for the techniques you need for this piece:
    • brk4inc
    • brk4dec 
    • brk4dec4inc
  • a schematic / cheat-sheet that explains the increases and decreases for this pattern
In order to knit this pattern you should be familiar with basic two-colour brioche knitting.


To knit a scarf like this you need the following materials

  • a total of about 1100 metres of lace weight yarn – in two colours,
    I used two (semi-)solid yarns: 
    • as LY I used light green Holst Garn, Titicaca (colorway “Wasabi”) 
    • as DY I used royal blue Wollmeise Lace (colorway “Kornblume”) 
  • 3 mm knitting needles – circulars or other needles with two points
  • 2 stitch markers 
  • a cable needle or a clippy stitch marker – for some of the brk4dec4inc and brk4dec stitches
  • tapestry needle for weaving in ends


Donnerstag, 21. April 2022

Pieces of Eight Mitts in Dutch - Gratis Breipatroon

Carolien (or mijikke on Ravelry) has provided a Dutch translation of the Pieces of Eight Mitts. Hartelijk bedankt!

The Dutch translation can be found here.

The original English version is available here - as well as links to German and Danish translations.


A list of all translations of my patterns can be found in this blogpost.

Samstag, 16. April 2022

Mauerblümchen

Here's another pattern for fingerless gloves - again knitted flat and in garter stitch. 

These fingerless gloves are knitted flat and in garter stitch. They are shaped with short rows around a point at the outer wrist, the thumb is created one half at a time (with a short knitted CO and a BO). The flower pattern is done in intarsia technique. The project starts with a provisional cast on and finishes with grafting in garter stitch. In the end the side seams are sewn up.

Since this is an intarsia project with three colours that also uses short rows, it can be quite fiddly.  It is NOT a beginner pattern.

As to the name, "Mauerblümchen" is the German word for wall flower - it ties in with my Blümchen Fingerless Gloves that have a flower motive around the thumb.

The knitting pattern in available via


The pattern PDF is 13 pages long and contains 

  • written row-by-row instructions for knitting a mitt in one size (slight adjustments can be made by using a different needle size) – including nine in-process photos  
  • a pattern chart
  • short photo tutorials for the following techniques
    • provisional CO with a crochet hook and how to undo it
    • grafting in garter stitch
    • short rows with wrap and turn and picking up the wraps 
    • intarsia knitting and weaving in yarn while carrying it (backwards and forwards)
    • knitted CO 


Gauge and Size
I knitted two pairs – one with 2.5 mm needles and one with 3 mm needles – see photo below.
With 2.5 mm needles 28 ridges (56 garter stitch rows) gave me 10 cm in height and 25 sts gave 10 cm in width (with an unblocked swatch, since I didn't block the mitts). The finished piece knitted with 2.5 mm needles is about 17 - 18 cm high (at it's highest point) and about 17 cm in diameter (without just below the thumb). 
With 3 mm needles 26 ridges (53 garter stitch rows) gave me 10 cm in height and 23 sts gave 10 cm in width (also with  unblocked swatch). The finished piece measures about 19 - 20 cm in height and about 19 cm in diameter (just below the thumb).
However, the pieces are all in garter stitch, so they are quite stretchy.


To knit a pair of these fingerless gloves you need the following materials:
  • a total of 30 to 35 grams of fingering weight yarn in two colors:
    • about 12 grams per mitt for C1 (background color)
    • about 4 grams per mitt for C2 (flower color)
  • 2.5 mm or 3 mm knitting needles (or another needle that gives you the gauge) – straight or circulars
  • scrap yarn and a crochet hook (about 3mm) for the provisional CO
  • a tapestry needles for grafting, sewing and to weave in ends