Dienstag, 4. Februar 2014

Winding Mitts

Free Knitting Pattern: Windings Mitts
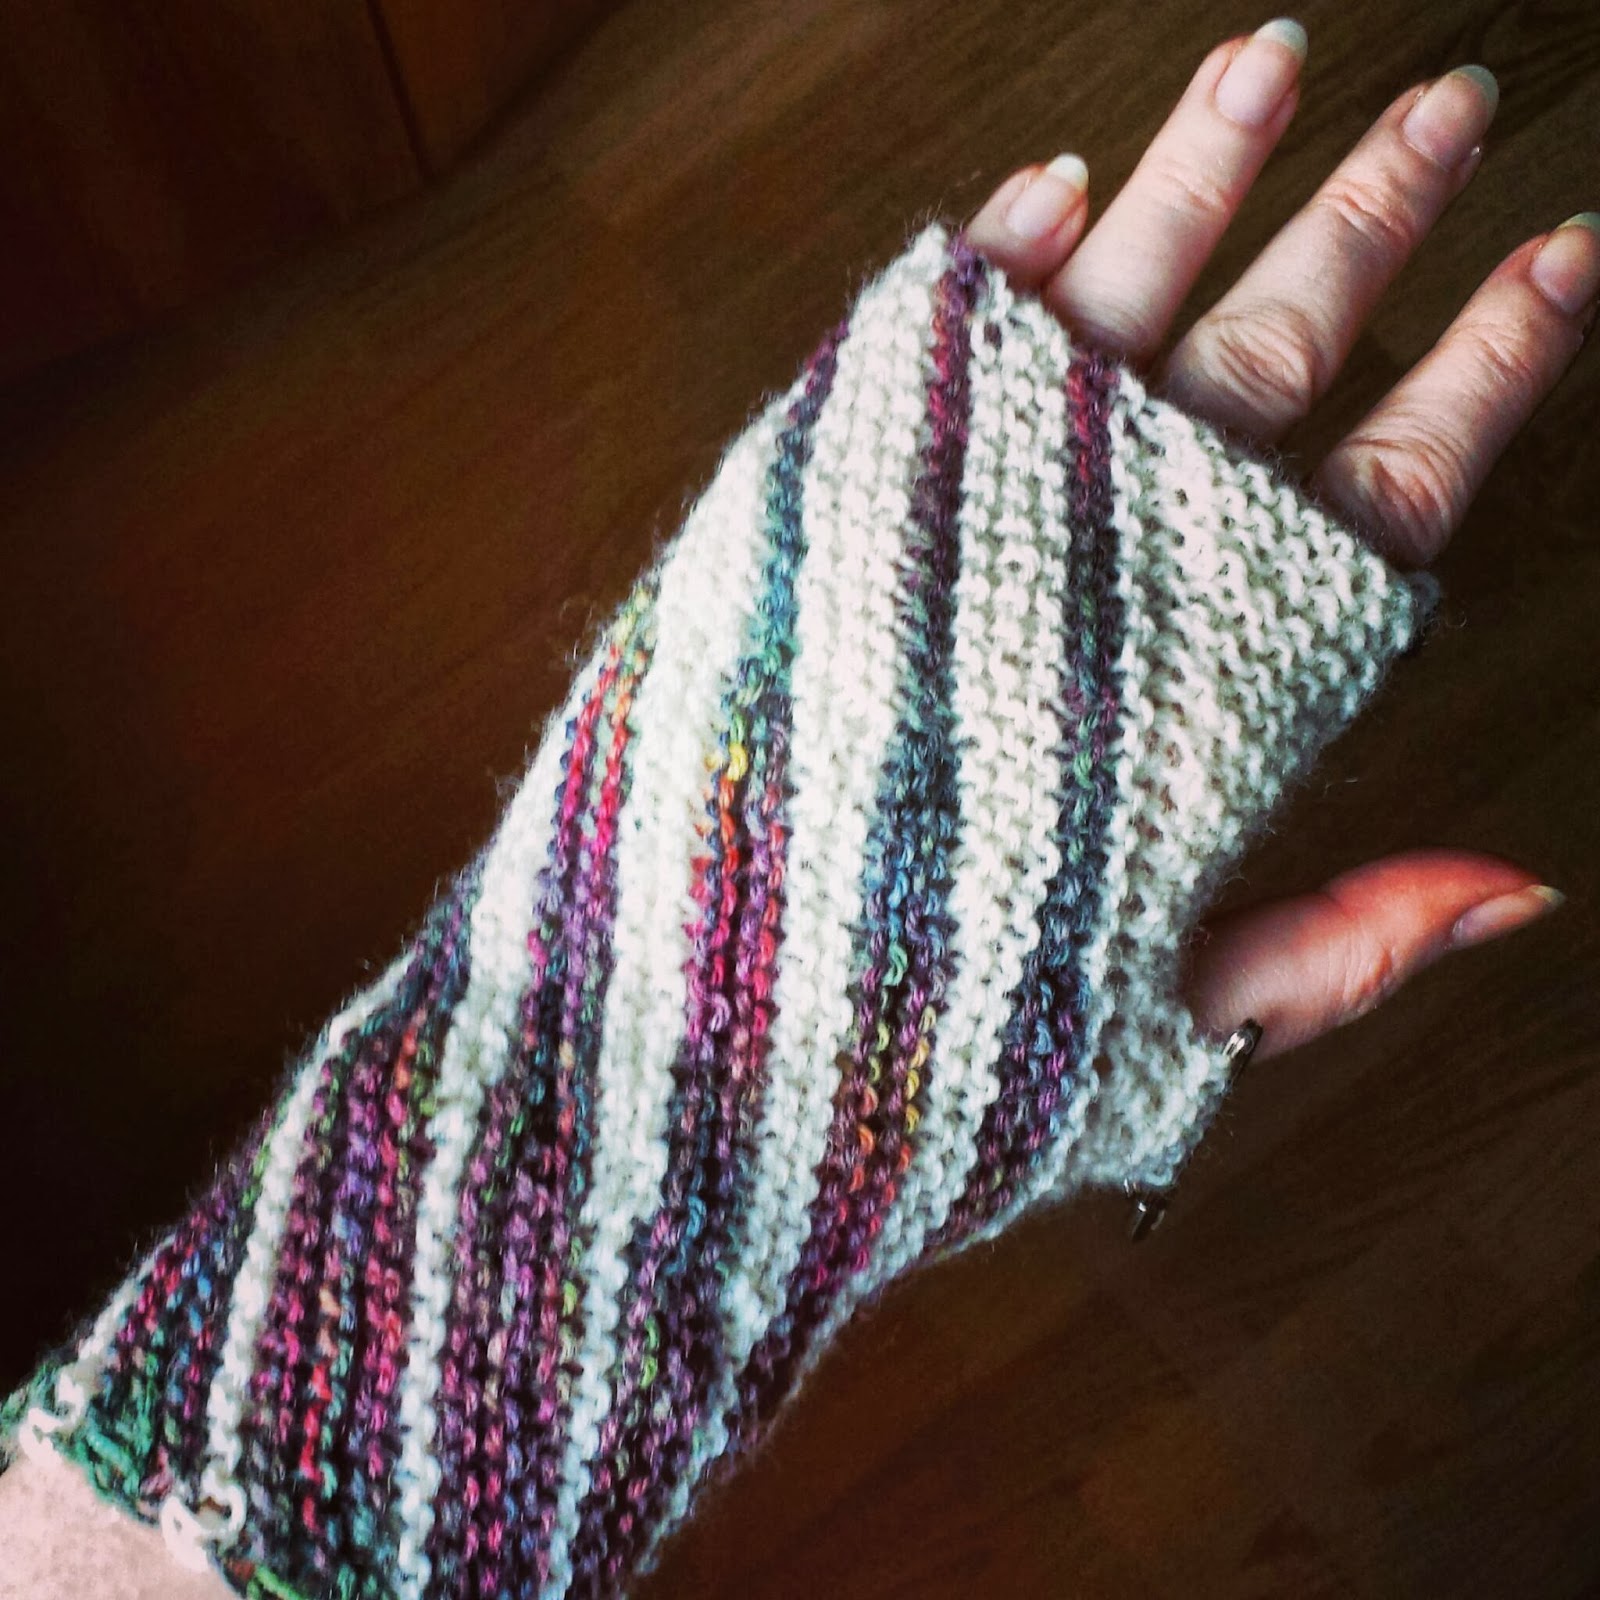
These "garter stitch only" mitts are
constructed from two rhomboids - the thumb panel and a main part.
Short row triangles in wind their way around your wrists creating a unique pattern.


Creative Commons License
This work by Knitting and so on is licensed under a Creative Commons Attribution-NonCommercial-ShareAlike 4.0 International License.


Materials:
  • A total of 40 grams of fingering weight yarn in two colours
    - Main Colour (MC) – white on the photo
    - Contrast Colour (CC) – dark on the photo
  • 3mm needles (straight needles for thumb panel and main part – dpns for finishing the thumbs)
  • Stitch holders or scrap yarn
  • Tapestry needle

Techniques or Abbreviations:
  • Grafting in Garter Stitch: Cut the yarn but leave a long enough tail (I usually take about 5 to 6 times the length of the seam). Put the yarn on a tapestry needle. For setting up insert tapestry needle purlwise into the first stitch - first on the front needle, then on the back needle. * Now insert the needle knitwise into the first stitch on the front needle and slip the stitch, then insert it purlwise in the next stitch but leave that on the needle. Do the same on the back needle - then repeat from * until there are no more stitches on your needles.
    If my explanation is too wordy, I found a video that shows it: http://www.youtube.com/watch?v=BAEIogIli6o
The picture below shows the general construction of the mitts. As you can see, left hand mitt and right hand mitt are mirror inverted. That's why there will be two different descriptions - one for each mitt.


Left mitt (with left-leaning thumb panel)


Thumb panel

With Main Colour CO9
R1 – R3: sl1 k to end
R4 (RS): sl1 ssk k4 kfb k1
Repeat R1 – R4 a total of 13 times

Now the thumb increases start: In short,  you make 12 increases (6 on each side of the thumb) distributed over 14 rows, while keeping up the increases and decreases at the sides. But, here it is in detail:

R53: s1 k1 place marker k2 place marker k to end
R54 (thumb increase row): sl1, k to marker, sm, kfb, k to 1 st before marker, kfb, sm, k to end
R55: sl1 k to end
R56: sl1 ssk,  k to last 2 sts before end, kfb, k1
R57 (thumb increase row): sl1, k to marker, sm, kfb, k to 1 st before marker, kfb, sm, k to end
R58: s1 k to end
R59 (thumb increase row): sl1, k to marker, sm, kfb, k to 1 st before marker, kfb, sm, k to end
R60: sl1, ssk, k to last 2 sts before end, kfb, k1
R61: sl1, k to end
R62 (thumb increase row): sl1, k to marker, sm, kfb, k to 1 st before marker, kfb, sm, k to end
R63: sl1, k to end
R64 (thumb increase row): sl1 ssk, k to marker, sm, kfb, k to stitch before marker kfb, sm, k to 2 sts before end, kfb k1
R65: sl1, k to end
R66 (thumb increase row): sl1, k to marker, sm, kfb, k to 1 st before marker, kfb, sm, k to end
R67: sl1, k to marker, put the 14 sts between the markers on stitch holders or scrap yarn, remove markers, CO2 (with backwards loop CO), k to end (there should be 9 stitches on your needle)
R68: s1 ssk k4 kfb k1
R69-71: sl1 k to end
Repeat R68 – 71 five more times, then once more R68 and R69
R94 BO until the last stitch, keep that stitch on your needle

Still with MC, pick up 47 stitches from the left side of the thumb panel, you have now  48 stitches on your needle, your working yarn is now on the lower edge of the mitt

Main part

With MC knit one row (WS) – connect CC

Row 1 (CC, RS): kfb, k to 2 sts before end, k2tog (from the second time on, pick up all wraps from row 12)
Row 2 (CC, WS): sl1 k31 w+t
Row 3 (CC, RS): k to end
Row 4 (CC, WS): sl1 k15 w+t
Row 5 (CC, RS): k to 2 sts before end, k2tog
Row 6 (CC, WS): sl1 k to end, picking up all wraps
Row 7 (MC, RS): k to end
Row 8 (MC, WS): sl1 k to end
Row 9 (MC, RS): kfb, k31 w+t
Row 10 (MC, WS): k to end
Row 11 (MC, RS): k17, w+t
Row 12 (MC, WS): k to end

Repeat rows 1 to 12 a total of 6 times, then repeat rows 1 to 6 once more. (Or until the mitt fits around your hand - make sure to end with row 6.) After a few repeats your mitt should look as shown in the photo.


With MC k one row. Cut yarn MC leaving a tail long enough for grafting (I usually leave 4-5 times the length of my knitting). Cut CC.

With another needle and without working yarn pick up 48 stitches from the right hand side of the thumb panel.

Graft both sides together with garter stitch.


Thumb

Move the thumb stitches from the stitch holder to two dpns. Pick up and knit 4 stitches from above the thumb gusset. Knit the stitches that were on the stitch holders up until the last stitch. p2tog (this closes a potential the gap between the stitches from the stitch holder and the newly picked up stitches), p2, p2tog (to close the gap on the other side of the thumb). Purl to the end of round.

Round 3: k
Round 4: p

Repeat until 3 more times (or until the thumb is long enough). Bind off.

Weave in ends.


Right Mitt (with right-leaning thumb panel)

Basically, this mitt is the mirror image of its partner, so increases and decreases (especially at the edges) are exchanged. Furthermore, the thumb is started at a different point. But here are the instructions in detail. The parts that differ from the left mitt have been underlined.

Thumb Panel

With Main Colour CO9
R1 – R3: sl1 k to end
R4 (RS): s1 kfb k4 k2tog k1
Repeat R1 – R4 a total of 13 times

The thumb increases are similar to the ones on the other mitt - the only difference is the starting point.

R53: s1 k4, place marker, k2, place marker, k to end
R54 (thumb increase row): sl1, k to marker, sm, kfb, k to 1 st before marker, kfb, sm, k to end
R55: sl1 k to end
R56:  s1 kfb, k to last 3 stitches, k2tog, k1

R57 (thumb increase row): sl1, k to marker, sm, kfb, k to 1 st before marker, kfb, sm, k to endR58: s1 k to end
R59 (thumb increase row): sl1, k to marker, sm, kfb, k to 1 st before marker, kfb, sm, k to end
R60: s1 kfb, k to last 3 stitches, k2tog, k1
R61: sl1, k to end
R62 (thumb increase row): sl1, k to marker, sm, kfb, k to 1 st before marker, kfb, sm, k to end
R63: sl1, k to end
R64 (thumb increase row): sl1 kfb, k to marker, sm, kfb, k to stitch before marker kfb, sm, k to 3 sts before end, k2tog, k1
R65: sl1, k to end
R66 (thumb increase row): sl1, k to marker, sm, kfb, k to 1 st before marker, kfb, sm, k to end

R67: sl1, k to marker, put the 14 sts between the markers on stitch holders or scrap yarn, remove markers, CO2 (with backwards loop CO), k to end (there should be 9 stitches on your needle)
R68: s1 kfb, k4, k2tog, k1
R69-71: sl1 k to end
Repeat R68 – 71 five more times, then once more R68 and R69
R94 BO until the last stitch, keep that stitch on your needle


Free Knitting Pattern: Windings Mitts
Main part

With MC knit one row (WS) – connect CC

Row 1 (CC, RS): ssk, k to 1 st before end, kfb (from the second time on, pick up all wraps from row 12)
Row 2 (CC, WS): sl1 k33 w+t
Row 3 (CC, RS): k to end
Row 4 (CC, WS): sl1 k17 w+t
Row 5 (CC, RS): k to 1 sts before end, kfb
Row 6 (CC, WS): sl1 k to end, picking up all wraps
Row 7 (MC, RS): k to end
Row 8 (MC, WS): sl1 k to end
Row 9 (MC, RS): ssk, 28 w+t
Row 10 (MC, WS): k to end
Row 11 (MC, RS): k13, w+t
Row 12 (MC, WS): k to end

Repeat rows 1 to 12 a total of 6 times, then repeat rows 1 to 6 once more. (Or until the mitt fits around your hand - make sure to end with row 6)

With MC k one row. Cut yarn MC leaving a tail long enough for grafting (I usually leave 4-5 times the length of my knitting). Cut CC.

With another needle and without working yarn pick up 48 stitches from the right hand side of the thumb panel.

Graft both sides together with garter stitch.


Finish the thumb as described for the left hand mitt.

Free Knitting Pattern: Windings Mitts

Samstag, 25. Januar 2014

Twisted

Not quite sure whether the twist looks "as designed" or just as if the mitt doesn't fit ...

Montag, 20. Januar 2014

Cable Experiment Mitts with Latvian Twist

A friend asked me whether I could knit a pair of my Cable Experiment Mitts for her - in dark red with some orange ...  Without thinking much, I started the first mitt with a latvian twist at the lower edge - only to realize later that it would be difficult to the same thing on the upper edge. I ended up, knitting a seperate piece - the same latvian twist I did as the lower edge - and grafted it to the top.


Creative Commons License
This work by Knitting and so on is licensed under a Creative Commons Attribution-NonCommercial-ShareAlike 4.0 International License.


So, here's how I did it in more detail:
  • I cast on 56 stitches as explained in the original pattern
  •  But instead of joining them in the round, I knitted 6 rows of garter stitch (2 rows in the contrast colour (orange), 2 rows in the main colour (red) and 2 rows in the contrast colour. I then cut the yarn of the contrast colour.
  • Using the main colour, I knitted 7 stitches and turned the rest of the stitches around the left-hand needle (that's the latvian twist - for more information see the links below), I repeated this to the end of the row and then joined the piece in the round.
  • Leaving out the ribbing rows of the original pattern, I then started to knit the pattern repeats (rows 1 to 20) and followed the pattern (thumb gusset and all).
  • When I had finished I cut the yarn (of the main colour) leaving a tail long enough for grafting.
  • On a different needle I cast on 56 stitches and knitted 6 rows of garter stitch (2 in CC, 2 in MC and 2 in CC) - as on the lower edge I knitted (in MC) 7 stitches, turned the not-yet-knitted stitches around the left-hand needle and repeated that process to the end of the row.
  • I then grafted the edge to the mitt, wove in the ends and started the second mitt :)

Some links:

Donnerstag, 9. Januar 2014

Pieces of Eight

Ever since I saw the Infinity Cardi-Wrap by Kristine Omdahl, I wanted to do something similar with fingerless gloves. It took me a three attempts to finally get it right.

Samstag, 4. Januar 2014

Nostalgia Brioche Cowl

I don't know whether it's because of the colours or of the pattern, but with its wavy edge this cowl reminds me somehow of "olden days" - that's why I called it "Nostalgia". It's a brioche pattern - it's reversible and both sides are attractive.

The finished cowl measures 22 cm in height and 116 cm in circumference.


Creative Commons License
This work by Knitting and so on is licensed under a Creative Commons Attribution-NonCommercial-ShareAlike 4.0 International License.

Materials:
  • 80 grams of DK weight yarn Colour A
  • 80 grams of DK weigh yarn in Colour B
  • 4.5 mm circular knitting needles
  • 12 stitch markers
  • a tapestry needle (to weave in ends)

Techniques:
I used the terminology (brioche notation) from briochestitch.com.
However, here are some short (!) explanations in my own words. If these are too short, please refer to the original link.
  • brsskpsso = slip 1 stitch (i.e. two loops), brk2tog (i.e. 3 loops), psso -> decrease by 2 stitches
  • brk3tog = bkr2tog, return stitch to left needle and pass next stitch over -> decrease by 2 stitches
  • brkyobrk = bark 1 stitch (and don't slip it off the left needle), yo, and bark the same stitch again -> increase by 2 stitches
  • sl1yof = slip 1 stitch while doing a yarn over -> stitch that's not knitted but just slipped in the brp-round
  • yfsl1yo = put yarn in front and slip 1 stitch while doing a yarn over -> stitch that's not knitted but just slipped in the brk-round
Some videos showing two-colour brioche in general

Instructions:

CO 216 stitches using Colour B - or any other number of stitches divisible by 18. Put in stitch markers between each 18 stitches.

Knit one round in Colour B (setup round)


Round 1a (Colour A - first time): *sl1yof p (repeat from * to end)
Round 1a (Colour A - next times): *sl1yof brp (repeat from * to end)
Round 1b (Colour B): *brsskpsso yfsl1yo,  6 times: (brk yfsl1yo), brkyobrk yfsl1yo (repeat from * end)

(Note for all brk-rounds: the instructions between stars (*) denote one pattern repeat (i.e. the space between two stitch markers))

Round 2a (Colour A): *sl1yof brp (repeat from * to end)
Round 2b (Colour B): *brsskpsso yfsl1yo, 5 times: (brk yfsl1yo),  brkyobrk yfsl1yo, once: (brk yfsl1yo) (repeat from * to end)

Round 3a (Colour A): *sl1yof brp (repeat from * to end)
Round 3b (Colour B): *brsskpsso yfsl1yo, 4 times: (brk yfsl1yo),  brkyobrk yfsl1yo, twice: (brk yfsl1yo) (repeat from * to end)

Round 4a (Colour A): *sl1yof brp (repeat from * to end)
Round 4b (Colour B): *brsskpsso yfsl1yo, 3 times: (brk yfsl1yo),  brkyobrk yo, 3 times: (brk yfsl1yo) (repeat from * to end)

Round 5a (Colour A): *sl1yof brp (repeat from * to end)
Round 5b (Colour B): *brsskpsso yfsl1yo, twice: (brk yfsl1yo),  brkyobrk yfsl1yo, 4 times: (brk yfsl1yo) (repeat from * to end)

Round 6a (Colour A): *sl1yof brp (repeat from * to end)
Round 6b (Colour B): *brsskpsso yfsl1yo, once: (brk yfsl1yo),  brkyobrk yfsl1yo, 5 times: (brk yfsl1yo) (repeat from * to end)

Round 7a (Colour A): *sl1yof brp (repeat from * to end)
Round 7b (Colour B): *brsskpsso yfsl1yo, brkyobrk yfsl1yo, 6 times: (brk yfsl1yo) (repeat from * to end)


Round 8a (Colour A): *sl1yof brp (repeat from * to end)
Round 8b (Colour B): *brkyobrk yfsl1yo, 6 times: (bkr yfsl1yo) brk3tog yfsl1yo (repeat from * to end)

Round 9a (Colour A): *sl1yof brp (repeat from * to end)
Round 9b (Colour B): *brk yfsl1yo, brkyobrk yfsl1yo, 5 times: (bkr yfsl1yo) brk3tog yfsl1yo (repeat from * to end)

Round 10a (Colour A): *sl1yof brp (repeat from * to end)
Round 10b (Colour B): *twice: (brk yfsl1yo), brkyobrk yfsl1yo, 4 times: (bkr yfsl1yo) brk3tog yfsl1yo (repeat from * to end)

Round 11a (Colour A): *sl1yof brp (repeat from * to end)
Round 11b (Colour B): *3 times: (brk yfsl1yo), brkyobrk yfsl1yo, 3 times: (bkr yfsl1yo) brk3tog yfsl1yo (repeat from * to end)

Round 12a (Colour A): *sl1yof brp (repeat from * to end)
Round 12b (Colour B): *4 times: (brk yfsl1yo), brkyobrk yfsl1yo, twice: (bkr yfsl1yo) brk3tog yfsl1yo (repeat from * to end)

Round 13a (Colour A): *sl1yof brp (repeat from * to end)
Round 13b (Colour B): *5 times: (brk yfsl1yo), brkyobrk yfsl1yo, once: (bkr yfsl1yo) brk3tog yfsl1yo (repeat from * to end)

Round 14a (Colour A): *sl1yof brp (repeat from * to end)
Round 14b (Colour B): *6 times: (brk yfsl1yo), brkyobrk yfsl1yo, brk3tog yfsl1yo (repeat from * to end)

Repeat Round 1a - 14b once more, then repeat round 1a - 7b

Last round (Colour B): *k1 brp1 (repeat from * to end)
Bind off using Colour B.
Weave in ends.

Montag, 30. Dezember 2013

Tomatoes and Coffee - Short Socks

After knitting a pair of Charade socks (pattern by Sandra Park on Ravelry), I started to "research" other sock types and came across the "sweet tomato heel" technique - and I wanted to try it :)
(Another type of heel would be the yo-yo heel, ... maybe I'll try that one later ...)

So, these short socks use the sweet tomato-heel technique by Cat Bordhi (http://catbordhi.com/) and a stitch that's called coffee bean pattern (Kaffeebohnenmuster).

This is not a complete pattern, but just a rough sketch.


Techiques:
  • The "Coffee Bean Pattern" consists of 4 rows.
    Row 1: p1 k2 p1
    Row 2: p1 k1 yo k1
    Row 3: p1 k3 p1
    Row 4: p1 sl1 k2 psso p1

Instructions:
With 3.25mm needles CO60
With 2.5mm needles knit 10 rows of ribbing
Switch to 3mm needles and knit 3 sets of coffee bean pattern
Knit tomato heel (while knitting the full rounds, continue coffee bean pattern on the front third)
Continue the foot, knitting coffee bean pattern on the front third and stockinette on the backside (2 thirds).
When foot is long enough, do toe decreases and graft leftover stitches.

Montag, 23. Dezember 2013

Brioche in Montreux

I called this cowl "Brioche in Montreux" because I knitted part of it on the way to the Christmas market in Montreux.
A two-colour brioche technique is used with three cabling strands distributed around the cowl. Since it's a brioche pattern, it's reversible - both sides are equally attractive.

After blocking it had a circumference of 60 cm and a height of 29 cm.


Creative Commons License
This work by Knitting and so on is licensed under a Creative Commons Attribution-NonCommercial-ShareAlike 4.0 International License.


Materials
  • 30-40 grams of fingering weight yarn (Colour A)
  • 30-40 grams of fingering weight yarn (Colour B)
  • 3.5mm circular needles
  • 3 stitch markers
  • tapestry needle (to weave in ends)

Abbreviations
  • The abbreviations brk & yfsl1yo, brp & sl1yof are taken from briochestitch.com
  • C8F: make a front cross cable over 8 stitches, i.e. put 4 stitches (here this means on a cable needle and leave them in front of your piece, knit the next 4 stitches from the left needle (in this case the 4 stitches are knitted: brp, sl1yof, brp, sl1yof), then knit the 4 stitches from the cable needle (i.e.  brp, sl1yof, brp, sl1yof,).
  • C8B: make a back cross cable over 8 stitches, i.e. put 4 stitches on a cable needle and leave them in the back of your piece,  knit the next 4 stitches from the left needle (in this case the 4 stitches are knitted: brp, sl1yof, brp, sl1yof), then knit the 4 stitches from the cable needle (i.e.  brp, sl1yof, brp, sl1yof).

Techniques


Instructions
CO120 stitches with colour B (white on the photo), placing a stitch marker after 40sts, 80 sts and 120 sts.
Join in round

Round 1a (Colour A): * p1 sl1yof (repeat from * to end)
Round 1b (Colour B): * yfsl1yo brk (repeat from * to end)
 
Round 2a (Colour A): * brp1 sl1yof (repeat from * to end of round)
Round 2b (Colour B): * yfsl1yo brk (repeat from * to end of round)

Repeat rounds 2a and 2b a total of 4 times


Round 5a (Colour A): * brp1 sl1yof (repeat from * a total of 3 times), C8F, +brp1 sl1yof (repeat from + to next marker);
    * brp1 sl1yof (repeat from * a total of 3 times), C8F, +brp1 sl1yof (repeat from + to next marker);
    * brp1 sl1yof (repeat from * a total of 3 times), C8F, +brp1 sl1yof (repeat from + to end of round)
Round 5b (Colour B): * yfsl1yo brk (repeat from * to end of round)

Repeat rounds 2a and 2b a total of 3 times

Round 9a (Colour A): brp 1 sl1yof, C8B, C8B *brp1 ysl1yof (repeat from * to next marker);
     brp 1 sl1yof, C8B, C8B *brp1 ysl1yof (repeat from * to next marker);
     brp 1 sl1yof, C8B, C8B *brp1 ysl1yof (repeat from * to next end of round)
Round 9b (Colour B): * yfsl1yo brk (repeat from * to end of round)

Repeat rounds 2a and 2b a total of 3 times

Round 13a = Round 5a
Round 13b = Round 5b

Repeat rounds 2a and 2b a total of 5 times - you have now completed round 18b

Repeat from round 5a to round 18b a total of 5 times, ending with round 17b - or until the cowl has reached your desired height.

Bind off in a p1k1-pattern using colour B. 

Weave in ends - and block.