Montag, 26. Dezember 2016

An Idea for Knitted Socks

In this frosty winter weather, nice wollen socks are a comfort for cold feet. That's why I am currently knitting socks, socks and even more socks. I also wanted to try a few different techniques for knitting socks. The helix knitting allows for jogless stripes and is great to use up leftovers of sock yarn that are not enough for a complete pair of socks.


This is definitely NOT a complete pattern, but a sketch or idea for a pair of socks that explains some points to pay attention to when knitting socks with this helix knitting technique.


Creative Commons License
This work by Knitting and so on is licensed under a Creative Commons Attribution-NonCommercial-ShareAlike 4.0 International License.


Materials
  • about 60 to 70 grams of fingering weight yarn
  • 3mm dpns (I usually distribute my stitches on four needles when knitting socks)
  • scrap yarn for afterthought heel
  • a tapestry needle to weave in ends

Techniques


"Instructions" or what to bear in mind

Knit a toe in one color and distribute your stitches on four needles. After finishing the toe, skip one needle and start the 2nd color in the middle of the sole side of your sock (see photo on the right hand side).


Knit two needles with the 2nd color, then go back to the 1st color yarn and knit two needles with your 1st color. Switch to the needle where the yarn of the 2nd color is currently and knit two needles from there. Go on alternating between both colors.

For this kind of helix knitting you need a heel that does not rely on rows on the top of the foot. The only heel with this property that I know of is the afterthought heel. Make sure to insert the scrap yarn for the afterthought heel after knitting the two heel needles in one color, i.e. do not insert the scrap yarn for the afterthought heel over a color change.

Then go on with your helix pattern - make sure to end the 2nd color also in the middle of the back of the sock. I used the first color to knit the rib and also to knit the afterthought heel.


Donnerstag, 15. Dezember 2016

Garter Stitch Christmas Gnome

When I recently saw a picture of a felted "Weihnachtswichtel" (Christmas gnome or christmas elf) on social media, I wanted to do something similar in knitting. So I took the general shape of the Little Christmas Tree pattern and added some stranded colorwork.


Creative Commons License
This work by Knitting and so on is licensed under a Creative Commons Attribution-NonCommercial-ShareAlike 4.0 International License.


I like the result - even though it took me a while to get the face right - so the first two got a little facelift after the knitting was finished, i.e. I added some embroidery :) The version described in this pattern is the last one I knitted (see picture below). for this one, no embroidery was added.


Materials
  • I used old yarn in four colors - mainly red, some white, some beige (for the face) and black for the eyes - I believe it was sports weight yarn; one gnome weighs about 12 grams
  • knitting needle that's a bit smaller than the size the yarn calls for; I used 2.5mm needles
  • a third needle for a three-needle bind off
  • scrap yarn for the provisional cast on
  • a crochet hook for provisional cast on

Techniques and Special Abbreviations

General Construction
Each gnome consist of a pizza-slice shaped piece that is sewn together at the straight sides in the end. The shape is achieved by knitting three parts of garter stitch short rows. Part 1 and 3 are only knitted in one color - part two also has the colorwork for the beard an face.
Before the three needle BO, the piece looks as shown in the picture below.


Instructions

With scrap yarn pCO 24 stitches - this does not include the first row with your working yarn.

Part 1 - all knitted in red yarn
Rigde 1: k all, turn, sl1, k to end
Ridge 2: k10, w+t, k to end
Ridge 3: k16, w+t, k to end
Ridge 4: k8, w+t, k to end
Ridge 5: k14, w+t, k to end
Ridge 6: k4, w+t, k to end
Ridge 7: k20, w+t, k to end
Ridge 8: k12, w+t, k to end
Ridge 9: k2, w+t, k to end
Ridge 10: k18, w+t, k to end
Ridge 11: k6, w+t, k to end
Ridge 12: k22, w+t, k to end
Chart for parts 1 and 3 - click to enlarge

Part 2

Ridge 1: k4 (red),
Ridge 2: k4 (red), k3 (white), k1 (red), w+t, k1 (red), k3 (white), k4 (red)
Ridge 3: k6 (white), k1 (beige), k5 (red), w+t, k5 (red), k1 (beige), k6 (white)
Ridge 4: k5 (white), k3 (beige), k8 (red), w+t, k8 (red), k3 (beige), k5 (white)
Ridge 5: k5 (white), k1 (beige), k1 (black), 1 (beige), k12 (red), w+t, k12 (red), k1 (beige), k1 (black), 1 (beige), k5 (white)
Ridge 6: k4 (white), k4 (beige), k16 (red), w+t, k16 (red), k4 (beige), k4 (white)
Ridge 7: k5 (white), k1 (beige), k1 (black), k1 (beige), k14 (red), w+t, k14 (red), k1 (beige), k1 (black), k1 (beige), k5 (white)
Ridge 8: k5 (white), k3 (beige), k10 (red), w+t, k10 (red), k3 (beige), k5 (white)
Ridge 9:  k6 (white), k1 (beige), k7 (red), w+t, k7 (red), k1 (beige), k6 (white)
Ridge 10: k4 (red), k3 (beige), k3 (red), w+t, k3 (red), k3 (beige), k4 (red)
Ridge 11: k7 (red), w+t, k7 (red)
Ridge 12: k2 (red), w+t, k2 (red)
Chart for part 2 - click to enlarge

Part 3
Repeat part 1

Finishing
Put the stitches from the provisional CO on a knitting needle. Hold the piece rights sides together and do a three needle bind off.
Afterwards, turn the piece right sides out. Use a pen or something similar to get into the top.
If the yarn you used was really soft, you might want to stabilize the tree. You can do this by cutting out a piece of paper or soft cardboard in the shape of a 90° pizza slice (similar to the tree before the three needle BO) and insert it into the tree.
The yarn I used was stiff enough, so there wasn't any need for stabilization.


This pattern was featured on Hooking up on Hump Day Link Party #134. Thank you!

Samstag, 10. Dezember 2016

O Christmas Tree

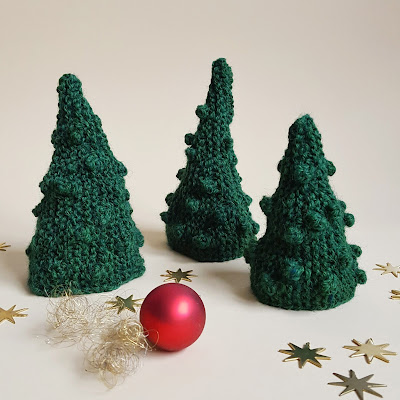
Christmas is drawing nearer and nearer. Unfortunately, this year it's quite difficult for me to get into a christmas mood. That's why I tried to create my own knitted decorations christmas decorations.
Here's the result: a small and fun pattern for a little christmas tree in two sizes. One tree only takes up about 10 to 15 grams of yarn, so it's great for using up some leftover green yarn. 


Creative Commons License
This work by Knitting and so on is licensed under a Creative Commons Attribution-NonCommercial-ShareAlike 4.0 International License.


Materials
  • per tree I used about 10 to 14 grams of very (!) old green yarn in my stash; I guess it was DK or sports weight yarn
  • knitting needle that's a bit smaller than the size the yarn calls for; I used 2.5mm needles
  • a third needle for a three-needle bind off
  • scrap yarn for the provisional cast on
  • a crochet hook for provisional cast on


Techniques and Special Abbreviations
  • Provisional CO: My favorite method for a provision CO is the crochet provisional CO - it is shown in this Youtube video by New Stitch a Day.
  • Short rows with wrap and turn ("w+t")https://youtu.be/G4GxFvi4KD0
  • Three Needle Bind Offhttps://youtu.be/Ph93jWSzTa0
  • Small "Bobble": I used the following method to knit a small bobble: right in the middle of the row (where the pattern asks you to knit a bobble) CO4 with knitted CO (or cable CO), then directly bind off 4 stitches and go on knitting the row. In the instructions the word "bobble" will be used (here's how to do a knitted CO: https://youtu.be/bTgT7kE1c_k)

Instructions

Bigger Tree

Provisionally CO 30 sts and knit the first row with your working yarn
Ridge 1: sl1, k10, w+t, k to end
Ridge 2: sl1, k4, bobble, k10, bobble, k3, w+t, k to end
Ridge 3: sl1, k16, w+t, k to end
Ridge 4: sl1, k8, bobble, k4, w+t, k to end
Ridge 5: sl1, k13, w+t, k to end
Ridge 6: sl1, k3, bobble, k7, bobble, k15, w+t, k to end
Ridge 7: sl1, k10, w+t, k to end
Ridge 8: sl1, k4, w+t, k to end
Ridge 9: sl1, k7, bobble, k6, w+t, k to end
Ridge 10: sl1, k6, w+t, k to end
Ridge 11: sl1, k22, w+t, k to end
Ridge 12: sl1, k5, bobble, k2, w+t, k to end
Ridge 13: sl1, k17, bobble, k to end; turn; sl1, k to end
Repeat rows 1 to 13 twice more.

Now your piece should look similar to the one in the picture on the right.

Finishing
Put the stitches from the provisional CO on a knitting needle. Hold the piece rights sides together and do a three needle bind off.
Afterwards, turn the piece right sides out. Use a pen or something similar to get into the top.
If the yarn you used was really soft, you might want to stabilize the tree. You can do this by cutting out a piece of paper or soft cardboard in the shape of a 90° pizza slice (similar to the tree before the three needle BO) and insert it into the tree.
The yarn I used was stiff enough that there wasn't any need for stabilization.


Smaller Tree

Provisionally CO 24 sts and knit the first row with your working yarn
Ridge 1: sl1, k20, w+t, k to end
Ridge 2: sl1, k3, bobble, k8, w+t, k to end
Ridge 3: sl1, k16, w+t, k to end
Ridge 4: sl1, k5, bobble, k4, bobble, k3, w+t, k to end
Ridge 5: sl1, k4, w+t, k to end
Ridge 6: sl1, k11, bobble, k2, w+t, k to end
Ridge 7: sl1, k10, w+t, k to end
Ridge 8: sl1, k4, bobble, k12, bobble, k to end; turn; sl1, k to end
Ridge 9, sl1, k8, w+t, k to end
Ridge 10: sl1, k6, bobble, k5, bobble, k5, w+t, k to end
Ridge 11: sl1, k6, w+t, k to end
Ridge 12: sl1 k to end; turn, s1, k to end
Repeat rows 1 to 13 twice more.

Finishing
Put the stitches from the provisional CO on a knitting needle. Hold the piece rights sides together and do a three needle bind off.
Afterwards, turn the piece right sides out. Use a pen or something similar to get into the top.
If the yarn you used was really soft, you might want to stabilize the tree. You can do this by cutting out a piece of paper or soft cardboard in the shape of a 90° pizza slice (similar to the tree before the three needle BO) and insert it into the tree.


This blogpost was featured at the Handmade Monday Link Party No. 5. Thank you!

Mittwoch, 7. Dezember 2016

Sparkler Mitts auf Deutsch

Heike von Heikeshaekellust (eifelgirl1 auf Ravelry) hat sich die Mühe gemacht, die Häkel-Anleitung für die Sparkler Mitts ins Deutsche zu übersetzen. Vielen lieben Dank dafür!
(Edit 03.10.2021: Update des Links auf die PDF-Datei, da sich offenbar die Links auf GoogleDrive geändert hatten.)

Die Anleitung findet sich hier als PDF-Datei.

The original english version of this free crochet pattern is available in this blogpost.


Montag, 5. Dezember 2016

Attempt at Intarsia

Usually I'm not very good at knitting intarsia. I have two patterns on my blog that use this technique (Xmas Star Mitts and Cordillera Scarf), but it's not exactly my speciality.

That's why I was really surprised, when a photo of this attempt of an intarsia cowl got a huge amounts of likes on my Instagram account. To be honest, before it got this attention, I wasn't even sure whether I would go on knitting it or whether I would frog it ... But now, I guess I will finish it (and later publish the pattern). At least it's good practice for colorwork knitting and it's fun to knit :)