Posts mit dem Label Sweater werden angezeigt. Alle Posts anzeigen

Samstag, 9. Mai 2020

Green Summer Top

I am always proud to finish tops or sweaters. I mostly knit accessories (scarfs, fingerless gloves) that don't need swatching, you just start and it will work because sizing is not an issue. But a bigger project - where size actually matters - is something special for me.
So I was quite pleased when I finished this nice summer top in green cotton. I bought the yarn about three years ago and had already made two other attempts to knit a top with it - but it just didn't work the way I planned (you can see photos of my failed attempts on the Ravelry project page).


Creative Commons License
This work is licensed under a Creative Commons Attribution-NonCommercial-NoDerivatives 4.0 International License.


When I restarted this in April, I settled for a simple top-down raglan construction - with seed stitch on arms and shoulders, stockinette stitch on front and back, and seed stitch instead of a ribbing. I am quite pleased with it and I like how the seed stitch feels.

Here's a rough description of what I did:
  • First of all, I knitted a swatch (yes, for sweaters this is a useful step, even though I don't like swatching) and calculating the stitches to start with and the increases (if you don't want to calculate yourself, there are raglan calculators available on the internet, e.g. one by knittingfool.com or one by From TheHartle).
  • Since I wanted visible raglan increases I distributed the stitches for the back of the neckline and the arms in a way, that I would reach the arm circumference and the planned width of the back or front at the same time. (Example: I wanted an arm circumference of 40 cm and 50 cm as width of the back or front part. So when I started, the neck part of my raglan part was 10 cm wider than either of the arm parts.)
  • So I distributed my CO into 5 parts: left front (very small), left arm, back, right arm, right front - and started knitting flat (RS and WS).
  • For the raglan increases I simply did yarn-overs.
  • The V-neck shape was created by a simple kfb/kbf at the beginning/end of each RS row. 
  • Once the stitch count on the two front bits added up to be as high as the stitch count of the back piece, I joined it at the front and started knitting in the round.
  • I started with seed stitch on the arms and on the back. After seperating the arm stitches, I continued in the round in stockinette stitch (also on the back).  
  • This is a boxy top. so I didn't do any shaping around the waist and hips (as opposed to other summer tops I've knitted, e.g. this one). 
  • I finished the lower hem in seed stitch again, first in the round - and then I separated the piece into front and back.
  • The arms were finished in seed stitch in the round, too.
Looking forward to wearing this in summer.


Lying flat - the pattern for the little knitted hearts is available here.

Freitag, 5. April 2019

Retstrikket top - Summertime Garter Stitch Top in Danish

Marianne Holmen from strikkeglad.dk has written another Danish translation for one of my patterns - this time for the Summertime Garter Stitch Top. Mange Tak!

The Danish translation can be found here.
The original (english) version of this pattern is available here.


A list of all translated versions of my patterns can be found in this blogpost.

Creative Commons License
This work by Knitting and so on is licensed under a Creative Commons Attribution-NonCommercial-ShareAlike 4.0 International License.


Montag, 25. Juni 2018

Bella Paquita

Bella Paquita is a beautiful free sweater pattern by Marnie MacLean - available via Ravelry or directly on her website. I discovered it in my early Ravelry days (in 2011) and wanted to knit it right then, even though I wasn't a good knitter back then and lacked some of the skills necessary for it.


I even bought a beautiful and quite expensive (at least I thought so at the time :) grey alpaca yarn for it, but I was a bit too afraid to use it. So I first tried the pattern with some really old old bordeaux red yarn from a sweater I had started in the 1980s and frogged (here's the Ravelry page of the project). I made quite a few mistakes when knitting it for the first time - some due to my lack of knitting experience other due to not reading the pattern :/

But I finished it and really liked the look of it - except for the curve of the lace collar. To make the lace collar fit, the pattern suggests: "to sew two small darts in the lace" and later after you've sewn it with your sewing machine to "clip the excess fabric about a quarter inch from the outer most seam line". Cutting into my knitting is something that I don't think I could ever do. So when I knitted the first one, I just sewed the collar to lay flat on my shoulders, but I didn't cut the excess. The picture on the right shows how that looked from the inside.

So I resolved to use to use short rows to shape the collar - when knitting it again with my beautiful alpaca yarn. A project that I started soon after finishing the first sweater. I quickly did the main pieces (front, back and sleeves) - and then started the lace. It took me a few attempts to get a) the short rows and b) the curve right, but I guess I got it right in December 2012. And I know I knitted a piece of the collar on the train home after New Year's Day of 2013.

And then it became a WIP - a hibernating WIP. For a loooong time ...

I don't even know why I abandoned it, but this year (more than 5 years later, when I was going through a bit of an inspirational crisis :) I finally picked it up again and
  • finished the lace collar (even though I had to try the lace pattern with the short rows a few times with scrap yarn)
  • sewed up the pieces and
  • inserted the lace collar.
It was finished (fireworks!), and I'm really happy with it ...

As it may help somebody else who also wants to knit this lovely sweater, here are the modifications I did. More photos can be seen on my Ravelry project page.

Firstly, I didn't knit the pieces in the order as given in the pattern. I started from the hip and knitted the front and back piece together in the round. After ribbing, I put 12 stitches (in the middle of the front part on a stitch holder (or rather scrap yarn) and started to knit in rows. When reaching the sleeves, I devided it into two front and one back part, that I finished seperately.

But the major modification was knitting the collar in short rows, which I did as follows:
  • Short row (ridge) for regular lace: (RS) k3, yo, p2tog, yo, p2tog, ktbl, turn (just a normal turn, no w+t), (WS) sl1, p1, k2, yo, p2tog, yo, p2tog, k1
    Since this increases the stitch count by 1, in the next row I did a k2tog just over the gap, i.e. the two stitches I knitted together were the last stitch of the short row (RS) and the next stitch. If that next stitch was to be a k2tog (as stated by the lace pattern), I did a k3tog.
  • Short row (ridge) for reverse lace: (WS), k1, p2tog, yo, p2tog, yo k2, p1, turn, (RS) sl1, yo, p2tog, yo, p2tog, k3
    As with the regular lace, this increases the stitch count by one, so I had to decrease by one in the following in row. And I did this also at the gap, where I did a p2tog instead of the normal p (as given in the lace pattern without short rows). 
On both sides (regular and reverse) I first knitted one normal repeat of the lace pattern (A in the picture below). Then 3 repeats with the short rows inserted every 2nd row (B, before rows 1, 3, 5, 7 and 9 for the regular lace and before rows 2, 4, 6, 8 and 10 for the reverse lace). Then one repeat with only two short rows (C, before the 3rd and 7th row for the regular lace, and before the 4th and 8th for the revers). Then I went on with normal pattern repeats (D).


Since I rarely knit sweaters that are sewn up (for my own stuff, I prefer top-down raglan constructions, e.g. this one), I had a hard time inserting the sleeves. On YouTube I found these helpful videos:
This was the first time I actually finished a long term WIP - usually, I tend to frog them.
Do you have a WIP that has been lying around for quite a while? If so, do you think you'll ever finish it?

By the way, the background picture of my blog (the grey knitted ribbing) is a photo of the ribbing of this project :) ... and it has been the background picture for more than five years.

Mittwoch, 13. Juni 2018

Lateral Knitting

It's summer and in summer I don't really like knitting scarfs and gloves (except when I have a really good idea, but currently I have no such luck :), but summer projects.
So I decided to knit myself a simple summer sweater from old (and bulky) cotton yarn, that I had reclaimed from a failed project. Another top I knitted with this yarn was last year's Waterfall Tunic.
This sweater is knitted sideways and in one big piece. It starts at one sleeve, and ends at the second one. Since is it knitted in one piece, only minimal seaming is required :) It is also knit in plain garter stitch and (except for the neckline) in right-angled pieces. So it's a quick and easy project.


As with many of my pattern, this is NOT a stitch-by-stitch knitting pattern for various sizes. It is rather a tutorial how to contruct and knit a similar tunic - and of course you don't have to use bulky yarn but can use other yarn weights as well. I will give you my numbers and calculations as an example written in purple.

Creative Commons License
This work by Knitting and so on is licensed under a Creative Commons Attribution-NonCommercial-ShareAlike 4.0 International License.


Materials
  • a tape measure to take your measurements
  • 400 to 500 grams of Bulky weight cotton yarn
  • 6mm knitting needles
  • one stitch marker (to mark the middle of the piece) and some removable stitch markers (I put them in just below the ridge of a new part, to make counting the ridges a bit easier)
  • something that acts as a big stitch holder - or a knitting needle that's roughly the same size as your original needle or scrap yarn
  • a tapestry needle to weave in ends and to sew the pieces together

Construction
This piece is knitted from sleeve to sleeve in one piece. When reaching the shoulder stitches are cast on on each side (to reach the total length on the front and back).
When you reach the neckline, the piece is parted into a front (part 2) and back (part 3) part that are knitted one after the other. Afterwards both parts are joined again and knitted until you've reached the width of the body part. Then stitches on both sides of the arm are bound off and the second sleeve is knitted.


Swatching and Measurements
The schematic below shows the measurements that you should take


A = circumference of the sleeve (since there are not increases it should fit your arm at its widest point)
B = total length of your sweater (I wanted mine to be quite short)
C = depth of V-neck (to simplify the decreases here, I decided that the depth would be exactly one half of the width of the neck. Of course you can use a different ratio here, but with bulky yarn, there isn't much of a margin to play with.)
D = total width (at least half of your hip circumference)
E = length of arm
F = neck opening to start of arm
G = neck opening (please note: E times 2 plus F should equal D)
H = lower edge to just below the arm (H equals B-A/2)

Knit a swatch! And block it.
Then carefully count your stitches and rows and calculate the numbers of the measurements you've taken.

My swatch gave the following numbers: 10 cm = 12 to 12.5 sts in width and 10 cm = 12 to 13 ridges in height. Since I used cotton, I chose to use the smaller number. This is due to the fact that - in my experience - cotton tends to extend over time, i.e. gets wider and longer, especially if it's heavy.

Then I calculated: 
A = 40 cm: 40 / 10 x 12 = 48 => 48 sts
B = 52 cm: 52 / 10 x 12 = 62.4 => 62 sts
C = 11 cm: 11 / 10 x 12 = 13,2 => 13 sts
D = 52 cm: 52 / 10 x 12 = 62.4 => 62 ridges ( i.e. 124 garter stitch rows)
E = 16 cm: 16 / 10 x 12 = 19,2 => 19 ridges (i.e. 38 rows)
F = 15 cm: 15 / 10 x 12 = 18 => 18 ridges (i.e. 36 rows)
G = 22 cm: 22 / 10 x 12 = 26,4 => 26 ridges (i.e. 52 rows)
H = B-A/2: 62 - 48/2 = 62 - 24 = 38 => 38 sts


Instructions

Part 1
CO A stitches
Knit E garter stitch ridges starting each row with a slipped stitch - in the last row, insert a stitch marker at the middle of the row (i.e. after knitting A/2 stitches)

(I CO 48 sts and knitted 19 ridges of garter stitch. I inserted my middle marker after the 24th stitch.)

CO-Ridge: With knitted CO, cast on H stitches on one side (front part), knit one row and CO H more stitches on the other side (back side), then knit back. Now you have Bx2 stitches on your needles.

Knit F-1 more garter stitch ridges.

(I did a knitted CO of 38 stitches on the front and 38 stitches on the back part. Afterwards, I had 124 stitches on my needles. Then I knitted 17 more garter stitch ridges.)

Part 2 - Front
Ridge 1: sl1, k to 3 bef middle marker, k2tog, k1 (you've now reached the middle marker), put the stitches of the back part on a stitch holder. For the next G ridges you'll only be knitting the stitches of the front part. Turn. k to end.

(I knitted 59 sts (62-3) before doing the k2tog, k1, then I put the stitches of the back part on a spare knitting needle. I turned and knitted back.)

Ridge 2: sl1, k to 3 bef turn, k2tog, k1; turn, sl1, k to end
Repeat ridge 2 G/2-2 more times. Now you've reached the tip of the V-shape.

(After doing ridge 2 once, I repeated it 11 times (26/2 - 2 = 13-2 = 11).)

Next ridge: sl1, k to last stitch, mk1, k1, turn, sl1, k to end.
Repeat this ridge G/2-1 more times.
You should now have the same number of stitches that you started part 2 with.

(After doing this ridge once, I repeated it 12 more times (26/2 - 1 = 13-1 = 12). And I was back to my original 62 stitches for the front part.)

Cut yarn.

Part 3 - Back
Put the stitches from the front part on a stitch holder and the stitches of the back part back on your needles.

Attach yarn and start from the middle of the piece.
Ridge 1: sl1, ssk, k to end, turn, k to end
Ridge 2 = Ridge 1
Ridge 3= sl1, k to end, turn, sl1, k to end
Repeat Ridge 3 G-5 more times. (After knitting ridge 3 once, I repeated it 21 times (26-5=21).)

Last but one ridge: sl1, k1, mk1, k to end, turn, sl1, k to end
Last Ridge: sl1, k1, mk1, k to end, turn, sl1, k to end

Now you've knitted the same number of rows you knitted for part 2, and you're back to the original number of stitches that you started part 3.

Cut yarn.

Part 4
Part 4 is basically part 1 knitted backwards.

Put all your stitches on your active needle again. And start from the bottom of the front.
Ridge 1: sl1, k to end, turn, sl1, k to end
Repeat ridge 1 F-1 more times. (In my case, 17 times.)

BO-Ridge: BO H stitches, k to end, turn, BO H stitches, k to end. There should be A stitches left on your needles.
Knit E-1 garter stitch ridges starting each row with a slipped stitch.
Then bind off.

Cut yarn, weave in ends and block.
Then seam the sides. I left about 5cm at the bottom hem.


Montag, 3. Juli 2017

No Assembly Required - Knitted Top

I really like variegated yarn, but I don't like the "interruption" effect that comes from adding a piece of knitting in a color at a different place in the color gradient. Furthermore, I don't really like finishing sweaters, i.e. sewing pieces together etc.

So, when I bought a few skeins of a beautiful variegated yarn, I started thinking about how to knit it into a top in one continuous piece ... and here's what I came up with.


As with my Summer Garter Stitch Top and my Waterfall Tunic this is not a stitch-by-stitch pattern with stitch and row counts for various sizes but rather a tutorial on how to knit a top like this. You will have to swatch and calculate for yourself. So this top is completely configurable to your wishes and your shape. I will however give you my numbers and calculations as an example (written in purple). ... I hope, it is not too complicated.

Creative Commons License
This work by Knitting and so on is licensed under a Creative Commons Attribution-NonCommercial-ShareAlike 4.0 International License.


A Danish translation of this pattern has been provided by Marianne Holmen and can be found here on strikkeglad.dk.


Materials
  • I used about 120 grams of lace weight yarn - however, this tutorial is written in a way that it can be adapted to other yarn weights as well (I used Jaipur by Katia - here's a link to the yarn's Ravelry page).
  • 3.5 mm needles (long straight needles or circulars)
  • 3 stitch markers, 2 removable stitch markers
  • scrap yarn for the provisional CO
  • a tapestry needle for grafting

Techniques

Measurements to take

Take the following measurements - either on yourself or using a top that fits you well.

A = distance between underarm edge and start of shoulder
B = width of the shoulder seam
C = half of the width of neckline
D = a quarter of the waist circumference
E = a quarter of your  bust circumference
F = a quarter of your hip circumference

G = from shoulder to neckline (back)
H = from shoulder to neckline (front)
I = from shoulder to right under your arm
J = from shoulder to bust
K = from shoulder to waist
L = from shoulder to hip (total length of the garment)

Furthermore (not on the picture) you need to measure the height of your bust (top of your breast to just below your breasts). This number will be called N.

Construction

The picture below shows the construction:


You start with a provisional CO that reaches from just under your arms to the bottom of the top. After a few rows you start increasing and then you CO in order to for the strap reaching up to your shoulder. Once the shoulder is finished you decrease again for the neckline with a normal BO and a few further decreases during the next row. After you've finished the 1st half of the front piece, you'll have to knit a mirror image of it, i.e. you increase a few stitches and then do a cable CO for the shoulder pieces
Other noteworthy points:
  • While you're knitting the front piece you add in short rows, a) to make sure that the bottom edge is wide enough to fit around your hip and b) to add bust "darts". These bust darts are not added at the back of the piece - instead the added width is knitted into an underarm part. However, there are also short rows to make the piece fit around your waist. 
  • The 2nd half of one piece (front or back) is the exact mirror of the 1st part. So it's really useful to take notes while you're knitting, in order to be able to knit the same rows in the opposite order.
  • When knitting the shoulder parts of the back piece you can connect them to the shoulder of the front piece while knitting - alternatively, you can sew them up after finishing.
You'll notice that I've used different COs and BOs for different parts of the piece. That's because different COs and BOs have a different "stretchy-ness". For the arm hole I wanted something rather elastic, that's why I chose a stretchy BO and a knitted CO. However, for the neckline I wanted something more stable, that's why I chose a "normal" BO and a cable CO.


Calculations

Knit a swatch in garter stitch that measures at least 10cm by 10cm. For this kind of project it is really important. I'm not a "swatcher" myself (i.e. I usually avoid knitting a swatch at all cost), but in case of a fitted top you're either really lucky (and it fits) or it safes some time and effort because when you start knitting without concrete ideas about stitch and row numbers, you just end up knitting a bigger swatch. Then start calculating how many stitches and rows there are for each of the measurements you took.

Here are my calculations for stitch numbers and ridges - rounded. My swatch measured 22 sts for 10 cm in width and 22 ridges (44 rows) for 10 cm in height.

A (distance between underarm edge and start of shoulder): 2 cm = 9 rows (4.4 ridges)
B (width of the shoulder seam): 10 cm = 22 ridges
C (half of the width of neckline): 11 cm = 24 ridges
D (a quarter of the waist circumference): 20,5 cm = 45 ridges
E (a quarter of your  bust circumference): 22,5 cm = 49 ridges
F (a quarter of your hip circumference): 24,5 cm = 54 ridges

G (from shoulder to neckline (back)): 13 cm = 28 sts
H (from shoulder to neckline (front)): 16 cm = 35 sts
I  (from shoulder to right under your arm): 21 cm = 46 sts
J  (from shoulder to bust): 29 cm = 64 sts
K (from shoulder to waist): 48 cm = 106 sts
L (from shoulder to hip (total length of the garment): 60 cm = 132 sts
N (height of bust darts): 15 cm = 33 sts

Further calculations:
You need to calculate the number of short rows - for bust darts and hip, per half of one side.
For the bust darts this is E-D, and F-D for the hip. To calculate how often they need to be done, divide the number of waist ridges (D) by E (for the bust darts) and F (for the hip) respectivel - taking into account the ridges you knitted before you started the shaping short rows (A).
  • For bust darts: (D-A)/(E-D)
  • For the waist: (D-A)/(F-D) 
In my case, I needed 
  • 4 ridges for the bust darts (E-D=49-45=4), i.e. 4 bust darts short rows and 
  • 9 more ridges for the hip shaping (F-D=54-45=9), i.e 9 waist shaping short row ridges need to be knitted for one half of one side 
  • the hip shaping ridges need to be done every 5th row ((D-A)/9=(45-4)/9=4.555, rounded 5). 
  • the bust shaping ridges need to be knitted every 10th row ((D-A)/4=(45-4)/4=10,25, rounded 10) 
You also need to calculate the length from just under your arm to the bottom edge for your first (provisional) CO, this is L-I, in my case 60-21=39 cm (86 sts).


Instructions

Front - 1st Half

With provisional CO cast on L-I stitches and knit the first row with your working yarn. This first row is knitted upwards (i.e. from the bottom hem of the top upwards, ↑).
To achieve a rounded arm hole, you need to increase a few stitches at this end before you cast on (with a knitted CO) the stitches for the armhole. That's why I knitted one kfb at this end in every row while knitting the distance A, i.e.
R1 (armhole to bottom hem, ↓): sl1, kfb, k to end
R2 (bottom hem to armhole, ↑): sl1, k to last 2 sts, kfb, k1
After these ridges, I did a knitted CO of the stitches that were needed for the armhole (I minus the increases already done).
In my case I knitted 9 rows (very first row after provisional CO plus four times R1 & R2), i.e. I had increased by 8 stitches. So I cast on 38 sts (46 (I) - 8 (increases) = 38).

In the next row (top-down) you can put in your stitch markers to help with the short rows for shaping:
M1: K sts from top (to mark the waistline)
M2: J sts from top (to mark the bustline)
M3: I sts from top (to mark the end of the armhole)

Now you need to start inserting the short rows for shaping waist and bust.

Ridge with waist shaping short row (starts from bottom hem):
  (↑) sl1, k to M1, w+t,
  (↓) k to end, turn,
  (↑) sl1, k to end, turn
  (↓) sl1, k to end

Ridge with short rows for bust darts:
  (↑) sl1, k to M2, k N/2, w+t,
  (↓) k to M2, k N/2, w+t
  (↑) k to end, turn
  (↓) sl1, k to end
In my case (with N = 33 sts) I knitted 16 sts on the way up /(counted from M2) and 17 sts on the way down (counted from M2)).

Normal ridges (no shaping) are knitted as follows:
  (↑) sl1, k to end,
  (↓) sl1, k to end

When the shoulder seam measures B ridges, knit your neckline. Start by a BO of three quarters of H at the top - i.e. start BO in the beginning of a top-down row.
During the next rows, decrease one stitch at the top edge - one quarter of H times (so in the end you have decreased a total of H sts), i.e.
  (↑) sl1, k to 3 bef, end, k2tog, k1
  (↓) sl1, ssk, k to end

In my case (with H = 35 sts), I did a BO of 26 sts, and decreased on the top edge by one stitch for the next 9 rows.

(Don't forget to insert the hip and bust short rows while knitting the neckline).

Knit to the middle of the front piece - without forgetting to knit the bust and hip shaping short rows.

Put a removable stitch marker into the first stitch of the next row to mark the middle of the front piece.

Front - 2nd Half
Knit exactly the same ridges as in the 1st half, but
  • knit them in the opposite order, i.e. start with the last ridge of the 1st half and end with the first ridge of the 1st half and
  • for every increased stitch on the top edge during the first half, you decrease a stitch in the second half - and vice versa.
After you've knitted nearly all of the first part, your piece should look as shown below.

After finishing the 2nd half of the front you should have the same number of stitches you CO in the first provisional CO.


1st Underarm Part

Since there are no bust darts on the back of this piece, the necessary ridges must be knitted somewhere else to get the bust circumference. In case of this sweater, I leveled this out by knitting the necessary ridges underarm. When starting from the top, knit to M2 and then N/2 stitches further (like in the short row for bust shaping), then do a w+t and knit back. The next row, knit up to 2 sts before the last w+t. do a w+t and knit back. Repeat this until you have knitted the calculated number of ridge. Or in knitting terms:

  (↓) sl1, k to M2, k N/2, w+t,
    (↑) k end
* (↓) sl1, k to M2, k 2 sts before last turn, w+t,
    (↑) k to end
  repeat from * until you've knitted E-D ridges.

In my case, I needed to knit 4 ridges  (E-D=49-45=4) and N/2 was calculated as 17 sts. So I knitted:
  (↓) sl1, k to M2, k17, w+t, (↑) k end
  (↓) sl1, k to M2, k15, w+t, (↑) k end
  (↓) sl1, k to M2, k13, w+t, (↑) k end
  (↓) sl1, k to M2, k11, w+t, (↑) k end

Back - 1st Half

Knit the same rows as in the 1st half of the front bit, with the following differences.
  • Do not knit the short rows for the bust darts.
  • When you've knitted the armhole CO (and start to knit the shoulder seam), you can connect the first stitch of the next top-down row to the last stitch of the second shoulder seam of the front part. Connect the first stitch next top-down row to the next stitch of the shoulder seam of the front part (alternatively, you can sew up both shoulder seams after finishing).
  • When decreasing for the neckline, use G sts (instead of H). The same goes for the increases later during the 2nd half of the back.
Back - 2nd Half

Knit exactly the same ridges as in the 1st half of the back piece, but
  • knit them in the opposite order, i.e. start with the last ridge of the 1st half and end with the first ridge of the 1st half and
  • for every increased stitch on the top edge during the first half, you decrease a stitch in the second half - and vice versa
  • connect the 2nd shoulder seam of the back to the first shoulder seam of the front.


2nd Underarm Part

Knit this exactly as the 1st underarm part.
Make sure that your last row is knitted upwards.

Finishing

Put the stitches of the provisional CO on the second needle.
Cut your yarn but leave a tail that is long enough for grafting - I usually leave a tail that is 5 times the length of the seam to be grafted. Graft in garter stitch.
Weave in ends and block to size.


Montag, 22. Mai 2017

Waterfall Tunic

I guess I've been watching too many sewing tutorials on the internet - without really being able to sew myself :/ ... something I really liked was the idea of a top with a waterfall or cowl neck.

So, I tried to create a pattern for myself using one of the great tutorials on the internet (linked below) and knitted the pieces all in stockinette stitch. So, here's a tutorial on how to do something similar for yourself. Since I used bulky yarn, this was a very quick knit for me - it only took me four days to knit the two pieces and - after blocking - one afternoon to sew it and to weave in the ends.

This sleeveless tunic is knitted in plain stockinette stitch. It is shaped to suit your body and has an elegant waterfall neck. It is knitted in two pieces (front and back) from bottom to top.


It is NOT a stitch-by-stitch knitting pattern for various sizes. It is rather a tutorial how to contruct and knit a similar tunic - and of course you don't have to use bulky yarn but can use other yarn weights as well. I will give you my numbers and calculations as an example written in purple.


Creative Commons License
This work by Knitting and so on is licensed under a Creative Commons Attribution-NonCommercial-ShareAlike 4.0 International License.

Materials
  • 300 to 400 grams of bulky weight cotton yarn (for my size I used a little over 300 grams - about 425 meters of yarn)
  • 8 mm needles (the yarn label asked for 5.5 - 6 mm needles, but since I wanted the fabric to be very loose I chose bigger needles)
  • 2 stitch markers
  • a tapestry needle to weave in ends and to sew the pieces together

Useful Techniques and Abbreviations
  • How to make a cowl top pattern (for sewing): see this YouTube video by IzzyMEIMsaab.
  • Make One Knit-Stitches (here's a video by PurlSoho that shows these stitches)
    • mk1l (left-leaning): pick up the bar from front to back and knit it through the back loop
    • mk1r (right-leaning): pick up the bar from back to front and knit it through the front loop
  • Make One Purl-Stitches (here's a video by KnitPurlHunter that shows these stitches)
    • mk1p right-leaning (mk1pl, i.e. right-leaning effect on RS): make one purl stitch by inserting the left-hand needle from the back in the bar between the two stitches and purl through the front of the loop
    • mk1p left-leaning (mk1pr, i.e. left-leaning effect on RS): make one purl stitch by inserting the left-hand needle from the back in the bar between the two stitches and purl through the back of the loop
  • Mattress stitch to create an invisible seam between two stockinette pieces: see this YouTube video by iknitwithcatfur
  • How to knit shoulder seams: see this YouTube video by knitpurlhunter.


Measuring and Swatching

I created a pattern on paper (any broadsheet newspaper will do) using the method shown in IzziMEIMsaab's video). But it will be OK if you just take the measurements listed below.
Note: For me it's difficult to take measurements from my body - that's why I generally use a top that fits me well to take measurements.

Here's an outline of the pattern with all the necessary measurements (since this was inspired by sewing videos, the measurements are shown on the fold, i.e. half of the piece).

You need to measure:
A = from your hips to your waist
B = from your waist to your bust
C = from your bust to under your arm
D = A + B + C = from your hips to under your arm
E = from the shoulder to under your arms
F = one quarter (1/4) of your hip circumference
G = one quarter (1/4) of your waist circumference
H = one quarter (1/4) of your bust circumference
I  = one quarter (1/4) of your underarm circumference
J = shoulder seam
Kback = half of your neck width

Drape your measuring tape from shoulder to shoulder around your neck to see how deep you want your neckline to fall (see IzziMEIMsaab's video at minute 1:44). Then see how many cm this is on your measuring tape. Kfront is half of that measurement.

Knit a swatch! And block it.
Then carefully count your stitches and rows and calculate the numbers of the measurements you've taken.

My swatch gave the following numbers: 10 cm = 10.5 sts in width and 10 cm = 16 rows in height. Then I calculated:
A = 27 cm => 2.7 x 16 = 43.2 => 43 rows
B = 11 cm => 1.1 x 16 = 17,6 => 18 rows
C = 5 cm => 0.5 x 16 = 8 => 8 rows
D = A + B + C => 69 rows
E = 22 cm => 2.2 x 16 = 35,2 => 35 rows
F = 25 cm => 2.5 x 10.5 = 26.25 => 26 sts
G = 19 cm => 1.9 x 10.5 = 19.95 => 20 sts
H = 23 cm =>  2.3 x 10.5 = 24.15 => 24 sts
I = 22 cm => 2.2 x 10.5= 23.1 => 23 sts
J = 12 cm => 1.2 x 10.5 = 12.6 => 13 sts
Kback = 9 cm => 0.9 x 10.5 => 9.45 => 10 sts
Kfront = 21 cm => 2.1 x 10.5= 22.05 => 22 sts


Instructions

Back piece

Hip to Waist
CO twice the stitches you've calculated for F plus 2 edge stitches (in my case 2x26 + 2 = 54).
Then knit in plain stockinette up to your waist while decreasing at the sides:

Normal row (RS): sl1, k to end
Normal row (WS): sl1, p to end
Decrease row (RS): sl1, ssk, k to last 3 sts, k2tog, k1
Decrease row (WS): sl1, p2tog, p to last 3 sts, p2togtbl, p1

Calculate the decreases you need for a shaped waist per side: F-G.  (I had to decrease 6 sts per side (F-G => 26-20 = 6) over 43 rows. I only wanted to decrease on RS, so I chose to knit normal rows, and then I knitted one decrease row instead of every 6th normal row.)

Waist to Bust
From the waist up to your bust, you want to increase, i.e. to knit normal rows as well as increasing rows. For this you want to calculate the number of stitches per side that you need to increase (H-G) over the rows you calculated for B. (I had to decrease 4 sts (H-G=24-20 = 4) over 18 rows (B).)

Increase row (RS): sl1, mk1l, k to last 2 sts, mk1r, k1
Increase row (WS): sl1, mk1p, p to last 2 sts, mk1p, p1

Bust to Armhole
From your bust line to the arm hole you'll want to decrease again. Here you need to calculate the number of stitches to decrease per side (I-H) over C rows. The decrease rows are the same as listed above. (I had to decrease only 1 sts (I-H = 24-23=1) per side over 8 rows.)

Armhole to Shoulder
If you're shoulder measurement (J+Kback) is narrower or wider than your underarm measurement (I) you also need to knit increase or decrease rows over the next E rows. In my case I didn't have to decrease (J+Kback-I = 13+10-23=0)).

When you've finished these last rows. Bind off.
The back piece is finished.


Front piece

Hip to Armhole
From the waist up to the armhole the front piece is knitted exactly as your back piece. So knit this exactly as your back piece up to the last row.
During the last row put in two stitchmarkers: look at the stitch number you calculated for your shoulder measurement (J, 13 sts in my case) and put the first stitchmarker J sts away from the beginning of the row, and the second stitch marker J sts away from the end of the row.


Armhole to shoulder
Now you need to calculate the increases per side for the waterfall neckline. This is the difference between Kback  and Kfront, i.e. Kfront-Kback (in my case: 22-10=12). These increases have to be distributed evenly over the number of rows you calculated for E (in my case over 36 rows; 36 / 12 = 3, this means I had to increase every 3rd row).

Neck Increase Row (RS): sl1, k to marker, mk1r, k to next marker, mk1l, k to end
Neck Increase Row (WS): sl1, p to marker, mk1pl, p to next marker, mk1pr, p to end

Alternate neck increase rows as calculated with normal (stockinette) rows until you've knitted the rows you calculated for E. Then bind off. Now your front piece is finished, too.

Finishing

I blocked both piece to size and then sewed them at the sides and the shoulders. I used the techniques linked above (mattress stitch & invisible seam).


This post was featured on OuiCrochet's Fiber Tuesday Link Party #115 and at the New Tuesday Pin-spiration Link Party.. Thank you!
Tuesday Pin-spiration Link Party

Montag, 1. August 2016

Sideways Top

Currently, instead of knitting small things like slippers or fingerless gloves, I like doing bigger projects, i.e. tops and sweaters. And since I don't like the finishing work on my knitting projects (i.e. assembling the pieces or weaving in ends) I have tried to design a sweater that can be knitted in one piece and that doesn't have to be sewn together in the end. I hope it will work.

Here's what it looks like so far.


Dienstag, 5. Juli 2016

Summertime Garter Stitch Top

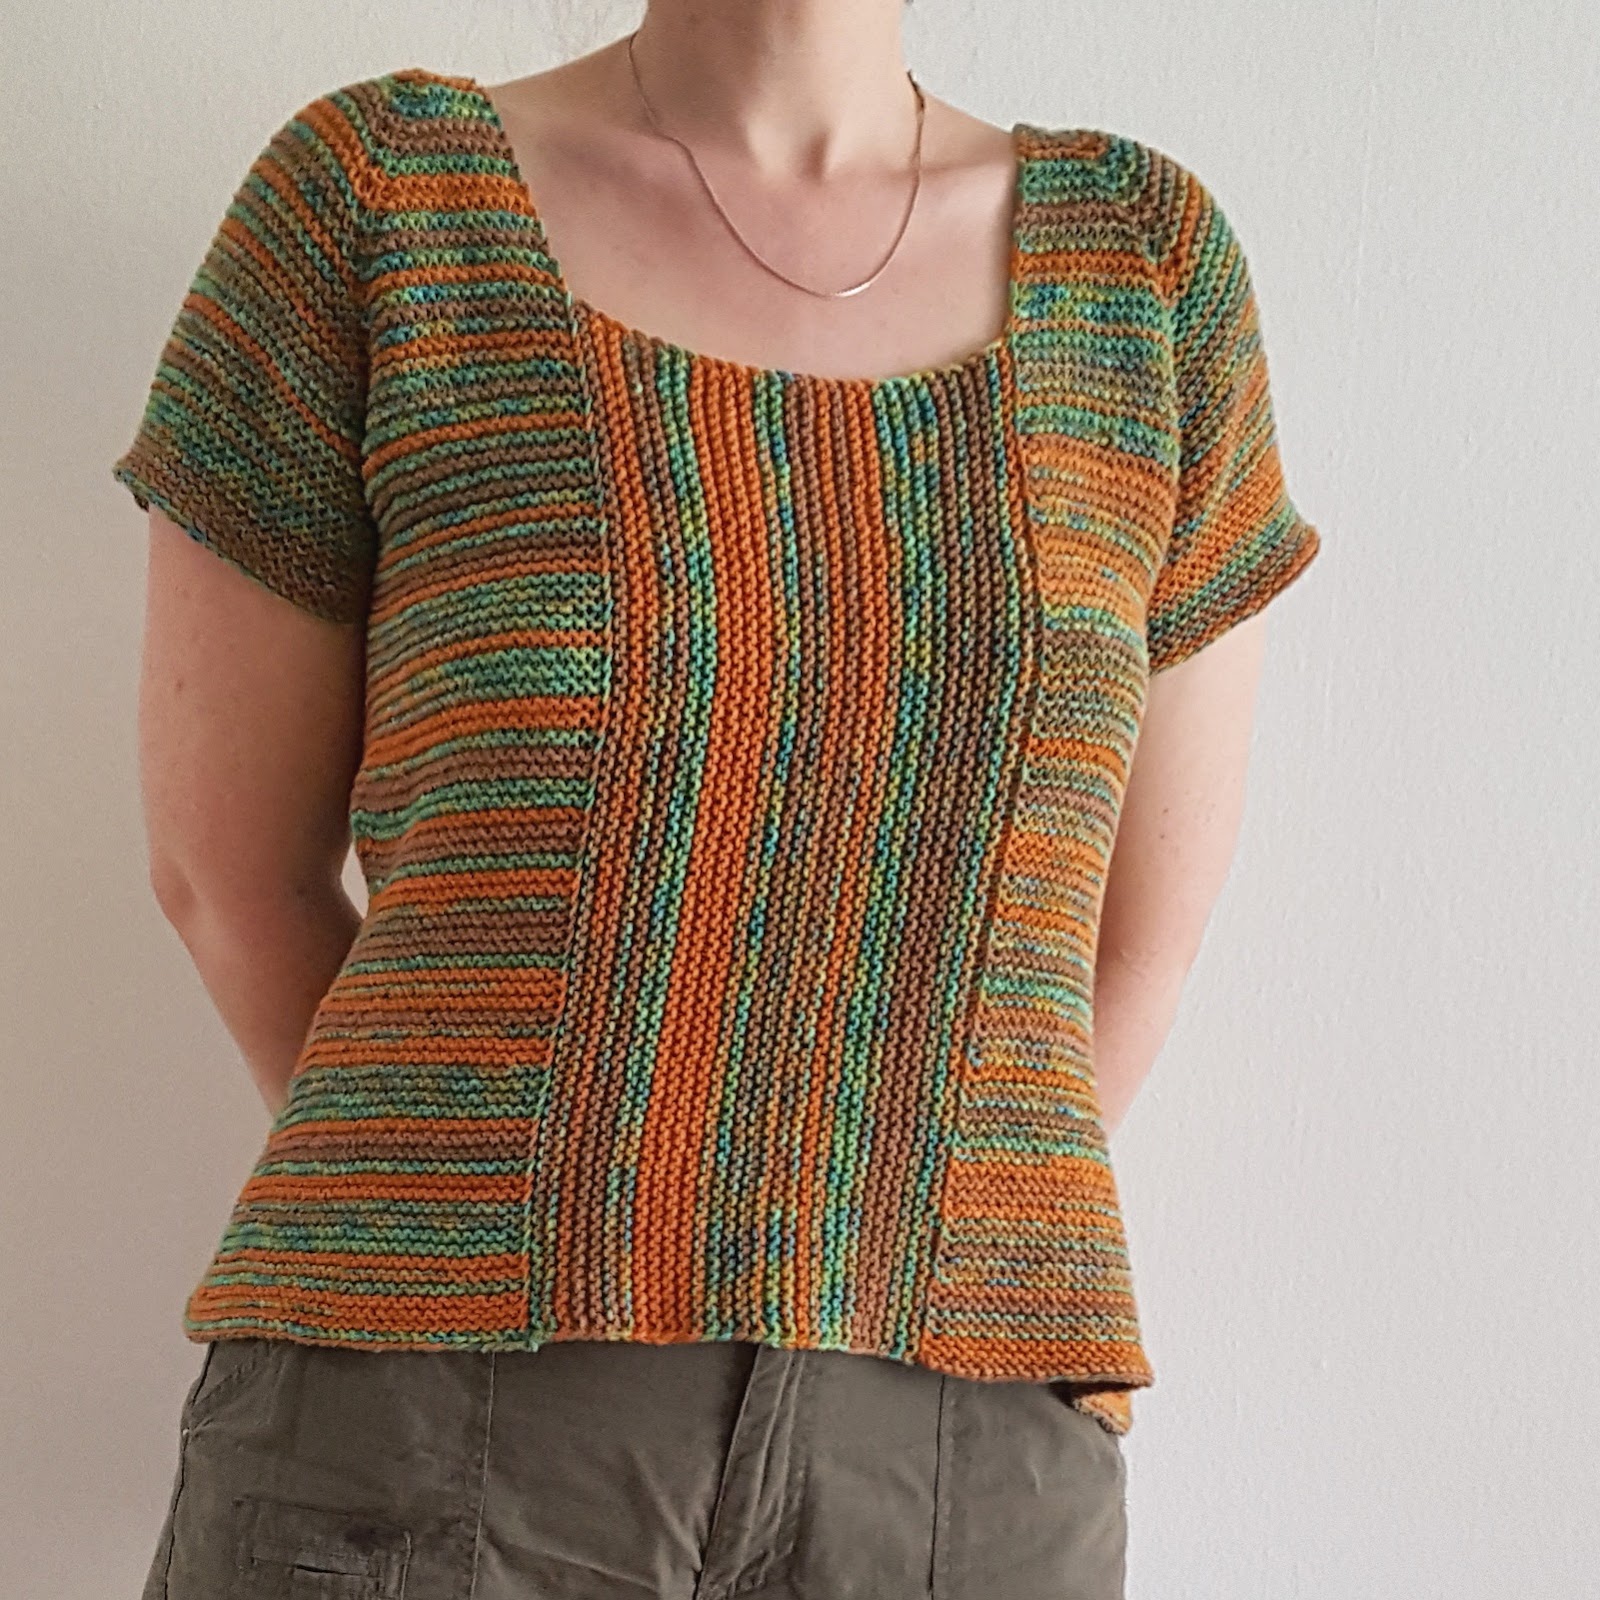
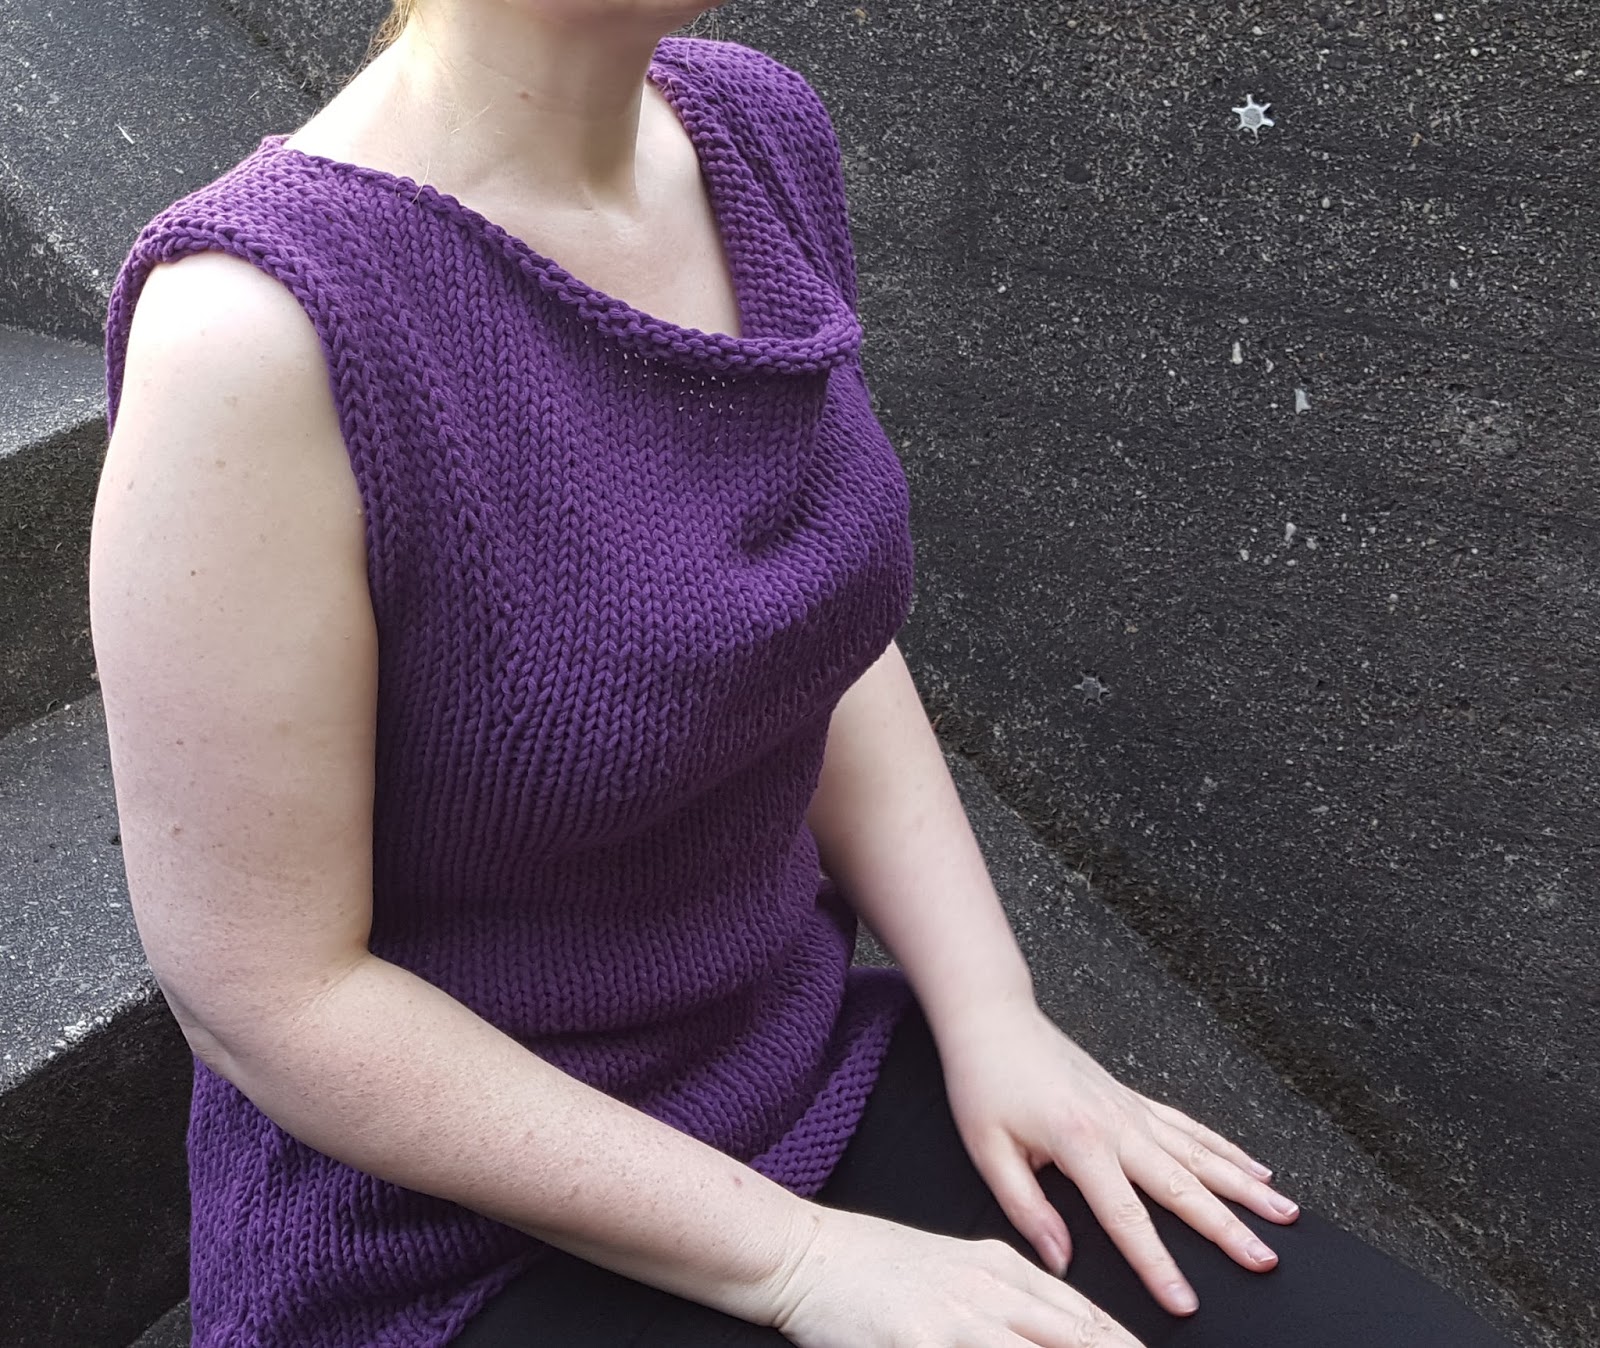
Usually, I'm the queen of unfinished sweaters. But for once I finished this summer tunic and I'm quite proud about it. I made a similar one last year but I honestly didn't like the front part (too many short rows) - so I did it again with a straight front part.

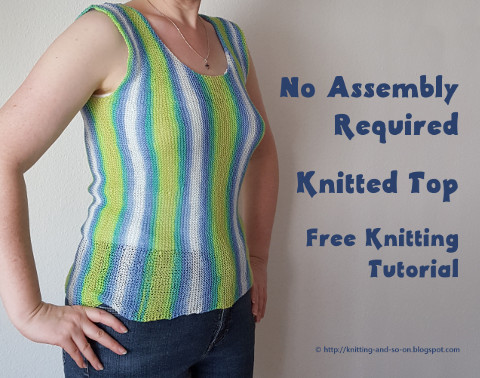
Knitted nearly all in garter stitch - except for the very short sleeves, this sweater is great to bring out the color combinations of variegated yarn. It is knitted flat - again except for the sleeves that are knitted in the round.


Dansk / Danish: A danish translation (by Marianne Holmen) can be found here.


Creative Commons License
This work by Knitting and so on is licensed under a Creative Commons Attribution-NonCommercial-ShareAlike 4.0 International License.


This is NOT a pattern with stitch counts for various sizes but a tutorial on how to knit a top like this. I will however give my numbers (lengths and widths, stitch and row counts) that I used - just to provide an example (these parts of this blogpost are written in purple).

In this post I assume that your already familiar with the general concept of a top-down raglan sweater. If you've never done this, here's a nice blog post by Knitting Pure and Simple that explains the idea or try to read this Raglan tutorial by Kirsten Tendyke - or knit a top-down pattern such as Buttercup by Heidi Kirrmaier or Gemini by Jane Richmond. (Here's a list of the free, knitted top-down sweaters on Ravelry; you nust be logged in to make this link work.)


Materials
  • yarn - I used about 900 meters of Sports weight yarn - more specifically, I used about 5,5 skeins of  Lana Grossa Elastico Print - Colorway 509 (here's the link to the yarn's Ravelry page)
  • a needle that fits the yarn, I used 4.5mm circular needles
  • a second knitting needle for the grafting at the end
  • 4 stitch markers for the top-down raglan part
  • scrap yarn to put the arm stitches on
  • two safety pins or other removable stitch markers
  • a tapestry needle ot weave in ends

Techniques

Measuring and Swatching
Knit a swatch with the yarn and the needle that you want to use for this sweater and measure your gauge. Usually, I don't swatch - for smaller projects - even if it doesn't fit, I generally can see this early enough, i.e. after about the same time, it'd take to knit the swatch. However, everytime I skipped swatching for a sweater or something similar, I ended up just knitting a bigger swatch, like half a sweater or two thirds of a cardigan :)

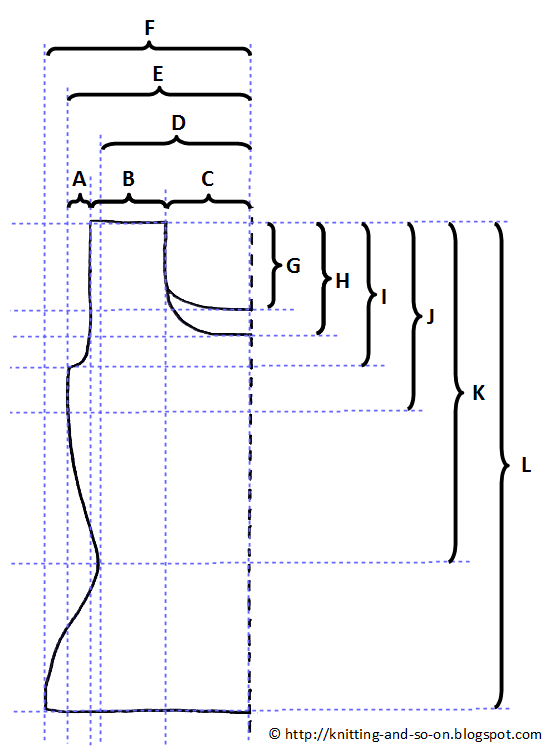
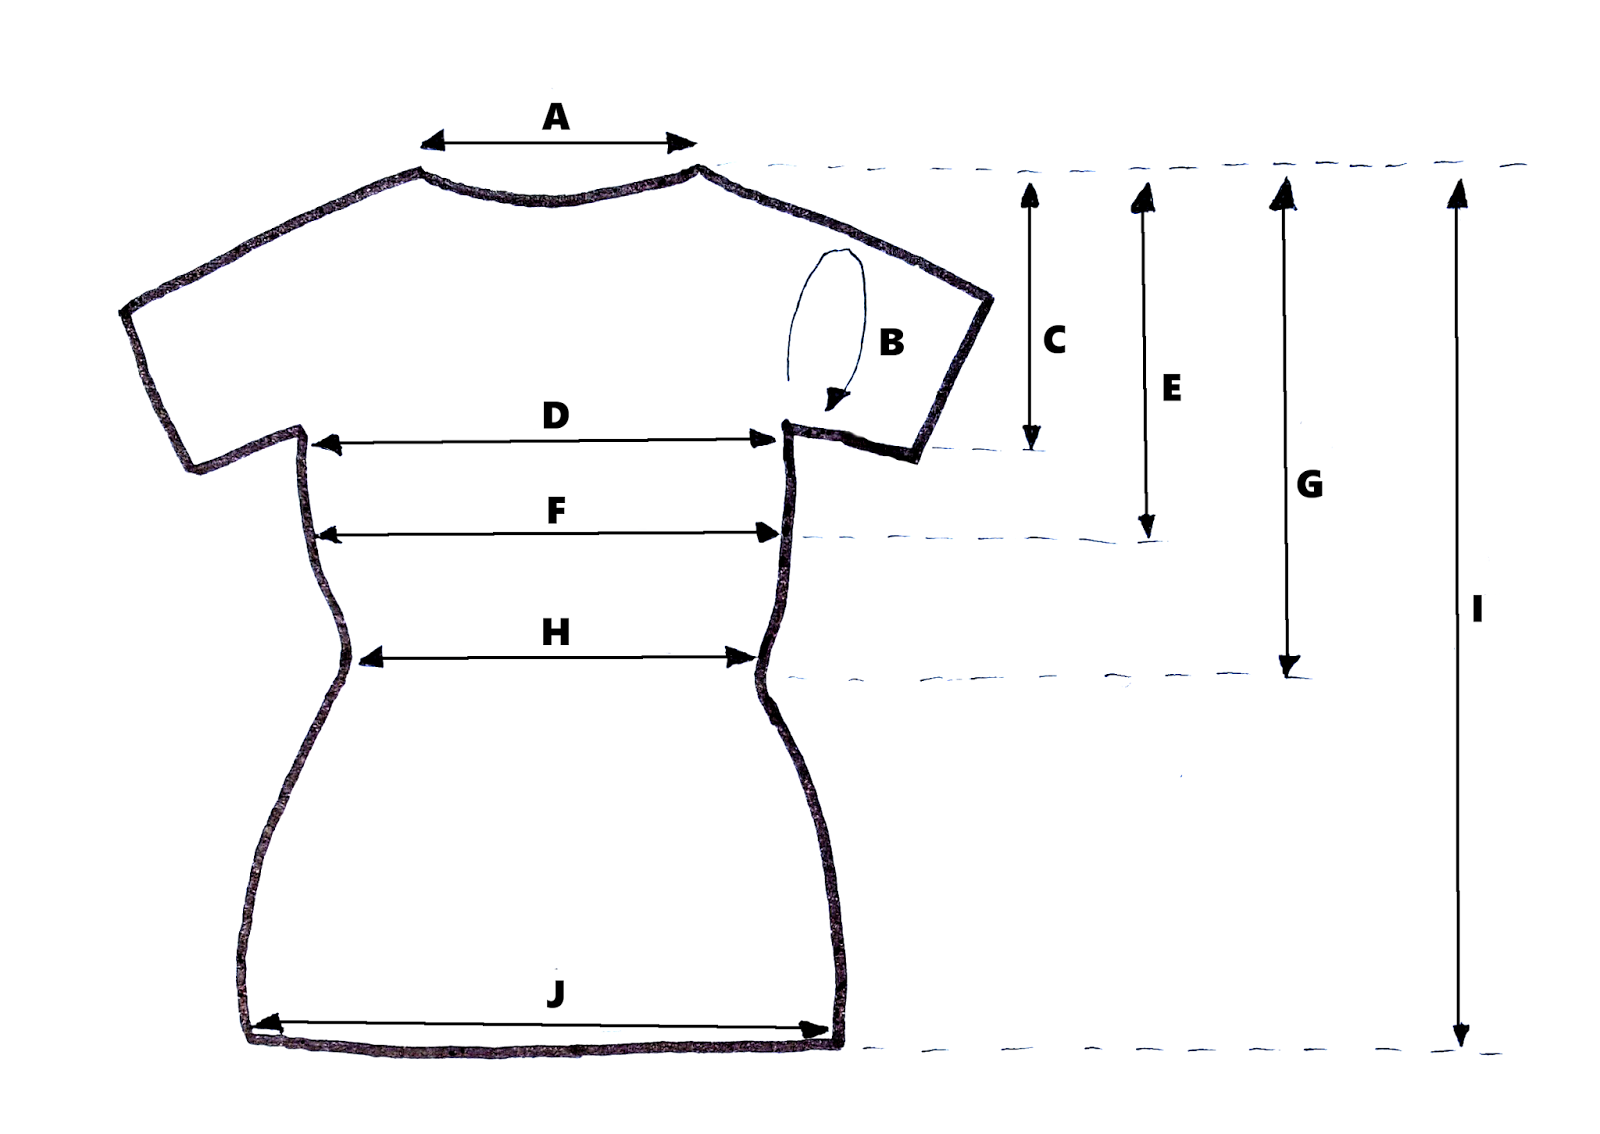
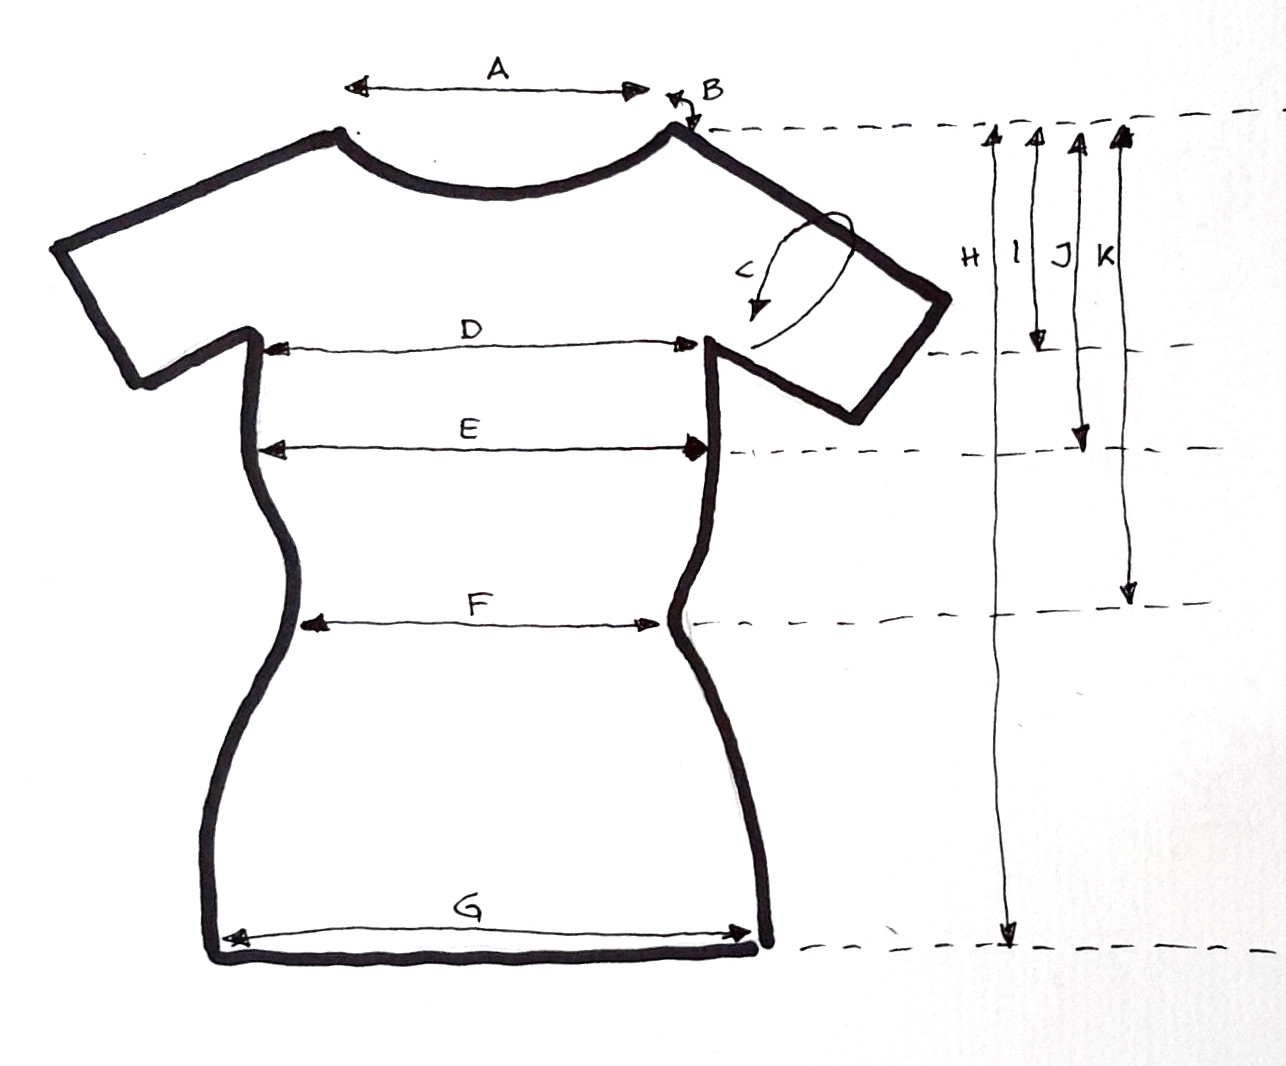
Now, either measure your body or take the following measurements on a t-shirt or top that fits you well:

A = width of your neck
B = circumference of your arms
C = from shoulder to under your arms
D = half of the circumference under your arms
E = from your shoulder to your bust
F = half of your bust circumference
G = from your should to your waist
H = half your waist circumference
I = the total length of your sweater
J = half of the circumference of your hips (where you want your sweater to end


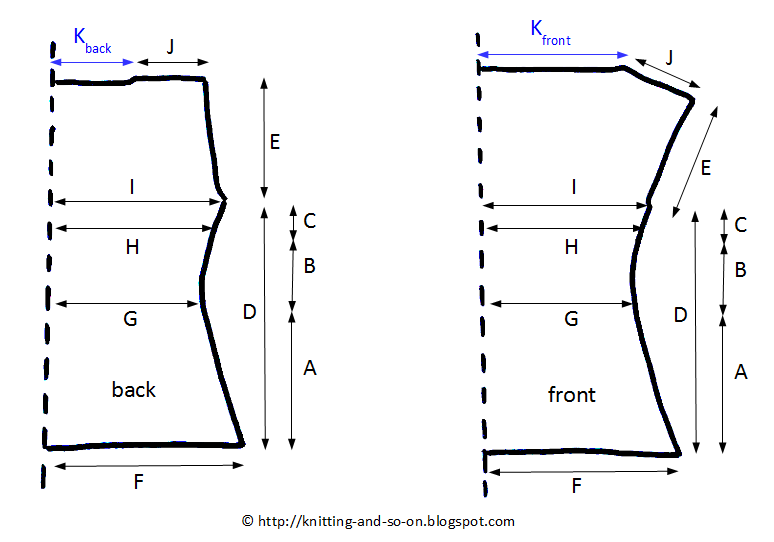
Cast on your sweater and knit the yoke

With your measurements and your swatch you can calculate your CO accordingly:
My gauge was 34 garter stitch rows (i.e. 17 ridges) to 10 cm and about 20 sts to 10 cm.
I wanted a neckwidth of about 17 cm (34 sts) and 3cm for each arm (6 sts).

Therefore my CO was 50 sts with stitch markers as follows: 2 sts (front), marker, 6 sts (arm), marker, 34 sts (back), marker, 6 sts (arm), marker, 2 sts (front),

Then start knitting the yoke according to your calculations with a raglan calculator. To be honest, I have never used any of these calculators, I prefer to do increases around the stitch markers - and stop increasing when I have reached the desired width and then going on without increasing until the yoke piece is long enough. But if you want to distribute your increases evenly over the length of your yoke or you have a bigger size, you should calculate your increases.

R1: sl1 purlwise, k all
R2: sl1 purlwise, knit to one before marker, kfb, slip marker, kfb, k to one before marker, kfb, slip marker, kfb,  k to one before marker, kfb, slip marker, kfb,  k to one before marker, kfb, slip marker, kfb, k to end

Repeat rows 1 and 2 until either
a) the arm part reaches your arm circumference (=B)
b) the back part is wide enough (=D)

In case of a) do only increases on the front and back piece, i.e
R2a sl1 purlwise, k to 1 before marker, kfb, slip marker, k to marker, slip marker, kfb, k to one before marker, kfb, slip marker, k to marker, slip marker, kfb, k to end

In case of b) do only increases on the arm parts, i.e.
R2a sl1 purlwise, k to 1 marker, slip marker, kfb, k to 1 before marker, kfb, slip marker, k to marker, slip marker, kfbm k to one before marker, kfb, slip marker, k to end

When both a) and b) are true, repeat only R1 until the piece is long enough to separate the arm stitches (C).

To reach my intended yoke length (19 cm), I knitted 62 rows, increasing every 2nd row up until row 60 where I only did increases in the arm parts and knitting without any increases in row 62. 
I put the arm stitches on scrap yarn in the 63rd row with the following stitch count (31 (front), 64 (arm), 92 (back), 64 (arm), 31 (front). I cast on 2 sts under each arm (with backwards loop CO)

Now your yoke is finished: Knit one row and put the arm stitches on scrap yarn, i.e.
k to marker, put all stitches from here to the next marker on scrap yarn, remove both stitch markers, CO 2 with backwards loop cast-on (and put a stitch marker between the two newly cast on stitches), knit to next marker, put all stitches from here to the next marker on scrap yarn, remove both stitch markers, CO 2 with backwards loop cast-on (put a stitch marker between the newly cast on stitches), k to end.

The stitch marker you just put will be called underarm markers.

Knitting the underarm part

Now all rows are knitted in garter stitch with the first stitch slipped purlwise. All shaping is done around the underarm markers.

Calculate how many stitches you have to increase (if at all) to reach your bust width - and then calculate how to distribute them among the rows to knit (length = E-C) and then do the increase rows along the underarm marker.
R increase = sl1 purlwise, k to one before marker, kfb, slip marker, kfb, k to one before marker, kfb, slip marker, kfb, k to end

Since my bust width doesn't differ much from the underarm width, I didn't increase at all. Therefore I knitted 12 cm straight down (about 42 rows with my gauge). 

Now calculate how many stitches you have to decrease to reach your waist width - and then calculated how to distribute them among the rows to knit (length = G-E). Do the decrease rows along the underarm marker.
decrease = sl1 purlwise, k to two sts before marker, ssk, slip marker, k2tog, k to two stitches before marker, ssk, slip marker, k2tog, k to end

I wanted to reach my waist 43 cm from the shoulder, therefore I knitted 10 more cm straight down and then distributed my decreases over the next 4 cm (or about 15 rows)  (from 45 cm width to 42 cm, i.e. 6 stitches with my gauge, ie. 3 decrease rows with 2 sts decrease per row and side). 

Calculate how many stitches you have to increase to reach your hip width - and then calculate how to distribute them among the rows to knit (length = I-G) and then do the increase rows along the underarm marker.
increase = sl1 purlwise, k to one before marker, kfb, slip marker, kfb, k to one before marker, kfb, slip marker, kfb, k to end

I knitted about 5 cm straight (about 17 rows) and then I increased 8 times every 5th row. That way I widened the piece by 16 stitches per side (i.e. 8 cm with my gauge). I then knitted straight down until I had reached my intended length (about 60 cm).


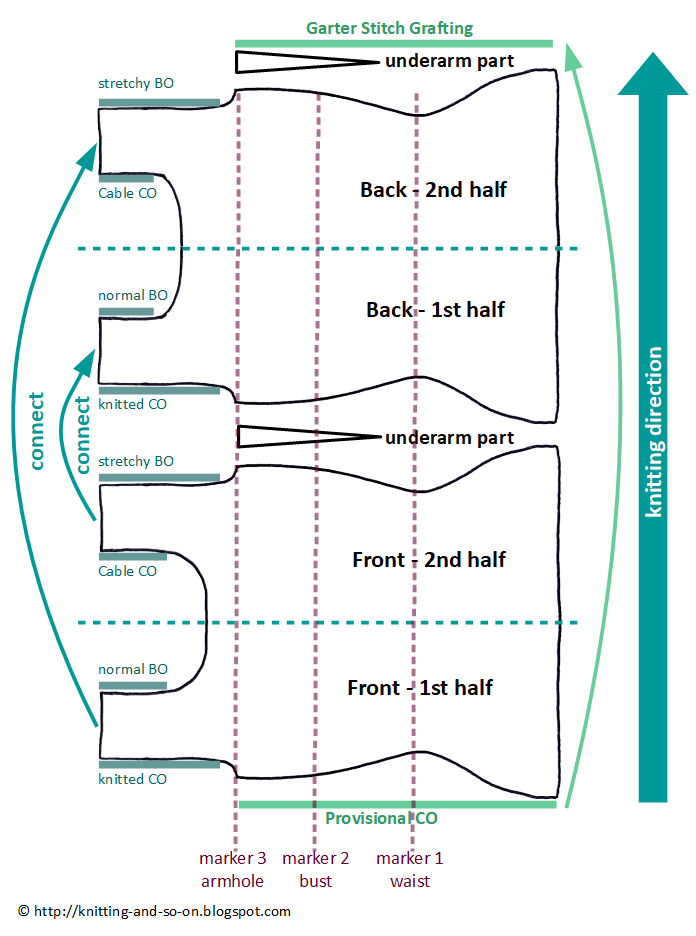
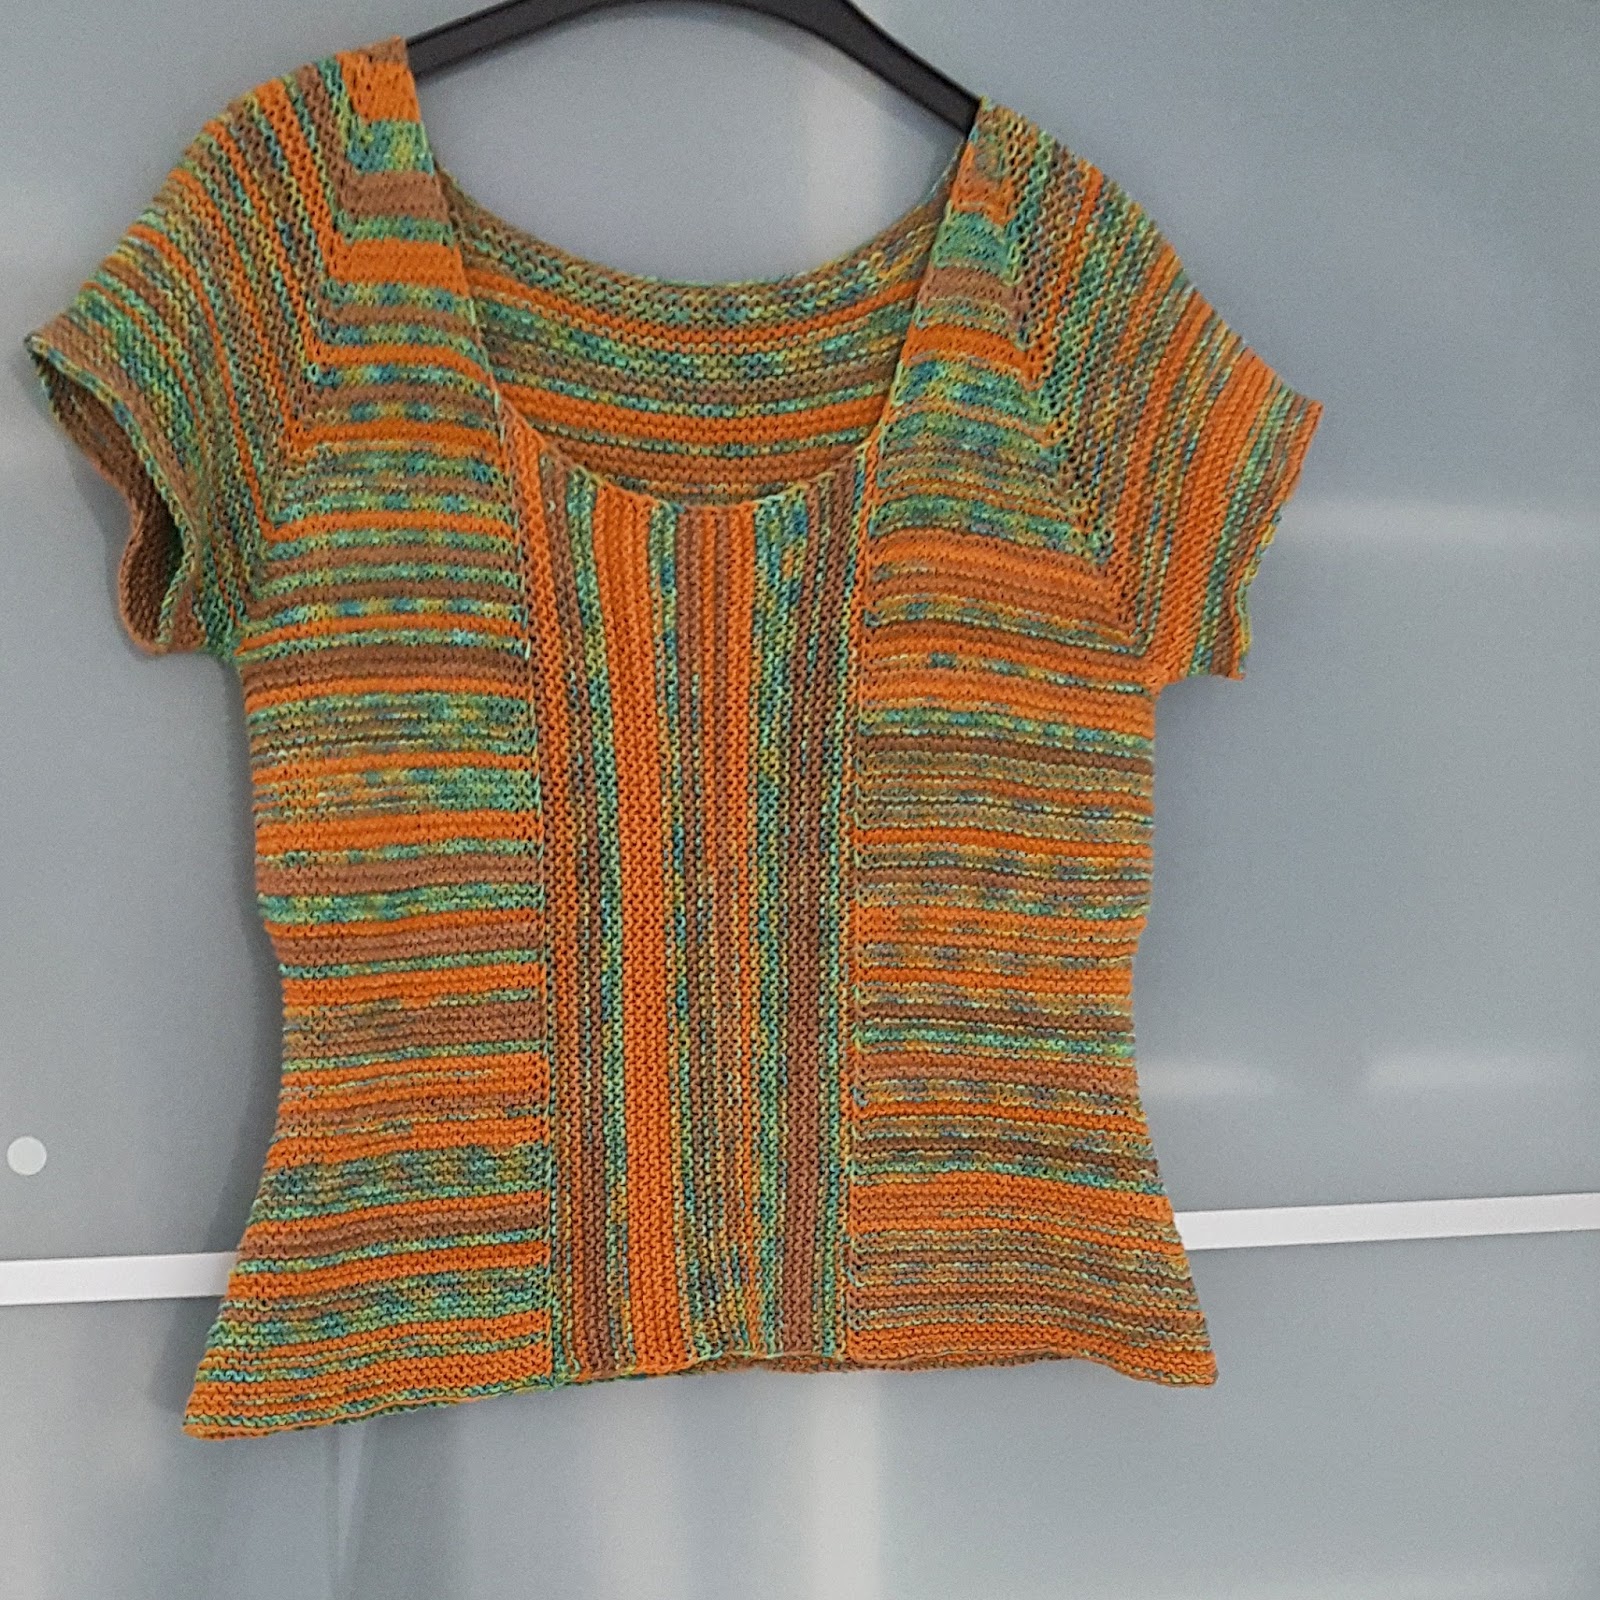
Knitting the sideways front piece

Once your piece is long enough cast off and cut yarn. Try it on and put a stitch marker to the point where you want your neckline to end, Count the number of rows from the bottom to this point and count the same number on the other front edge.

Now pick up and knit this number of stitches of the selvedge of the left hand side of your front - from the bottom hem of your top up to your stitch marker. To get a nice edge I only picked up the back loops of the selvedge stitches.


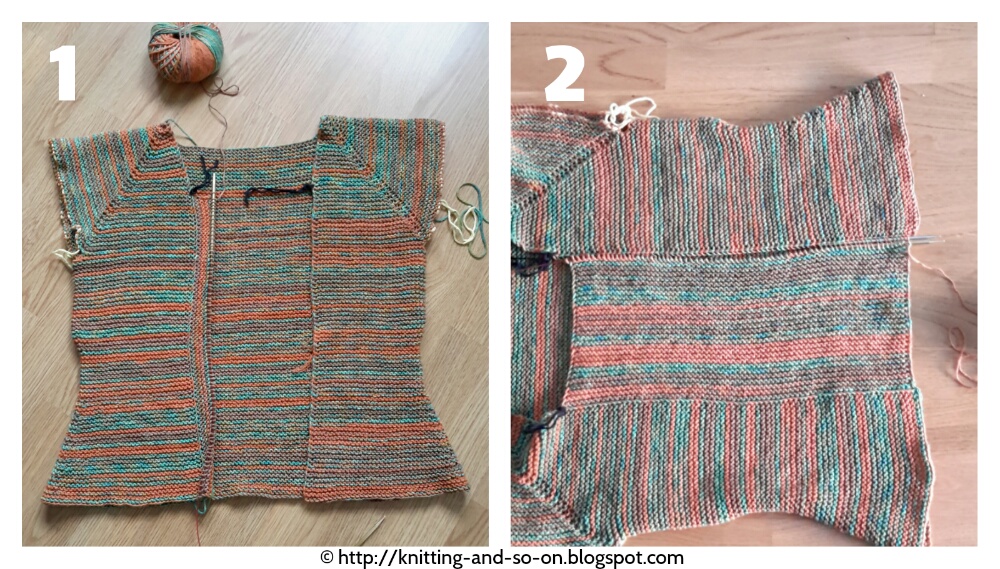
Knit straight rows until you have reached the intended width - this should be roughly as wide as your neck width (A). Photo 1 (below) shows how your piece looks after a few knitted rows; it also shows the yarn ends I used as removable stitch markers to mark where I wanted my neckline to end.

To get to the height I wanted, I picked up 74 stitches from the edge. I wanted about 15 cm (a bit less than the neck width used before) - therefore I knitted 52 rows.

Make sure to end on after an even row (counting the pick up and knit row as the first).

With your second needle pick up the stitches on the other selvedge (i.e. right hand side of your piece) from the stitch marker to the bottom (if you use circulars, you can start from the bottom hem as well). Here I also picked up only the back loops (i.e. the ones closest to the WS) to get a consistent look.
Photo 2 (above) shows how the piece looks with the two needles, just before grafting.

Graft both sides together in stockinette stitch.


Sleeves

Put the arm stitches of one arm from your scrap yarn to your needle(s) and pick up 4 underarm stitches (i.e. 2 above the backwards loop CO stitches you made when you transfered the arm stitches to the scrap yarn plus 1 at each side in the gap between these stitches and the live ones). Place a stitch marker (end of round marker) in the middle of these underarm stitches.

Row 1: p2tog, purl to last two stitches, p2tog
Row 2: k2tog, k to last two stitches, k2tog
Row 3: p all
Row 4: k all
Repeat rows 3 and 4 until your sleeves are as long as you'd want them to be and bind off.
I knitted a total of 18 rounds before doing my BO round.

Do the same with the second sleeve.


Weave in ends an block lightly.

Montag, 22. Juni 2015

Tips to Knit A Striped Top-Down Sweater without A Pattern

When I'm planning to knit a sweater, I'm usually too lazy to search for a knitting pattern and too unconcentrated to follow a pattern through.

Even though most sweater patterns that I have knitted (e.g. Corinne cardigan by Crystal Erb Junkins) were great and beautifully written, I tend to be unwilling to really follow the pattern. Following a pattern seems to take more of my concentration than trying something of my own. (And I want to be clear that up until now it's never been the pattern's fault, but just me being me.)

This blog post is NOT A PATTERN (far from it) but a collections of tools, techniques and links that can help you when you're designing and knitting a similar sweater yourself.

In this post I assume that your already familiar with the general concept of a top-down raglan sweater. If you've never done this, here's a nice blog post by Knitting Pure and Simple that explains the idea or try to read this Raglan tutorial by Kirsten Tendyke - or knit a top-down pattern such as Buttercup by Heidi Kirrmaier or Gemini by Jane Richmond. (Here's a list of the free, knitted top-down sweaters on Ravelry; you must be logged in to make this link work.)


Creative Commons License
This work by Knitting and so on is licensed under a Creative Commons Attribution-NonCommercial-ShareAlike 4.0 International License.


Measuring, swatching and planning raglan increases

Usually, I don't like knitting swatches - for smaller projects (fingerless gloves etc.), it's just not worth my while. Even if it doesn't fit, I generally can see this early enough, i.e. after about the same time, it'd take to knit the swatch. However, everytime I skipped swatching for a sweater or another big project, I only ended up just knitting a bigger swatch, like half a sweater or two thirds of a cardigan. Therefore, I really (REALLY) recommend knitting a swatch in garter stitch for anything a big as a sweater.

The best way to take measurements is to use another sweater that really fits you well. The measurements depend on the type of sweater you want to knit (e.g. for a V-neck sweater, you'd want to measure the depth of the neckline) - the raglan calculators (listed below) require different measurements.

For the sweater in this picture, I measured according to this picture. A is the width of the neckline, and B the width of the arm part. I knitted in the round (stitches for A, stitch marker, stitches for B, stitch marker, stitches for A, stitch marker, stitches for B, stitch marker - join in round).

To know how to increase, you can use one of the following raglan calculators:


To be honest, I have never used any of these calculators, I prefer to do increases around the stitch markers - and stop increasing when I have reached the desired width (C or D) and then going on without increasing until the yoke piece is long enough (I). But if you want to distribute your increases evenly over the length of your yoke, you should calculate your increases.

After finishing the yoke part, I put the arm stitches on scrap yarn, cast-on a few underarm stitches and placed a stitch marker at the middle of my underarm stitches.


Increases and decreases for a fitted sweater

In order to knit a fitted sweater, I'd measured my chest (E), my waist (F) and the width at the sweater's lower edge (G) - as well as the corresponding heights (I, J and K). To fit the sweater to my size, I knitted increases and decreases at the underarm stitch markers, i.e. down the sides of the sweater.


Traveling jogless stripes

When knitting stripes in the round, the color change can be seen as a visible jog.

A technique to avoid this is called traveling jogless stripes, which is done as follows: When changing to another color knit one round of that new color; when reaching the first stitch of that color, slip that stitch purlwise and replace the marker that indicates the beginning of your round from before that stitch to behind that stitch. This way the beginning of the round keeps traveling as long as you keep changing colors.

A more detailed explanation can be found at techknitting blog or in this YouTube video by New Stitch a Day.


Carrying yarn up

If you're anything like me, you'd want to avoid having to cut your yarn everytime you change colors (and consequently to avoid too many ends to weave in) and at the same time to avoid long floats on the WS of your piece,

To do this you have to connect the yarn in the color that's not used every few rows, i.e. when you come to the end-of-round marker, wrap it around your working yarn before knitting the next stitch.

The technique is shown in this YouTube video by karin kelly-burns.

The photo on the right shows how the WS looks when using both the jogless stripe technique while carrying up your yarn.


Avoiding holes at the underarm stitches

I always pick up more stitches under the arm than I have cast-on after the yoke part. Usually, about 2 at the side (i.e. the gap between the last arm stitch from my scrap yarn and the stitches cast-on after the yoke), than the cast-on stitches and two more at the other side. In the next two rows, I usually decrease the stitches from the gap. This avoids the potential holes.

Here's a YouTube video by TheKnittingArts that shows this technique.


How to try it on while knitting

If you want to check whether the sweater fits you, you need to be able to try it on while it's still on the needles. This is easier, if you do the following:

  • Put all arm stitches on a long piece of scrap yarn - at least twice as long as the circumference of your upper arm (and secured with a slipknot). That way the hole is big enough to let your arm through when trying it on.
  • For the body part, it helps to distribute the stitches on two circular needles before trying it on (e.g. I have two 4.5mm circulars that I used for the pictured project - one 80 cm and one 60 cm). Afterwards, you can go on knitting with one needle.