Mittwoch, 8. Mai 2019

Random Lace Tiles

A few years ago, I (see this blogpost) I thought it would be interesting to do lace stitches in a random manner. It turned out that it also looked gorgeous on a finished object (see Random Lace Scarf or Random Bubbles Scarf).
I was reminded of this idea when I was asked to give a workshop on random lace ... so I thought that I might as well do it again in order to get an idea back into my head :)
So here is a combination of random lace with simple garter stitch - i.e. a mix of two very different textures.


The important thing about random lace is ... it's random. That's why I don't give exact stitch sequences. So, this is not a standard knitting pattern with stitch-by-stitch and row-by-row instructions but rather an invitation to try out an idea for a (really) unique scarf.


Creative Commons License
This work by Knitting and so on is licensed under a Creative Commons Attribution-NonCommercial-NoDerivatives 4.0 International License.


What You Need

Materials
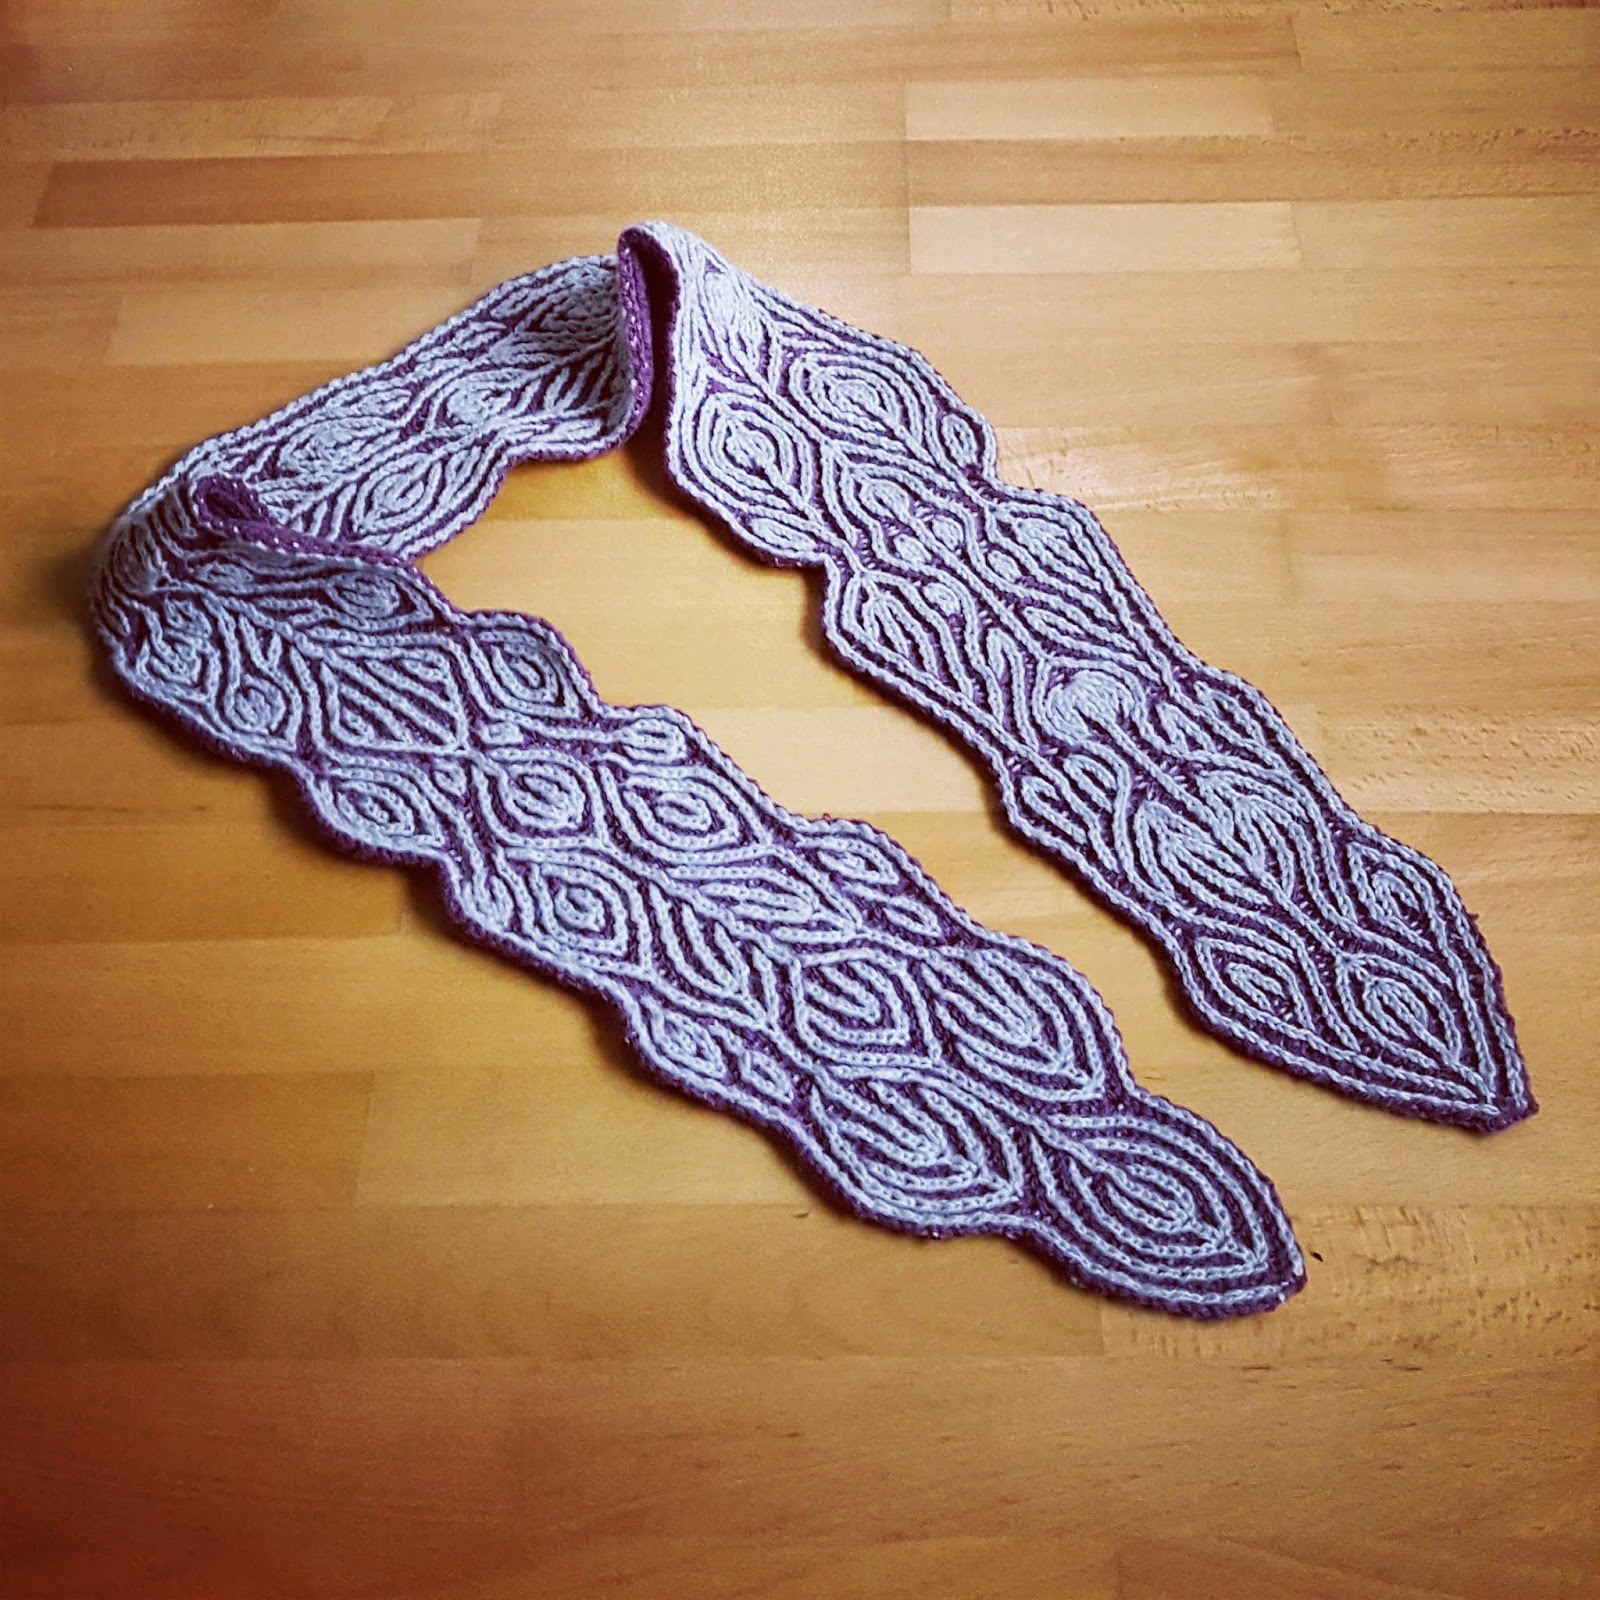
  • about 220 gr of fingering weight yarn (I used Wollmeise Pure Merino Superwash - Colorway Ballerina) - my finished piece measures about 30 cm x 170 cm.
  • 3.25 mm knitting needles (straights or circulars)
  • three stitch markers - one of them removable
  • a tapestry needle to weave in ends
You can use other yarn weights as well. I'd advise to use needles that are slightly to big for the yarn in order to get a loose texture.

Other Requirements
  • The ability and the willingness to count your stitches over and over again … since there are not pattern repeats or anything that could help, it’s easy to lose track of where you are in the row. This is a concentration exercise, i.e. NOT something that I would take to my local knitting group. 
  • The patience to knit a piece that will look extremely crumpled and not very attractive while you are knitting it. I will look so much better after blocking - see picture below. 


How to Knit Random Lace

It's best to use a yarn that blocks well, e.g. something that has a large percentage of wool. I used standard sock yarn and 3mm needles.

I decided to do only "knit stitches" on both sides of the piece - to go with the garter stitch of the other rectangles, i.e. I randomly did k2tog's, ssk's yo's and double-yo's.
(For ideas with a clear knit and purl side, see Random Lace Scarf or Random Bubbles Scarf).

The important thing is to make sure that the number of stitches stays the same after finishing one row, e.g. if you started off with 22 stitches, you need to finish each row with 22 stitches (loops) on your needles.

If you want a neater pattern, do one increase and corresponding decrease next to each other. For a more organic look, do a few increases and only then the necessary decreases. I would advise, however, not to do this too much, since then your piece will be askew.

For me it was easier to only count the increases and decreases, i.e. I added 1 to my count when I did an increase and subtracted 1 from my count when I did a decrease. So you should end the row with a count of 0.

I'd advise you, to knit a small swatch of random lace and block it, to get into the idea. You can use this swatch to decorate small things (like a phone sleeve or a pencil holder).


Instructions for this Scarf

CO 68
Row 0: k23, pm, k22, pm, k23
Rows 1- 44: sl1, k to marker, knit 22 sts of random lace (up to next marker), k to end
After a few rows, mark the side of your even numbered rows - just to make counting a bit easier. Without this marker, there is no way to distinguish between the two sides.
Rows 45 - 88: sl1, k22 sts of random lace (up to marker), k22, knit 23 sts of random lace
Repeat rows 1-88 five more times
Repeat rows 1-44 once more.
BO
Weave in ends.

Block it.


Freitag, 12. April 2019

Easter Bunny

I love knitting small seasonal and decorative pieces - especially for Easter and Christmas. This time I wanted to knit little easter bunnies to add a touch of cuteness to the Easter egg nests. I used a construction in the round and in stockinette stitch - knitted from the bottom up.
The finished bunnies are about 15 cm high - they are great to use up yarn leftovers.
Please note, this is fiddly work - esprecially the cast on, the first few rounds, and the finishing. But I really like the result.


Creative Commons License
This work by Knitting and so on is licensed under a Creative Commons Attribution-NonCommercial-NoDerivatives 4.0 International License.


Materials
  • light colored leftover yarn - I guess I used less than 10 grams of fingering weight yarn
  • 2.5mm knitting needles - I used Addi Trios, but you can also use dpns or circulars (magic loop method)
  • black embroidery floss or black fingering weight yarn to stitch on the face
  • an embroidery needle
  • stuffing - I used yarn leftovers and to give them some stability I even put a couple of pebbles right into the bottom of the lower half of their body

Techniques
  • Shadow Wrap Short Rows - used throughout the pattern: as shown in this YouTube video by Lee Meredith. A video by Miriam Felton that shows how to do a heel with shadow wraps can be found here on YouTube. However, the heel knitted here is knitted slightly different because here there are two rounds between the two parts of the heel, i.e. there won't be any triple stitches.
    • Knitting the Shadow Wraps: In a knit row (i.e. you're knitting on the outside of your socks), you knit up to the stitch where you want to turn, and then knit into the stitch in the row below, i.e. you insert the right hand needle from the front into the stitch below the next stitch and pull your working yarn through. Then you put the loop onto the left hand needle (creating a double stitch from the stitch below) - keeping the yarn on the back. Then you turn and your yarn is now in front, tighten it to make sure that all stitches have the same size and start to purl in the opposite direction. This sequence (knitting int the stitch below and turning) will be called kbelow in the pattern.
      If you're in a purl row, you purl into the stitch of the row below, i.e. insert the right hand needle from the back into the stitch below and draw your yarn through and put the stitch onto your left hand needle - creating a double stitch. The yarn is in front while you're doing this. Turn your work. The yarn is now on the back of your knitting. Make sure that the stitch is as tight as the other stitches on your needles and start knitting in the opposite direction. This sequence will be called pbelow in the pattern.
    • Knitting the double stitch.: When you come to a double stitch you can simply knit / purl it as one. This looks well when you're working it in the same direction it was created (i.e. the double stitch was created in a purl row and is also worked in a purl row). However, when you have to knit a double stitch that was created in a purl row, the following sequence made the result look a bit neater. I slipped the first loop of the double stitch to the right hand needle, turned the second loop so that the front leg was now in the back and put the first loop back facing the same way (i.e. the former front leg was now in the back). Then I knitted both loops through the back loop.


Instructions

Body

CO 8 sts an join in round
Round 1: k all
Round 2: * kfb repeat from * to end (16 sts)
Round 3: k all
Round 4: * k1, kfb repeat from * to end (24 sts)
Round 5: k all
Round 6: * kfb, k2 repeat from * to end (32 sts)
Round 7: k all
Round 8: * k2, kfb, k1 repeat from * to end  (40 sts)
Rounds 9-10: k all
Round 11: * k1, kfb, k3 repeat from * to end (48 sts)
Round 12: k10, kfb, kfb, kfb, kfb, kblelow, p8, pbelow, k to end (the little bulge that will be created during the next rounds will be the tail - it's on the first half of the round)
Round 13: k18, kbelow, p8, pbelow,, k7, kbelow, p6, pbelow, k to end
Round 14: k10, ssk, ssk, k2tog, k2tog, k to end  (your total stitch count is back to 48 sts)
Round 15-17: k all
Round 18: * k5, k2tog, k5 repeat from * to end (44 sts)
Round 19: k all
Round 20: * k2tog, k9 repeat from * to end (40 sts)
Round 21: k all
Round 22: * k2, k2tog, k6 repeat from * to end (36 sts)
Round 23: k all
Round 24: * k7, k2tog, repeat from * to end (32 sts)
Round 25: k all
Round 26: * k2, k2tog repeat from * to end (24 sts)
Round 27: k all
Start stuffing the lower part of the body


Head
Round 1: * k1, mk1, k2 repeat from * to end (32 sts)
Round 2: k all
Round 3: k16, k5, mk1, k6, mk1, k5 (the bulge that will be created now, is the snout, it's on the 2nd half of the round)
Round 4: k16, k5, kfb, kfb, k4, kfb, kfb, k5
Round 5: k4, mk1, k8, mk1, k4; k4, mk1, k14, mk1, k14
Round 6: k all
Round 7: k18; k4, ssk k12, k2tog k4
Round 8: k18; k5, ssk, ssk, k4, k2tog, k2tog, k5 (2 x 18 sts = 36 sts)
Round 9: k all
Round 10: k3, ssk, k4, k3, ssk, k4; k4, ssk, k6, k2tog, k4 (32 sts)
Round 11: k all
Round 12: * k2tog, k6 repeat from * to end (28 sts)
Round 13: k all
Round 14: * k4, k2tog, k1 repeat from * to end (24 sts)
Round 15: k all
Round 16: * k1, k2tog, k3 * repeat from * to end (20 sts)
I stitched on the face after finishing this. Then I stuffed the head.
However, it is an option to stitch on the face after you finish knitting the rabbit.

Ear 1
You now have 20 sts on your needles. To knit the first ear, you will only need the first 4 sts and the last 4 sts of that round. So:
Round 1: k2tog, k2, put the next 12 sts on two stitch holders (safety pins or scrap yarn), k2, k2tog
Round 2: (only knitting the stitches that are still on your needles): k all
Round 3: kfb, k1, kfb; kbf, k1, kfb (your piece should now look similar to illustration 1)
Round 4-6: k all
Round 7: kbf, k3, kfb, kfb, k3, kfb
Rounds 8-14: k all
Round 15: ssk, k3, k2tog, ssk, k3, k2tog
Round 16-18: k all
Round 19: ssk, k1, k2tog, ssk, k1, k2tog
Round 20: k all
Round 21: sl1, k2tog, psso; sl1, k2tog, psso
BO

Illustrations

Ear 2
From the top, your piece should look like illustration 2. The second ear will be knitted over the 8 sts that are furthest away from the first ear, i.e. the stitches that are on the left of illustration 2.
Put 2 x 4 stitch from the stitch holders back on your needles. There will be 2 x 2 sts left over - unknitted and on the stitch holders.
Now knit rounds 1 to 21 of Ear 1 and BO.

Finishing
There are 2x2 unknitted stitches left on your stitch holders. Put these on your needles (see illustration 3).
If you haven't stuffed your bunny yet, now is the last chance to do it.
Connect the 2 rows of 2 stitches using the kitchener stitch.
Weave in ends.


Variations
If you want a bunny that is a bit bigger (like the one on the left on the picture above), you can knit a few more "k all" rounds between round 15-17 of the body.

Easter bunnies together with knitted Easter Eggs (free pattern available)


Freitag, 5. April 2019

Retstrikket top - Summertime Garter Stitch Top in Danish

Marianne Holmen from strikkeglad.dk has written another Danish translation for one of my patterns - this time for the Summertime Garter Stitch Top. Mange Tak!

The Danish translation can be found here.
The original (english) version of this pattern is available here.


A list of all translated versions of my patterns can be found in this blogpost.

Creative Commons License
This work by Knitting and so on is licensed under a Creative Commons Attribution-NonCommercial-ShareAlike 4.0 International License.


Montag, 11. März 2019

Querverweis - or Inclination towards Short Rows

It's always fun to knit socks, and I usually like to try out new ideas to make them more interesting - especially if it makes the self-striping sock yarn stand out in an interesting manner. And since I really like to work with short rows, here's another way to use them for socks - to create a diagonal stripe. Other sock patterns with short rows are my Tipsy Toe Socks, Tipsy Toe Socks 2.0 and Klecks Socks.

The name "Querverweis" is the german word for cross-reference.


This is NOT a complete row-by-row knitting pattern, but just a rough sketch to enable you to knit a similar pair for yourself. It assumes that you have a rough idea of how to knit socks and especially that you know how to do a heel.

Creative Commons License
This work by Knitting and so on is licensed under a Creative Commons Attribution-NonCommercial-NoDerivatives 4.0 International License.


Materials
  • 50 to 100 grams of fingering weight yarn 
  • 2.5mm needles - I used Addi CrasyTrio, but you can use dpns or a circular needle (with Magic Loop method) as well 
  • 2.25mm needles - to knit the ribbing 
  • 2 different stitch markers - one to mark the end of round (called "end marker") and one to mark the middle of the round (called "middle marker")
  • a tapestry needle to weave in ends

Techniques
  • Judy's Magic Cast-On is a technique that gives you live stitches on both sides of your needle - it is generally used for toe-up socks (e.g. in this pattern), but it can be used for other purposes as well. Here's a written description (from Knitty) and here's a YouTube-video by Cat Bordhi and another YouTube-video by Very Pink Knits.
  • Stretchy Bind-Off: see this YouTube-video by Knitting Pipeline.
  • Shadow Wrap Short Rows - used throughout the pattern: as shown in this YouTube video by Lee Meredith. A video by Miriam Felton that shows how to do a heel with shadow wraps can be found here on YouTube. However, the heel knitted here is knitted slightly different because here there are two rounds between the two parts of the heel, i.e. there won't be any triple stitches.
    • Knitting the Shadow Wraps: In a knit row (i.e. you're knitting on the outside of your socks), you knit up to the stitch where you want to turn, and then knit into the stitch in the row below, i.e. you insert the right hand needle from the front into the stitch below the next stitch and pull your working yarn through. Then you put the loop onto the left hand needle (creating a double stitch from the stitch below) - keeping the yarn on the back. Then you turn and your yarn is now in front, tighten it to make sure that all stitches have the same size and start to purl in the opposite direction. This sequence (knitting int the stitch below and turning) will be called kbelow in the pattern.
      If you're in a purl row, you purl into the stitch of the row below, i.e. insert the right hand needle from the back into the stitch below and draw your yarn through and put the stitch onto your left hand needle - creating a double stitch. The yarn is in front while you're doing this. Turn your work. The yarn is now on the back of your knitting. Make sure that the stitch is as tight as the other stitches on your needles and start knitting in the opposite direction. This sequence will be called pbelow in the pattern.
    • Knitting the double stitch.: When you come to a double stitch you can simply knit / purl it as one. This looks well when you're working it in the same direction it was created (i.e. the double stitch was created in a purl row and is also worked in a purl row). However, when you have to knit a double stitch that was created in a purl row, the following sequence made the result look a bit neater. I slipped the first loop of the double stitch to the right hand needle, turned the second loop so that the front leg was now in the back and put the first loop back facing the same way (i.e. the former front leg was now in the back). Then I knitted both loops through the back loop.
  • Flap Heel when knitting toe-up: I used the formular given in this free pattern on Ravelry by Sarah Keller. But you can use the heel type you prefer.
    Other heel tutorials are:


Instructions

First Sock

Toe

With the magic CO cast on 2x10 stitches

To get a rounded toe, my usual toe is:
  • 4 x increases in every row
  • 2 x increases in every 2nd row
  • 2 x increases in every 3rd row
  • then increases every 4th row ... until wide enough
This means:
Round 1: Knit all - while placing stitch markers after 10 sts and at the end of the round - alternatively divide the stitches on your needles in such a way that you know exacly where one half of your stitches are.
Round 2 (increase round): * k1, kfb, k to one before marker, kfb, k1, slip marker repeat from *
Rounds 3 to 5 = increase rounds
Round 6 (neutral round): k all 
Round 7 = increase round
Round 8 = neutral round
Round 9 = increase round
Rounds 10 to 11 = neutral round
Round 12 = increase round
Rounds 13 to 14 = neutral round
Round 15 = increase round
Rounds 16 to 18 = neutral round
Round 19 = increase round
Repeat rounds 16 to 19 until the sock is wide enough and your stitch count is a multiple of 4.

I tend to knit up to a total of 56 stitches, but you might as well have 60, 64 etc. - depending on your size of foot.


Foot
Now it's time to start main pattern. It starts with a short rows sequence that includes a few increases, then a few diagonal rounds and finishes with a 2nd short row sequence where you decrease again.

Short rows part 1 - knitted back and forth:
Basically, each row is 2 sts shorter than the row below and every third row there is an increase on each side.

Row 1: k to 3 sts before the middle marker, kbelow, p to end marker, without turning continue and p to 3 before middle marker, pbelow, k to end marker
Row 2: k to 2 sts before last turn, kbelow, p to end marker, without turning continue and p to 2 before last turn,  pbelow, k to end marker
Row 3: k to 3 sts before last turn, mk1, k1, kbelow, p to end marker, without turning continue and p to 3 sts before last turn, mk1p, p1, pbelow, k to end marker
Row 4: k to 3 sts before last turn, kbelow, p to end marker, without turning continue and p to 3 sts before last turn,  pbelow, k to end marker
Repeat rows 2 to 4 until the last row consists of 2 x 2 sts. Depending on the number of stitches you started with, you may end with a row 2, row 3 or row 4.

Diagonal rows - knitted in the round:
Round 1: k all
Round 2: k1, mk1, k to 3 sts before half marker, ssk, k1; k1, k2tog, k to 2 sts before end marke, mk1, k1
Repeat rounds 1 and 2 nine times more.

Short rows part 2 - knitted back and forth:
Here, every row is 2 sts longer than the one below and there is a decrease on each side every third row. It's knitted around the middle marker.

Row 1: k to half marker, k2, kbelow, p to middle marker and continue without turning, p2, pbelow, k2
Row 2: k up to and including last turn, k1, kbelow,  p to middle marker and continue without turning, p up to and including last turn, p1, p below, k to middle marker.
Row 3: k up to and including last turn, ssk, kbelow,  p to middle marker and continue without turning, p up to and including last turn, p2tog, p below, k to middle marker.
Row 4: k up to and including last turn, k1, kbelow,  p to middle marker and continue without turning, p up to and including last turn, p1, p below, k to middle marker.
Repeat rows 2 to 4, until the last row ends 1 or 2 sts before the middle marker - depending on whether you count the "below stitch".
Row 5: You are at the middle marker now: k to end marker

Now you should have the same stitch count that you started with.

Continue in plain stockinette until you need to start the heel.

Then knit your preferred kind of heel.

Cuff
I knitted straight stockinette (I like my sock cuffs rather short), but for longer socks you can also repeat the short row pattern of the foot. 

Ribbing
Switch to 2.25 mm needles.

Knit 15 rows of p1k2p1-ribbing (i.e. k2p2 ribbing with an offset of 1 purl stitch) and bind off in pattern.


The second sock is knitted in the same way - except for the heel that is started on the other side.


Mittwoch, 20. Februar 2019

Almendra Cowl in Czech

Fellow raveler Nemravka has written a Czech translation of the Almendra Cowl. Děkuju mnohokrát! (*)

The Czech translation can be found here.
The original (english) version of this pattern is available here.


A list of all translated versions of my patterns can be found in this blogpost.


Creative Commons License
This work by Knitting and so on is licensed under a Creative Commons Attribution-NonCommercial-ShareAlike 4.0 International License.


(*) According to tatoeba.org (a great ressource for example sentences in foreign languages), this means "Thank you!" in Czech.

Samstag, 16. Februar 2019

Random Brioche Scarf

I'd been planning to do a two-color-brioche project for quite a while now, but I couldn't decide on the stitch pattern that I wanted to use. So I started to play around with different brioche increases and decreases - and the sampler piece grew longer and longer. After a while, I started to embrace the idea of different brioche patterns in one scarf and continued knitting until the piece was 160 cm long - the perfect scarf length.

In the end, I knitted another (slightly wider) scarf in this random manner - and I am currently knitting a third one. Actually, knitting in this manner - just seeing where the increases and decreases take you - is quite fun, and it's great travel knitting, too :)

So, if you want to have a completely special - and certainly unique - scarf, why not knit yourself a random brioche scarf, too.

This tutorial explains how to knit a scarf in the random brioche. Please note that this is not a knitting pattern in the classic sense with detailed stitch by stitch and row by row sequences, but a set of instructions and tips that allow you to knit a scarf and achieve a similar result and perhaps an invitation (inspiration) to try out how different brioche increases and decreases work.


In contrast to random lace technique that I tried out several years ago, with random brioche it's actually easy to see your progress. 


Creative Commons License
This work by Knitting and so on is licensed under a Creative Commons Attribution-NonCommercial-NoDerivatives 4.0 International License.


Materials
  • yarn in two colors of the same weight: 
    • For the red and beige one, I used a total of 80 grams of lace weight merino yarn (Wollmeise Lace and Lana Grossa Cool Wool Fine).
    • For the violet and grey one, I used a total 130 grams of (really old, and I don't know the yarn weight) acryllic yarn.
  • knitting needles that the yarn calls for - with two tips (so either dpns or circulars) - for the lace weight merino I used 3mm needles
  • a clippy stitch marker (for the 4 stitch decreases)
  • a tapestry needle to weave in ends


Techniques, Brioche Stitches and Abbreviations

If you search YouTube for brioche increases and decreases, you will find many videos and ressources. Here are links to some of them:
  • The Basics of Two-Color Brioche are shown in this YouTube video by Voolenvine
  • Increases in Brioche Knitting:
    • brkyobrk: a two stitch increase - as shown in this YouTube video by The Unapologetic Knitter 
    • brk4st inc: a four stitch increase - as shown in this YouTube video by The Blue Mouse Knits
  • Decreases in Brioche Knitting 
    • brk2st dec: decrease by two stitches (like k2tog and like ssk) - as shown in this YouTube video by Knitting with Suzanne Bryan - there is a right-leaning and a left-leaning decrease
    • brk4st dec: a four stitch decrease - as shown in this YouTube video by the Unapologetic Knitter
  • DC: dark color
  • LC: light color
  • DS: side where the DC is prominent
  • LS: side where the LC is prominent
  • I used a Two Color Long-Tail Cast-On - as shown in this YouTube video by knitwithpat, but any other CO will do. I'd suggest casting on in DC.
  • Weaving in ends on Brioche: as shown in this YouTube video by New Stitch a Day


Basic Two-Color Brioche
Here are the basic knitting instructions for two-color brioche (without any increases or decreases) with an uneven stitch number:

Row 1a (WS, DC): k1, yos, * brk, yos repeat from * to last st, p1
Row 1b (WS, LC): sl1wyib, brp, * yos, brp repeat from * to last st, sl1wyib
Row 2a (RS, DC): k1, yos, * brp, yos repeat from * to last st, p1
Row 2b (RS, LC): sl1wyib, brk, * yos, brk repeat from * to last st, sl1wyib
Repeat.

Rows like this will be referred to as "basic two-color brioche" below.


How to Do the Edges
As you can see in the basic instructions above, I started and ended every row with a stitch in DC and the edge stitches were handled as follows:
  • With DC yarn always knit the first stitch of a row – making sure to put it under the LC yarn in order to attach it – and purl the last stitch of a row
  • With LC yarn always slip the first stitch with yarn in back (sl1wyib) and slip the last stitch with yarn in front (sl1wyif)


Instructions

To get you started, I will give you instructions as to a (possible) start and finish - and the general "rules" I used when knitting the scarf.

In general:
  • Start with 5 stitches and increase gradually. I had a maximum of  41 stitches on my needles, since I wanted a) a slim scarf and b) be able to keep a clear view of where to put my increases and decreases (i.e. symmetrically to the middle stitch).
  • I didn't care whether the stitch count stayed the same, so my scarfs don't have straight edges but curvy ones - as you can see in the pictures. That means, I could do increases and decreases as I liked.
  • Make sure to keep your pattern symmetrical to the middle stitch to give a certain order to the randomness, i.e. 
    • if you do a two stitch increase (brkyobrk) 4 stitches before the middle stitch, do a two stitch increase 4 stitches after the middle stitch as well,
    • and if you do a left-leaning decrease 6 stitches before the middle stitch, do a right-leaning decrease 6 sts after the middle stitch
  • Looking at the LC of your piece you have several choices to increase. I mainly used the two shown in the picture below:
     
    • A) "branching out" of a column of LC brk-stitches: you need to increase with LC, e.g. with a brkyobrk while working on LS; in the next row (DS) you do "yos, k1, yos" at this place with DC, and "brp, yos, brp" with LC. This is an increase by 2 stitches.
    • B) from a column of DC brp-stitches: then you need to increase with DC, e.g. with a brkyobrk while working on DS, when you knit the same row in LC, you do a "yos, p1, yos" at this point. In the next row, I knitted "normal" 2-color brioche in DC (brp, yos, brp) and another increase in LC (yos, brkyobrk, yos). This is an increase by 4 stitches.
  • For decreases, I mainly used decreases while knitting with LC on the LS.
  • End by gradually decreasing the overall number of stitches back to 5 and then bind off in DC.


Start
If you want to start small (as I did in the grey and violet scarf) - here are the first rows

CO5
Row 1a (LS, DC): k1, yos, p1, yos, p1
Row 1b (LS, LC): sl1wyib, brk, yos, brk, sl1wyif
Row 2a (DS, DC): k1, yos, brkyobrk, yos, p1
Row 2b (DS, LC): sl1wyib, brp, yos, p1, yos, brp, sl1wyif
Row 3a (LS, DC): k1, yos, brp, yos, brp, yos, p1
Row 3b (LS, LC): sl1wyib, brk, yos, brk4st inc, yos, brk, sl1wyif
Row 4a (DS, DC): k1, yos, brk, yos, k1, yos, k1, yos, brk, yos, p1
Rows 4b - 7a: basic 2-color brioche
Row 7b (LS, LC): sl1wyib, brk, yos, brk, yos, brk4st inc, yos, brk, yos, brk, sl1wyif
Row 8a (DS, DC): k1, yos, brk, yos, brk, yos, k1, yos, k1, yos, brk, yos, brk, yos, p1
Rows 8b - 11a: basic 2-color brioche
Row 11b (LS, LC):  sl1wyib, brk, yos, brk, yos, brk, yos, brk4st inc, yos, brk, yos, brk, yos, brk,, sl1wyif
Row 12a (DS, DC): k1, yos, brk, yos, brk, yos, brk, yos, k1, yos, k1, yos, brk, yos, brk, yos, brk, yos, p1
Rows 12b - 17a: basic 2-color brioche
Row 17b (LS, LC): sl1wyib, brk, yos, brk, yos, brk, yos, brk4st dec, yos, brk, yos, brk, yos, brk,, sl1wyif
Rows 18a - 21a: basic 2-color brioche
Row 21b (LS, LC): sl1wyib, brk,  yos, brk, yos, brk4st dec, yos, brk, yos, brk, sl1wyif
Row 22a (DS, DC): k1, yos, brkyobrk, yos, brk, yos, brk, yos, brkyobrk, yos, p1
Row 22b (DS, LC): sl1wyib, brp, yos, p1, yos, brp, yos, brp, yos, brp, yos, p1, yos, brp. sl1wyif
...


End
Assuming that there are 15 stitches left.

Row 1a (LS, DC): basic 2-color brioche
Row 1b (LS, LC): sl1wyib, brk,  yos, brk, yos, brk4st dec, yos, brk, yos, brk, sl1wyif
Rows 2a - 5a: basic 2-color brioche
Row 5b (LS. LC): sl1wyib, brk, yos, brk4st dec, yos, brk, sl1wyif
Row 6a (DS, DC): k1, yos, brk2st dec, yos, p1
Row 6b: basic 2-color brioche
Bind off with DC.


A random brioche scarf with no fixed dark and light side


Mittwoch, 6. Februar 2019

Slaskehuet i Ret

Marianne Holmen from strikkeglad.dk has written a Danish translation of the Knit-Only Slouch Hat. Mange Tak!

The Danish translation can be found here.
The original (english) version of this pattern is available here.


A list of all translated versions of my patterns can be found in this blogpost.

Creative Commons License
This work by Knitting and so on is licensed under a Creative Commons Attribution-NonCommercial-ShareAlike 4.0 International License.